2016 CHEVROLET ORLANDO electric
[x] Cancel search: electricPage 227 of 372
Black plate (47,1)Chevrolet Orlando Owner Manual - 2013 - CRC - 6/5/12
Driving and Operating 9-47
Trailer Brakes
Does the trailer have its own
brakes? Be sure to read and follow
the instructions for the trailer brakes
so they are installed, adjusted, and
maintained properly.
Because the vehicle has antilock
brakes, do not tap into the vehicle's
brake system. If this is done, both
brake systems will not work well,
or at all.
Conversions and
Add-Ons
Add-On Electrical
Equipment
Notice:Some electrical
equipment can damage the
vehicle or cause components to
not work and would not be
covered by the warranty. Always
check with your dealer before
adding electrical equipment. Add-on equipment can drain the
vehicle's 12-volt battery, even if the
vehicle is not operating.
The vehicle has an airbag system.
Before attempting to add anything
electrical to the vehicle, see
Servicing the Airbag-Equipped
Vehicle on page 3‑30
andAdding
Equipment to the Airbag-Equipped
Vehicle on page 3‑30.
Page 229 of 372
Black plate (1,1)Chevrolet Orlando Owner Manual - 2013 - CRC - 6/5/12
Vehicle Care 10-1
Vehicle Care
General Information
General Information . . . . . . . . . . 10-2
California Proposition65 Warning . . . . . . . . . . . . . . . . . 10-3
California Perchlorate Materials Requirements . . . . 10-3
Accessories and Modifications . . . . . . . . . . . . . . . 10-3
Vehicle Checks
Doing Your OwnService Work . . . . . . . . . . . . . . . 10-4
Hood . . . . . . . . . . . . . . . . . . . . . . . . 10-4
Engine Compartment Overview . . . . . . . . . . . . . . . . . . . 10-6
Engine Oil . . . . . . . . . . . . . . . . . . . 10-7
Engine Oil Life System . . . . . . 10-9
Automatic Transmission Fluid . . . . . . . . . . . . . . . . . . . . . . 10-10
Manual Transmission Fluid . . . . . . . . . . . . . . . . . . . . . . 10-11
Hydraulic Clutch . . . . . . . . . . . . 10-11
Engine Air Cleaner/Filter . . . . 10-11
Cooling System . . . . . . . . . . . . 10-13
Engine Coolant . . . . . . . . . . . . . 10-13
Engine Overheating . . . . . . . . 10-17 Washer Fluid . . . . . . . . . . . . . . . 10-18
Brakes . . . . . . . . . . . . . . . . . . . . . 10-19
Brake Fluid . . . . . . . . . . . . . . . . . 10-20
Battery . . . . . . . . . . . . . . . . . . . . . 10-21
Starter Switch Check . . . . . . . 10-22
Automatic Transmission Shift
Lock Control Function
Check . . . . . . . . . . . . . . . . . . . . . 10-22
Ignition Transmission Lock Check . . . . . . . . . . . . . . . . . . . . . 10-23
Park Brake and P (Park) Mechanism Check . . . . . . . . 10-23
Wiper Blade Replacement . . . . . . . . . . . . . . 10-23
Headlamp Aiming
Headlamp Aiming . . . . . . . . . . 10-25
Bulb Replacement
Bulb Replacement . . . . . . . . . . 10-25
Halogen Bulbs . . . . . . . . . . . . . . 10-25
Headlamps, Front TurnSignal, Sidemarker, and
Parking Lamps . . . . . . . . . . . . 10-25
Fog Lamps . . . . . . . . . . . . . . . . . 10-27
Taillamps, Turn Signal, Sidemarker, and
Stoplamps . . . . . . . . . . . . . . . . 10-27 Back-Up Lamps . . . . . . . . . . . . 10-29
License Plate Lamp . . . . . . . . 10-29
Replacement Bulbs . . . . . . . . . 10-30
Electrical System
Electrical System
Overload . . . . . . . . . . . . . . . . . . 10-30
Fuses and Circuit Breakers . . . . . . . . . . . . . . . . . . 10-31
Engine Compartment Fuse Block . . . . . . . . . . . . . . . . . . . . . 10-31
Instrument Panel Fuse Block . . . . . . . . . . . . . . . . . . . . . 10-34
Wheels and Tires
Tires . . . . . . . . . . . . . . . . . . . . . . . . 10-37
All-Season Tires . . . . . . . . . . . . 10-37
Winter Tires . . . . . . . . . . . . . . . . 10-38
Summer Tires . . . . . . . . . . . . . . 10-38
Tire Sidewall Labeling . . . . . . 10-38
Tire Designations . . . . . . . . . . . 10-40
Tire Terminology andDefinitions . . . . . . . . . . . . . . . . 10-40
Tire Pressure . . . . . . . . . . . . . . . 10-43
Tire Pressure Monitor System . . . . . . . . . . . . . . . . . . . 10-44
Tire Pressure Monitor Operation . . . . . . . . . . . . . . . . . 10-45
Tire Inspection . . . . . . . . . . . . . . 10-48
Page 241 of 372

Black plate (13,1)Chevrolet Orlando Owner Manual - 2013 - CRC - 6/5/12
Vehicle Care 10-13
Cooling System
1. Engine Cooling Fan (Outof View)
2. Engine Coolant Surge Tank and Pressure Cap
{WARNING
An electric engine cooling fan
under the hood can start up even
when the engine is not running
and can cause injury. Keep
hands, clothing, and tools away
from any underhood electric fan. If the coolant inside the coolant
surge tank is boiling, do not do
anything else until it cools down.
The vehicle should be parked on a
level surface.
The coolant level should be at the
COLD FILL line. If it is not, the
vehicle may have a leak at the
radiator hoses, heater hoses,
radiator, water pump, or somewhere
else in the cooling system.
{WARNING
Heater and radiator hoses, and
other engine parts, can be very
hot. Do not touch them. If you do,
you can be burned.
Do not run the engine if there is a
leak. If you run the engine, it
could lose all coolant. That could
cause an engine fire, and you
could be burned. Get any leak
fixed before you drive the vehicle.
If there seems to be no leak, with
the engine on, check to see if the
electric engine cooling fan is
running. If the engine is
overheating, the fan should be
running. If it is not, the vehicle
needs service. Turn off the engine.
Notice:
Using coolant other than
DEX-COOL
®can cause premature
engine, heater core, or radiator
corrosion. In addition, the engine
coolant could require changing
sooner, at 50 000 km (30,000 mi)
or 24 months, whichever occurs
first. Any repairs would not be
covered by the vehicle warranty.
Always use DEX-COOL
(silicate-free) coolant in the
vehicle.
Engine Coolant
The cooling system in the vehicle is
filled with DEX-COOL® engine
coolant. This coolant is designed to
remain in the vehicle for 5 years or
240 000 km (150,000 mi), whichever
occurs first.
Page 255 of 372

Black plate (27,1)Chevrolet Orlando Owner Manual - 2013 - CRC - 6/5/12
Vehicle Care 10-27
2. Remove the bulb from the bulbsocket by pulling it straight out.
3. Install the new bulb in the bulb socket.
4. Replace the bulb socket into the headlamp assembly by turning
clockwise.
Fog Lamps
1. Locate the bulb assembly under
the front fascia.
2. Remove the bulb by turning it counterclockwise and pulling it
straight out of the assembly.
3. Disconnect the electrical connector from the bulb. 4. Install the new bulb by turning it
clockwise into the assembly.
5. Reconnect the electrical connector to the bulb assembly.
Taillamps, Turn Signal,
Sidemarker, and
Stoplamps
Liftgate Inboard Taillamps
1. Open the liftgate.
2. Remove the liftgate taillampaccess cover.
3. Remove the bulb socket byturning counterclockwise and
pulling straight out.
4. Remove the bulb from the socket by pulling it straight out.
5. Install the new bulb in the bulb socket.
6. Install the bulb socket by turning clockwise.
7. Install the liftgate taillamp access cover.
Page 257 of 372
Black plate (29,1)Chevrolet Orlando Owner Manual - 2013 - CRC - 6/5/12
Vehicle Care 10-29
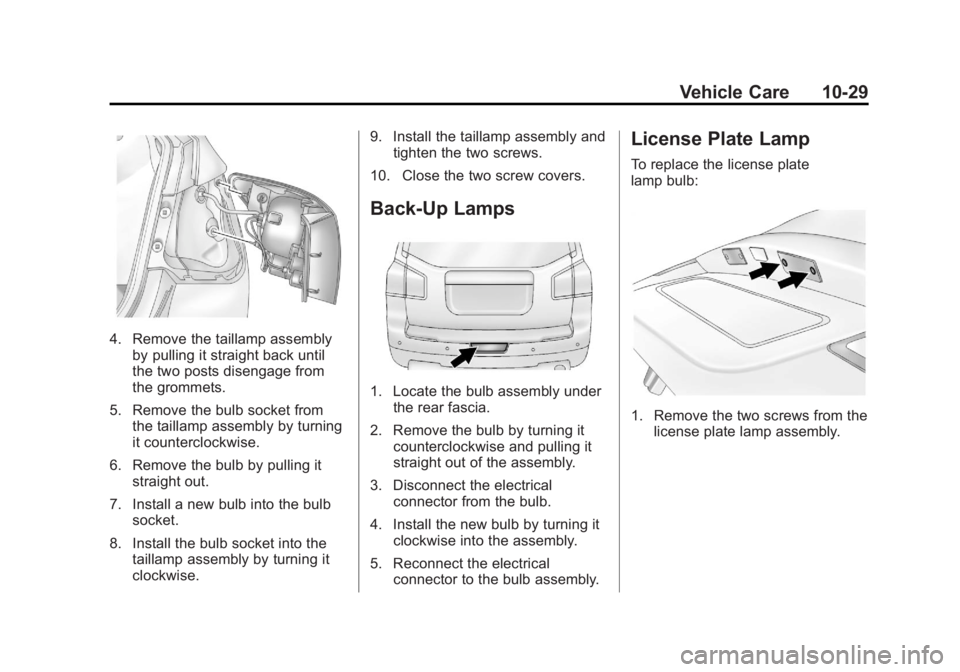
4. Remove the taillamp assemblyby pulling it straight back until
the two posts disengage from
the grommets.
5. Remove the bulb socket from the taillamp assembly by turning
it counterclockwise.
6. Remove the bulb by pulling it straight out.
7. Install a new bulb into the bulb socket.
8. Install the bulb socket into the taillamp assembly by turning it
clockwise. 9. Install the taillamp assembly and
tighten the two screws.
10. Close the two screw covers.
Back-Up Lamps
1. Locate the bulb assembly under the rear fascia.
2. Remove the bulb by turning it counterclockwise and pulling it
straight out of the assembly.
3. Disconnect the electrical connector from the bulb.
4. Install the new bulb by turning it clockwise into the assembly.
5. Reconnect the electrical connector to the bulb assembly.
License Plate Lamp
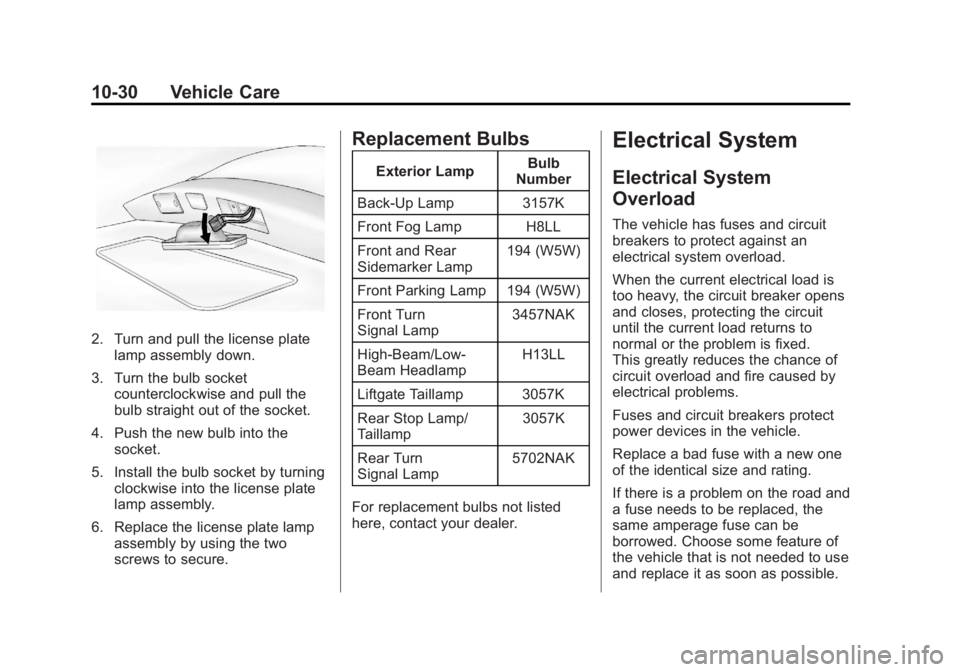
To replace the license plate
lamp bulb:
1. Remove the two screws from thelicense plate lamp assembly.
Page 258 of 372
Black plate (30,1)Chevrolet Orlando Owner Manual - 2013 - CRC - 6/5/12
10-30 Vehicle Care
2. Turn and pull the license platelamp assembly down.
3. Turn the bulb socket counterclockwise and pull the
bulb straight out of the socket.
4. Push the new bulb into the socket.
5. Install the bulb socket by turning clockwise into the license plate
lamp assembly.
6. Replace the license plate lamp assembly by using the two
screws to secure.
Replacement Bulbs
Exterior Lamp Bulb
Number
Back-Up Lamp 3157K
Front Fog Lamp H8LL
Front and Rear
Sidemarker Lamp 194 (W5W)
Front Parking Lamp 194 (W5W)
Front Turn
Signal Lamp 3457NAK
High‐Beam/Low‐
Beam Headlamp H13LL
Liftgate Taillamp 3057K
Rear Stop Lamp/
Taillamp 3057K
Rear Turn
Signal Lamp 5702NAK
For replacement bulbs not listed
here, contact your dealer.
Electrical System
Electrical System
Overload
The vehicle has fuses and circuit
breakers to protect against an
electrical system overload.
When the current electrical load is
too heavy, the circuit breaker opens
and closes, protecting the circuit
until the current load returns to
normal or the problem is fixed.
This greatly reduces the chance of
circuit overload and fire caused by
electrical problems.
Fuses and circuit breakers protect
power devices in the vehicle.
Replace a bad fuse with a new one
of the identical size and rating.
If there is a problem on the road and
a fuse needs to be replaced, the
same amperage fuse can be
borrowed. Choose some feature of
the vehicle that is not needed to use
and replace it as soon as possible.
Page 259 of 372
Black plate (31,1)Chevrolet Orlando Owner Manual - 2013 - CRC - 6/5/12
Vehicle Care 10-31
Headlamp Wiring
An electrical overload may cause
the lamps to go on and off, or in
some cases to remain off. Have the
headlamp wiring checked right away
if the lamps go on and off or
remain off.
Windshield Wipers
If the wiper motor overheats due to
heavy snow or ice, the windshield
wipers will stop until the motor cools
and will then restart.
Although the circuit is protected
from electrical overload, overload
due to heavy snow or ice may
cause wiper linkage damage.
Always clear ice and heavy snow
from the windshield before using the
windshield wipers.
If the overload is caused by an
electrical problem and not snow or
ice, be sure to get it fixed.
Fuses and Circuit
Breakers
The wiring circuits in the vehicle are
protected from short circuits by a
combination of fuses and circuit
breakers. This greatly reduces the
chance of damage caused by
electrical problems.
To check a fuse, look at the
silver-colored band inside the fuse.
If the band is broken or melted,
replace the fuse. Be sure to replace
a bad fuse with a new one of the
identical size and rating.
Fuses of the same amperage can
be temporarily borrowed from
another fuse location, if a fuse goes
out. Replace the fuse as soon as
possible.
To identify and check fuses, circuit
breakers, and relays, seeEngine
Compartment Fuse Block on
page 10‑31 andInstrument Panel
Fuse Block on page 10‑34.
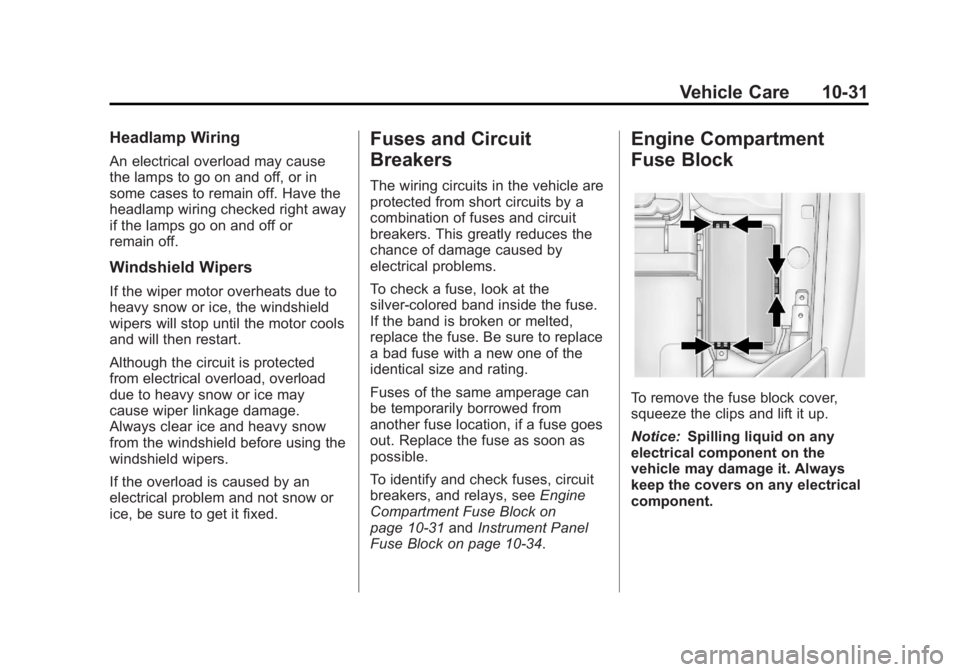
Engine Compartment
Fuse Block
To remove the fuse block cover,
squeeze the clips and lift it up.
Notice: Spilling liquid on any
electrical component on the
vehicle may damage it. Always
keep the covers on any electrical
component.
Page 301 of 372

Black plate (73,1)Chevrolet Orlando Owner Manual - 2013 - CRC - 6/5/12
Vehicle Care 10-73
Jump Starting
For more information about the
vehicle battery, seeBattery on
page 10‑21.
If the battery has run down, try to
use another vehicle and some
jumper cables to start your vehicle.
Be sure to use the following steps to
do it safely.
{WARNING
Batteries can hurt you. They can
be dangerous because:
.They contain acid that can
burn you.
.They contain gas that can
explode or ignite.
.They contain enough
electricity to burn you.
If you do not follow these steps
exactly, some or all of these
things can hurt you. Notice:
Ignoring these steps
could result in costly damage to
the vehicle that would not be
covered by the warranty.
Trying to start the vehicle by
pushing or pulling it will not
work, and it could damage the
vehicle.
The jump start positive post is
located in the engine compartment
on the driver side of the vehicle.
See Engine Compartment Overview
on page 10‑6.
The jump start negative grounding
point is the engine block or an
engine mounting bolt. Connect to a
spot as far away from the
discharged battery as possible.
These locations are used instead of
a direct connection to the battery.
The positive jump start connection
is under a trim cover. Open the
cover door to expose the terminal.
1. Check the other vehicle. It must
have a 12-volt battery with a
negative ground system.
Notice: Only use a vehicle that
has a 12-volt system with a
negative ground for jump
starting. If the other vehicle does
not have a 12-volt system with a
negative ground, both vehicles
can be damaged.
2. Position the two vehicles so that they are not touching.