2016 CHEVROLET ORLANDO tow
[x] Cancel search: towPage 55 of 372
Black plate (9,1)Chevrolet Orlando Owner Manual - 2013 - CRC - 6/5/12
Seats and Restraints 3-9
Folding the Seatbacks
Notice:Folding a rear seat with
the safety belts still fastened may
cause damage to the seat or the
safety belts. Always unbuckle the
safety belts and return them to
their normal stowed position
before folding a rear seat.
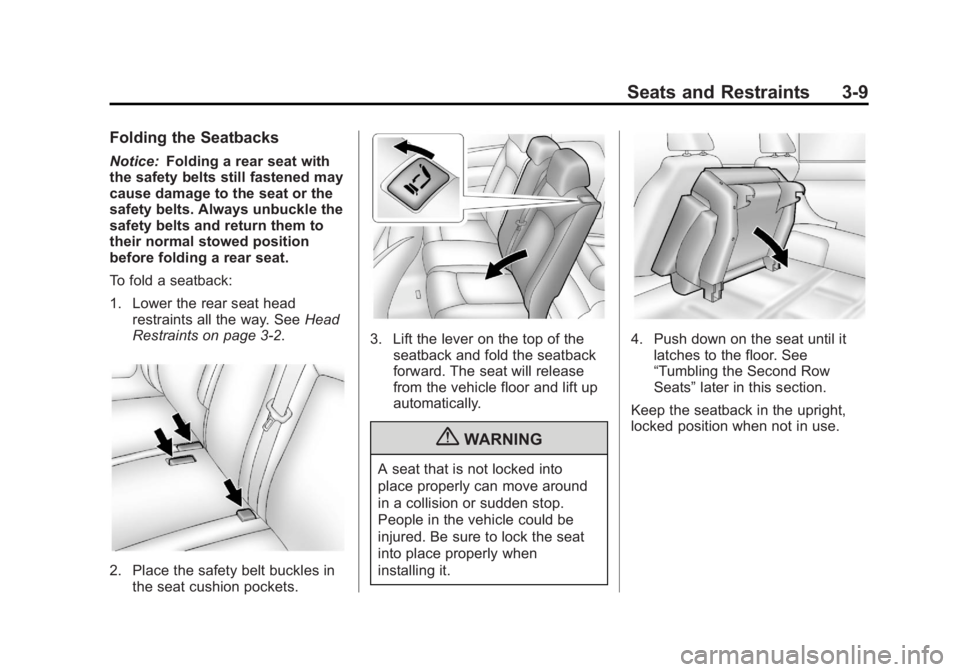
To fold a seatback:
1. Lower the rear seat head restraints all the way. See Head
Restraints on page 3‑2.
2. Place the safety belt buckles in the seat cushion pockets.
3. Lift the lever on the top of the
seatback and fold the seatback
forward. The seat will release
from the vehicle floor and lift up
automatically.
{WARNING
A seat that is not locked into
place properly can move around
in a collision or sudden stop.
People in the vehicle could be
injured. Be sure to lock the seat
into place properly when
installing it.
4. Push down on the seat until itlatches to the floor. See
“Tumbling the Second Row
Seats” later in this section.
Keep the seatback in the upright,
locked position when not in use.
Page 58 of 372
Black plate (12,1)Chevrolet Orlando Owner Manual - 2013 - CRC - 6/5/12
3-12 Seats and Restraints
{WARNING
If either seatback is not locked, it
could move forward in a sudden
stop or crash. That could cause
injury to the person sitting there.
Always push and pull on the
seatbacks to be sure they are
locked.
3. Push and pull on the seatback to make sure it is locked in place.
{WARNING
A safety belt that is improperly
routed, not properly attached,
or twisted will not provide the
protection needed in a crash. The
person wearing the belt could be
seriously injured. After raising the
rear seatback, always check to be
sure that the safety belts are
properly routed and attached, and
are not twisted. 4. Remove the safety belt buckles
from the seat cushion pockets.
Make sure the safety belts are
not twisted or caught between
the seat cushion and the
seatback.
Third Row Seats
Stowing the Seats
{WARNING
Using the third row seating
position while the second row is
folded, or folded and tumbled,
could cause injury in a sudden
stop or crash. Be sure to return
the seat to the passenger seating
position. Push and pull on the
seat to make sure it is locked into
place.
{WARNING
The hinge area of the seats must
remain clear when stowing or
unstowing the seats. Keep hands
away from the seat hinges to
avoid injury.
Notice: Folding a rear seat with
the safety belts still fastened may
cause damage to the seat or the
safety belts. Always unbuckle the
safety belts and return them to
their normal stowed position
before folding a rear seat.
To stow the seats:
1. Unbuckle the safety belts in the third row seats.
2. Open the liftgate.
Page 59 of 372
Black plate (13,1)Chevrolet Orlando Owner Manual - 2013 - CRC - 6/5/12
Seats and Restraints 3-13
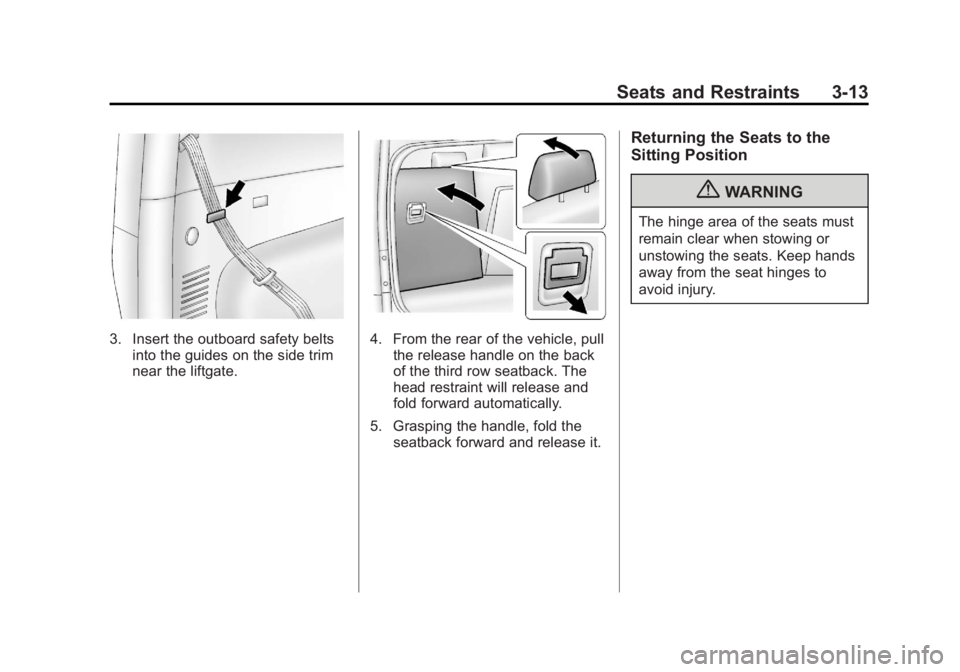
3. Insert the outboard safety beltsinto the guides on the side trim
near the liftgate.4. From the rear of the vehicle, pullthe release handle on the back
of the third row seatback. The
head restraint will release and
fold forward automatically.
5. Grasping the handle, fold the seatback forward and release it.
Returning the Seats to the
Sitting Position
{WARNING
The hinge area of the seats must
remain clear when stowing or
unstowing the seats. Keep hands
away from the seat hinges to
avoid injury.
Page 65 of 372
Black plate (19,1)Chevrolet Orlando Owner Manual - 2013 - CRC - 6/5/12
Seats and Restraints 3-19
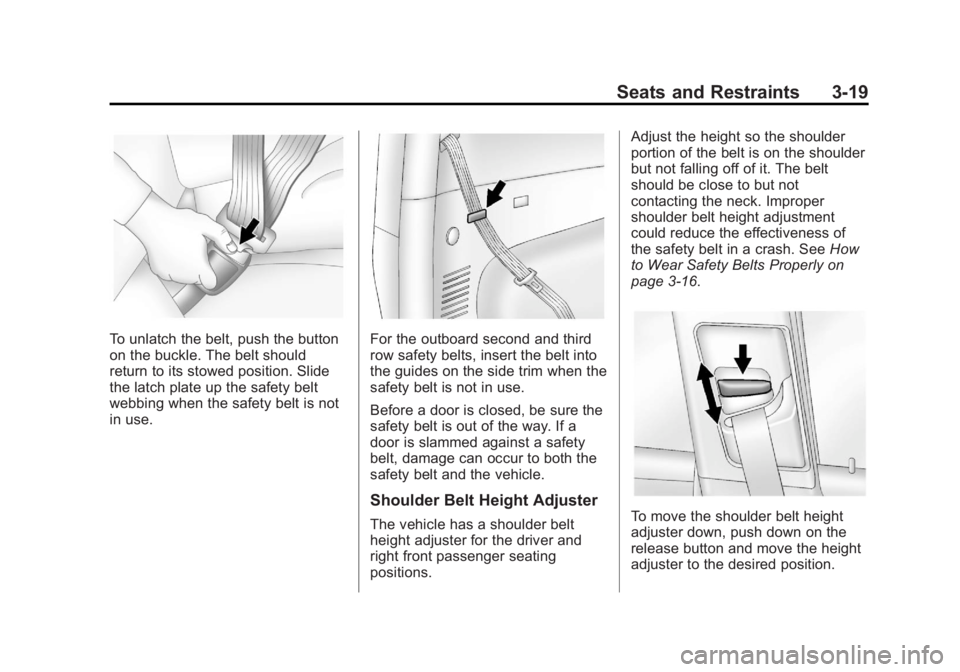
To unlatch the belt, push the button
on the buckle. The belt should
return to its stowed position. Slide
the latch plate up the safety belt
webbing when the safety belt is not
in use.For the outboard second and third
row safety belts, insert the belt into
the guides on the side trim when the
safety belt is not in use.
Before a door is closed, be sure the
safety belt is out of the way. If a
door is slammed against a safety
belt, damage can occur to both the
safety belt and the vehicle.
Shoulder Belt Height Adjuster
The vehicle has a shoulder belt
height adjuster for the driver and
right front passenger seating
positions.Adjust the height so the shoulder
portion of the belt is on the shoulder
but not falling off of it. The belt
should be close to but not
contacting the neck. Improper
shoulder belt height adjustment
could reduce the effectiveness of
the safety belt in a crash. See
How
to Wear Safety Belts Properly on
page 3‑16.To move the shoulder belt height
adjuster down, push down on the
release button and move the height
adjuster to the desired position.
Page 74 of 372
Black plate (28,1)Chevrolet Orlando Owner Manual - 2013 - CRC - 6/5/12
3-28 Seats and Restraints
The vehicle has seat-mounted side
impact and roof-rail airbags. See
Airbag System on page 3‑24.
Seat-mounted side impact and
roof-rail airbags are intended to
inflate in moderate to severe side
crashes, depending on the location
of the impact. In addition, these
roof-rail airbags are intended to
inflate during a rollover or in a
severe frontal impact. Seat-mounted
side impact and roof-rail airbags will
inflate if the crash severity is above
the system's designed threshold
level. The threshold level can vary
with specific vehicle design.
Seat-mounted side impact airbags
are not intended to inflate in frontal
impacts, near frontal impacts,
rollovers, or rear impacts. Roof-rail
airbags are not intended to inflate in
rear impacts. A seat-mounted side
impact airbag is intended to inflate
on the side of the vehicle that is
struck. Both roof-rail airbags will
inflate when either side of the
vehicle is struck, or if the sensingsystem predicts that the vehicle is
about to roll over on its side, or in a
severe frontal impact.
In any particular crash, no one can
say whether an airbag should have
inflated simply because of the
vehicle damage or repair costs.
What Makes an Airbag
Inflate?
In a deployment event, the sensing
system sends an electrical signal
triggering a release of gas from the
inflator. Gas from the inflator fills the
airbag causing the bag to break out
of the cover. The inflator, the airbag,
and related hardware are all part of
the airbag module.
For airbag location, see
Where Are
the Airbags? on page 3‑26.
How Does an Airbag
Restrain?
In moderate to severe frontal or
near frontal collisions, even belted
occupants can contact the steering wheel or the instrument panel. In
moderate to severe side collisions,
even belted occupants can contact
the inside of the vehicle.
Airbags supplement the protection
provided by safety belts by
distributing the force of the impact
more evenly over the
occupant's body.
Rollover capable roof-rail airbags
are designed to help contain the
head and chest of occupants in the
outboard seating positions in the
first and second rows. The rollover
capable roof-rail airbags are
designed to help reduce the risk of
full or partial ejection in rollover
events, although no system can
prevent all such ejections.
But airbags would not help in many
types of collisions, primarily
because the occupant's motion is
not toward those airbags. See
When
Should an Airbag Inflate? on
page 3‑27.
Page 88 of 372
Black plate (42,1)Chevrolet Orlando Owner Manual - 2013 - CRC - 6/5/12
3-42 Seats and Restraints
According to accident statistics,
children and infants are safer when
properly restrained in a child
restraint system or infant restraint
system secured in a rear seating
position. SeeWhere to Put the
Restraint on page 3‑38 for
additional information.
Securing a Child Restraint
Designed for the LATCH
System
{WARNING
If a LATCH-type child restraint is
not attached to anchors, the child
restraint will not be able to protect
the child correctly. In a crash, the
child could be seriously injured or
killed. Install a LATCH-type child
restraint properly using the
anchors, or use the vehicle safety
belts to secure the restraint,
following the instructions that
came with the child restraint and
the instructions in this manual.
{WARNING
Do not attach more than one child
restraint to a single anchor.
Attaching more than one child
restraint to a single anchor could
cause the anchor or attachment
to come loose or even break
during a crash. A child or others
could be injured. To reduce the
risk of serious or fatal injuries
during a crash, attach only one
child restraint per anchor.
{WARNING
Children can be seriously injured
or strangled if a shoulder belt is
wrapped around their neck and
the safety belt continues to
tighten. Buckle any unused safety
belts behind the child restraint so
children cannot reach them. Pull
the shoulder belt all the way out
(Continued)
WARNING (Continued)
of the retractor to set the lock,
if the vehicle has one, after the
child restraint has been installed.
Notice: Do not let the LATCH
attachments rub against the
vehicle’ s safety belts. This may
damage these parts. If necessary,
move buckled safety belts to
avoid rubbing the LATCH
attachments.
Do not fold the empty rear seat
with a safety belt buckled. This
could damage the safety belt or
the seat. Unbuckle and return the
safety belt to its stowed position,
before folding the seat.
If you need to secure more than one
child restraint in the rear seat, see
Where to Put the Restraint on
page 3‑38.
This system is designed to make
installation of child restraints easier.
When using lower anchors, do not
Page 92 of 372
Black plate (46,1)Chevrolet Orlando Owner Manual - 2013 - CRC - 6/5/12
3-46 Seats and Restraints
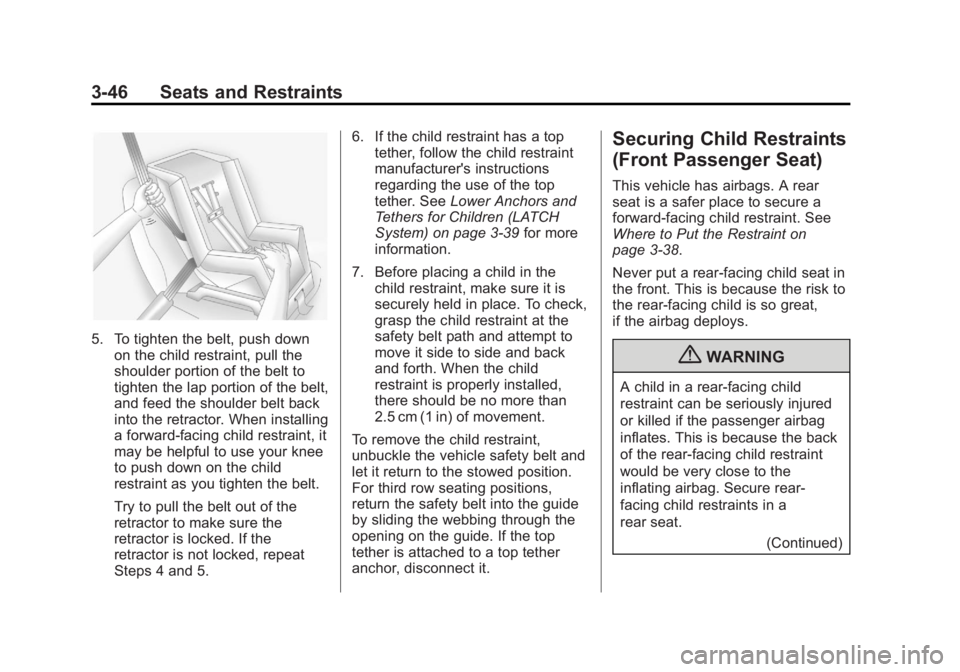
5. To tighten the belt, push downon the child restraint, pull the
shoulder portion of the belt to
tighten the lap portion of the belt,
and feed the shoulder belt back
into the retractor. When installing
a forward-facing child restraint, it
may be helpful to use your knee
to push down on the child
restraint as you tighten the belt.
Try to pull the belt out of the
retractor to make sure the
retractor is locked. If the
retractor is not locked, repeat
Steps 4 and 5. 6. If the child restraint has a top
tether, follow the child restraint
manufacturer's instructions
regarding the use of the top
tether. See Lower Anchors and
Tethers for Children (LATCH
System) on page 3‑39 for more
information.
7. Before placing a child in the child restraint, make sure it is
securely held in place. To check,
grasp the child restraint at the
safety belt path and attempt to
move it side to side and back
and forth. When the child
restraint is properly installed,
there should be no more than
2.5 cm (1 in) of movement.
To remove the child restraint,
unbuckle the vehicle safety belt and
let it return to the stowed position.
For third row seating positions,
return the safety belt into the guide
by sliding the webbing through the
opening on the guide. If the top
tether is attached to a top tether
anchor, disconnect it.
Securing Child Restraints
(Front Passenger Seat)
This vehicle has airbags. A rear
seat is a safer place to secure a
forward-facing child restraint. See
Where to Put the Restraint on
page 3‑38.
Never put a rear-facing child seat in
the front. This is because the risk to
the rear-facing child is so great,
if the airbag deploys.
{WARNING
A child in a rear-facing child
restraint can be seriously injured
or killed if the passenger airbag
inflates. This is because the back
of the rear-facing child restraint
would be very close to the
inflating airbag. Secure rear‐
facing child restraints in a
rear seat. (Continued)
Page 94 of 372
Black plate (48,1)Chevrolet Orlando Owner Manual - 2013 - CRC - 6/5/12
3-48 Seats and Restraints
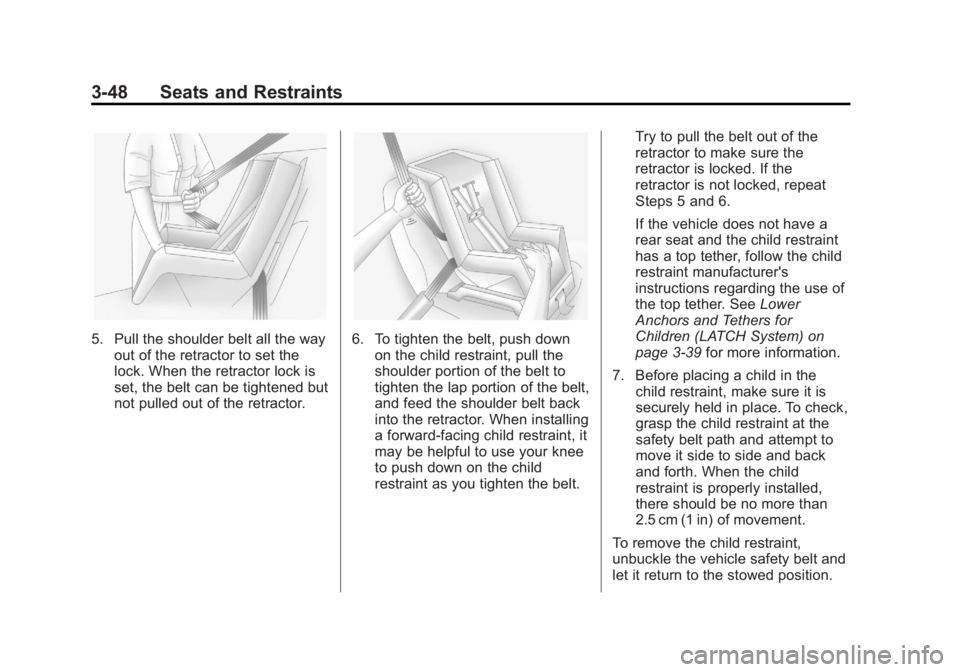
5. Pull the shoulder belt all the wayout of the retractor to set the
lock. When the retractor lock is
set, the belt can be tightened but
not pulled out of the retractor.6. To tighten the belt, push downon the child restraint, pull the
shoulder portion of the belt to
tighten the lap portion of the belt,
and feed the shoulder belt back
into the retractor. When installing
a forward-facing child restraint, it
may be helpful to use your knee
to push down on the child
restraint as you tighten the belt. Try to pull the belt out of the
retractor to make sure the
retractor is locked. If the
retractor is not locked, repeat
Steps 5 and 6.
If the vehicle does not have a
rear seat and the child restraint
has a top tether, follow the child
restraint manufacturer's
instructions regarding the use of
the top tether. See
Lower
Anchors and Tethers for
Children (LATCH System) on
page 3‑39 for more information.
7. Before placing a child in the child restraint, make sure it is
securely held in place. To check,
grasp the child restraint at the
safety belt path and attempt to
move it side to side and back
and forth. When the child
restraint is properly installed,
there should be no more than
2.5 cm (1 in) of movement.
To remove the child restraint,
unbuckle the vehicle safety belt and
let it return to the stowed position.