2016 CHEVROLET MALIBU display
[x] Cancel search: displayPage 228 of 420
Chevrolet Malibu Owner Manual (GMNA-Localizing-U.S./Canada/Mexico-
9087641) - 2016 - crc - 9/3/15
Driving and Operating 227
If the vehicle is not in P (Park), the
ignition will return to ACC/
ACCESSORY and display the
message SHIFT TO PARK in the
Driver Information Center (DIC).
SeeTransmission Messages 0144
ii.
When the vehicle is shifted into
P (Park), the ignition system will
switch to OFF.
Do not turn the engine off when the
vehicle is moving. This will cause a
loss of power assist in the brake
and steering systems and disable
the airbags.
If the vehicle must be shut off in an
emergency:
1. Brake using a firm and steady pressure. Do not pump the
brakes repeatedly. This may
deplete power assist, requiring
increased brake pedal force.
2. Shift the vehicle to N (Neutral). This can be done while the
vehicle is moving. After shifting
to N (Neutral), firmly apply the
brakes and steer the vehicle to
a safe location. 3. Come to a complete stop, shift
to P (Park), and turn the
ignition to OFF. On vehicles
with an automatic transmission,
the shift lever must be in
P (Park) to turn the ignition
switch to the OFF position.
4. Set the parking brake. See Parking Brake 0238
ii.
{Warning
Turning off the vehicle while
moving may cause loss of power
assist in the brake and steering
systems and disable the airbags.
While driving, only shut the
vehicle off in an emergency.
If the vehicle cannot be pulled over
and must be shut off while driving,
press and hold ENGINE START/
STOP for longer than two seconds,
or press twice in five seconds.
ACC/ACCESSORY (Amber
Indicator Light) : This mode allows
you to use some electrical
accessories when the engine is off. With the ignition off, pressing the
button one time without the brake
pedal applied will place the ignition
system in ACC/ACCESSORY.
The ignition will switch from ACC/
ACCESSORY to OFF after
five minutes to prevent battery
run down.
ON/RUN/START (Green Indicator
Light) :
This mode is for driving and
starting. With the ignition off, and
the brake pedal applied, pressing
the button once will place the
ignition system in ON/RUN/START.
Once engine cranking begins,
release the button. Engine cranking
will continue until the engine starts.
See Starting the Engine 0228
ii. The
ignition will then remain in ON/RUN.
Service Only Mode
This power mode is available for
service and diagnostics, and to
verify the proper operation of the
malfunction indicator lamp as may
be required for emission inspection
purposes. With the vehicle off, and
the brake pedal not applied,
pressing and holding the button for
more than five seconds will place
Page 229 of 420
Chevrolet Malibu Owner Manual (GMNA-Localizing-U.S./Canada/Mexico-
9087641) - 2016 - crc - 9/3/15
228 Driving and Operating
the vehicle in Service Only Mode.
The instruments and audio systems
will operate as they do in ON/RUN,
but the vehicle will not be able to be
driven. The engine will not start in
Service Only Mode. Press the
button again to turn the vehicle off.
Starting the Engine
Move the shift lever to P (Park) or
N (Neutral). The engine will not start
in any other position. To restart the
engine when the vehicle is already
moving, use N (Neutral) only.
For hybrid vehicles, the engine will
only start if required for cabin
warming or high voltage battery
charging. The Vehicle Ready
indicator will be illuminated when
the vehicle is ready to be driven.
Caution
Do not try to shift to P (Park) if the
vehicle is moving. If you do, you
could damage the transmission.
Shift to P (Park) only when the
vehicle is stopped.
Caution
If you add electrical parts or
accessories, you could change
the way the engine operates. Any
resulting damage would not be
covered by the vehicle warranty.
SeeAdd-On Electrical Equipment
0 278
ii.
Caution
If the steering wheel is turned
until it reaches the end of its
travel, and is held in that position
while starting the vehicle, damage
may occur to the hydraulic power
steering system and there may be
loss of power steering assist.
Starting Procedure 1. With the Keyless Access System, the RKE transmitter
must be in the vehicle. Press
the ENGINE START/STOP
button with the brake pedal applied. When the engine
begins cranking, let go of the
button.
The idle speed will go down as
the engine gets warm. Do not
race the engine immediately
after starting it.
If the RKE transmitter is not in
the vehicle, if there is
interference, or the RKE
transmitter battery is low, the
Driver Information Center (DIC)
will display a message. See
Driver Information Center (DIC)
(Base Level)
0129iior Driver
Information Center (DIC)
(Uplevel) 0132
iiand Remote
Keyless Entry (RKE) System
Operation 031
ii.
Caution
Cranking the engine for long
periods of time, by returning the
ignition to the START position
immediately after cranking has
ended, can overheat and damage
the cranking motor, and drain the
(Continued)
Page 230 of 420
Chevrolet Malibu Owner Manual (GMNA-Localizing-U.S./Canada/Mexico-
9087641) - 2016 - crc - 9/3/15
Driving and Operating 229
Caution (Continued)
battery. Wait at least 15 seconds
between each try, to let the
cranking motor cool down.
2. If the engine does not start after five to 10 seconds,
especially in very cold weather
(below −18 °C or 0 °F), it could
be flooded with too much
gasoline. Try pushing the
accelerator pedal all the way to
the floor and holding it there as
you hold ENGINE START/
STOP, for up to a maximum of
15 seconds. Wait at least
15 seconds between each try,
to allow the cranking motor to
cool down. When the engine
starts, let go of the button and
the accelerator. If the vehicle
starts briefly but then stops
again, do the same thing. This
clears the extra gasoline from
the engine. Do not race the
engine immediately after
starting it. Operate the engine and transmission gently until
the oil warms up and lubricates
all moving parts.
Hybrid Operation
This vehicle combines gasoline and
electric propulsion. The gasoline
engine will automatically start to
provide power and then shut off to
save fuel.
The engine may remain
running when:
.
Accelerating aggressively or
climbing hills.
. Vehicle speed is greater than
88 km/h (55 mph).
. Charging the high voltage
battery.
. The heater is being used.
The engine and transmission work
together to provide propulsion
power at the highest efficiency. This
may result in higher engine speeds.
Stop/Start System
{Warning
Exiting the vehicle without first
shifting into P (Park) may cause
the vehicle to move. You or others
may be injured. Because the
vehicle has the auto engine stop/
start feature, the vehicle's engine
might seem to be shut off;
however, once the brake pedal is
released, the engine will start up
again.
Shift to P (Park) and turn the
ignition to LOCK/OFF, before
exiting the vehicle.
If equipped with the 1.5L L4 engine,
the vehicle has a fuel saving stop/
start system to shut off the engine to
help conserve fuel.
Auto Engine Stop/Start
When the brakes are applied and
the vehicle is at a complete stop,
the engine may turn off. When
stopped, the tachometer displays
Page 236 of 420
Chevrolet Malibu Owner Manual (GMNA-Localizing-U.S./Canada/Mexico-
9087641) - 2016 - crc - 9/3/15
Driving and Operating 235
{Warning
Shifting into a drive gear while the
engine is running at high speed is
dangerous. Unless your foot is
firmly on the brake pedal, the
vehicle could move very rapidly.
You could lose control and hit
people or objects. Do not shift
into a drive gear while the engine
is running at high speed.
Caution
Shifting out of P (Park) or
N (Neutral) with the engine
running at high speed may
damage the transmission. The
repairs would not be covered by
the vehicle warranty. Be sure the
engine is not running at high
speed when shifting the vehicle.
For hybrid vehicles, the engine will
always be off while in N (Neutral).
The vehicle cannot charge the high
voltage battery while the shift lever
selector is in N (Neutral). Only use N (Neutral) when required. If the
high voltage battery state of charge
is low, the Driver Information Center
(DIC) will display a message to shift
out of N (Neutral). Shift to P (Park),
R (Reverse), D (Drive), or L (Low)
depending on the situation. If the
high voltage battery is depleted too
far, the vehicle will shut down,
requiring a shift to P (Park) to restart
the vehicle.
D :
This position is for normal
driving. It provides the best fuel
economy. If you need more power
for passing, and you are:
. Accelerating slowly or
maintaining a constant speed,
push the accelerator pedal about
halfway down.
. Accelerating quickly or passing,
push the accelerator all the
way down.
L : This position allows you to
change gears similar to a manual
transmission. If the vehicle has this
feature, see Manual Mode 0235
ii. Operating Modes
The transmission may operate in a
lower gear than normal to improve
vehicle performance. When in a
lower gear the engine speed will be
higher and there may be an
increase in noise.
.
When climbing a grade, driving
in hot temperatures or at high
altitudes the transmission may
hold a lower gear to prevent
excessive shifting.
. When coasting down a grade
the transmission may hold a
lower gear to provide engine
braking. The transmission may
also downshift to a lower gear
when pressing the brake pedal
to provide engine braking.
Manual Mode
Electronic Range Select
(ERS) Mode
ERS mode allows you to choose the
top-gear limit of the transmission
and the vehicle's speed while
driving downhill or towing a trailer.
The vehicle has an electronic shift
Page 237 of 420
Chevrolet Malibu Owner Manual (GMNA-Localizing-U.S./Canada/Mexico-
9087641) - 2016 - crc - 9/3/15
236 Driving and Operating
position indicator within the
instrument cluster. When using the
ERS mode a number will display
next to the L, indicating the current
gear that has been selected.
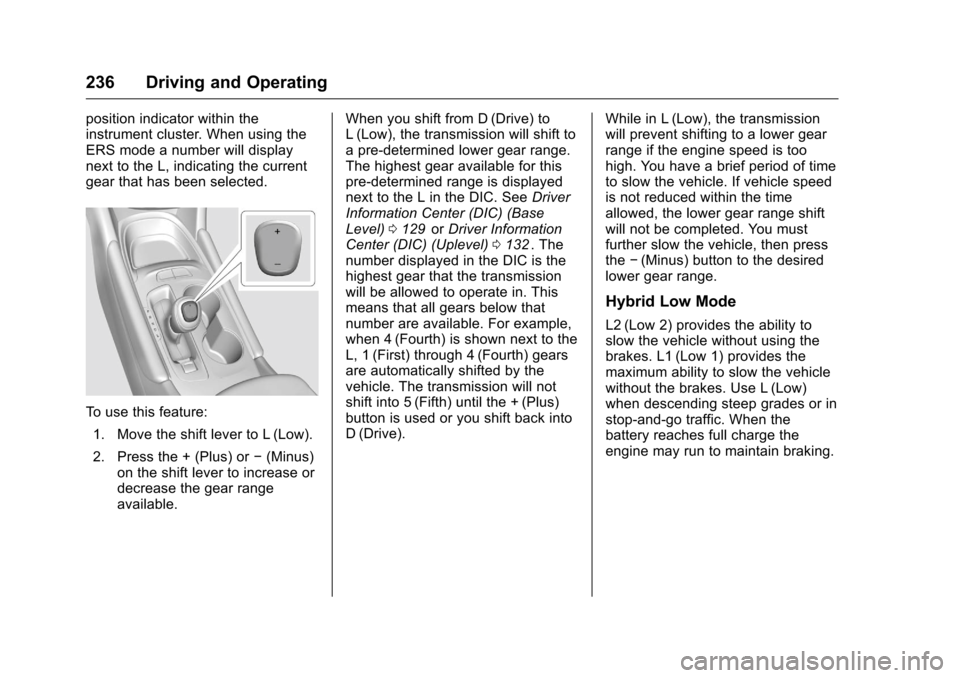
To use this feature:1. Move the shift lever to L (Low).
2. Press the + (Plus) or −(Minus)
on the shift lever to increase or
decrease the gear range
available. When you shift from D (Drive) to
L (Low), the transmission will shift to
a pre-determined lower gear range.
The highest gear available for this
pre-determined range is displayed
next to the L in the DIC. See
Driver
Information Center (DIC) (Base
Level) 0129
iior Driver Information
Center (DIC) (Uplevel) 0132ii. The
number displayed in the DIC is the
highest gear that the transmission
will be allowed to operate in. This
means that all gears below that
number are available. For example,
when 4 (Fourth) is shown next to the
L, 1 (First) through 4 (Fourth) gears
are automatically shifted by the
vehicle. The transmission will not
shift into 5 (Fifth) until the + (Plus)
button is used or you shift back into
D (Drive). While in L (Low), the transmission
will prevent shifting to a lower gear
range if the engine speed is too
high. You have a brief period of time
to slow the vehicle. If vehicle speed
is not reduced within the time
allowed, the lower gear range shift
will not be completed. You must
further slow the vehicle, then press
the
−(Minus) button to the desired
lower gear range.
Hybrid Low Mode
L2 (Low 2) provides the ability to
slow the vehicle without using the
brakes. L1 (Low 1) provides the
maximum ability to slow the vehicle
without the brakes. Use L (Low)
when descending steep grades or in
stop-and-go traffic. When the
battery reaches full charge the
engine may run to maintain braking.
Page 240 of 420
Chevrolet Malibu Owner Manual (GMNA-Localizing-U.S./Canada/Mexico-
9087641) - 2016 - crc - 9/3/15
Driving and Operating 239
The system has a red parking brake
status light and an amber parking
brake warning light. SeeElectric
Parking Brake Light 0122
iiand
Service Electric Parking Brake Light
0 122
ii. There are also parking
brake-related Driver Information
Center (DIC) messages. See Brake
System Messages 0136
ii. In case of
insufficient electrical power, the EPB
cannot be applied or released.
Before leaving the vehicle, check
the red parking brake status light to
ensure that the parking brake is
applied.
EPB Apply
To apply the EPB:
1. Be sure the vehicle is at a complete stop.
2. Lift up the EPB switch momentarily.
The red parking brake status light
will flash and then stay on once the
EPB is fully applied. If the red
parking brake status light flashes
continuously, then the EPB is only
partially applied or there is a
problem with the EPB. A DIC message will display. Release the
EPB and try to apply it again. If the
light does not come on, or keeps
flashing, have the vehicle serviced.
Do not drive the vehicle if the red
parking brake status light is flashing.
See your dealer. See
Electric
Parking Brake Light 0122
ii.
If the amber parking brake warning
light is on, lift up on the EPB switch
and hold it up. Continue to hold the
switch until the red parking brake
status light remains on. If the amber
parking brake warning light remains
on, see your dealer.
If the EPB is applied while the
vehicle is moving, the vehicle will
decelerate as long as the switch is
held up. If the switch is held up until
the vehicle comes to a stop, the
EPB will remain applied.
The vehicle may automatically apply
the EPB in some situations when
the vehicle is not moving. This is
normal, and is done to periodically
check the correct operation of the
EPB system. If the EPB fails to apply, the rear
wheels should be blocked to
prevent vehicle movement.
EPB Release
To release the EPB:
1. Place the ignition in the ACC/ ACCESSORY or ON/RUN
position.
2. Apply and hold the brake pedal.
3. Push down momentarily on the EPB switch.
The EPB is released when the red
parking brake status light is off.
If the amber parking brake warning
light is on, release the EPB by
pushing down on the EPB switch
and holding it down. Continue to
hold the switch until the red parking
brake status light is off. If either light
stays on after release is attempted,
see your dealer.
Page 241 of 420
Chevrolet Malibu Owner Manual (GMNA-Localizing-U.S./Canada/Mexico-
9087641) - 2016 - crc - 9/3/15
240 Driving and Operating
Caution
Driving with the parking brake on
can overheat the brake system
and cause premature wear or
damage to brake system parts.
Make sure that the parking brake
is fully released and the brake
warning light is off before driving.
Automatic EPB Release
The EPB will automatically release if
the vehicle is running, placed into
gear, and an attempt is made to
drive away. Avoid rapid acceleration
when the EPB is applied, to
preserve parking brake lining life.
If parking on a hill, or if the vehicle
is pulling a trailer, seeDriving
Characteristics and Towing Tips
0 273
ii.
Brake Assist
The Brake Assist feature is
designed to assist the driver in
stopping or decreasing vehicle
speed in emergency driving
conditions. This feature uses the stability system hydraulic brake
control module to supplement the
power brake system under
conditions where the driver has
quickly and forcefully applied the
brake pedal in an attempt to quickly
stop or slow down the vehicle. The
stability system hydraulic brake
control module increases brake
pressure at each corner of the
vehicle until the ABS activates.
Minor brake pedal pulsation or
pedal movement during this time is
normal and the driver should
continue to apply the brake pedal as
the driving situation dictates. The
Brake Assist feature will
automatically disengage when the
brake pedal is released or brake
pedal pressure is quickly
decreased.
Hill Start Assist (HSA)
The HSA feature will activate when
the vehicle is stopped on a
moderate to steep grade to help
prevent it from rolling in an
unintended direction. After the brake
pedal has been released and before
the accelerator pedal has been
pressed, HSA uses braking
pressure to hold the vehicle
stationary. If HSA is holding the
vehicle, a DIC message displays.
HSA will not activate in a forward
drive gear when facing downhill,
or in R (Reverse) when facing uphill.
Extended Hill Start
Assist (EHSA)
Select the duration of the HSA
feature on the center stack
touchscreen by choosing the
submenu for Hill Start Assist or
Extended Hill Start Assist (EHSA).
See
“Extended Hill Start Assist"
under “Comfort and Convenience” in
Vehicle Personalization 0145
ii.
When Standard Hold is selected,
the vehicle is held stationary for up
to two seconds after the brake pedal
is released. When Extended Hold is
selected, the vehicle is held
stationary for up to five minutes
after the brake pedal is released. In
either case, override the hold
feature by pressing the accelerator
pedal and attempting to drive away.
Page 243 of 420
Chevrolet Malibu Owner Manual (GMNA-Localizing-U.S./Canada/Mexico-
9087641) - 2016 - crc - 9/3/15
242 Driving and Operating
vehicle wheel brakes to assist the
driver in keeping the vehicle on the
intended path.
If cruise control is being used and
traction control or StabiliTrak begins
to limit wheel spin, cruise control will
disengage. Cruise control may be
turned back on when road
conditions allow.
Both systems come on
automatically when the vehicle is
started and begins to move. The
systems may be heard or felt while
they are operating or while
performing diagnostic checks. This
is normal and does not mean there
is a problem with the vehicle.
It is recommended to leave both
systems on for normal driving
conditions, but it may be necessary
to turn TCS off if the vehicle gets
stuck in sand, mud, ice, or snow.
SeeIf the Vehicle Is Stuck 0222
iiand “Turning the Systems Off and
On” later in this section.
The indicator light for both systems
is in the instrument cluster. This
light will:
.
Flash when TCS is limiting
wheel spin.
. Flash when StabiliTrak is
activated.
. Turn on and stay on when either
system is not working.
If either system fails to turn on or to
activate, a message displays in the
Driver Information Center (DIC),
and
dcomes on and stays on to
indicate that the system is inactive
and is not assisting the driver in
maintaining control. The vehicle is
safe to drive, but driving should be
adjusted accordingly.
If
dcomes on and stays on:
1. Stop the vehicle. 2. Turn the engine off and wait
15 seconds.
3. Start the engine.
Drive the vehicle. If
dcomes on
and stays on, the vehicle may need
more time to diagnose the problem.
If the condition persists, see your
dealer.
Turning the Systems Off
and On
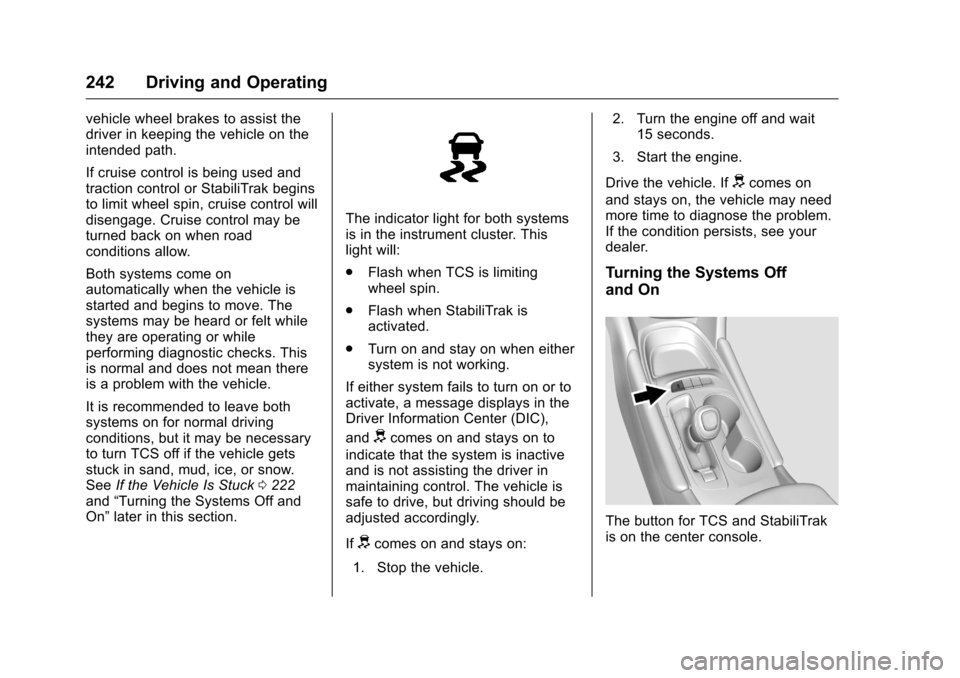
The button for TCS and StabiliTrak
is on the center console.