2016 CHEVROLET MALIBU LIMITED ECO mode
[x] Cancel search: ECO modePage 3 of 360

Chevrolet Malibu Limited Owner Manual (GMNA-Localizing-U.S/Canada-
9086425) - 2016 - crc - 7/30/15
2 Introduction
Introduction
The names, logos, emblems,
slogans, vehicle model names, and
vehicle body designs appearing in
this manual including, but not limited
to, GM, the GM logo, CHEVROLET,
the CHEVROLET Emblem,
MALIBU, and the MALIBU Emblem
are trademarks and/or service
marks of General Motors LLC, its
subsidiaries, affiliates, or licensors.
For vehicles first sold in Canada,
substitute the name“General
Motors of Canada Limited” for
Chevrolet Motor Division wherever it
appears in this manual. This manual describes features that
may or may not be on the vehicle
because of optional equipment that
was not purchased on the vehicle,
model variants, country
specifications, features/applications
that may not be available in your
region, or changes subsequent to
the printing of this owner manual.
Refer to the purchase
documentation relating to your
specific vehicle to confirm the
features.
Keep this manual in the vehicle for
quick reference.
Canadian Vehicle Owners
Propriétaires Canadiens
A French language manual can be
obtained from your dealer, at
www.helminc.com, or from:
On peut obtenir un exemplaire de
ce guide en français auprès du
concessionnaire ou à l'adresse
suivante:Helm, Incorporated
Attention: Customer Service
47911 Halyard Drive
Plymouth, MI 48170
Using this Manual
To quickly locate information about
the vehicle, use the Index in the
back of the manual. It is an
alphabetical list of what is in the
manual and the page number where
it can be found.
Danger, Warning, and
Caution
Warning messages found on vehicle
labels and in this manual describe
hazards and what to do to avoid or
reduce them.
{Danger
Danger indicates a hazard with a
high level of risk which will result
in serious injury or death.
Litho in U.S.A.
Part No. 23179986 B Second Printing©2015 General Motors LLC. All Rights Reserved.
Page 17 of 360
Chevrolet Malibu Limited Owner Manual (GMNA-Localizing-U.S/Canada-
9086425) - 2016 - crc - 7/30/15
16 In Brief
HI :Use for fast wipes.
LO : Use for slow wipes.
INT : Move the lever up to INT for
intermittent wipes, then turn the
x
INT band up for more frequent
wipes or down for less frequent
wipes.
OFF : Use to turn the wipers off.
1X : For a single wipe, briefly move
the lever down. For several wipes,
hold the lever down.
n L: Pull the lever toward you to
spray windshield washer fluid and
activate the wipers.
See Windshield Wiper/Washer 097.
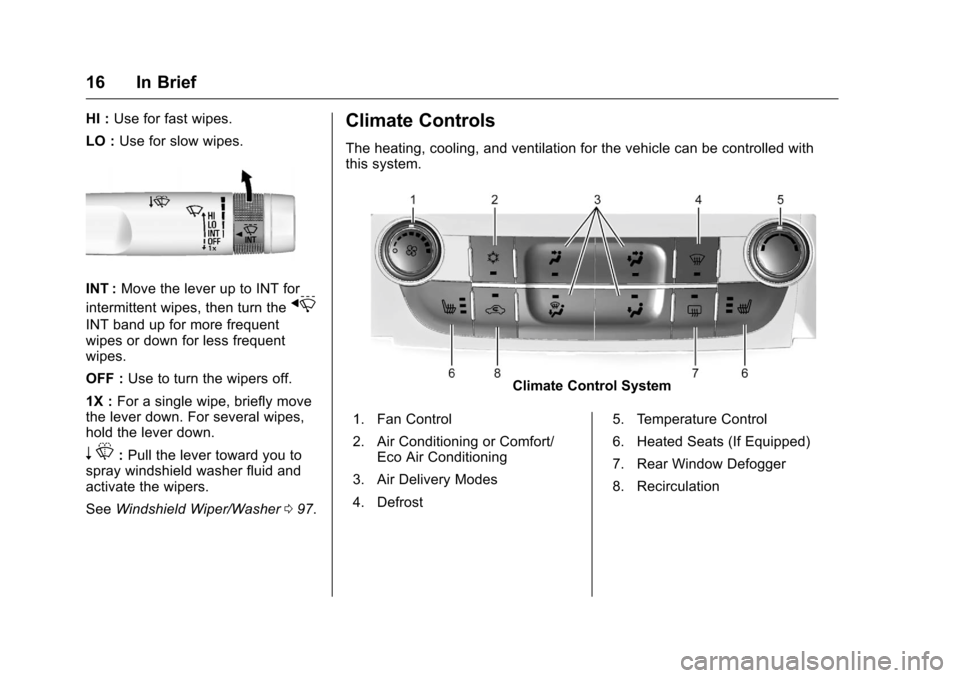
Climate Controls
The heating, cooling, and ventilation for the vehicle can be controlled with
this system.
Climate Control System
1. Fan Control
2. Air Conditioning or Comfort/ Eco Air Conditioning
3. Air Delivery Modes
4. Defrost 5. Temperature Control
6. Heated Seats (If Equipped)
7. Rear Window Defogger
8. Recirculation
Page 18 of 360
Chevrolet Malibu Limited Owner Manual (GMNA-Localizing-U.S/Canada-
9086425) - 2016 - crc - 7/30/15
In Brief 17
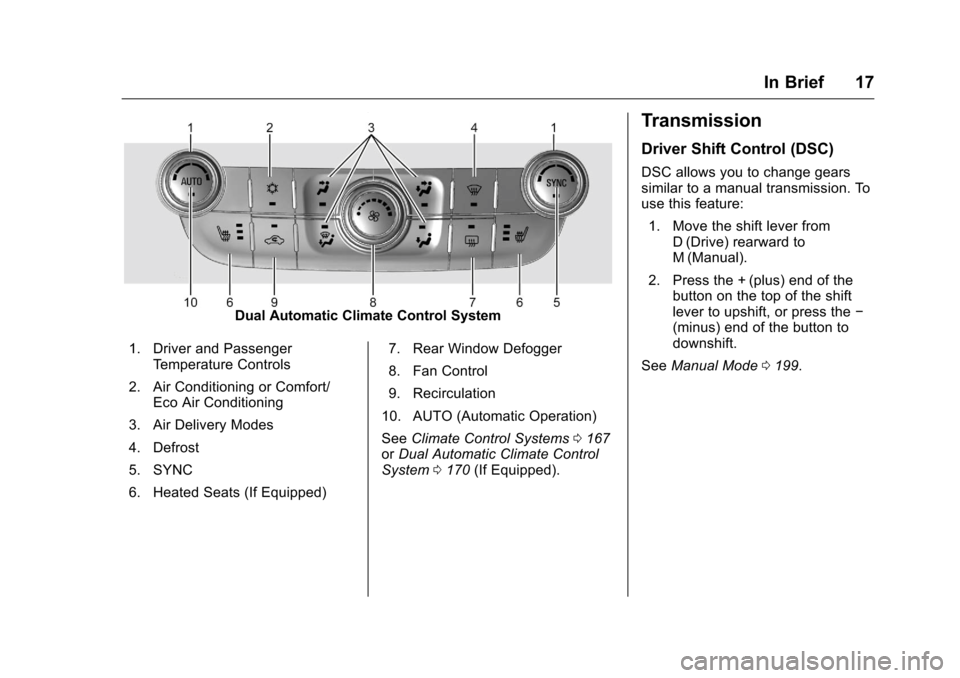
Dual Automatic Climate Control System
1. Driver and Passenger Temperature Controls
2. Air Conditioning or Comfort/ Eco Air Conditioning
3. Air Delivery Modes
4. Defrost
5. SYNC
6. Heated Seats (If Equipped) 7. Rear Window Defogger
8. Fan Control
9. Recirculation
10. AUTO (Automatic Operation)
See Climate Control Systems 0167
or Dual Automatic Climate Control
System 0170 (If Equipped).
Transmission
Driver Shift Control (DSC)
DSC allows you to change gears
similar to a manual transmission. To
use this feature:
1. Move the shift lever from D (Drive) rearward to
M (Manual).
2. Press the + (plus) end of the button on the top of the shift
lever to upshift, or press the −
(minus) end of the button to
downshift.
See Manual Mode 0199.
Page 32 of 360
Chevrolet Malibu Limited Owner Manual (GMNA-Localizing-U.S/Canada-
9086425) - 2016 - crc - 7/31/15
Keys, Doors, and Windows 31
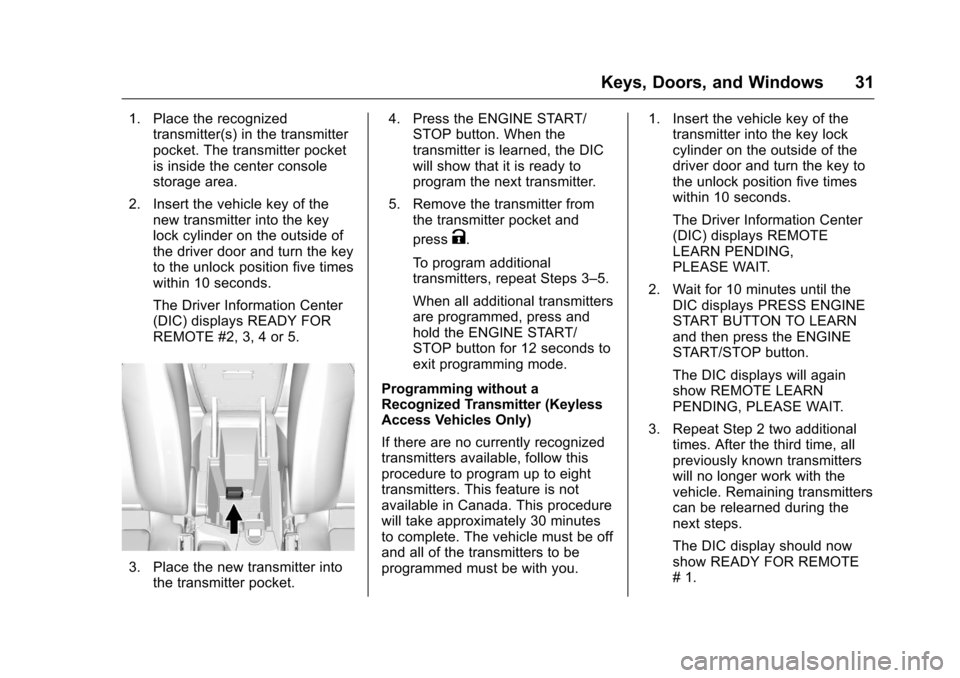
1. Place the recognizedtransmitter(s) in the transmitter
pocket. The transmitter pocket
is inside the center console
storage area.
2. Insert the vehicle key of the new transmitter into the key
lock cylinder on the outside of
the driver door and turn the key
to the unlock position five times
within 10 seconds.
The Driver Information Center
(DIC) displays READY FOR
REMOTE #2, 3, 4 or 5.
3. Place the new transmitter intothe transmitter pocket. 4. Press the ENGINE START/
STOP button. When the
transmitter is learned, the DIC
will show that it is ready to
program the next transmitter.
5. Remove the transmitter from the transmitter pocket and
press
K.
To program additional
transmitters, repeat Steps 3–5.
When all additional transmitters
are programmed, press and
hold the ENGINE START/
STOP button for 12 seconds to
exit programming mode.
Programming without a
Recognized Transmitter (Keyless
Access Vehicles Only)
If there are no currently recognized
transmitters available, follow this
procedure to program up to eight
transmitters. This feature is not
available in Canada. This procedure
will take approximately 30 minutes
to complete. The vehicle must be off
and all of the transmitters to be
programmed must be with you. 1. Insert the vehicle key of the
transmitter into the key lock
cylinder on the outside of the
driver door and turn the key to
the unlock position five times
within 10 seconds.
The Driver Information Center
(DIC) displays REMOTE
LEARN PENDING,
PLEASE WAIT.
2. Wait for 10 minutes until the DIC displays PRESS ENGINE
START BUTTON TO LEARN
and then press the ENGINE
START/STOP button.
The DIC displays will again
show REMOTE LEARN
PENDING, PLEASE WAIT.
3. Repeat Step 2 two additional times. After the third time, all
previously known transmitters
will no longer work with the
vehicle. Remaining transmitters
can be relearned during the
next steps.
The DIC display should now
show READY FOR REMOTE
# 1.
Page 33 of 360
Chevrolet Malibu Limited Owner Manual (GMNA-Localizing-U.S/Canada-
9086425) - 2016 - crc - 7/31/15
32 Keys, Doors, and Windows
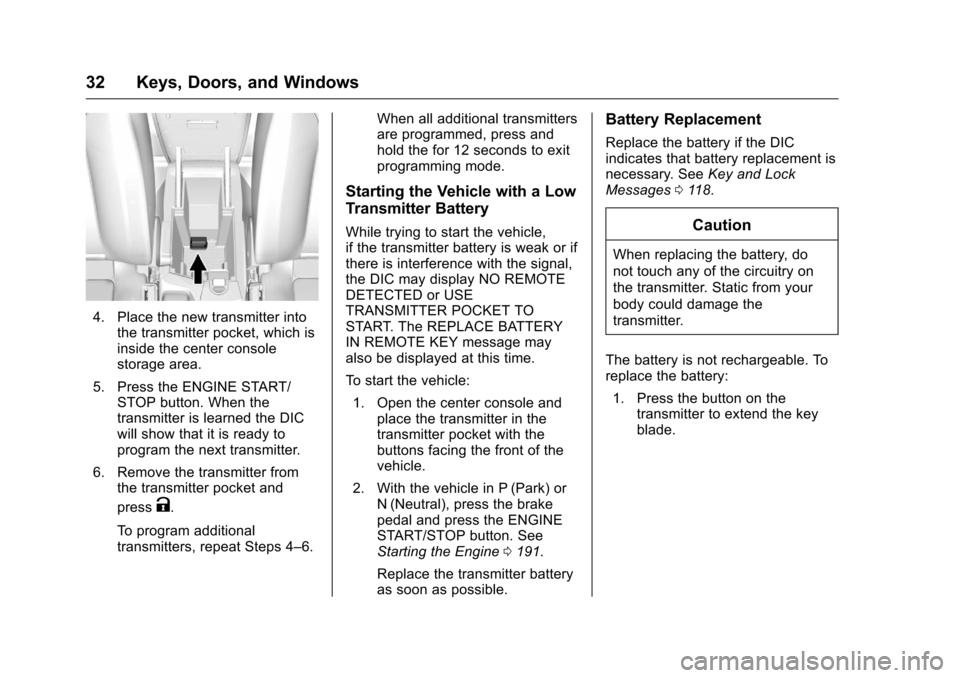
4. Place the new transmitter intothe transmitter pocket, which is
inside the center console
storage area.
5. Press the ENGINE START/ STOP button. When the
transmitter is learned the DIC
will show that it is ready to
program the next transmitter.
6. Remove the transmitter from the transmitter pocket and
press
K.
To program additional
transmitters, repeat Steps 4–6. When all additional transmitters
are programmed, press and
hold the for 12 seconds to exit
programming mode.
Starting the Vehicle with a Low
Transmitter Battery
While trying to start the vehicle,
if the transmitter battery is weak or if
there is interference with the signal,
the DIC may display NO REMOTE
DETECTED or USE
TRANSMITTER POCKET TO
START. The REPLACE BATTERY
IN REMOTE KEY message may
also be displayed at this time.
To start the vehicle:
1. Open the center console and place the transmitter in the
transmitter pocket with the
buttons facing the front of the
vehicle.
2. With the vehicle in P (Park) or N (Neutral), press the brake
pedal and press the ENGINE
START/STOP button. See
Starting the Engine 0191.
Replace the transmitter battery
as soon as possible.
Battery Replacement
Replace the battery if the DIC
indicates that battery replacement is
necessary. See Key and Lock
Messages 0118.
Caution
When replacing the battery, do
not touch any of the circuitry on
the transmitter. Static from your
body could damage the
transmitter.
The battery is not rechargeable. To
replace the battery: 1. Press the button on the transmitter to extend the key
blade.
Page 68 of 360
Chevrolet Malibu Limited Owner Manual (GMNA-Localizing-U.S/Canada-
9086425) - 2016 - crc - 7/30/15
Seats and Restraints 67
How Does an Airbag
Restrain?
In moderate to severe frontal or
near frontal collisions, even belted
occupants can contact the steering
wheel or the instrument panel. In
moderate to severe side collisions,
even belted occupants can contact
the inside of the vehicle.
Airbags supplement the protection
provided by safety belts by
distributing the force of the impact
more evenly over the
occupant's body.
Rollover capable roof-rail airbags
are designed to help contain the
head and chest of occupants in the
outboard seating positions in the
first and second rows. The rollover
capable roof-rail airbags are
designed to help reduce the risk of
full or partial ejection in rollover
events, although no system can
prevent all such ejections.But airbags would not help in many
types of collisions, primarily
because the occupant's motion is
not toward those airbags. See
When
Should an Airbag Inflate? 065.
Airbags should never be regarded
as anything more than a supplement
to safety belts.
What Will You See after
an Airbag Inflates?
After the frontal, knee, and
seat-mounted side impact airbags
inflate, they quickly deflate, so
quickly that some people may not
even realize an airbag inflated.
Roof-rail airbags may still be at least
partially inflated for some time after
they inflate. Some components of
the airbag module may be hot for
several minutes. For location of the
airbags, see Where Are the
Airbags? 064.
The parts of the airbag that come
into contact with you may be warm,
but not too hot to touch. There may
be some smoke and dust coming
from the vents in the deflated
airbags. Airbag inflation does not prevent the driver from seeing out of
the windshield or being able to steer
the vehicle, nor does it prevent
people from leaving the vehicle.
{Warning
When an airbag inflates, there
may be dust in the air. This dust
could cause breathing problems
for people with a history of
asthma or other breathing trouble.
To avoid this, everyone in the
vehicle should get out as soon as
it is safe to do so. If you have
breathing problems but cannot
get out of the vehicle after an
airbag inflates, then get fresh air
by opening a window or a door.
If you experience breathing
problems following an airbag
deployment, you should seek
medical attention.
The vehicle has a feature that may
automatically unlock the doors, turn
on the interior lamps and hazard
warning flashers, and shut off the
fuel system after the airbags inflate.
Page 69 of 360

Chevrolet Malibu Limited Owner Manual (GMNA-Localizing-U.S/Canada-
9086425) - 2016 - crc - 7/30/15
68 Seats and Restraints
The feature may also activate,
without airbag inflation, after an
event that exceeds a predetermined
threshold. You can lock the doors,
and turn off the interior lamps and
hazard warning flashers by using
the controls for those features.
{Warning
A crash severe enough to inflate
the airbags may have also
damaged important functions in
the vehicle, such as the fuel
system, brake and steering
systems, etc. Even if the vehicle
appears to be drivable after a
moderate crash, there may be
concealed damage that could
make it difficult to safely operate
the vehicle.
Use caution if you should attempt
to restart the engine after a crash
has occurred.
In many crashes severe enough to
inflate the airbag, windshields are
broken by vehicle deformation. Additional windshield breakage may
also occur from the front outboard
passenger airbag.
.
Airbags are designed to inflate
only once. After an airbag
inflates, you will need some new
parts for the airbag system.
If you do not get them, the
airbag system will not be there
to help protect you in another
crash. A new system will include
airbag modules and possibly
other parts. The service manual
for the vehicle covers the need
to replace other parts.
. The vehicle has a crash sensing
and diagnostic module which
records information after a
crash. See Vehicle Data
Recording and Privacy 0336
and Event Data Recorders
0 337.
. Let only qualified technicians
work on the airbag systems.
Improper service can mean that
an airbag system will not work
properly. See your dealer for
service.
Passenger Sensing
System
The vehicle has a passenger
sensing system for the front
outboard passenger position. The
passenger airbag status indicator
will light on the overhead console
when the vehicle is started.
United States
Canada
The words ON and OFF, or the
symbol for on and off, will be visible
during the system check. When the
system check is complete, either the
word ON or OFF, or the symbol for
Page 107 of 360
Chevrolet Malibu Limited Owner Manual (GMNA-Localizing-U.S/Canada-
9086425) - 2016 - crc - 7/30/15
106 Instruments and Controls
Malfunction Indicator
Lamp (Check Engine
Light)
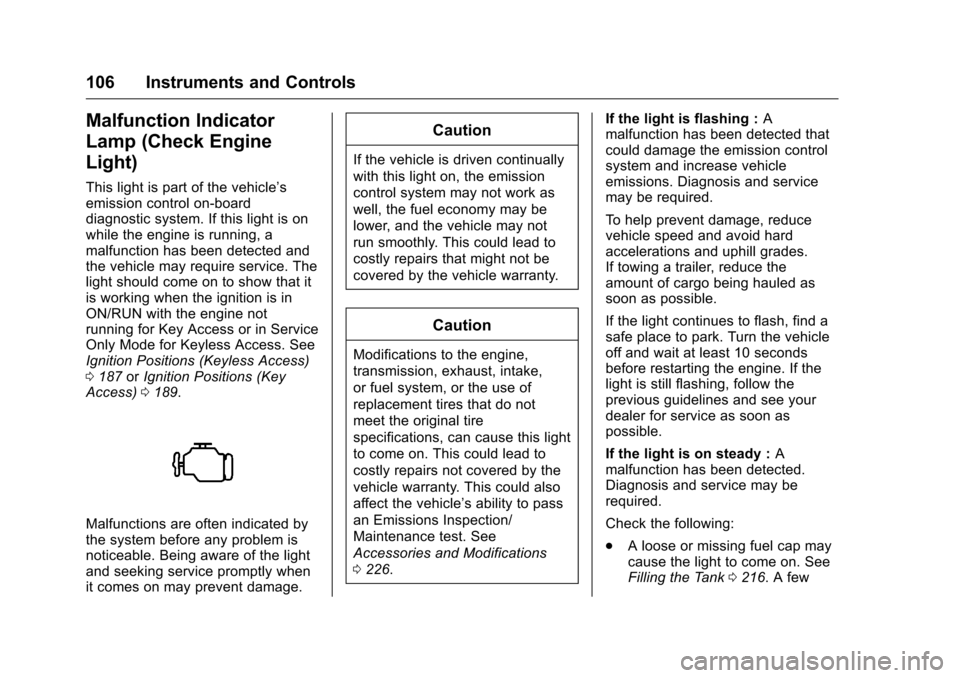
This light is part of the vehicle’s
emission control on-board
diagnostic system. If this light is on
while the engine is running, a
malfunction has been detected and
the vehicle may require service. The
light should come on to show that it
is working when the ignition is in
ON/RUN with the engine not
running for Key Access or in Service
Only Mode for Keyless Access. See
Ignition Positions (Keyless Access)
0187 orIgnition Positions (Key
Access) 0189.
Malfunctions are often indicated by
the system before any problem is
noticeable. Being aware of the light
and seeking service promptly when
it comes on may prevent damage.
Caution
If the vehicle is driven continually
with this light on, the emission
control system may not work as
well, the fuel economy may be
lower, and the vehicle may not
run smoothly. This could lead to
costly repairs that might not be
covered by the vehicle warranty.
Caution
Modifications to the engine,
transmission, exhaust, intake,
or fuel system, or the use of
replacement tires that do not
meet the original tire
specifications, can cause this light
to come on. This could lead to
costly repairs not covered by the
vehicle warranty. This could also
affect the vehicle’s ability to pass
an Emissions Inspection/
Maintenance test. See
Accessories and Modifications
0226. If the light is flashing :
A
malfunction has been detected that
could damage the emission control
system and increase vehicle
emissions. Diagnosis and service
may be required.
To help prevent damage, reduce
vehicle speed and avoid hard
accelerations and uphill grades.
If towing a trailer, reduce the
amount of cargo being hauled as
soon as possible.
If the light continues to flash, find a
safe place to park. Turn the vehicle
off and wait at least 10 seconds
before restarting the engine. If the
light is still flashing, follow the
previous guidelines and see your
dealer for service as soon as
possible.
If the light is on steady : A
malfunction has been detected.
Diagnosis and service may be
required.
Check the following:
. A loose or missing fuel cap may
cause the light to come on. See
Filling the Tank 0216. A few