2016 CHEVROLET MALIBU LIMITED manual transmission
[x] Cancel search: manual transmissionPage 257 of 360
Chevrolet Malibu Limited Owner Manual (GMNA-Localizing-U.S/Canada-
9086425) - 2016 - crc - 7/30/15
256 Vehicle Care
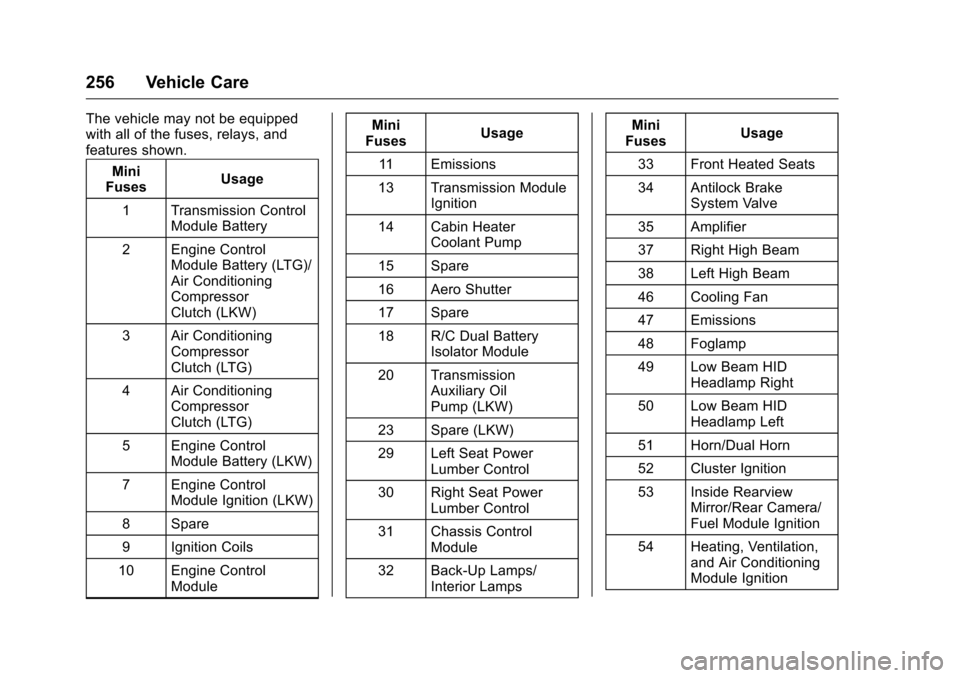
The vehicle may not be equipped
with all of the fuses, relays, and
features shown.Mini
Fuses Usage
1 Transmission Control Module Battery
2 Engine Control Module Battery (LTG)/
Air Conditioning
Compressor
Clutch (LKW)
3 Air Conditioning Compressor
Clutch (LTG)
4 Air Conditioning Compressor
Clutch (LTG)
5 Engine Control Module Battery (LKW)
7 Engine Control Module Ignition (LKW)
8 Spare
9 Ignition Coils
10 Engine Control Module Mini
Fuses Usage
11 Emissions
13 Transmission Module Ignition
14 Cabin Heater Coolant Pump
15 Spare
16 Aero Shutter
17 Spare
18 R/C Dual Battery Isolator Module
20 Transmission Auxiliary Oil
Pump (LKW)
23 Spare (LKW)
29 Left Seat Power Lumber Control
30 Right Seat Power Lumber Control
31 Chassis Control Module
32 Back-Up Lamps/ Interior Lamps Mini
Fuses Usage
33 Front Heated Seats
34 Antilock Brake System Valve
35 Amplifier
37 Right High Beam
38 Left High Beam
46 Cooling Fan
47 Emissions
48 Foglamp
49 Low Beam HID Headlamp Right
50 Low Beam HID Headlamp Left
51 Horn/Dual Horn
52 Cluster Ignition
53 Inside Rearview Mirror/Rear Camera/
Fuel Module Ignition
54 Heating, Ventilation, and Air Conditioning
Module Ignition
Page 258 of 360
Chevrolet Malibu Limited Owner Manual (GMNA-Localizing-U.S/Canada-
9086425) - 2016 - crc - 7/30/15
Vehicle Care 257
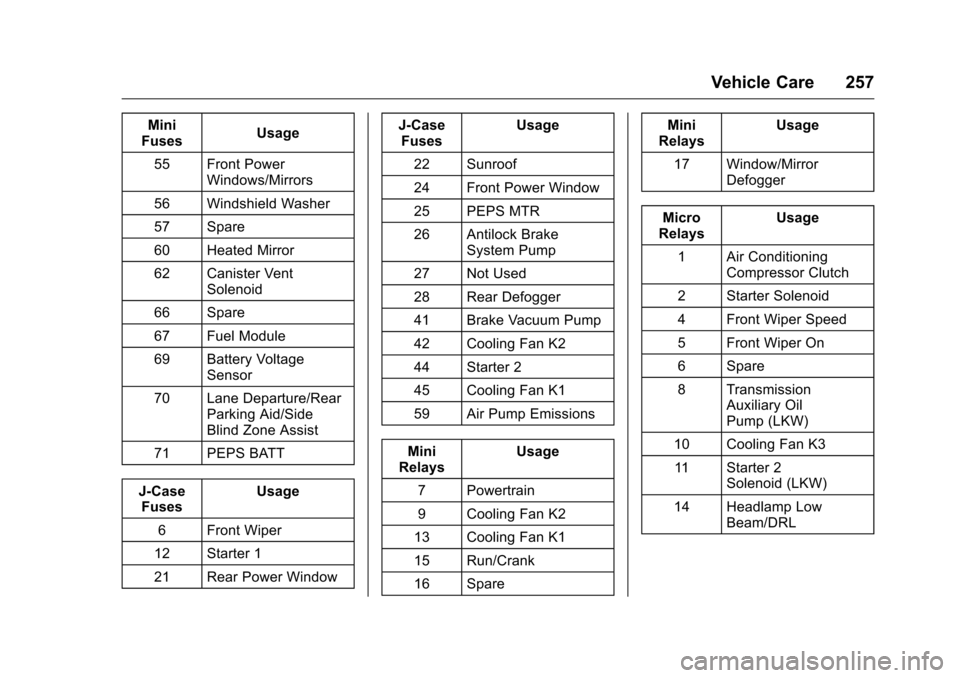
Mini
Fuses Usage
55 Front Power Windows/Mirrors
56 Windshield Washer
57 Spare
60 Heated Mirror
62 Canister Vent Solenoid
66 Spare
67 Fuel Module
69 Battery Voltage Sensor
70 Lane Departure/Rear Parking Aid/Side
Blind Zone Assist
71 PEPS BATT
J-Case Fuses Usage
6 Front Wiper
12 Starter 1
21 Rear Power Window J-Case
Fuses Usage
22 Sunroof
24 Front Power Window
25 PEPS MTR
26 Antilock Brake System Pump
27 Not Used
28 Rear Defogger
41 Brake Vacuum Pump
42 Cooling Fan K2
44 Starter 2
45 Cooling Fan K1
59 Air Pump Emissions
Mini
Relays Usage
7 Powertrain
9 Cooling Fan K2
13 Cooling Fan K1
15 Run/Crank
16 Spare Mini
Relays Usage
17 Window/Mirror Defogger
Micro
Relays Usage
1 Air Conditioning Compressor Clutch
2 Starter Solenoid
4 Front Wiper Speed
5 Front Wiper On
6 Spare
8 Transmission Auxiliary Oil
Pump (LKW)
10 Cooling Fan K3 11 Starter 2 Solenoid (LKW)
14 Headlamp Low Beam/DRL
Page 266 of 360
Chevrolet Malibu Limited Owner Manual (GMNA-Localizing-U.S/Canada-
9086425) - 2016 - crc - 7/30/15
Vehicle Care 265
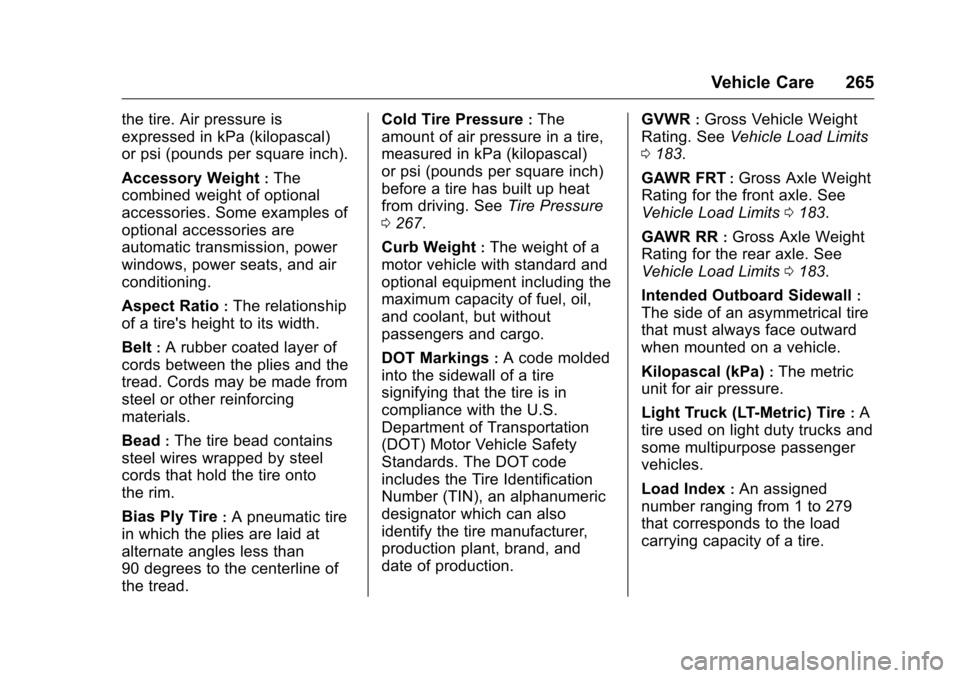
the tire. Air pressure is
expressed in kPa (kilopascal)
or psi (pounds per square inch).
Accessory Weight
:The
combined weight of optional
accessories. Some examples of
optional accessories are
automatic transmission, power
windows, power seats, and air
conditioning.
Aspect Ratio
:The relationship
of a tire's height to its width.
Belt
:A rubber coated layer of
cords between the plies and the
tread. Cords may be made from
steel or other reinforcing
materials.
Bead
:The tire bead contains
steel wires wrapped by steel
cords that hold the tire onto
the rim.
Bias Ply Tire
:A pneumatic tire
in which the plies are laid at
alternate angles less than
90 degrees to the centerline of
the tread. Cold Tire Pressure
:The
amount of air pressure in a tire,
measured in kPa (kilopascal)
or psi (pounds per square inch)
before a tire has built up heat
from driving. See Tire Pressure
0 267.
Curb Weight
:The weight of a
motor vehicle with standard and
optional equipment including the
maximum capacity of fuel, oil,
and coolant, but without
passengers and cargo.
DOT Markings
:A code molded
into the sidewall of a tire
signifying that the tire is in
compliance with the U.S.
Department of Transportation
(DOT) Motor Vehicle Safety
Standards. The DOT code
includes the Tire Identification
Number (TIN), an alphanumeric
designator which can also
identify the tire manufacturer,
production plant, brand, and
date of production. GVWR
:Gross Vehicle Weight
Rating. See Vehicle Load Limits
0 183.
GAWR FRT
:Gross Axle Weight
Rating for the front axle. See
Vehicle Load Limits 0183.
GAWR RR
:Gross Axle Weight
Rating for the rear axle. See
Vehicle Load Limits 0183.
Intended Outboard Sidewall
:
The side of an asymmetrical tire
that must always face outward
when mounted on a vehicle.
Kilopascal (kPa)
:The metric
unit for air pressure.
Light Truck (LT-Metric) Tire
:A
tire used on light duty trucks and
some multipurpose passenger
vehicles.
Load Index
:An assigned
number ranging from 1 to 279
that corresponds to the load
carrying capacity of a tire.
Page 282 of 360
Chevrolet Malibu Limited Owner Manual (GMNA-Localizing-U.S/Canada-
9086425) - 2016 - crc - 7/30/15
Vehicle Care 281
Warning (Continued)
2. Put an automatictransmission in P (Park) or a
manual transmission in
1 (First) or R (Reverse).
3. Turn off the engine and do not restart while the vehicle
is raised.
4. Do not allow passengers to remain in the vehicle.
5. Place wheel blocks, if equipped, on both sides of
the tire at the opposite
corner of the tire being
changed.
This vehicle may come with a jack
and spare tire or a tire sealant and
compressor kit. To use the jacking
equipment to change a spare tire
safely, follow the instructions below.
Then see Tire Changing 0287. To
use the tire sealant and compressor
kit, see Tire Sealant and
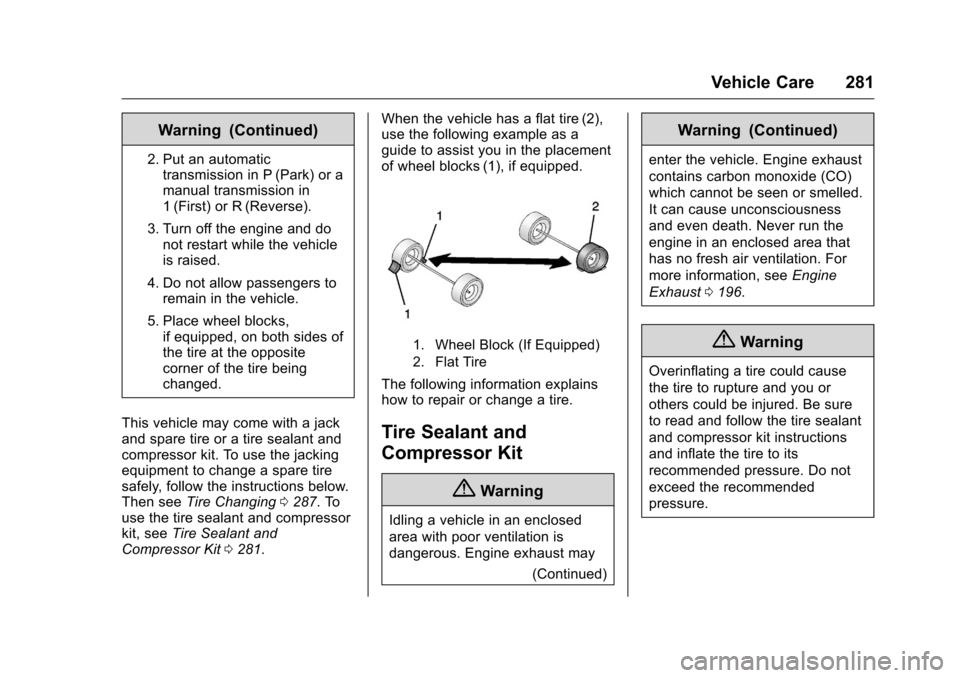
Compressor Kit 0281. When the vehicle has a flat tire (2),
use the following example as a
guide to assist you in the placement
of wheel blocks (1), if equipped.
1. Wheel Block (If Equipped)
2. Flat Tire
The following information explains
how to repair or change a tire.
Tire Sealant and
Compressor Kit
{Warning
Idling a vehicle in an enclosed
area with poor ventilation is
dangerous. Engine exhaust may
(Continued)
Warning (Continued)
enter the vehicle. Engine exhaust
contains carbon monoxide (CO)
which cannot be seen or smelled.
It can cause unconsciousness
and even death. Never run the
engine in an enclosed area that
has no fresh air ventilation. For
more information, seeEngine
Exhaust 0196.
{Warning
Overinflating a tire could cause
the tire to rupture and you or
others could be injured. Be sure
to read and follow the tire sealant
and compressor kit instructions
and inflate the tire to its
recommended pressure. Do not
exceed the recommended
pressure.
Page 295 of 360
Chevrolet Malibu Limited Owner Manual (GMNA-Localizing-U.S/Canada-
9086425) - 2016 - crc - 7/30/15
294 Vehicle Care
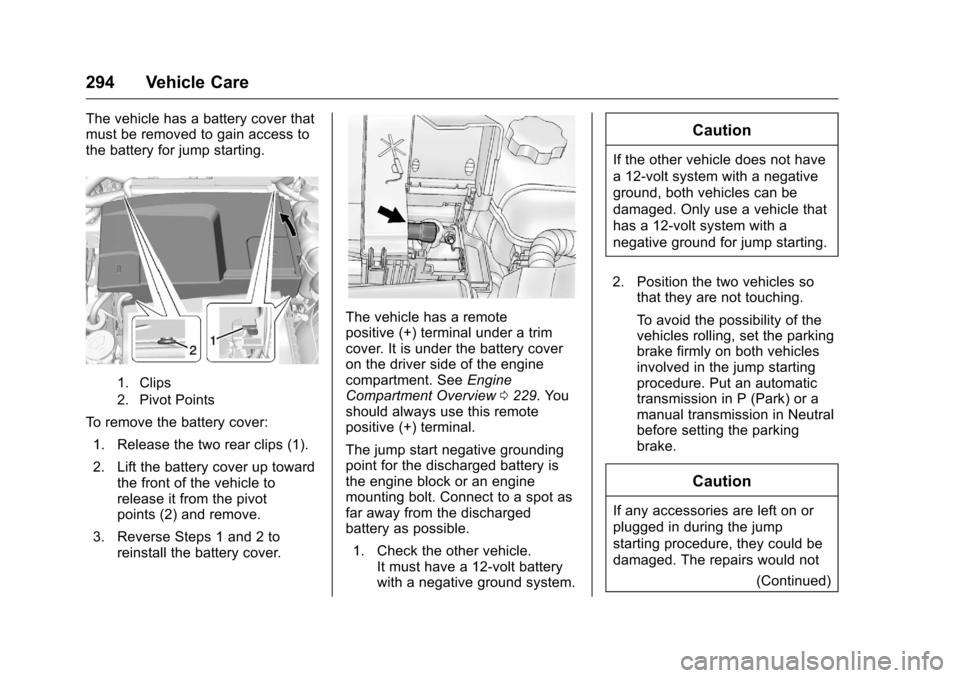
The vehicle has a battery cover that
must be removed to gain access to
the battery for jump starting.
1. Clips
2. Pivot Points
To remove the battery cover:1. Release the two rear clips (1).
2. Lift the battery cover up toward the front of the vehicle to
release it from the pivot
points (2) and remove.
3. Reverse Steps 1 and 2 to reinstall the battery cover.
The vehicle has a remote
positive (+) terminal under a trim
cover. It is under the battery cover
on the driver side of the engine
compartment. See Engine
Compartment Overview 0229. You
should always use this remote
positive (+) terminal.
The jump start negative grounding
point for the discharged battery is
the engine block or an engine
mounting bolt. Connect to a spot as
far away from the discharged
battery as possible.
1. Check the other vehicle. It must have a 12-volt battery
with a negative ground system.
Caution
If the other vehicle does not have
a 12-volt system with a negative
ground, both vehicles can be
damaged. Only use a vehicle that
has a 12-volt system with a
negative ground for jump starting.
2. Position the two vehicles so that they are not touching.
To avoid the possibility of the
vehicles rolling, set the parking
brake firmly on both vehicles
involved in the jump starting
procedure. Put an automatic
transmission in P (Park) or a
manual transmission in Neutral
before setting the parking
brake.
Caution
If any accessories are left on or
plugged in during the jump
starting procedure, they could be
damaged. The repairs would not
(Continued)
Page 298 of 360
Chevrolet Malibu Limited Owner Manual (GMNA-Localizing-U.S/Canada-
9086425) - 2016 - crc - 7/30/15
Vehicle Care 297
.Does the vehicle have the
proper towing equipment? See
your dealer or trailering
professional for additional advice
and equipment
recommendations.
. Is the vehicle ready to be
towed? Just as preparing the
vehicle for a long trip, make sure
the vehicle is prepared to be
towed.
Dinghy Towing
Vehicles equipped with an active
shutter system cannot be dinghy
towed without the tow equipment
damaging the vehicle. See “Dolly
Towing” following for the correct way
to tow a vehicle with an active
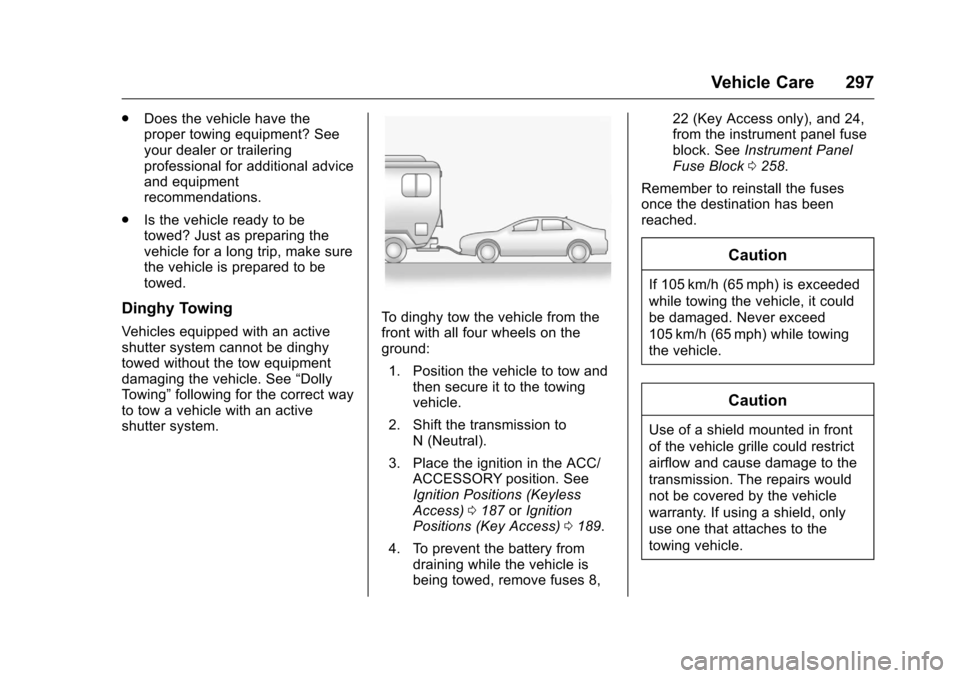
shutter system.To dinghy tow the vehicle from the
front with all four wheels on the
ground:
1. Position the vehicle to tow and then secure it to the towing
vehicle.
2. Shift the transmission to N (Neutral).
3. Place the ignition in the ACC/ ACCESSORY position. See
Ignition Positions (Keyless
Access) 0187 orIgnition
Positions (Key Access) 0189.
4. To prevent the battery from draining while the vehicle is
being towed, remove fuses 8, 22 (Key Access only), and 24,
from the instrument panel fuse
block. See
Instrument Panel
Fuse Block 0258.
Remember to reinstall the fuses
once the destination has been
reached.
Caution
If 105 km/h (65 mph) is exceeded
while towing the vehicle, it could
be damaged. Never exceed
105 km/h (65 mph) while towing
the vehicle.
Caution
Use of a shield mounted in front
of the vehicle grille could restrict
airflow and cause damage to the
transmission. The repairs would
not be covered by the vehicle
warranty. If using a shield, only
use one that attaches to the
towing vehicle.
Page 311 of 360
Chevrolet Malibu Limited Owner Manual (GMNA-Localizing-U.S/Canada-
9086425) - 2016 - crc - 7/30/15
310 Service and Maintenance
a year and the oil life system must
be reset. Your trained dealer
technician can perform this work.
If the engine oil life system is reset
accidentally, service the vehicle
within 5 000 km/3,000 mi since the
last service. Reset the oil life
system when the oil is changed.
SeeEngine Oil Life System 0232.
Tire Rotation and Required
Services Every 12 000 km/
7,500 mi
Rotate the tires, if recommended for
the vehicle, and perform the
following services. See Tire
Rotation 0273.
. Check engine oil level and oil
life percentage. If needed,
change engine oil and filter, and
reset oil life system. See Engine
Oil 0230 andEngine Oil Life
System 0232. .
Check engine coolant level. See
Engine Coolant 0235.
. Check windshield washer fluid
level. See Washer Fluid 0239.
. Visually inspect windshield wiper
blades for wear, cracking,
or contamination. See Exterior
Care 0298. Replace worn or
damaged wiper blades. See
Wiper Blade Replacement
0 244.
. Check tire inflation pressures.
See Tire Pressure 0267.
. Inspect tire wear. See Tire
Inspection 0273.
. Visually check for fluid leaks.
. Inspect engine air cleaner filter.
See Engine Air Cleaner/Filter
0 233.
. Inspect brake system. See
Exterior Care 0298. .
Visually inspect steering,
suspension, and chassis
components for damaged, loose,
or missing parts or signs of
wear. See Exterior Care 0298.
. Check restraint system
components. See Safety System
Check 061.
. Visually inspect fuel system for
damage or leaks.
. Visually inspect exhaust system
and nearby heat shields for
loose or damaged parts.
. Lubricate body components. See
Exterior Care 0298.
. Check starter switch. See Starter
Switch Check 0243.
. Check automatic transmission
shift lock control function. See
Automatic Transmission Shift
Lock Control Function Check
0243.
Page 312 of 360
Chevrolet Malibu Limited Owner Manual (GMNA-Localizing-U.S/Canada-
9086425) - 2016 - crc - 7/30/15
Service and Maintenance 311
.Check ignition transmission lock
(If equipped with a key type
ignition). See Ignition
Transmission Lock Check 0243.
. Check parking brake and
automatic transmission park
mechanism. See Park Brake and
P (Park) Mechanism Check
0 243.
. Check accelerator pedal for
damage, high effort, or binding.
Replace if needed.
. Visually inspect gas strut for
signs of wear, cracks, or other
damage. Check the hold open
ability of the strut. See your
dealer if service is required.
. Check tire sealant expiration
date, if equipped. See Tire
Sealant and Compressor Kit
0 281.
. Inspect sunroof track and seal,
if equipped. See Sunroof046.