2016 CHEVROLET MALIBU LIMITED remove seats
[x] Cancel search: remove seatsPage 89 of 360
Chevrolet Malibu Limited Owner Manual (GMNA-Localizing-U.S/Canada-
9086425) - 2016 - crc - 7/30/15
88 Seats and Restraints
Replacing LATCH System
Parts After a Crash
{Warning
A crash can damage the LATCH
system in the vehicle. A damaged
LATCH system may not properly
secure the child restraint,
resulting in serious injury or even
death in a crash. To help make
sure the LATCH system is
working properly after a crash,
see your dealer to have the
system inspected and any
necessary replacements made as
soon as possible.
If the vehicle has the LATCH system
and it was being used during a
crash, new LATCH system parts
may be needed.
New parts and repairs may be
necessary even if the LATCH
system was not being used at the
time of the crash.
Securing Child Restraints
(Rear Seat)
When securing a child restraint in a
rear seating position, study the
instructions that came with the child
restraint to make sure it is
compatible with this vehicle.
If the child restraint has the LATCH
system, see Lower Anchors and
Tethers for Children (LATCH
System) 081 for how and where to
install the child restraint using
LATCH. If a child restraint is
secured in the vehicle using a
safety belt and it uses a top tether,
see Lower Anchors and Tethers for
Children (LATCH System) 081 for
top tether anchor locations.
Do not secure a child seat in a
position without a top tether anchor
if a national or local law requires
that the top tether be anchored, or if
the instructions that come with the
child restraint say that the top strap
must be anchored. In Canada, the law requires that
forward-facing child restraints have
a top tether, and that the tether be
attached.
If the child restraint or vehicle seat
position does not have the LATCH
system, you will be using the safety
belt to secure the child restraint in
this position. Be sure to follow the
instructions that came with the child
restraint. Secure the child in the
child restraint when and as the
instructions say.
If more than one child restraint
needs to be installed in the rear
seat, be sure to read
Where to Put
the Restraint 080.
1. Put the child restraint on the seat.
If the head restraint interferes
with the proper installation of
the child restraint, the head
restraint may be removed. See
“Head Restraint Removal and
Reinstallation” underLower
Anchors and Tethers for
Children (LATCH System) 081.
Page 91 of 360
Chevrolet Malibu Limited Owner Manual (GMNA-Localizing-U.S/Canada-
9086425) - 2016 - crc - 7/30/15
90 Seats and Restraints
6. If the child restraint has a toptether, follow the child restraint
manufacturer's instructions
regarding the use of the top
tether. See Lower Anchors and
Tethers for Children (LATCH
System) 081.
7. Before placing a child in the child restraint, make sure it is
securely held in place. To
check, grasp the child restraint
at the safety belt path and
attempt to move it side to side
and back and forth. When the
child restraint is properly
installed, there should be no
more than 2.5 cm (1 in) of
movement.
To remove the child restraint,
unbuckle the vehicle safety belt and
let it return to the stowed position.
If the top tether is attached to a top
tether anchor, disconnect it. If the
head restraint was removed,
reinstall it before the seating
position is used. See “Head
Restraint Removal and
Reinstallation” underLower Anchors
and Tethers for Children (LATCH
System) 081.Securing Child Restraints
(Front Passenger Seat)
This vehicle has airbags. A rear
seat is a safer place to secure a
forward-facing child restraint. See
Where to Put the Restraint 080.
In addition, the vehicle has a
passenger sensing system which is
designed to turn off the front
outboard passenger frontal airbag
and knee airbag under certain
conditions. See Passenger Sensing
System 068 and Passenger Airbag
Status Indicator 0104 for more
information, including important
safety information.
Never put a rear-facing child seat in
the front. This is because the risk to
the rear-facing child is so great,
if the airbag deploys.
{Warning
A child in a rear-facing child
restraint can be seriously injured
or killed if the front outboard
passenger frontal airbag inflates.
(Continued)
Warning (Continued)
This is because the back of the
rear-facing child restraint would
be very close to the inflating
airbag. A child in a forward-facing
child restraint can be seriously
injured or killed if the front
outboard passenger frontal airbag
inflates and the passenger seat is
in a forward position.
Even if the passenger sensing
system has turned off the front
outboard passenger frontal
airbag, no system is fail-safe. No
one can guarantee that an airbag
will not deploy under some
unusual circumstance, even
though it is turned off.
Secure rear-facing child restraints
in a rear seat, even if the airbag
is off. If you secure a
forward-facing child restraint in
the front seat, always move the
(Continued)
Page 93 of 360
Chevrolet Malibu Limited Owner Manual (GMNA-Localizing-U.S/Canada-
9086425) - 2016 - crc - 7/30/15
92 Seats and Restraints
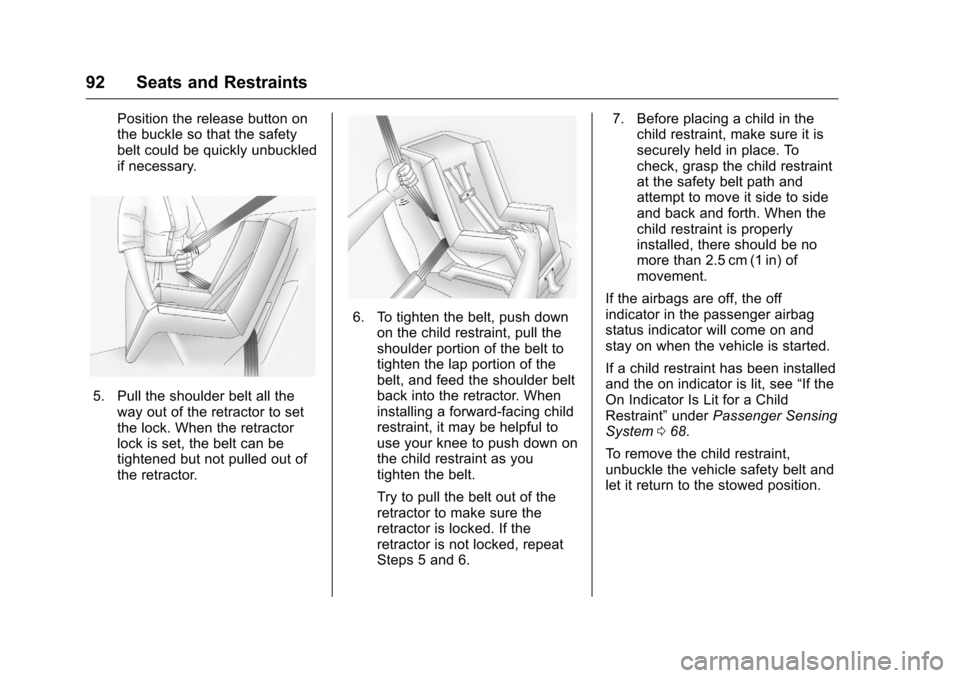
Position the release button on
the buckle so that the safety
belt could be quickly unbuckled
if necessary.
5. Pull the shoulder belt all theway out of the retractor to set
the lock. When the retractor
lock is set, the belt can be
tightened but not pulled out of
the retractor.
6. To tighten the belt, push downon the child restraint, pull the
shoulder portion of the belt to
tighten the lap portion of the
belt, and feed the shoulder belt
back into the retractor. When
installing a forward-facing child
restraint, it may be helpful to
use your knee to push down on
the child restraint as you
tighten the belt.
Try to pull the belt out of the
retractor to make sure the
retractor is locked. If the
retractor is not locked, repeat
Steps 5 and 6. 7. Before placing a child in the
child restraint, make sure it is
securely held in place. To
check, grasp the child restraint
at the safety belt path and
attempt to move it side to side
and back and forth. When the
child restraint is properly
installed, there should be no
more than 2.5 cm (1 in) of
movement.
If the airbags are off, the off
indicator in the passenger airbag
status indicator will come on and
stay on when the vehicle is started.
If a child restraint has been installed
and the on indicator is lit, see “If the
On Indicator Is Lit for a Child
Restraint” underPassenger Sensing
System 068.
To remove the child restraint,
unbuckle the vehicle safety belt and
let it return to the stowed position.
Page 138 of 360
Chevrolet Malibu Limited Owner Manual (GMNA-Localizing-U.S/Canada-
9086425) - 2016 - crc - 7/30/15
Lighting 137
Lighting Features
Entry Lighting
Some exterior lamps and most of
the interior lights turn on briefly
when the Remote Keyless Entry
(RKE) transmitter
Kbutton is
pressed. After about 30 seconds the
exterior lamps turn off, then the
dome lamps and remaining interior
lights dim to off. Entry lighting can
be disabled manually by changing
the ignition out of the OFF position,
or by pressing the RKE transmitter
Qbutton.
This feature can be changed. See
Vehicle Personalization 0122.
Exit Lighting
Some exterior lamps come on at
night, or in areas with limited
lighting, when the key is removed
from the ignition. The dome lamps
also come on when the key is
removed from the ignition. The
exterior lamps and dome lamps remain on after the door is closed
for a set amount of time, then
automatically turn off.
For vehicles with Keyless Access,
the exterior lamps automatically turn
on when a door is opened after the
ignition is changed to the OFF
position. The dome lamps also
come on after the ignition is
changed to the OFF position. See
Ignition Positions (Keyless Access)
0
187 orIgnition Positions (Key
Access) 0189.
The exterior lamps turn off
immediately by turning the exterior
lamps control off.
This feature can be changed. See
Vehicle Personalization 0122.
Battery Load
Management
The vehicle has Electric Power
Management (EPM), which
estimates the battery's temperature
and state of charge. It then adjusts
the voltage for best performance
and extended life of the battery. When the battery's state of charge
is low, the voltage is raised slightly
to quickly bring the charge back up.
When the state of charge is high,
the voltage is lowered slightly to
prevent overcharging. If the vehicle
has a voltage display on the Driver
Information Center (DIC), you may
see the voltage move up or down.
This is normal. If there is a problem,
an alert will be displayed.
The battery can be discharged at
idle if the electrical loads are very
high. This is true for all vehicles.
This is because the generator
(alternator) may not be spinning fast
enough at idle to produce all the
power that is needed for very high
electrical loads.
A high electrical load occurs when
several of the following are on, such
as: headlamps, high beams, fog
lamps, rear window defogger,
climate control fan at high speed,
heated seats, engine cooling fans,
trailer loads, and loads plugged into
accessory power outlets.
Page 175 of 360
Chevrolet Malibu Limited Owner Manual (GMNA-Localizing-U.S/Canada-
9086425) - 2016 - crc - 7/30/15
174 Climate Controls
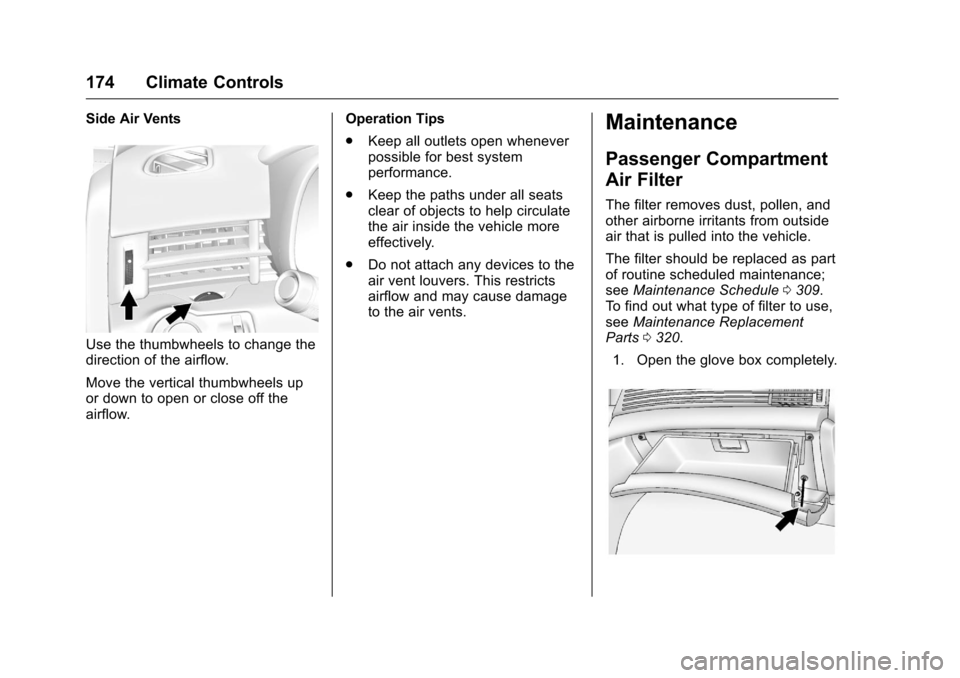
Side Air Vents
Use the thumbwheels to change the
direction of the airflow.
Move the vertical thumbwheels up
or down to open or close off the
airflow.Operation Tips
.
Keep all outlets open whenever
possible for best system
performance.
. Keep the paths under all seats
clear of objects to help circulate
the air inside the vehicle more
effectively.
. Do not attach any devices to the
air vent louvers. This restricts
airflow and may cause damage
to the air vents.
Maintenance
Passenger Compartment
Air Filter
The filter removes dust, pollen, and
other airborne irritants from outside
air that is pulled into the vehicle.
The filter should be replaced as part
of routine scheduled maintenance;
see Maintenance Schedule 0309.
To find out what type of filter to use,
see Maintenance Replacement
Parts 0320.
1. Open the glove box completely.