2016 CHEVROLET MALIBU LIMITED radio
[x] Cancel search: radioPage 99 of 360

Chevrolet Malibu Limited Owner Manual (GMNA-Localizing-U.S/Canada-
9086425) - 2016 - crc - 7/30/15
98 Instruments and Controls
activated. SeeWasher Fluid0239
for information on filling the
windshield washer fluid reservoir.
Clear snow and ice from the wiper
blades and windshield before using
them. If frozen to the windshield,
carefully loosen or thaw them.
Damaged blades should be
replaced. See Wiper Blade
Replacement 0244.
Heavy snow or ice can overload the
wiper motor.
Wiper Parking
If the ignition is put in OFF while the
wipers are on LO, HI, or INT, they
will immediately stop.
If the windshield wiper lever is then
moved to OFF before the driver
door is opened or within 10 minutes,
the wipers will restart and move to
the base of the windshield.
If the ignition is put in OFF while the
wipers are performing wipes due to
windshield washing, the wipers
continue to run until they reach the
base of the windshield.Compass
The vehicle may have a compass
display on the center stack. The
compass receives its heading and
other information from the Global
Positioning System (GPS) antenna,
StabiliTrak
®, and vehicle speed
information.
The compass system is designed to
operate for a certain number of
miles or degrees of turn before
needing a signal from the GPS
satellites. When the compass
display shows CAL, drive the
vehicle for a short distance in an
open area where it can receive a
GPS signal. The compass system
will automatically determine when a
GPS signal is restored and provide
a heading again. See Compass
Messages 0116 for the messages
that may be displayed for the
compass.
Clock
The infotainment system controls
are used to access the time and
date settings through the menu
system. The clock menu can only be used with the radio on while in
ON/RUN or ACC/ACCESSORY.
See
Overview 0140 for information
about how to use the menu system.
For vehicles with a navigation
system, see the navigation manual.
Setting the Clock (Radio
with CD)
To set the time:
1. Press the CONFIG button and select Time Settings.
2. Select Set Time.
3. Turn the TUNE/MENU knob to adjust the highlighted number.
4. Press the TUNE/MENU knob to select the next number.
5. To save the time and return to the Time Settings menu, press
the BACK
/button at any time
or press the TUNE/MENU knob
after adjusting the minutes.
Setting the 12/24 Hour Format 1. Press the CONFIG button and select Time Settings.
2. Highlight 12/24 Hour Format.
Page 100 of 360

Chevrolet Malibu Limited Owner Manual (GMNA-Localizing-U.S/Canada-
9086425) - 2016 - crc - 7/30/15
Instruments and Controls 99
3. Press the TUNE/MENU knob toselect the 12 hour or 24 hour
display format.
Setting the Clock (Radio with
Touchscreen)
To set the time:
1. Press the CONFIG button to enter the menu options. Turn
the TUNE/MENU knob to scroll
through the available setup
features. Press the TUNE/
MENU knob or press the Time
screen button to display other
options within that feature.
2. Press + or −to increase or
decrease the Hours and
Minutes displayed on the clock.
To turn Auto Set on and off, press
the Auto Set button.
If auto timing is set, the time
displayed on the clock may not
update immediately when driving
into a new time zone.
12/24 HR Format : Press the 12 HR
screen button for standard time;
press the 24 HR screen button for
military time. Day + or Day
−:Press the Day +
or Day −display buttons to increase
or decrease the day.
Display : Press Display to turn the
display of the time on the screen on
or off.
Power Outlets
Power Outlets 12 Volt Direct
Current
The accessory power outlets can be
used to plug in electrical equipment,
such as a cell phone or MP3 player.
There are two accessory power
outlets: one on the center stack
below the climate control system,
and one under the armrest inside
the center console storage.
The outlet is powered when the
ignition is in ON/RUN or ACC/
ACCESSORY, or until the driver
door is opened within 10 minutes of
turning off the vehicle. See Retained
Accessory Power (RAP) 0194.
Open the protective cover to use the
accessory power outlet. Certain electrical accessories may
not be compatible with the
accessory power outlets and could
overload vehicle or adapter fuses.
If there is a problem, see your
dealer.
When adding electrical equipment,
be sure to follow the installation
instructions included with the
equipment. See
Add-On Electrical
Equipment 0223.
Caution
Hanging heavy equipment from
the power outlet can cause
damage not covered by the
vehicle warranty. The power
outlets are designed for
accessory power plugs only, such
as cell phone charge cords.
Power Outlet 110/120 Volt
Alternating Current
If equipped with this power outlet it
can be used to plug in electrical
equipment that uses a maximum
limit of 150 watts.
Page 106 of 360

Chevrolet Malibu Limited Owner Manual (GMNA-Localizing-U.S/Canada-
9086425) - 2016 - crc - 7/30/15
Instruments and Controls 105
United States
Canada
When the vehicle is started, the
passenger airbag status indicator
will light ON and OFF, or the symbol
for on and off, for several seconds
as a system check. Then, after
several more seconds, the status
indicator will light either ON or OFF,
or either the on or off symbol, to let
you know the status of the front
outboard passenger frontal airbag
and knee airbag.
If the word ON or the on symbol is
lit on the passenger airbag status
indicator, it means that the front outboard passenger frontal airbag
and knee airbag are allowed to
inflate.
If the word OFF or the off symbol is
lit on the airbag status indicator, it
means that the passenger sensing
system has turned off the front
outboard passenger frontal airbag
and knee airbag.
If, after several seconds, both status
indicator lights remain on, or if there
are no lights at all, there may be a
problem with the lights or the
passenger sensing system. See
your dealer for service.
{Warning
If the airbag readiness light ever
comes on and stays on, it means
that something may be wrong
with the airbag system. To help
avoid injury to yourself or others,
have the vehicle serviced right
away. See
Airbag Readiness
Light 0104 for more information,
including important safety
information.
Charging System Light
This light comes on briefly when the
ignition key is turned to START, but
the engine is not running, as a
check to show it is working.
If it does not, have the vehicle
serviced by your dealer.
The light should go out once the
engine starts. If it stays on,
or comes on while driving, there
could be a problem with the
charging system. This light could
indicate that there are problems with
a generator drive belt, or that there
is an electrical problem. Have it
checked right away. If the vehicle
must be driven a short distance with
the light on, turn off accessories,
such as the radio and air
conditioner.
Page 114 of 360

Chevrolet Malibu Limited Owner Manual (GMNA-Localizing-U.S/Canada-
9086425) - 2016 - crc - 7/30/15
Instruments and Controls 113
detected. SeeVehicle Messages
0 115. All messages appear in the
DIC display in the center of the
instrument cluster.
The vehicle may also have features
that can be customized through the
controls on the radio. See Vehicle
Personalization 0122.
DIC Operation and Displays
The DIC has different displays,
which can be accessed by using the
DIC buttons on the turn signal lever
to the left of the steering wheel. The
DIC displays trip, fuel, vehicle
system information, and warning
messages if a system problem is
detected.
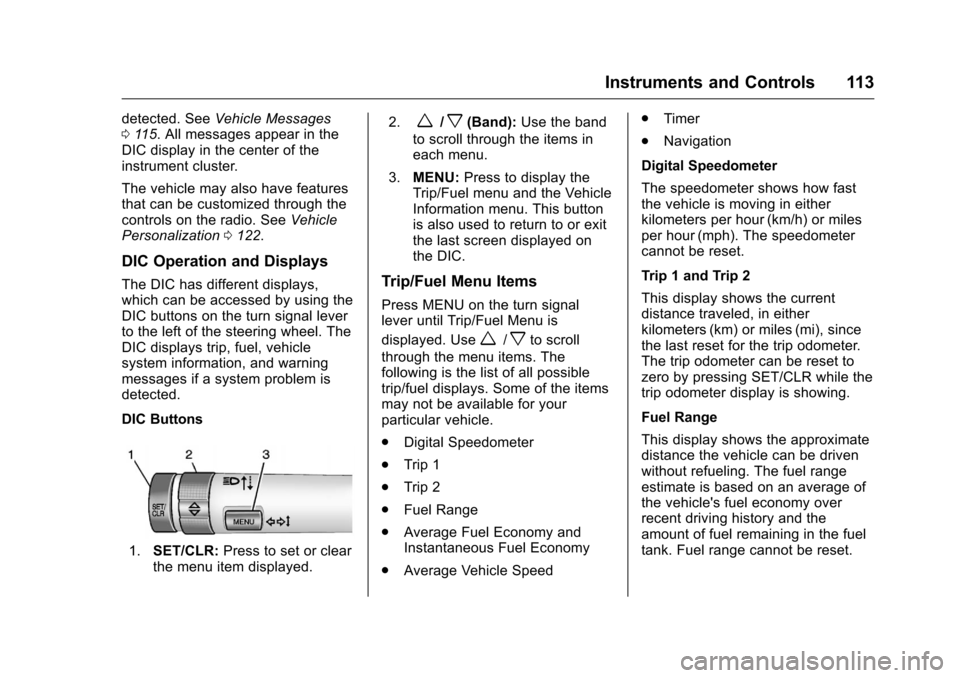
DIC Buttons
1. SET/CLR: Press to set or clear
the menu item displayed. 2.
w/x(Band):
Use the band
to scroll through the items in
each menu.
3. MENU: Press to display the
Trip/Fuel menu and the Vehicle
Information menu. This button
is also used to return to or exit
the last screen displayed on
the DIC.
Trip/Fuel Menu Items
Press MENU on the turn signal
lever until Trip/Fuel Menu is
displayed. Use
w/xto scroll
through the menu items. The
following is the list of all possible
trip/fuel displays. Some of the items
may not be available for your
particular vehicle.
. Digital Speedometer
. Trip 1
. Trip 2
. Fuel Range
. Average Fuel Economy and
Instantaneous Fuel Economy
. Average Vehicle Speed .
Timer
. Navigation
Digital Speedometer
The speedometer shows how fast
the vehicle is moving in either
kilometers per hour (km/h) or miles
per hour (mph). The speedometer
cannot be reset.
Trip 1 and Trip 2
This display shows the current
distance traveled, in either
kilometers (km) or miles (mi), since
the last reset for the trip odometer.
The trip odometer can be reset to
zero by pressing SET/CLR while the
trip odometer display is showing.
Fuel Range
This display shows the approximate
distance the vehicle can be driven
without refueling. The fuel range
estimate is based on an average of
the vehicle's fuel economy over
recent driving history and the
amount of fuel remaining in the fuel
tank. Fuel range cannot be reset.
Page 123 of 360

Chevrolet Malibu Limited Owner Manual (GMNA-Localizing-U.S/Canada-
9086425) - 2016 - crc - 7/30/15
122 Instruments and Controls
Vehicle
Personalization
Use the audio system controls to
access the personalization menus
for customizing vehicle features.
The following are all possible
personalization features. Depending
on the vehicle, some may not be
available.
Infotainment System Audio
System Controls
Using the Faceplate
TUNE/MENU Knob
.Press to enter, select, or activate
a highlighted menu option.
. Turn to highlight a menu option.
. Press to enable or disable a
system setting.
}BACK
. Press to exit a menu.
. Press to return to a previous
screen.
Using the Touch Screen
Press a screen feature to: .
View more feature options.
. Enable or disable the feature.
w:Press to scroll up.
x:Press to scroll down.
Back : Press to return to the
previous menu.
To access the
personalization menu:
1. Press Config on the Home page on the infotainment
system display or CONFIG on
the faceplate.
2. Select the desired feature to display a list of available
options.
3. Select the desired feature setting.
Personalization Menus
The following list of menu items may
be available:
. Languages
. Time and Date
. Radio Settings
. Phone Settings .
Navigation Settings
. Display Settings
. Vehicle Settings
Each menu is detailed in the
following information.
Languages
Select Languages, then select from
the available language(s).
Time and Date
Manually set the time and date. See
Clock 098.
Radio Settings
Select and the following may
display:
.
Auto Volume
. Gracenote Options
. XM Channel Art
. Max Startup Volume
. Number of Favorites Pages
. XM Categories
. Software Versions Menu
Page 125 of 360

Chevrolet Malibu Limited Owner Manual (GMNA-Localizing-U.S/Canada-
9086425) - 2016 - crc - 7/30/15
124 Instruments and Controls
Display Settings
Press and the following may
display:
.Home Page Menu
. Rear Camera Options
. Display Off
. Map Settings
Home Page Menu
Select and the following may
display:
. Customize
. Sort
. Restore Home Page Defaults
Customize
This feature allows the selection of
what icons will be on the first
Home Page.
Select and follow the screen
prompts.
Sort
This feature allows the icons on the
Home Page to be moved. Select and follow the screen
prompts.
Restore Home Page Defaults
This feature will restore the Home
Page to the factory settings.
Select and follow the screen
prompts.
Rear Camera Options
Select and the following may
display:
.
Symbols
. Guiding Lines
Symbols
Select to turn the rear camera
symbols on or off. See Rear Vision
Camera (RVC) 0206.
Guiding Lines
Select to turn the rear camera
guiding lines on or off. See Rear
Vision Camera (RVC) 0206. Display Off
Press to turn the display off. The
display will return when any radio
buttons are pressed or the screen is
touched (if equipped).
Map Settings
See
“Map Settings” in“Configure
Menu” in the infotainment manual.
Vehicle Settings
Select and the following may
display:
.
Climate and Air Quality
. Comfort and Convenience
. Collision/Detection Systems
. Lighting
. Power Door Locks
. Remote Lock/Unlock/Start
. Return to Factory Settings?
Climate and Air Quality
Select and the following may
display:
.
Auto Fan Speed
. Remote Start Heated Seats
Page 127 of 360

Chevrolet Malibu Limited Owner Manual (GMNA-Localizing-U.S/Canada-
9086425) - 2016 - crc - 7/30/15
126 Instruments and Controls
Rear Cross Traffic Alert
This allows the feature to be turned
on or off.
Select Off or On.
SeeRear Vision Camera (RVC)
0 206.
Lighting
Select and the following may
display:
.
Vehicle Locator Lights
. Exit Lighting
Vehicle Locator Lights
This allows the vehicle locator lights
to be turned on or off. The vehicle
locator lights come on when
unlocking the vehicle with the RKE
transmitter.
Select On or Off.
Exit Lighting
This allows for selecting how long
the exterior lamps stay on when
leaving the vehicle and it is dark
outside.
Select Off, 30 Seconds, 1 Minute,
or 2 Minutes.
Power Door Locks
Select and depending on the radio
the following may display:
. Open Door Anti Lock Out
. Unlocked Door Anti Lock Out
. Auto Door Unlock
. Delayed Door Lock
Open Door Anti Lock Out or
Unlocked Door Anti Lock Out
When on, this feature will keep the
driver door from locking when the
door is open. If Off is selected, the
Delayed Door Lock menu will be
available and the door will lock as
programmed through this menu.
Select to turn On or Off.
Auto Door Unlock
This allows selection of which of the
doors will automatically unlock when
the vehicle is shifted into P (Park).
Select All Doors, Driver Door, or Off.
Delayed Door Lock
When on, this feature will delay the
locking of the doors until
five seconds after the last door is closed. Three chimes will signal
delayed locking is in use. Press
either the power lock button orQon
the RKE transmitter twice to
override the delayed locking feature
and immediately lock all of the
doors.
Select to turn On or Off.
Remote Lock/Unlock/Start
Select and depending on the radio
the following may display:
. Remote Unlock Feedback
. Unlock Feedback (Lights)
. Remote Lock Feedback
. Locking Feedback
. Remote Door Unlock
. Door Unlock Options
. Memory Remote Recall
. Remote Left in Vehicle Reminder
. Relock Remote Door
. Passive Door Unlock
. Passive Door Lock
Page 129 of 360

Chevrolet Malibu Limited Owner Manual (GMNA-Localizing-U.S/Canada-
9086425) - 2016 - crc - 7/30/15
128 Instruments and Controls
or Off. Press TUNE/MENU to
confirm and go back to the
last menu.
Passive Door Unlock
This allows selection of which doors
are unlocked by pressing the button
on the outside door handle.
Press TUNE/MENU when Passive
Door Unlock is highlighted. Turn the
TUNE/MENU knob to select All
Doors or Driver Door. Press TUNE/
MENU to confirm and go back to the
last menu.
Passive Door Lock
This allows for turning Passive
Locking off, on, or on with feedback.Press TUNE/MENU when Passive
Door Lock is highlighted. Turn the
TUNE/MENU knob to select Off, On,
or On with Active Horn Chirp. Press
TUNE/MENU to confirm and go
back to the last menu.
Return to Factory Settings?
Select Return to Factory Settings?
for the option to return all vehicle
personalization to the default
settings. Turn the TUNE/MENU
knob to select Yes or No. Press
TUNE/MENU to confirm and go
back to the last menu.
Universal Remote
System
See
Radio Frequency Statement
0 335.
Universal Remote System
Programming
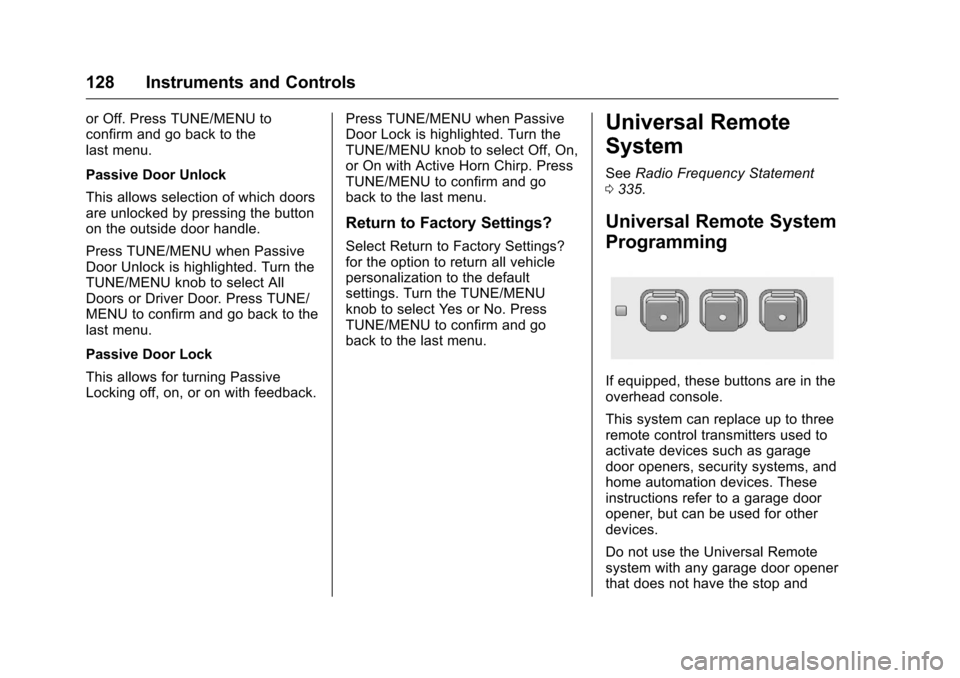
If equipped, these buttons are in the
overhead console.
This system can replace up to three
remote control transmitters used to
activate devices such as garage
door openers, security systems, and
home automation devices. These
instructions refer to a garage door
opener, but can be used for other
devices.
Do not use the Universal Remote
system with any garage door opener
that does not have the stop and