2016 CHEVROLET EQUINOX lock
[x] Cancel search: lockPage 228 of 324
Chevrolet Equinox Owner Manual (GMNA-Localizing-U.S./Canada/Mexico-
9234773) - 2016 - crc - 9/3/15
Vehicle Care 227
Mini Fuses Usage46 Fuel System Control Module Ignition
47 Spare
48 Rear Drive Module
49 Lift Gate Module Logic
50 Instrument Panel Fuse Block Ignition
51 Heated Seat– Front
52 Fuel System Control Module
53 Engine Control Module
54 Rear Vision Camera
78 Passenger Power Lumbar
Midi Fuse Usage 55 Electric Power Steering Micro
Relays Usage
56 AIR Pump Solenoid
57 Brake Booster
58 Cooling Fan Low
59 Headlamp High Beam
60 Cooling Fan Control
61 Wiper On/Off Control
62 Air Conditioning Compressor
63 Rear Defogger
64 Wiper Speed
65 Fog Lamp
66 Engine Control
67 Starter
68 Run/Crank
Mini Relays Usage 69 Cooling Fan High
70 AIR Pump MotorInstrument Panel Fuse
Block
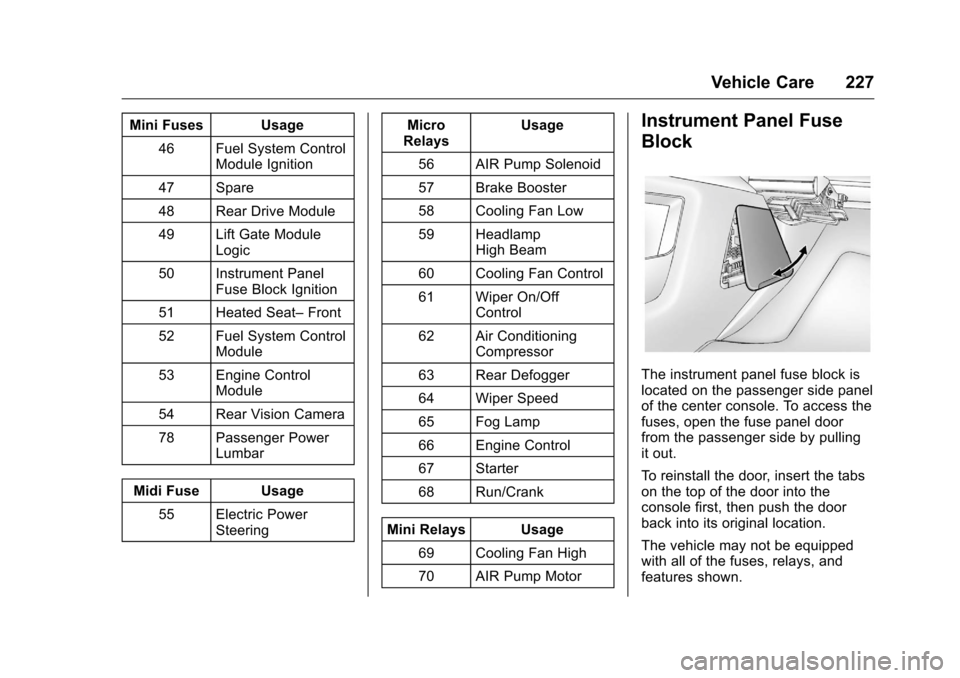
The instrument panel fuse block is
located on the passenger side panel
of the center console. To access the
fuses, open the fuse panel door
from the passenger side by pulling
it out.
To reinstall the door, insert the tabs
on the top of the door into the
console first, then push the door
back into its original location.
The vehicle may not be equipped
with all of the fuses, relays, and
features shown.
Page 229 of 324
Chevrolet Equinox Owner Manual (GMNA-Localizing-U.S./Canada/Mexico-
9234773) - 2016 - crc - 9/3/15
228 Vehicle Care
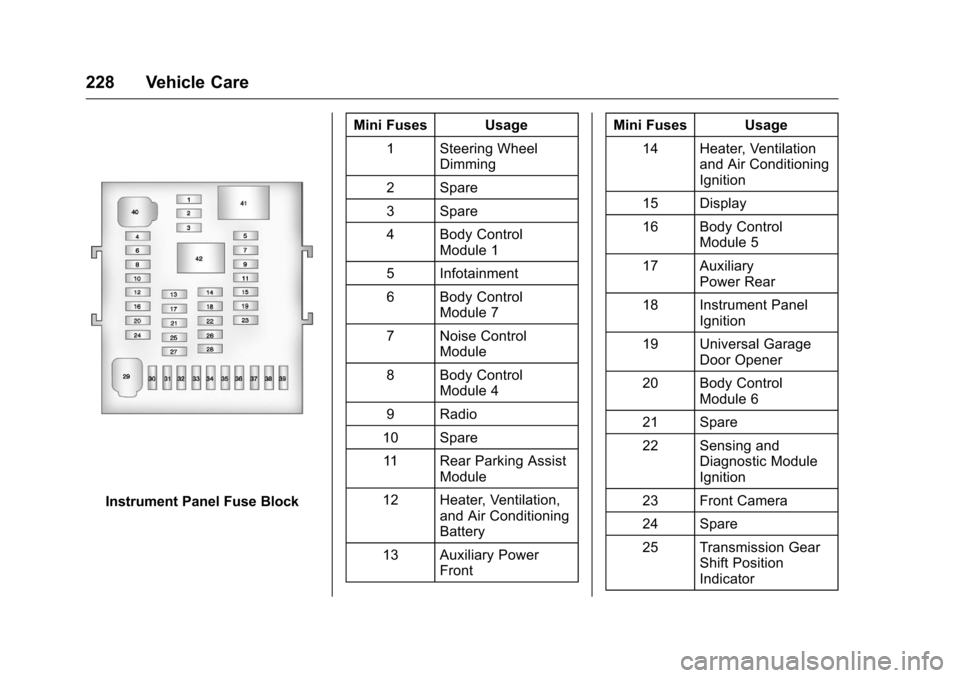
Instrument Panel Fuse BlockMini Fuses Usage
1 Steering Wheel Dimming
2 Spare
3 Spare
4 Body Control Module 1
5 Infotainment
6 Body Control Module 7
7 Noise Control Module
8 Body Control Module 4
9 Radio
10 Spare 11 Rear Parking Assist Module
12 Heater, Ventilation, and Air Conditioning
Battery
13 Auxiliary Power Front Mini Fuses Usage
14 Heater, Ventilation and Air Conditioning
Ignition
15 Display
16 Body Control Module 5
17 Auxiliary Power Rear
18 Instrument Panel Ignition
19 Universal Garage Door Opener
20 Body Control Module 6
21 Spare
22 Sensing and Diagnostic Module
Ignition
23 Front Camera
24 Spare
25 Transmission Gear Shift Position
Indicator
Page 242 of 324
Chevrolet Equinox Owner Manual (GMNA-Localizing-U.S./Canada/Mexico-
9234773) - 2016 - crc - 9/3/15
Vehicle Care 241
tires or replacing one or more of the
TPMS sensors. The TPMS sensor
matching process should also be
performed after replacing a spare
tire with a road tire containing the
TPMS sensor. The malfunction light
and the DIC message should go off
at the next ignition cycle. The
sensors are matched to the tire/
wheel positions, using a TPMS
relearn tool, in the following order:
driver side front tire, passenger side
front tire, passenger side rear tire,
and driver side rear. See your
dealer for service or to purchase a
relearn tool. A TPMS relearn tool
can also be purchased. See Tire
Pressure Monitor Sensor Activation
Tool at
www.gmtoolsandequipment.com or
call 1-800-GM TOOLS
(1-800-468-6657).
There are two minutes to match the
first tire/wheel position, and
five minutes overall to match all four
tire/wheel positions. If it takes
longer, the matching process stops
and must be restarted.
The TPMS sensor matching
process is:1. Set the parking brake.
2. Turn the ignition to ON/RUN
with the engine off.
3. Use the MENU button to select the Vehicle Information Menu
in the Driver Information Center
(DIC). Use the arrow keys to
scroll to the Tire Pressure
screen.
4. Press the SET/CLR button to begin the sensor matching
process.
A message requesting
acceptance of the process
should display.
5. Press the SET/CLR button again to confirm the selection.
The horn sounds twice to
signal the receiver is in relearn
mode and the TIRE
LEARNING ACTIVE message
displays on the DIC screen.
6. Start with the driver side front tire.
7. Place the relearn tool against the tire sidewall, near the valve
stem. Then press the button to activate the TPMS sensor.
A horn chirp confirms that the
sensor identification code has
been matched to this tire and
wheel position.
8. Proceed to the passenger side front tire, and repeat the
procedure in Step 7.
9. Proceed to the passenger side rear tire, and repeat the
procedure in Step 7.
10. Proceed to the driver side rear tire, and repeat the procedure
in Step 7. The horn sounds two
times to indicate the sensor
identification code has been
matched to the driver side rear
tire, and the TPMS sensor
matching process is no longer
active. The TIRE LEARNING
ACTIVE message on the DIC
display screen goes off.
11. Turn the ignition to LOCK/OFF.
12. Set all four tires to the recommended air pressure
level as indicated on the Tire
and Loading Information label.
Page 246 of 324

Chevrolet Equinox Owner Manual (GMNA-Localizing-U.S./Canada/Mexico-
9234773) - 2016 - crc - 9/3/15
Vehicle Care 245
{Warning
Mixing tires of different sizes,
brands, or types may cause
loss of control of the vehicle,
resulting in a crash or other
vehicle damage. Use the
correct size, brand, and type
of tires on all wheels.
{Warning
Using bias-ply tires on the
vehicle may cause the wheel
rim flanges to develop cracks
after many miles of driving.
A tire and/or wheel could fail
suddenly and cause a crash.
Use only radial-ply tires with
the wheels on the vehicle.
If the vehicle tires must be
replaced with a tire that does not
have a TPC Spec number, make
sure they are the same size, load range, speed rating, and
construction (radial) as the
original tires.
Vehicles that have a tire
pressure monitoring system
could give an inaccurate
low-pressure warning if non-TPC
Spec rated tires are installed.
See
Tire Pressure Monitor
System 0238
ii.
The Tire and Loading
Information label indicates the
original equipment tires on the
vehicle. See Vehicle Load Limits
0 156
ii.
Different Size Tires and
Wheels
If wheels or tires are installed that
are a different size than the original
equipment wheels and tires, vehicle
performance, including its braking,
ride and handling characteristics,
stability, and resistance to rollover
may be affected. If the vehicle has
electronic systems such as antilock
brakes, rollover airbags, roll bars, traction control, electronic stability
control, or All-Wheel Drive, the
performance of these systems can
also be affected.
{Warning
If different sized wheels are used,
there may not be an acceptable
level of performance and safety if
tires not recommended for those
wheels are selected. This
increases the chance of a crash
and serious injury. Only use GM
specific wheel and tire systems
developed for the vehicle, and
have them properly installed by a
GM certified technician.
See Buying New Tires 0244
iiand
Accessories and Modifications
0 198
ii.
Page 251 of 324
Chevrolet Equinox Owner Manual (GMNA-Localizing-U.S./Canada/Mexico-
9234773) - 2016 - crc - 9/3/15
250 Vehicle Care
Warning (Continued)
2. Put an automatictransmission in P (Park) or a
manual transmission in
1 (First) or R (Reverse).
3. Turn off the engine and do not restart while the vehicle
is raised.
4. Do not allow passengers to remain in the vehicle.
5. Place wheel blocks, if equipped, on both sides of
the tire at the opposite
corner of the tire being
changed.
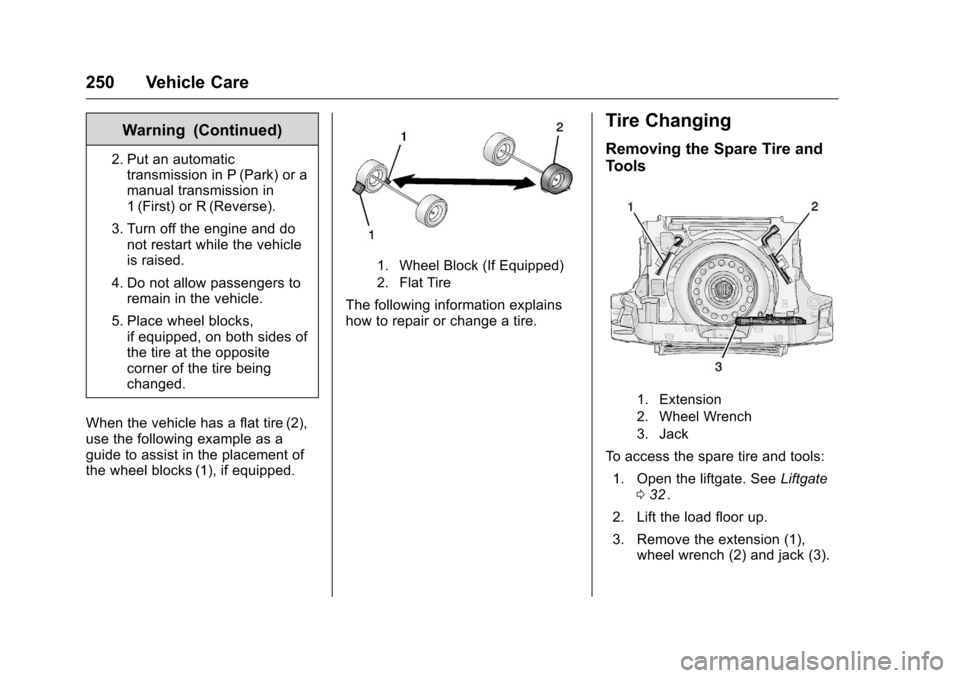
When the vehicle has a flat tire (2),
use the following example as a
guide to assist in the placement of
the wheel blocks (1), if equipped.
1. Wheel Block (If Equipped)
2. Flat Tire
The following information explains
how to repair or change a tire.
Tire Changing
Removing the Spare Tire and
Tools
1. Extension
2. Wheel Wrench
3. Jack
To access the spare tire and tools: 1. Open the liftgate. See Liftgate
0 32
ii.
2. Lift the load floor up.
3. Remove the extension (1), wheel wrench (2) and jack (3).
Page 252 of 324
Chevrolet Equinox Owner Manual (GMNA-Localizing-U.S./Canada/Mexico-
9234773) - 2016 - crc - 9/3/15
Vehicle Care 251
Place the tools next to the tire
being changed.
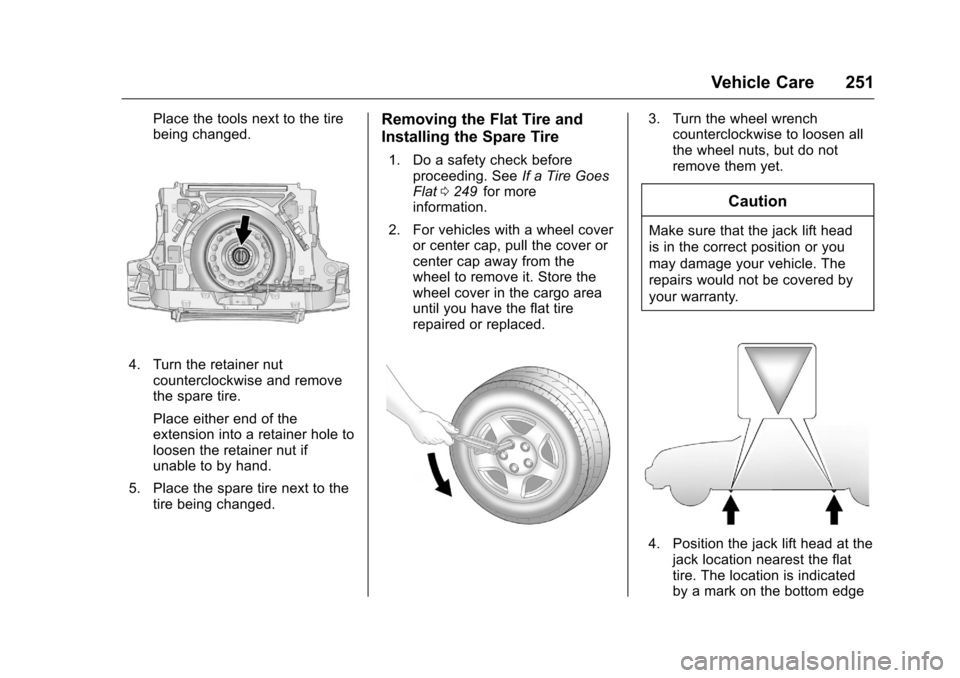
4. Turn the retainer nutcounterclockwise and remove
the spare tire.
Place either end of the
extension into a retainer hole to
loosen the retainer nut if
unable to by hand.
5. Place the spare tire next to the tire being changed.
Removing the Flat Tire and
Installing the Spare Tire
1. Do a safety check beforeproceeding. See If a Tire Goes
Flat 0249
iifor more
information.
2. For vehicles with a wheel cover or center cap, pull the cover or
center cap away from the
wheel to remove it. Store the
wheel cover in the cargo area
until you have the flat tire
repaired or replaced.
3. Turn the wheel wrenchcounterclockwise to loosen all
the wheel nuts, but do not
remove them yet.
Caution
Make sure that the jack lift head
is in the correct position or you
may damage your vehicle. The
repairs would not be covered by
your warranty.
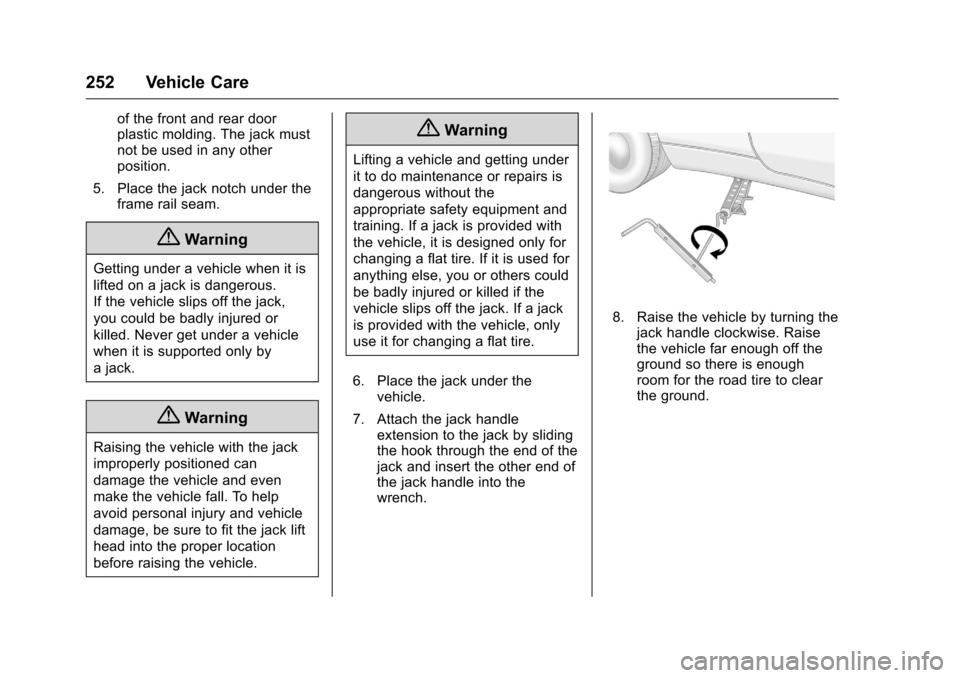
4. Position the jack lift head at the
jack location nearest the flat
tire. The location is indicated
by a mark on the bottom edge
Page 253 of 324
Chevrolet Equinox Owner Manual (GMNA-Localizing-U.S./Canada/Mexico-
9234773) - 2016 - crc - 9/3/15
252 Vehicle Care
of the front and rear door
plastic molding. The jack must
not be used in any other
position.
5. Place the jack notch under the frame rail seam.
{Warning
Getting under a vehicle when it is
lifted on a jack is dangerous.
If the vehicle slips off the jack,
you could be badly injured or
killed. Never get under a vehicle
when it is supported only by
a jack.
{Warning
Raising the vehicle with the jack
improperly positioned can
damage the vehicle and even
make the vehicle fall. To help
avoid personal injury and vehicle
damage, be sure to fit the jack lift
head into the proper location
before raising the vehicle.
{Warning
Lifting a vehicle and getting under
it to do maintenance or repairs is
dangerous without the
appropriate safety equipment and
training. If a jack is provided with
the vehicle, it is designed only for
changing a flat tire. If it is used for
anything else, you or others could
be badly injured or killed if the
vehicle slips off the jack. If a jack
is provided with the vehicle, only
use it for changing a flat tire.
6. Place the jack under the vehicle.
7. Attach the jack handle extension to the jack by sliding
the hook through the end of the
jack and insert the other end of
the jack handle into the
wrench.
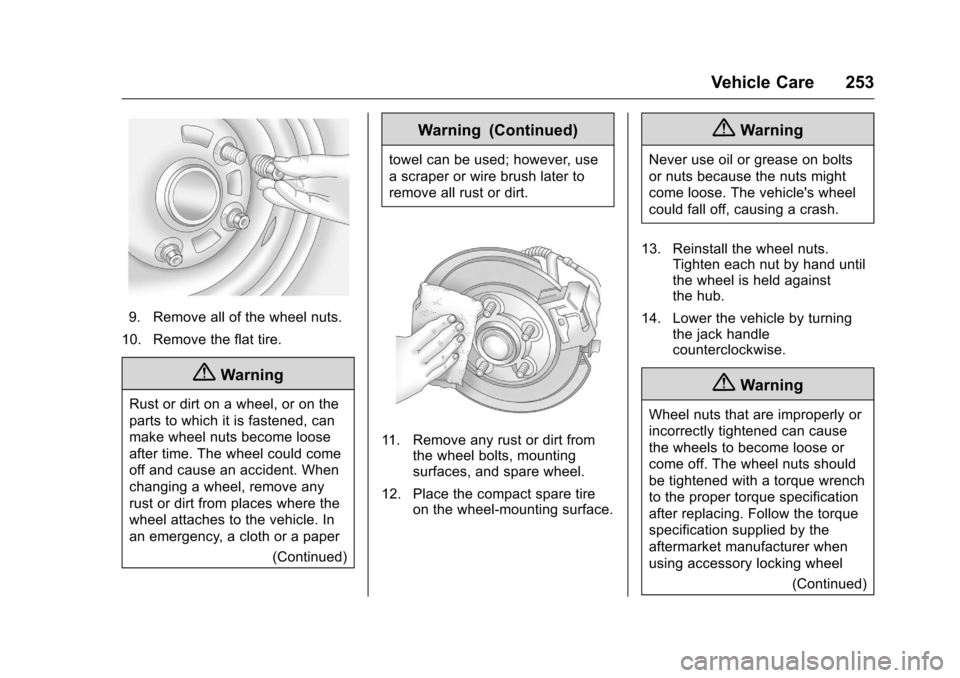
8. Raise the vehicle by turning thejack handle clockwise. Raise
the vehicle far enough off the
ground so there is enough
room for the road tire to clear
the ground.
Page 254 of 324
Chevrolet Equinox Owner Manual (GMNA-Localizing-U.S./Canada/Mexico-
9234773) - 2016 - crc - 9/3/15
Vehicle Care 253
9. Remove all of the wheel nuts.
10. Remove the flat tire.
{Warning
Rust or dirt on a wheel, or on the
parts to which it is fastened, can
make wheel nuts become loose
after time. The wheel could come
off and cause an accident. When
changing a wheel, remove any
rust or dirt from places where the
wheel attaches to the vehicle. In
an emergency, a cloth or a paper (Continued)
Warning (Continued)
towel can be used; however, use
a scraper or wire brush later to
remove all rust or dirt.
11. Remove any rust or dirt fromthe wheel bolts, mounting
surfaces, and spare wheel.
12. Place the compact spare tire on the wheel-mounting surface.
{Warning
Never use oil or grease on bolts
or nuts because the nuts might
come loose. The vehicle's wheel
could fall off, causing a crash.
13. Reinstall the wheel nuts. Tighten each nut by hand until
the wheel is held against
the hub.
14. Lower the vehicle by turning the jack handle
counterclockwise.
{Warning
Wheel nuts that are improperly or
incorrectly tightened can cause
the wheels to become loose or
come off. The wheel nuts should
be tightened with a torque wrench
to the proper torque specification
after replacing. Follow the torque
specification supplied by the
aftermarket manufacturer when
using accessory locking wheel
(Continued)