2016 CHEVROLET CRUZE infotainment
[x] Cancel search: infotainmentPage 105 of 377
Chevrolet Cruze Owner Manual (GMNA-Localizing-U.S./Canada/Mexico-
9234744) - 2016 - CRC - 3/9/16
104 Instruments and Controls
Tire Messages . . . . . . . . . . . . . . . . 142
Transmission Messages . . . . . . 143
Vehicle ReminderMessages . . . . . . . . . . . . . . . . . . . 143
Vehicle Personalization
Vehicle Personalization . . . . . . . 143
Controls
Steering Wheel
Adjustment
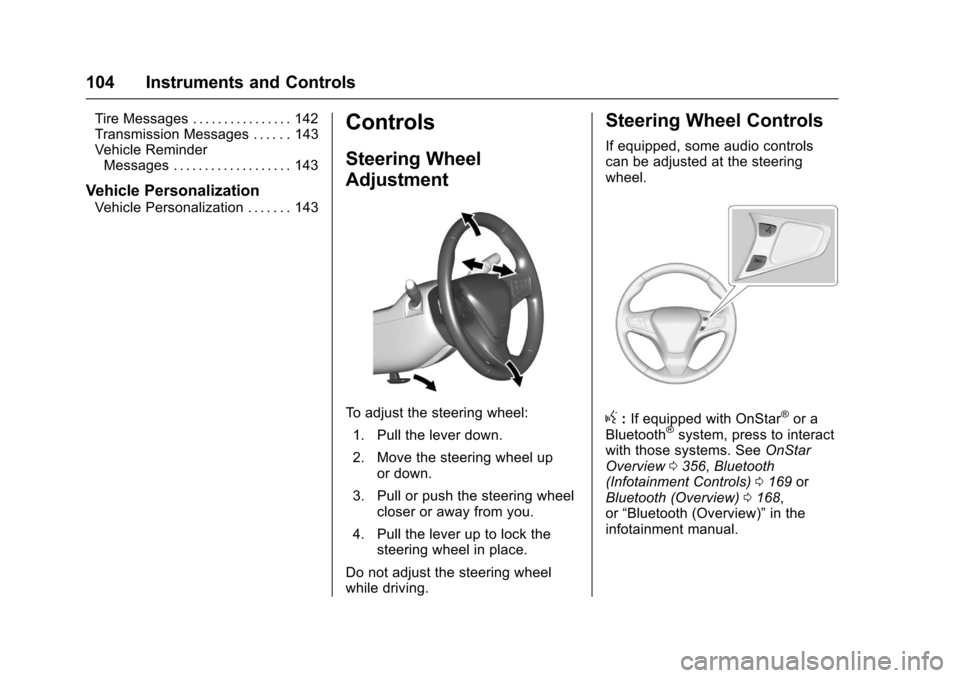
To adjust the steering wheel:
1. Pull the lever down.
2. Move the steering wheel up or down.
3. Pull or push the steering wheel closer or away from you.
4. Pull the lever up to lock the steering wheel in place.
Do not adjust the steering wheel
while driving.
Steering Wheel Controls
If equipped, some audio controls
can be adjusted at the steering
wheel.
g: If equipped with OnStar®or a
Bluetooth®system, press to interact
with those systems. See OnStar
Overview 0356, Bluetooth
(Infotainment Controls) 0169 or
Bluetooth (Overview) 0168,
or “Bluetooth (Overview)” in the
infotainment manual.
Page 106 of 377
Chevrolet Cruze Owner Manual (GMNA-Localizing-U.S./Canada/Mexico-
9234744) - 2016 - CRC - 3/9/16
Instruments and Controls 105
c:Press to reject an incoming
call or end a current call. Press to
mute or unmute the infotainment
system when not on a call.
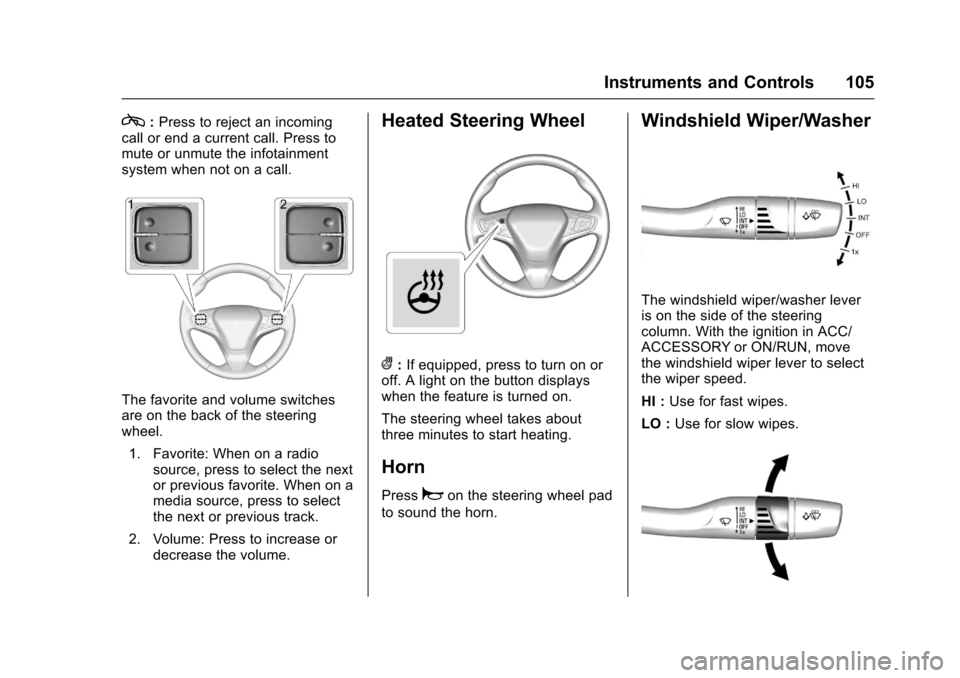
The favorite and volume switches
are on the back of the steering
wheel.
1. Favorite: When on a radio source, press to select the next
or previous favorite. When on a
media source, press to select
the next or previous track.
2. Volume: Press to increase or decrease the volume.
Heated Steering Wheel
(:If equipped, press to turn on or
off. A light on the button displays
when the feature is turned on.
The steering wheel takes about
three minutes to start heating.
Horn
Pressaon the steering wheel pad
to sound the horn.
Windshield Wiper/Washer
The windshield wiper/washer lever
is on the side of the steering
column. With the ignition in ACC/
ACCESSORY or ON/RUN, move
the windshield wiper lever to select
the wiper speed.
HI : Use for fast wipes.
LO : Use for slow wipes.
Page 108 of 377
Chevrolet Cruze Owner Manual (GMNA-Localizing-U.S./Canada/Mexico-
9234744) - 2016 - CRC - 3/9/16
Instruments and Controls 107
open area where it can receive a
GPS signal. The compass system
will automatically determine when
the GPS signal is restored and
provide a heading again. See
Compass Messages0136 for more
information on the messages that
may be displayed for the compass.
Clock
Base Radio
The infotainment system controls
are used to access the time and
date settings through the menu
system. See Operation0162 on
how to use the menu system.
Setting the Time and Date
When Auto Set is enabled the time
cannot be manually set.
1. Press
{, then touch
SETTINGS.
2. Touch Time and Date, then Set Time or Set Date.
3. Touch + or −to adjust the
value. 4. Touch
RorQto adjust AM or
PM for 12 hour format.
5. Touch
0.
Auto Set
1. Press{, then touch
SETTINGS.
2. Touch Time and Date, then Auto Set.
3. Select from the available selections.
4. Touch
0.
Setting the 12/24 Hour Format
1. Press{, then touch
SETTINGS.
2. Touch Time and Date, then select 12h or 24h format.
3. Touch
0.
Setting the Month and Day
Format
1. Press{, then touch
SETTINGS. 2. Touch Time and Date, then Set
Date Format.
3. Select DD/MM/YYYY (day/ month/year), MM/DD/YYYY
(month/day/year), or YYYY/
MM/DD (year/month/day)
format.
4. Touch
0.
Uplevel Radio Using Faceplate
Controls
To set the time or date: 1. Select Home Page, then select SETTINGS.
2. Select Time and Date, then the desired function.
3. Turn the MENU knob to increase or decrease the value.
4. Press the MENU knob to go to the next value. After the last
value is selected, the system
will update and return to the
Settings menu. Press
oBACK
to go to the last menu and
save the changes.
Auto Set requires OnStar
subscription.
Page 109 of 377
Chevrolet Cruze Owner Manual (GMNA-Localizing-U.S./Canada/Mexico-
9234744) - 2016 - CRC - 3/9/16
108 Instruments and Controls
If auto timing is set, the time
displayed on the clock may not
update immediately when driving
into a new time zone.
To set the clock display:1. Select SETTINGS from the Home Page, then select Time
and Date.
2. Select Clock Display.
3. Turn the MENU knob to Off or On.
4. Press the MENU knob to select.
Press
oBACK to go to the last
menu and save the changes.
Uplevel Radio Using
Touchscreen Controls
The infotainment system controls
are used to access the time and
date settings through the menu
system. See “Using the System”
under “Introduction” in the
infotainment manual. To set the time:
1. Touch SETTINGS from the Home Page, then touch Time
and Date.
2. Touch Set Time and touch
«
orªto increase or decrease
hours, minutes, and AM or PM.
Touch 12–24 Hr for 12 or
24 hour clock.
3. Touch
}to go back to the
previous menu.
Auto Set requires OnStar
subscription.
If auto timing is set, the time
displayed on the clock may not
update immediately when driving
into a new time zone.
To set the date: 1. Touch SETTINGS from the Home Page, then touch Time
and Date.
2. Touch Set Date and touch
«
orªto increase or decrease
month, day, or year. 3. Touch
}to go back to the
previous menu.
To set the clock display: 1. Touch SETTINGS and touch Time and Date.
2. Touch Clock Display and touch OFF or ON to turn the clock
display off or on.
3. Touch
}to go back to the
previous menu.
The clock settings can also be
accessed by touching the time
display, then touching Set.
Power Outlets
Power Outlet 12-Volt Direct
Current
The accessory power outlet can be
used to plug in electrical equipment,
such as a cell phone or MP3 player.
There is an accessory power outlet
on the center floor console in front
of the shift lever. This outlet is
powered when the ignition is in the
ON/RUN or ACC/ACCESSORY
position, or until the driver door is
Page 112 of 377
Chevrolet Cruze Owner Manual (GMNA-Localizing-U.S./Canada/Mexico-
9234744) - 2016 - CRC - 3/9/16
Instruments and Controls 111
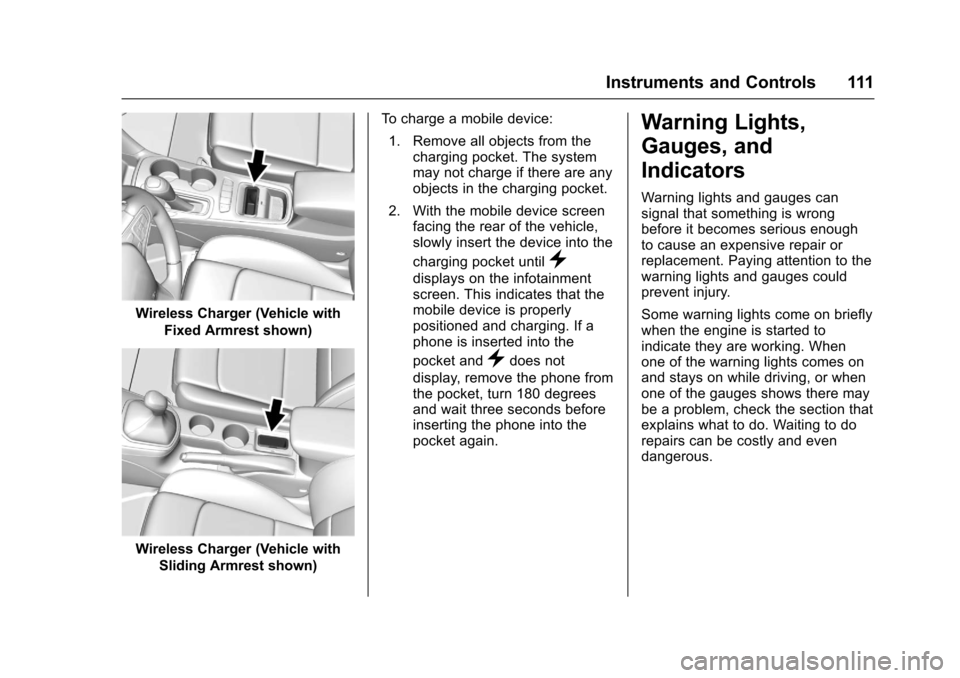
Wireless Charger (Vehicle withFixed Armrest shown)
Wireless Charger (Vehicle withSliding Armrest shown) To charge a mobile device:
1. Remove all objects from the charging pocket. The system
may not charge if there are any
objects in the charging pocket.
2. With the mobile device screen facing the rear of the vehicle,
slowly insert the device into the
charging pocket until
}
displays on the infotainment
screen. This indicates that the
mobile device is properly
positioned and charging. If a
phone is inserted into the
pocket and
}does not
display, remove the phone from
the pocket, turn 180 degrees
and wait three seconds before
inserting the phone into the
pocket again.
Warning Lights,
Gauges, and
Indicators
Warning lights and gauges can
signal that something is wrong
before it becomes serious enough
to cause an expensive repair or
replacement. Paying attention to the
warning lights and gauges could
prevent injury.
Some warning lights come on briefly
when the engine is started to
indicate they are working. When
one of the warning lights comes on
and stays on while driving, or when
one of the gauges shows there may
be a problem, check the section that
explains what to do. Waiting to do
repairs can be costly and even
dangerous.
Page 145 of 377
Chevrolet Cruze Owner Manual (GMNA-Localizing-U.S./Canada/Mexico-
9234744) - 2016 - CRC - 3/9/16
144 Instruments and Controls
3. PressSBACK on the
faceplate or touch
0on the
infotainment display to return to
the previous menu or exit.
Turn the vehicle to ON/RUN to
access the Settings menu, then
select SETTINGS from the Home
Page on the infotainment display.
Personalization Menus
The following list of menu items may
be available:
. Time and Date
. Language
. Valet Mode
. Radio
. Vehicle
. Bluetooth
. Apple CarPlay
. Android Auto
. USB Auto Launch
. Voice
. Display
. Rear Camera .
Return to Factory Settings
. Software Information
Detailed information for each menu
follows.
Time and Date
Manually set the time and date. See
Clock 0107.
Language
Select Language, then select from
the available language(s).
The selected language will display
on the system, and voice
recognition will reflect the selected
language.
Valet Mode (If Equipped)
This will lock the infotainment
system and steering wheel controls.
It may also limit access to vehicle
storage locations (if equipped).
To enable valet mode:
1. Enter a four-digit code on the keypad.
2. Select Enter to go to the confirmation screen. 3. Re-enter the four-digit code.
Touch LOCK or UNLOCK to lock or
unlock the system. Press Back to go
back to the previous menu.
Radio
Touch and the following may
display:
. Manage Favorites
. Number of Favorites Shown
. Audible Touch Feedback
. Text Scroll
. Tone Settings
. Auto Volume
. Maximum Startup Volume
. Audio Cue Volume
Manage Favorites
This allows favorites to be edited.
See “Storing a Station as a
Favorite” inAM-FM Radio 0163 or
“Manage Favorites” in“Settings”
under “Radio” in the infotainment
manual.
Page 146 of 377
Chevrolet Cruze Owner Manual (GMNA-Localizing-U.S./Canada/Mexico-
9234744) - 2016 - CRC - 3/9/16
Instruments and Controls 145
Number of Favorites Shown
Touch to set the number of favorites
to display.
Select the desired number or select
Auto and the infotainment system
will automatically adjust the number
of favorites shown.
Audible Touch Feedback
This allows Audible Touch
Feedback to be turned on or off.
Select Off or On.
Text Scroll
Select to see text scroll on the
screen.
Select Off or On.
Tone Settings
Select to adjust the radio tone. See
Operation0162 or“Tone Settings”
under “AM-FM Radio” in the
infotainment manual.
Auto Volume
This feature adjusts the volume
based on vehicle speed and
ambient noise. Select Off, Low, Medium-Low,
Medium, Medium-High, or High.
Maximum Startup Volume
This feature sets the maximum
startup volume. If the vehicle is
started and the volume is greater
than this level, the volume is
adjusted to this level. To set the
maximum startup volume, turn the
MENU knob or press + or
−to
increase or decrease.
Audio Cue Volume
This feature sets the volume of
audio files played at system startup
and shutdown.
Select On, then touch + or −to
increase or decrease the volume.
Vehicle
Select and the following may
display:
. Climate and Air Quality
. Collision/Detection Systems
. Comfort and Convenience
. Lighting .
Power Door Locks
. Remote Lock, Unlock, Start
Climate and Air Quality
Select and the following may
display:
. Auto Fan Speed
. Auto Defog
. Auto Rear Defog
Auto Fan Speed
This feature will set the auto fan
speed.
Select Low, Medium, or High.
Auto Defog
When turned on and high humidity
is detected, the climate control
system may adjust to outside air
supply and turn on the air
conditioner or the heater. The fan
speed may slightly increase to help
prevent fogging. When high
humidity is no longer detected, the
system will return to its prior
operation.
Select Off or On.
Page 149 of 377
Chevrolet Cruze Owner Manual (GMNA-Localizing-U.S./Canada/Mexico-
9234744) - 2016 - CRC - 3/9/16
148 Instruments and Controls
Passive Door Lock
This feature can be turned on, off,
or on with feedback. SeeRemote
Keyless Entry (RKE) System
Operation (Keyless Access) 033 or
Remote Keyless Entry (RKE)
System Operation (Key
Access) 031.
Select Off, On with Horn
Chirp, or On.
Remote Left in Vehicle Alert
This feature sounds an alert when
the RKE transmitter is left in the
vehicle.
Select Off or On.
Bluetooth
Select and the following may
display:
. Pair New Device
. Discoverable
. Device Management
. Ringtones
. Voice Mail Numbers
. Text Message Alerts Pair New Device
Select to pair a new device. See
“Pairing”
underBluetooth
(Infotainment Controls) 0169 or
Bluetooth (Overview) 0168 or
“Pairing” in“Infotainment Controls”
under “Bluetooth” in the infotainment
manual.
Discoverable
This allows the system to find a
device.
Select Off or On.
Device Management
Select to connect to a different
phone source, disconnect a phone,
or delete a phone.
Ringtones
Press to change the ring tone for
the specific phone. The phone does
not need to be connected to change
the ring tones. Voice Mail Numbers
This feature displays the voice mail
number for all connected phones.
To change the voice mail number,
select EDIT. Type a new number,
then select SAVE.
Text Message Alerts
This allows the feature to be turned
on or off.
Select Off or On.
Apple CarPlay™
Select and the following may
display:
.
Apple CarPlay
. Manage Apple CarPlay Devices
Apple CarPlay
This feature allows Apple devices to
be connected to the infotainment
system through a USB port.
Select Off or On.
Manage Apple CarPlay Devices
Select to manage Apple devices.
Apple CarPlay must be on for this
feature to be accessed.