2016 CHEVROLET CRUZE LIMITED mirror controls
[x] Cancel search: mirror controlsPage 6 of 357
Chevrolet Cruze Limited Owner Manual (GMNA-Localizing-U.S./Canada-
9282844) - 2016 - crc - 9/3/15
In Brief 5
In Brief
Instrument Panel
Instrument Panel Overview . . . . . . 6
Initial Drive Information
Initial Drive Information . . . . . . . . . . 8
Remote Keyless Entry (RKE)System . . . . . . . . . . . . . . . . . . . . . . . . 8
Remote Vehicle Start . . . . . . . . . . . 8
Door Locks . . . . . . . . . . . . . . . . . . . . . 9
Windows . . . . . . . . . . . . . . . . . . . . . . . . 9
Seat Adjustment . . . . . . . . . . . . . . . 10
Heated Seats . . . . . . . . . . . . . . . . . . 11
Head Restraint Adjustment . . . . 11
Safety Belts . . . . . . . . . . . . . . . . . . . . 12
Passenger Sensing System . . . 12
Mirror Adjustment . . . . . . . . . . . . . . 12
Steering Wheel Adjustment . . . . 13
Interior Lighting . . . . . . . . . . . . . . . . 14
Exterior Lighting . . . . . . . . . . . . . . . 14
Windshield Wiper/Washer . . . . . . 15
Climate Controls . . . . . . . . . . . . . . . 15
Transmission . . . . . . . . . . . . . . . . . . 17
Vehicle Features
Radio(s) . . . . . . . . . . . . . . . . . . . . . . . 17
Satellite Radio . . . . . . . . . . . . . . . . . 18
Portable Audio Devices . . . . . . . . 18
Bluetooth
®. . . . . . . . . . . . . . . . . . . . . 19 Steering Wheel Controls . . . . . . . 19
Cruise Control . . . . . . . . . . . . . . . . . 20
Driver Information
Center (DIC) . . . . . . . . . . . . . . . . . 20
Side Blind Zone
Alert (SBZA) . . . . . . . . . . . . . . . . . . 20
Rear Vision Camera (RVC) . . . . 21
Rear Cross Traffic Alert (RCTA) System . . . . . . . . . . . . . . . . . . . . . . . 21
Parking Assist . . . . . . . . . . . . . . . . . 21
Power Outlets . . . . . . . . . . . . . . . . . 21
Performance and Maintenance
Traction Control/Electronic Stability Control . . . . . . . . . . . . . . 21
Tire Pressure Monitor . . . . . . . . . . 22
Engine Oil Life System . . . . . . . . 22
Driving for Better Fuel Economy . . . . . . . . . . . . . . . . . . . . . 22
Roadside Assistance Program . . . . . . . . . . . . . . . . . . . . . . 23
Page 14 of 357
Chevrolet Cruze Limited Owner Manual (GMNA-Localizing-U.S./Canada-
9282844) - 2016 - crc - 9/3/15
In Brief 13
3. Turn the selector switch to theO position to deselect the
mirror.
See Power Mirrors 041
ii.
If the vehicle has heated mirrors,
see Heated Mirrors 042
ii.
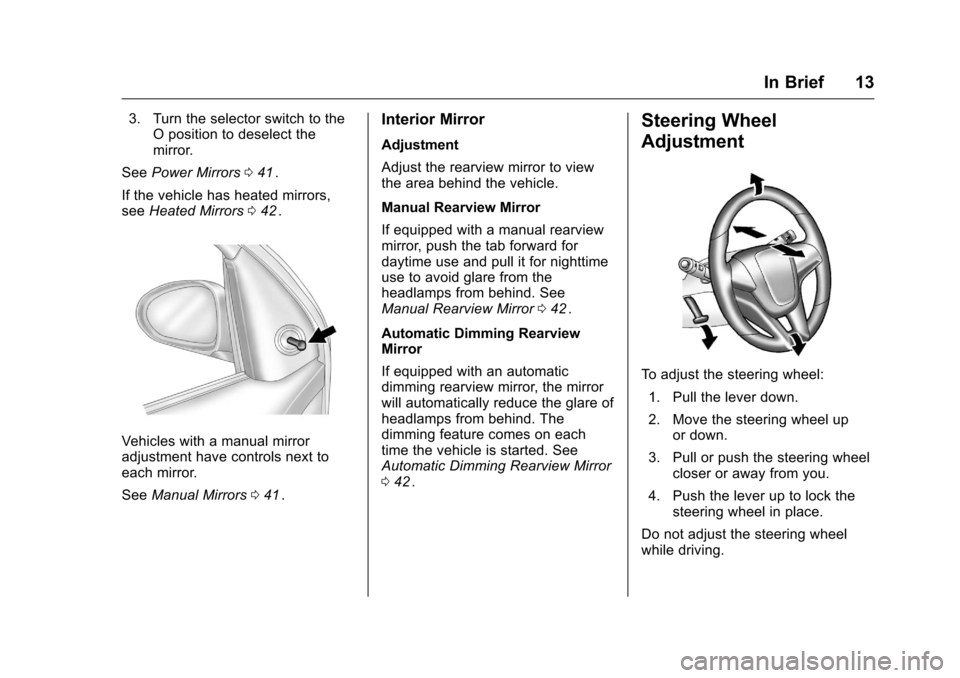
Vehicles with a manual mirror
adjustment have controls next to
each mirror.
See Manual Mirrors 041
ii.
Interior Mirror
Adjustment
Adjust the rearview mirror to view
the area behind the vehicle.
Manual Rearview Mirror
If equipped with a manual rearview
mirror, push the tab forward for
daytime use and pull it for nighttime
use to avoid glare from the
headlamps from behind. See
Manual Rearview Mirror 042
ii.
Automatic Dimming Rearview
Mirror
If equipped with an automatic
dimming rearview mirror, the mirror
will automatically reduce the glare of
headlamps from behind. The
dimming feature comes on each
time the vehicle is started. See
Automatic Dimming Rearview Mirror
0 42
ii.
Steering Wheel
Adjustment
To adjust the steering wheel:
1. Pull the lever down.
2. Move the steering wheel up or down.
3. Pull or push the steering wheel closer or away from you.
4. Push the lever up to lock the steering wheel in place.
Do not adjust the steering wheel
while driving.
Page 21 of 357
Chevrolet Cruze Limited Owner Manual (GMNA-Localizing-U.S./Canada-
9282844) - 2016 - crc - 9/3/15
20 In Brief
Cruise Control
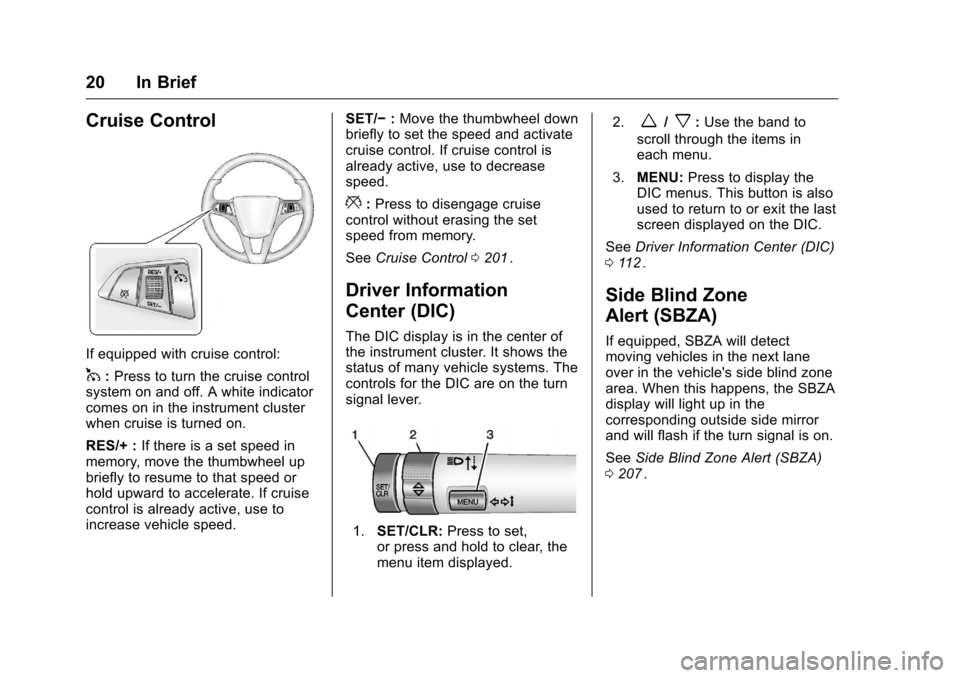
If equipped with cruise control:
1:Press to turn the cruise control
system on and off. A white indicator
comes on in the instrument cluster
when cruise is turned on.
RES/+ : If there is a set speed in
memory, move the thumbwheel up
briefly to resume to that speed or
hold upward to accelerate. If cruise
control is already active, use to
increase vehicle speed. SET/−
:Move the thumbwheel down
briefly to set the speed and activate
cruise control. If cruise control is
already active, use to decrease
speed.
*: Press to disengage cruise
control without erasing the set
speed from memory.
See Cruise Control 0201
ii.
Driver Information
Center (DIC)
The DIC display is in the center of
the instrument cluster. It shows the
status of many vehicle systems. The
controls for the DIC are on the turn
signal lever.
1. SET/CLR: Press to set,
or press and hold to clear, the
menu item displayed. 2.
w/x:
Use the band to
scroll through the items in
each menu.
3. MENU: Press to display the
DIC menus. This button is also
used to return to or exit the last
screen displayed on the DIC.
See Driver Information Center (DIC)
0 112
ii.
Side Blind Zone
Alert (SBZA)
If equipped, SBZA will detect
moving vehicles in the next lane
over in the vehicle's side blind zone
area. When this happens, the SBZA
display will light up in the
corresponding outside side mirror
and will flash if the turn signal is on.
See Side Blind Zone Alert (SBZA)
0 207
ii.
Page 25 of 357
Chevrolet Cruze Limited Owner Manual (GMNA-Localizing-U.S./Canada-
9282844) - 2016 - crc - 9/3/15
24 Keys, Doors, and Windows
Keys, Doors, and
Windows
Keys and Locks
Keys . . . . . . . . . . . . . . . . . . . . . . . . . . . 24
Remote Keyless Entry (RKE)System . . . . . . . . . . . . . . . . . . . . . . . 26
Remote Keyless Entry (RKE) System Operation . . . . . . . . . . . . 26
Remote Vehicle Start . . . . . . . . . . 32
Door Locks . . . . . . . . . . . . . . . . . . . . 34
Power Door Locks . . . . . . . . . . . . . 35
Delayed Locking . . . . . . . . . . . . . . . 35
Automatic Door Locks . . . . . . . . . 35
Lockout Protection . . . . . . . . . . . . . 36
Safety Locks . . . . . . . . . . . . . . . . . . . 36
Doors
Trunk . . . . . . . . . . . . . . . . . . . . . . . . . . 37
Vehicle Security
Vehicle Security . . . . . . . . . . . . . . . . 38
Vehicle Alarm System . . . . . . . . . 38
Immobilizer . . . . . . . . . . . . . . . . . . . . 40
Immobilizer Operation . . . . . . . . . 40
Exterior Mirrors
Convex Mirrors . . . . . . . . . . . . . . . . 41
Manual Mirrors . . . . . . . . . . . . . . . . . 41 Power Mirrors . . . . . . . . . . . . . . . . . . 41
Folding Mirrors . . . . . . . . . . . . . . . . . 42
Heated Mirrors . . . . . . . . . . . . . . . . . 42
Interior Mirrors
Interior Rearview Mirrors . . . . . . . 42
Manual Rearview Mirror . . . . . . . . 42
Automatic Dimming Rearview
Mirror . . . . . . . . . . . . . . . . . . . . . . . . . 42
Windows
Windows . . . . . . . . . . . . . . . . . . . . . . . 43
Power Windows . . . . . . . . . . . . . . . 43
Sun Visors . . . . . . . . . . . . . . . . . . . . . 45
Roof
Sunroof . . . . . . . . . . . . . . . . . . . . . . . . 45
Keys and Locks
Keys
{Warning
Leaving children in a vehicle with
an ignition key or Remote
Keyless Entry (RKE) transmitter is
dangerous and children or others
could be seriously injured or
killed. They could operate the
power window or other controls or
make the vehicle move. The
windows will function with the key
in the ignition or with the RKE
transmitter in the vehicle, and
children or others could be caught
in the path of a closing window.
Do not leave children in a vehicle
with the ignition key or an RKE
transmitter.
Page 42 of 357
Chevrolet Cruze Limited Owner Manual (GMNA-Localizing-U.S./Canada-
9282844) - 2016 - crc - 9/3/15
Keys, Doors, and Windows 41
Exterior Mirrors
Convex Mirrors
{Warning
A convex mirror can make things,
like other vehicles, look farther
away than they really are. If you
cut too sharply into the right lane,
you could hit a vehicle on the
right. Check the inside mirror or
glance over your shoulder before
changing lanes.
The passenger side mirror is convex
shaped. A convex mirror's surface is
curved so more can be seen from
the driver seat.
Manual Mirrors
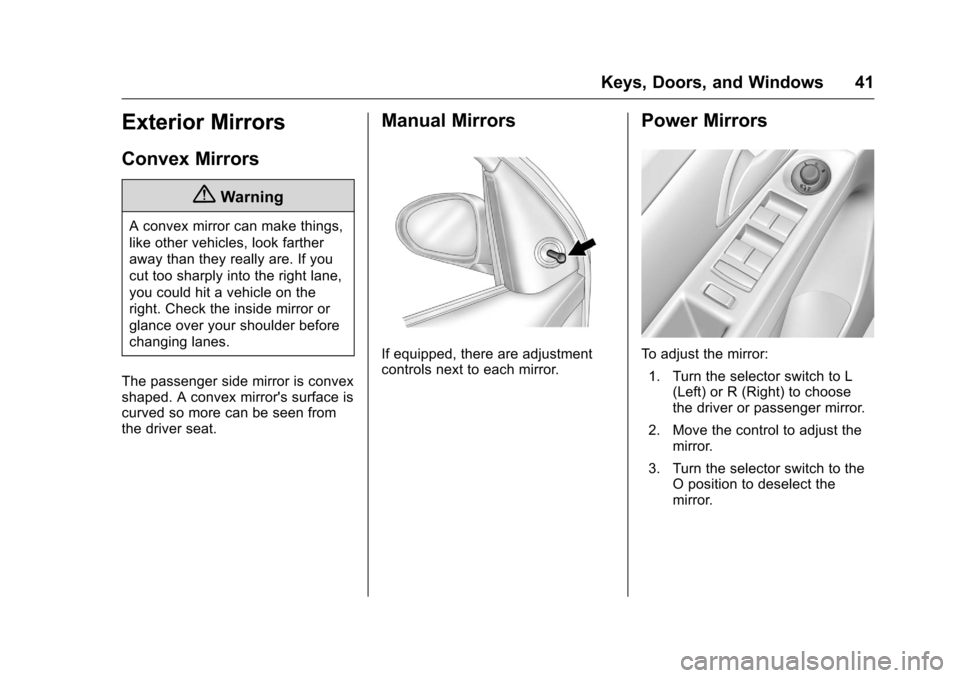
If equipped, there are adjustment
controls next to each mirror.
Power Mirrors
To adjust the mirror: 1. Turn the selector switch to L (Left) or R (Right) to choose
the driver or passenger mirror.
2. Move the control to adjust the mirror.
3. Turn the selector switch to the O position to deselect the
mirror.
Page 165 of 357
Chevrolet Cruze Limited Owner Manual (GMNA-Localizing-U.S./Canada-
9282844) - 2016 - crc - 9/3/15
164 Climate Controls
9. Defog
10. Recirculation
11. Rear Window Defogger
9(Fan Control) : Turn to increase
or decrease the fan speed.
Temperature Control : Turn to
increase or decrease the
temperature.
Air Delivery Mode Control : To
change the current mode, press one
of the following:
F (Vent) : Air is directed to the
instrument panel outlets.
* (Bi-level) : Air is directed to the
instrument panel outlets and the
floor outlets.
7 (Floor) : Air is directed to the
floor outlets.
W(Defog) : Clears the windows of
fog or moisture. Air is directed to the
windshield and floor outlets.
0(Defrost) : Clears the
windshield of fog or frost more
quickly. Air is directed to the
windshield and side window outlets. For best results, clear all snow and
ice from the windshield before
defrosting.
Do not drive the vehicle until all
windows are clear.
Air Conditioning
#(Air Conditioning, If
Equipped) : Press to turn the air
conditioning on or off. If the fan is
turned off or the outside
temperature falls below freezing, the
air conditioning compressor will
not work.
h(Recirculation, If Equipped) :
Press to turn on the recirculation.
An indicator light comes on. Air is
recirculated inside the vehicle.
It helps to quickly cool the air inside
the vehicle and reduce the entry of
outside air and odors.
To improve fuel efficiency and to
cool the vehicle faster, recirculation
may be automatically selected in
warm weather. The recirculation
light will not come on. Press
hto
select recirculation; press it again to
select outside air.
Rear Window Defogger
1(Rear Defogger) : Press to turn
the rear window defogger on or off.
An indicator light on the button
comes on to show that the rear
window defogger is on.
The defogger only works when the
ignition is in ON/RUN. The defogger
turns off if the ignition is in the ACC/
ACCESSORY or LOCK/OFF
position.
Do not drive the vehicle until all
windows are clear.
If equipped with heated outside
rearview mirrors, they turn on when
the rear window defogger button is
on and help to clear fog or frost from
the surface of the mirrors. See
Heated Mirrors 042
ii.
Caution
Do not use a razor blade or sharp
object to clear the inside rear
window. Do not adhere anything
to the defogger grid lines in the
rear glass. These actions may
(Continued)
Page 168 of 357
Chevrolet Cruze Limited Owner Manual (GMNA-Localizing-U.S./Canada-
9282844) - 2016 - crc - 9/3/15
Climate Controls 167
When Auto Rear Defog is selected,
the rear window defogger turns on
automatically when the interior
temperature is cold and the outside
temperature is about 5 °C (40 °F)
and below. The auto rear defogger
turns off automatically. At higher
speeds, the rear window defogger
may stay on continuously.
If equipped with heated outside
rearview mirrors, they turn on when
the rear window defogger button is
on and help to clear fog or frost from
the surface of the mirrors. See
Heated Mirrors042
ii.
Caution
Do not try to clear frost or other
material from the inside of the
front windshield and rear window
with a razor blade or anything
else that is sharp. This may
damage the rear window
defogger grid and affect the
radio's ability to pick up stations
clearly. The repairs would not be
covered by the vehicle warranty. Heated Seats (If Equipped) :
Press
to turn the heated seats on or off.
See Heated Front Seats 050
ii.
Remote Start Climate Control
Operation : If equipped, the climate
control system may run. The driver ’s
previous settings are used to heat
or cool the vehicle. During extreme
cold temperatures, for manual
operation, set the temperature
control to high heat and the fan
control to medium speed instead of
high for better results. The rear
defog and front heated seats may
come on if it is cold outside. The
indicators do not come on. See
Remote Vehicle Start 032
iiand
Heated Front Seats 050ii.
Sensors
The solar sensor, on top of the
instrument panel near the
windshield, monitors the solar heat.
The climate control system uses the
sensor information to adjust the
temperature, fan speed,
recirculation, and air delivery mode
for best comfort. If the sensor is covered, the
automatic climate control system
may not work properly.
Page 207 of 357
Chevrolet Cruze Limited Owner Manual (GMNA-Localizing-U.S./Canada-
9282844) - 2016 - crc - 9/3/15
206 Driving and Operating
The sensors on the rear bumper
detect objects up to 2.5 m (8 ft)
behind the vehicle, and at least
20 cm (8 in) off the ground. The
distance objects can be detected
may be less during warmer or humid
weather.
{Warning
The parking assist system does
not detect children, pedestrians,
bicyclists, animals, or objects
below the bumper or that are too
close or too far from the vehicle.
It is not available at speeds
greater than 8 km/h (5 mph). To
prevent injury, death, or vehicle
damage, even with parking assist,
always check the area around the
vehicle and check all mirrors
before backing.
How the System Works
RPA comes on automatically when
the shift lever is moved into
R (Reverse). A single beep sounds
to indicate the system is working.An obstacle detection is indicated
by beeps. The time between the
beeps becomes shorter as the
vehicle gets closer to the obstacle.
When the distance is less than
30 cm (12 in), the beeping is a
continuous beep for five seconds.
Turning the System On and Off
The RPA system can be turned on
and off using the infotainment
system controls. See
Vehicle
Personalization 0122
ii.
When the system is off, PARK
ASSIST OFF displays on the Driver
Information Center (DIC). The
message disappears after a short
period of time.
RPA defaults to the on setting each
time the vehicle is started.
Turn off RPA when towing a trailer.
When the System Does Not
Seem to Work Properly
The following messages may be
displayed on the DIC:
SERVICE PARKING ASSIST : If
this message occurs, check the
following conditions:
. The sensors are not clean. Keep
the vehicle's rear bumper free of
mud, dirt, snow, ice, and slush.
For cleaning instructions, see
Exterior Care 0296
ii.
. The parking assist sensors are
covered by frost or ice. Frost or
ice can form around and behind
the sensors and may not always
be seen; this can occur after
washing the vehicle in cold
weather. The message may not
clear until the frost or ice has
melted.
If the above conditions do not exist,
take the vehicle to your dealer to
repair the system.