2016 CHEVROLET CRUZE LIMITED remove seats
[x] Cancel search: remove seatsPage 33 of 357
Chevrolet Cruze Limited Owner Manual (GMNA-Localizing-U.S./Canada-
9282844) - 2016 - crc - 9/3/15
32 Keys, Doors, and Windows
2. Press the button on therecognized transmitter to
extend the key blade. Insert the
key blade into the
transmitter slot.
3. With the vehicle in P (Park) or N (Neutral), press the brake
pedal and the ENGINE START/
STOP button. See Starting the
Engine 0185
iifor additional
information about the vehicle's
keyless ignition with
pushbutton start.
Replace the transmitter battery
as soon as possible.
Battery Replacement
Replace the battery if the REPLACE
BATTERY IN REMOTE KEY
message displays in the DIC. See
Key and Lock Messages 0118
ii.
Caution
When replacing the battery, do
not touch any of the circuitry on
the transmitter. Static from your
body could damage the
transmitter. The battery is not rechargeable. To
replace the battery:
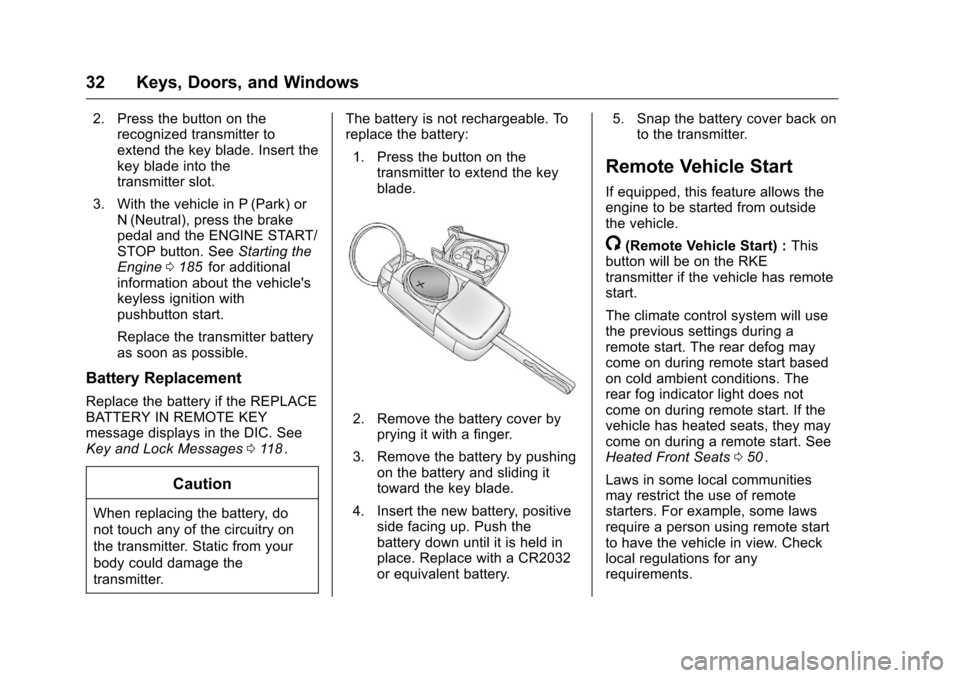
1. Press the button on the transmitter to extend the key
blade.
2. Remove the battery cover byprying it with a finger.
3. Remove the battery by pushing on the battery and sliding it
toward the key blade.
4. Insert the new battery, positive side facing up. Push the
battery down until it is held in
place. Replace with a CR2032
or equivalent battery. 5. Snap the battery cover back on
to the transmitter.
Remote Vehicle Start
If equipped, this feature allows the
engine to be started from outside
the vehicle.
/(Remote Vehicle Start) : This
button will be on the RKE
transmitter if the vehicle has remote
start.
The climate control system will use
the previous settings during a
remote start. The rear defog may
come on during remote start based
on cold ambient conditions. The
rear fog indicator light does not
come on during remote start. If the
vehicle has heated seats, they may
come on during a remote start. See
Heated Front Seats 050
ii.
Laws in some local communities
may restrict the use of remote
starters. For example, some laws
require a person using remote start
to have the vehicle in view. Check
local regulations for any
requirements.
Page 69 of 357
Chevrolet Cruze Limited Owner Manual (GMNA-Localizing-U.S./Canada-
9282844) - 2016 - crc - 9/3/15
68 Seats and Restraints
in a child restraint. If a child restraint
has been installed and the on
indicator is lit:1. Turn the vehicle off.
2. Remove the child restraint from the vehicle.
3. Remove any additional items from the seat such as blankets,
cushions, seat covers, seat
heaters, or seat massagers.
4. Reinstall the child restraint following the directions
provided by the child restraint
manufacturer and refer to
Securing Child Restraints
(Rear Seat) 085
iior Securing
Child Restraints (Front
Passenger Seat) 087
ii.
5. If, after reinstalling the child restraint and restarting the
vehicle, the on indicator is still
lit, turn the vehicle off. Then
slightly recline the vehicle
seatback and adjust the seat
cushion, if adjustable, to make
sure that the vehicle seatback
is not pushing the child
restraint into the seat cushion. Also make sure the child
restraint is not trapped under
the vehicle head restraint.
If this happens, adjust the head
restraint. See
Head Restraints
0 47
ii.
6. Restart the vehicle.
The passenger sensing system may
or may not turn off the airbag(s) for
a child in a child restraint depending
upon the child’s size. It is better to
secure the child restraint in a rear
seat. Never put a rear-facing child
restraint in the front seat, even if the
on indicator is not lit.
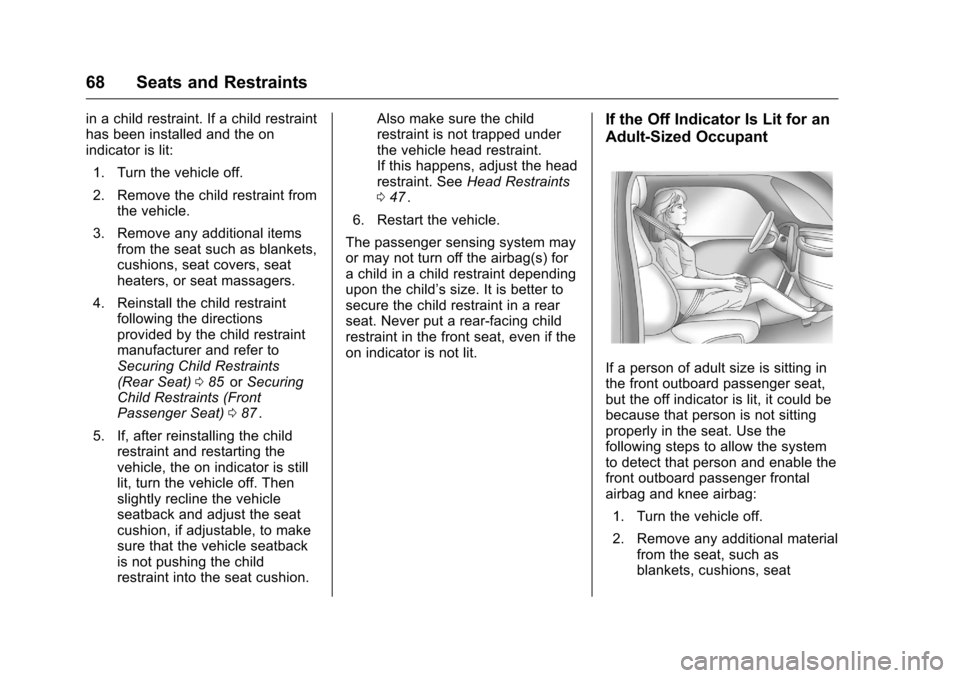
If the Off Indicator Is Lit for an
Adult-Sized Occupant
If a person of adult size is sitting in
the front outboard passenger seat,
but the off indicator is lit, it could be
because that person is not sitting
properly in the seat. Use the
following steps to allow the system
to detect that person and enable the
front outboard passenger frontal
airbag and knee airbag: 1. Turn the vehicle off.
2. Remove any additional material from the seat, such as
blankets, cushions, seat
Page 71 of 357
Chevrolet Cruze Limited Owner Manual (GMNA-Localizing-U.S./Canada-
9282844) - 2016 - crc - 9/3/15
70 Seats and Restraints
or other electronic device, is put on
an unoccupied seat. If this is not
desired, remove the object from
the seat.
{Warning
Stowing of articles under the
passenger seat or between the
passenger seat cushion and
seatback may interfere with the
proper operation of the passenger
sensing system.
Servicing the
Airbag-Equipped Vehicle
Airbags affect how the vehicle
should be serviced. There are parts
of the airbag system in several
places around the vehicle. Your
dealer and the service manual have
information about servicing the
vehicle and the airbag system. To
purchase a service manual, see
Service Publications Ordering
Information0332
ii.
{Warning
For up to 10 seconds after the
vehicle is turned off and the
battery is disconnected, an airbag
can still inflate during improper
service. You can be injured if you
are close to an airbag when it
inflates. Avoid yellow connectors.
They are probably part of the
airbag system. Be sure to follow
proper service procedures, and
make sure the person performing
work for you is qualified to do so.
Adding Equipment to the
Airbag-Equipped Vehicle
Adding accessories that change the
vehicle's frame, bumper system,
height, front end, or side sheet
metal, may keep the airbag system
from working properly. The
operation of the airbag system can
also be affected by changing or
moving any parts of the front seats,
safety belts, the airbag sensing and
diagnostic module, steering wheel,
instrument panel, any of the airbag modules, ceiling or pillar garnish
trim, front sensors, side impact
sensors, or airbag wiring.
Your dealer and the service manual
have information about the location
of the airbag sensors, sensing and
diagnostic module, and airbag
wiring.
In addition, the vehicle has a
passenger sensing system for the
front outboard passenger position,
which includes sensors that are part
of the passenger seat. The
passenger sensing system may not
operate properly if the original seat
trim is replaced with non-GM
covers, upholstery, or trim; or with
GM covers, upholstery, or trim
designed for a different vehicle. Any
object, such as an aftermarket seat
heater or a comfort-enhancing pad
or device, installed under or on top
of the seat fabric, could also
interfere with the operation of the
passenger sensing system. This
could either prevent proper
deployment of the passenger
airbag(s) or prevent the passenger
sensing system from properly
Page 83 of 357
Chevrolet Cruze Limited Owner Manual (GMNA-Localizing-U.S./Canada-
9282844) - 2016 - crc - 9/3/15
82 Seats and Restraints
Warning (Continued)
wrapped around a child’s neck.
If the shoulder belt is locked and
tightened around a child’s neck,
the only way to loosen the belt is
to cut it.
Buckle any unused safety belts
behind the child restraint so
children cannot reach them. Pull
the shoulder belt all the way out
of the retractor to set the lock,
and tighten the belt behind the
child restraint after the child
restraint has been installed.
Caution
Do not let the LATCH
attachments rub against the
vehicle’s safety belts. This may
damage these parts. If necessary,
move buckled safety belts to
avoid rubbing the LATCH
attachments.(Continued)
Caution (Continued)
Do not fold the rear seatback
when the seat is occupied. Do not
fold the empty rear seat with a
safety belt buckled. This could
damage the safety belt or the
seat. Unbuckle and return the
safety belt to its stowed position,
before folding the seat.
If you need to secure more than one
child restraint in the rear seat, see
Where to Put the Restraint 077
iifor
additional information.
This system is designed to make
installation of child restraints easier.
When using lower anchors, do not
use the vehicle's safety belts.
Instead use the vehicle's anchors
and child restraint attachments to
secure the restraints. Some
restraints also use another vehicle
anchor to secure a top tether.
1. Attach and tighten the lower attachments to the lower
anchors. If the child restraint
does not have lower attachments or the desired
seating position does not have
lower anchors, secure the child
restraint with the top tether and
the safety belts. Refer to the
child restraint manufacturer
instructions and the
instructions in this manual.
1.1. Find the lower anchors for
the desired rear outboard
seating position.
1.2. Put the child restraint on the seat.
For outboard rear seating
positions, if the head
restraint interferes with the
proper installation of the
child restraint, the head
restraint may be removed.
See“Head Restraint
Removal and
Reinstallation” at the end
of this section.
1.3. Attach and tighten the lower attachments on the
child restraint to the lower
anchors.
Page 84 of 357
Chevrolet Cruze Limited Owner Manual (GMNA-Localizing-U.S./Canada-
9282844) - 2016 - crc - 9/3/15
Seats and Restraints 83
2. If the child restraintmanufacturer recommends that
the top tether be attached,
attach and tighten the top
tether to the top tether anchor.
Refer to the child restraint
instructions and the following
steps:
2.1. Find the top tether anchor.
Open the cover to expose
the anchor.
2.2. Route, attach, and tighten the top tether according to
the child restraint
instructions and the
following instructions:
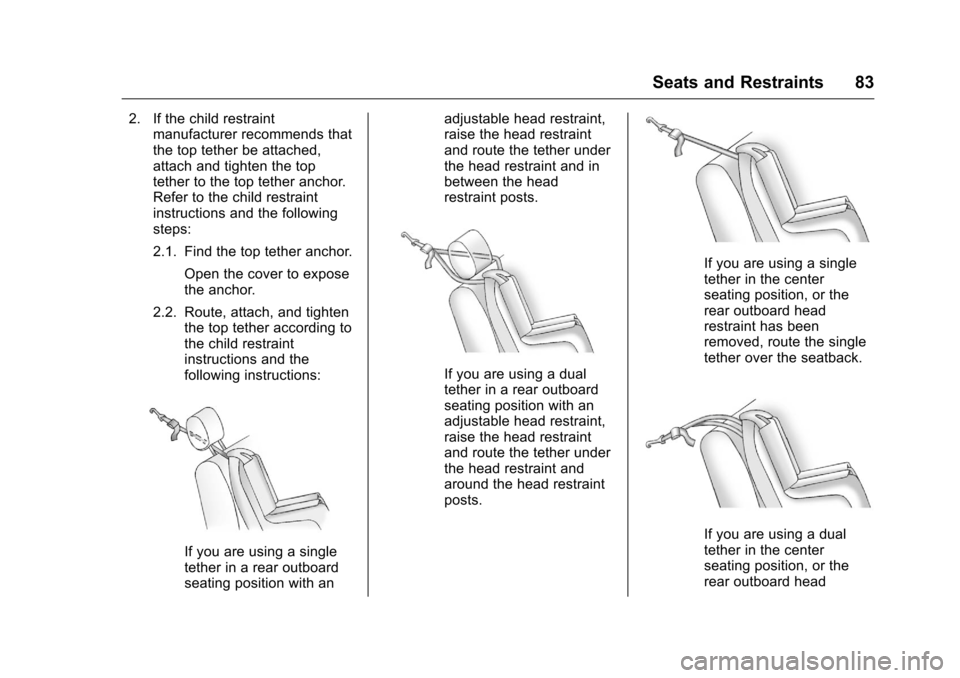
If you are using a single
tether in a rear outboard
seating position with an adjustable head restraint,
raise the head restraint
and route the tether under
the head restraint and in
between the head
restraint posts.
If you are using a dual
tether in a rear outboard
seating position with an
adjustable head restraint,
raise the head restraint
and route the tether under
the head restraint and
around the head restraint
posts.
If you are using a single
tether in the center
seating position, or the
rear outboard head
restraint has been
removed, route the single
tether over the seatback.
If you are using a dual
tether in the center
seating position, or the
rear outboard head
Page 85 of 357
Chevrolet Cruze Limited Owner Manual (GMNA-Localizing-U.S./Canada-
9282844) - 2016 - crc - 9/3/15
84 Seats and Restraints
restraint has been
removed, route the dual
tether over the seatback.
3. Before placing a child in the child restraint, make sure it is
securely held in place. To
check, grasp the child restraint
at the LATCH path and attempt
to move it side to side and
back and forth. There should
be no more than 2.5 cm (1 in) of
movement, for proper
installation.
Head Restraint Removal and
Reinstallation
The rear outboard head restraints
can be removed if they interfere with
the proper installation of the child
restraint.
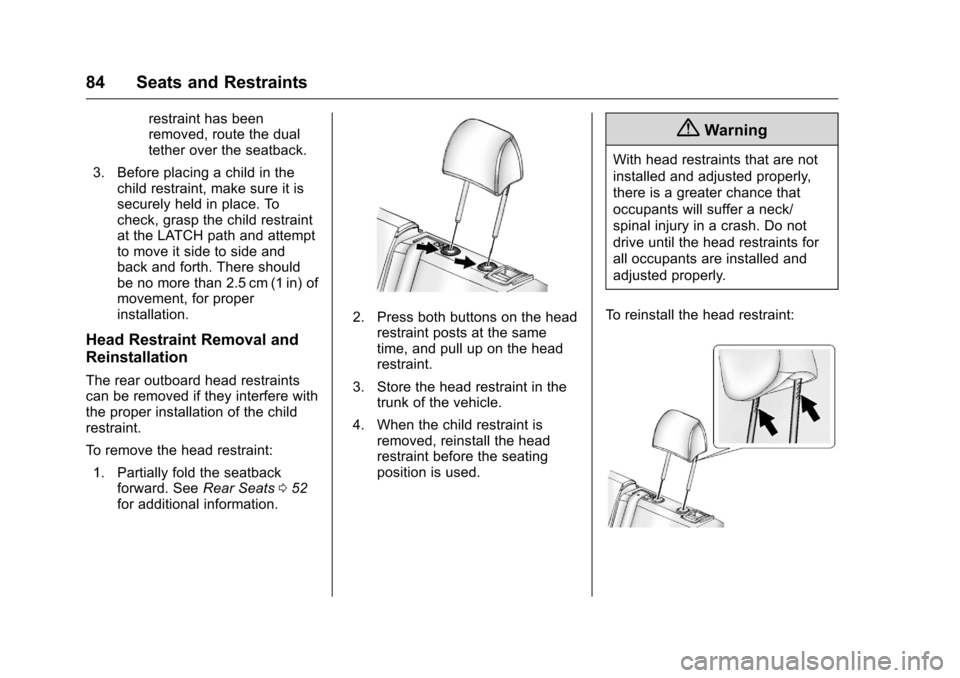
To remove the head restraint:
1. Partially fold the seatback forward. See Rear Seats052
iifor additional information.
2. Press both buttons on the head
restraint posts at the same
time, and pull up on the head
restraint.
3. Store the head restraint in the trunk of the vehicle.
4. When the child restraint is removed, reinstall the head
restraint before the seating
position is used.
{Warning
With head restraints that are not
installed and adjusted properly,
there is a greater chance that
occupants will suffer a neck/
spinal injury in a crash. Do not
drive until the head restraints for
all occupants are installed and
adjusted properly.
To reinstall the head restraint:
Page 87 of 357
Chevrolet Cruze Limited Owner Manual (GMNA-Localizing-U.S./Canada-
9282844) - 2016 - crc - 9/3/15
86 Seats and Restraints
If more than one child restraint
needs to be installed in the rear
seat, be sure to readWhere to Put
the Restraint 077
ii.
1. Put the child restraint on the seat.
If the head restraint interferes
with the proper installation of
the child restraint, the head
restraint may be removed. See
“Head Restraint Removal and
Reinstallation” underLower
Anchors and Tethers for
Children (LATCH System)
0 78
ii.
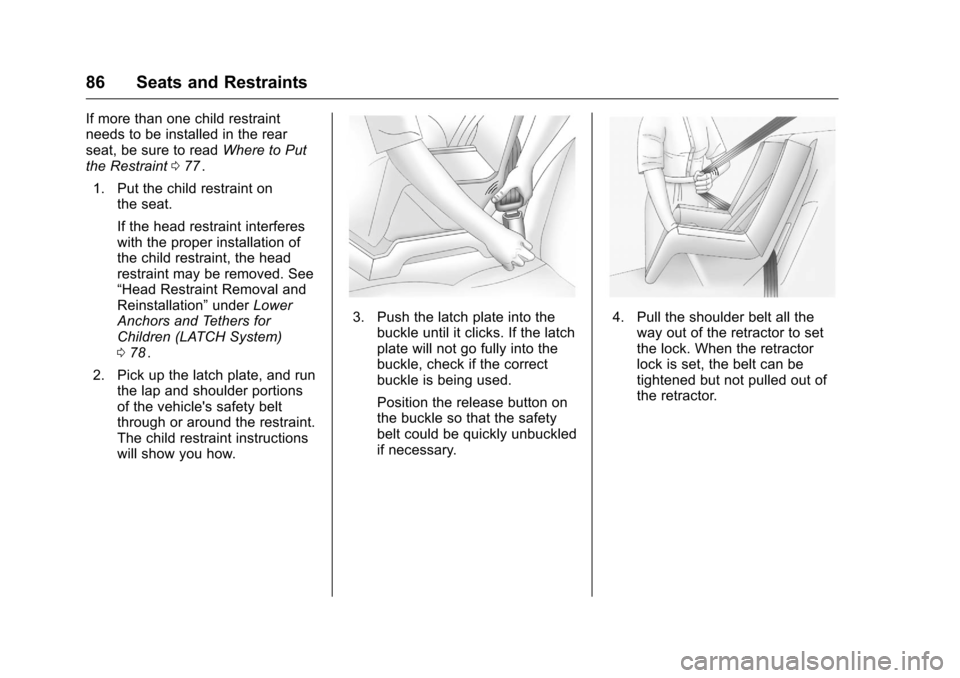
2. Pick up the latch plate, and run the lap and shoulder portions
of the vehicle's safety belt
through or around the restraint.
The child restraint instructions
will show you how.
3. Push the latch plate into the
buckle until it clicks. If the latch
plate will not go fully into the
buckle, check if the correct
buckle is being used.
Position the release button on
the buckle so that the safety
belt could be quickly unbuckled
if necessary.4. Pull the shoulder belt all theway out of the retractor to set
the lock. When the retractor
lock is set, the belt can be
tightened but not pulled out of
the retractor.
Page 88 of 357
Chevrolet Cruze Limited Owner Manual (GMNA-Localizing-U.S./Canada-
9282844) - 2016 - crc - 9/3/15
Seats and Restraints 87
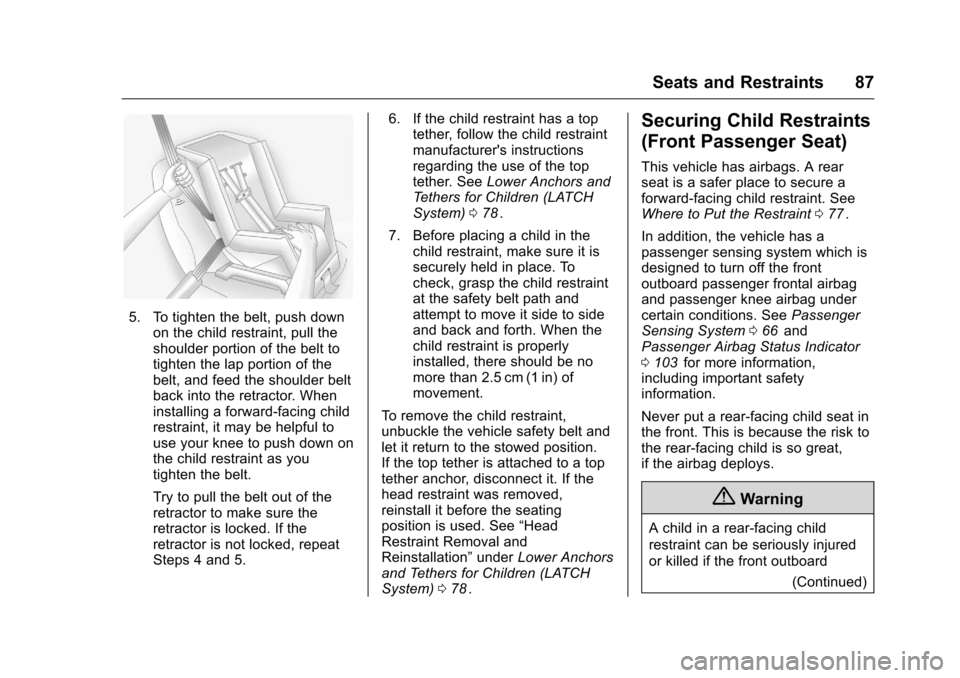
5. To tighten the belt, push downon the child restraint, pull the
shoulder portion of the belt to
tighten the lap portion of the
belt, and feed the shoulder belt
back into the retractor. When
installing a forward-facing child
restraint, it may be helpful to
use your knee to push down on
the child restraint as you
tighten the belt.
Try to pull the belt out of the
retractor to make sure the
retractor is locked. If the
retractor is not locked, repeat
Steps 4 and 5. 6. If the child restraint has a top
tether, follow the child restraint
manufacturer's instructions
regarding the use of the top
tether. See Lower Anchors and
Tethers for Children (LATCH
System) 078
ii.
7. Before placing a child in the child restraint, make sure it is
securely held in place. To
check, grasp the child restraint
at the safety belt path and
attempt to move it side to side
and back and forth. When the
child restraint is properly
installed, there should be no
more than 2.5 cm (1 in) of
movement.
To remove the child restraint,
unbuckle the vehicle safety belt and
let it return to the stowed position.
If the top tether is attached to a top
tether anchor, disconnect it. If the
head restraint was removed,
reinstall it before the seating
position is used. See “Head
Restraint Removal and
Reinstallation” underLower Anchors
and Tethers for Children (LATCH
System) 078
ii.
Securing Child Restraints
(Front Passenger Seat)
This vehicle has airbags. A rear
seat is a safer place to secure a
forward-facing child restraint. See
Where to Put the Restraint 077
ii.
In addition, the vehicle has a
passenger sensing system which is
designed to turn off the front
outboard passenger frontal airbag
and passenger knee airbag under
certain conditions. See Passenger
Sensing System 066
iiand
Passenger Airbag Status Indicator
0 103
iifor more information,
including important safety
information.
Never put a rear-facing child seat in
the front. This is because the risk to
the rear-facing child is so great,
if the airbag deploys.
{Warning
A child in a rear-facing child
restraint can be seriously injured
or killed if the front outboard
(Continued)