2016 CHEVROLET CRUZE LIMITED battery
[x] Cancel search: batteryPage 226 of 357
Chevrolet Cruze Limited Owner Manual (GMNA-Localizing-U.S./Canada-
9282844) - 2016 - crc - 9/3/15
Vehicle Care 225
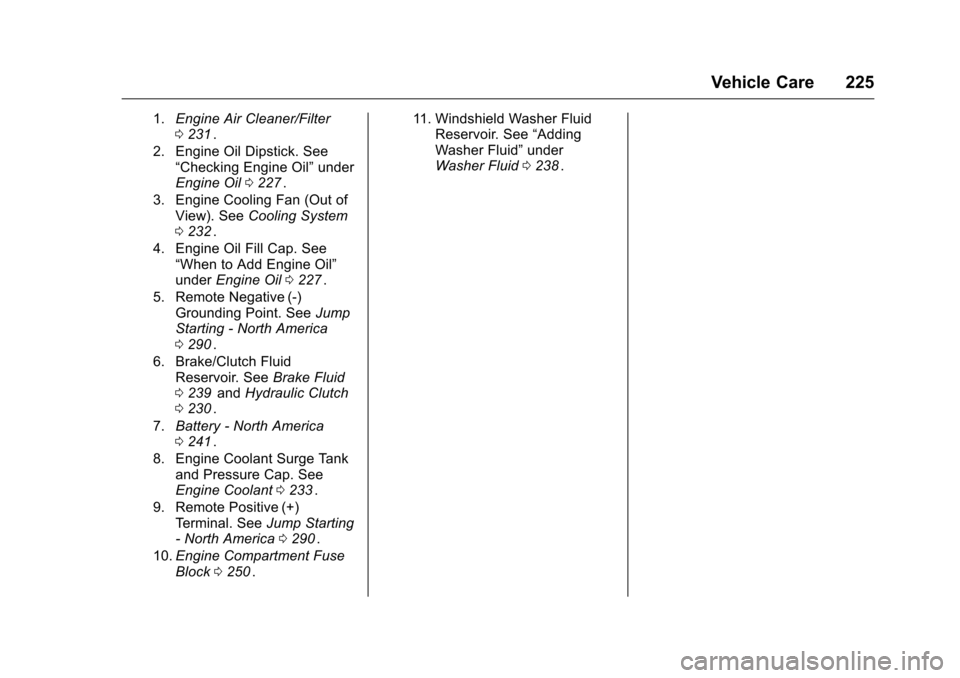
1.Engine Air Cleaner/Filter
0231ii.
2. Engine Oil Dipstick. See “Checking Engine Oil” under
Engine Oil 0227
ii.
3. Engine Cooling Fan (Out of View). See Cooling System
0 232
ii.
4. Engine Oil Fill Cap. See “When to Add Engine Oil”
under Engine Oil 0227
ii.
5. Remote Negative (-) Grounding Point. See Jump
Starting - North America
0 290
ii.
6. Brake/Clutch Fluid Reservoir. See Brake Fluid
0 239
iiand Hydraulic Clutch
0 230ii.
7. Battery - North America
0241
ii.
8. Engine Coolant Surge Tank and Pressure Cap. See
Engine Coolant 0233
ii.
9. Remote Positive (+) Terminal. See Jump Starting
- North America 0290
ii.
10. Engine Compartment Fuse
Block 0250
ii. 11. Windshield Washer Fluid
Reservoir. See “Adding
Washer Fluid” under
Washer Fluid 0238
ii.
Page 228 of 357
Chevrolet Cruze Limited Owner Manual (GMNA-Localizing-U.S./Canada-
9282844) - 2016 - crc - 9/3/15
Vehicle Care 227
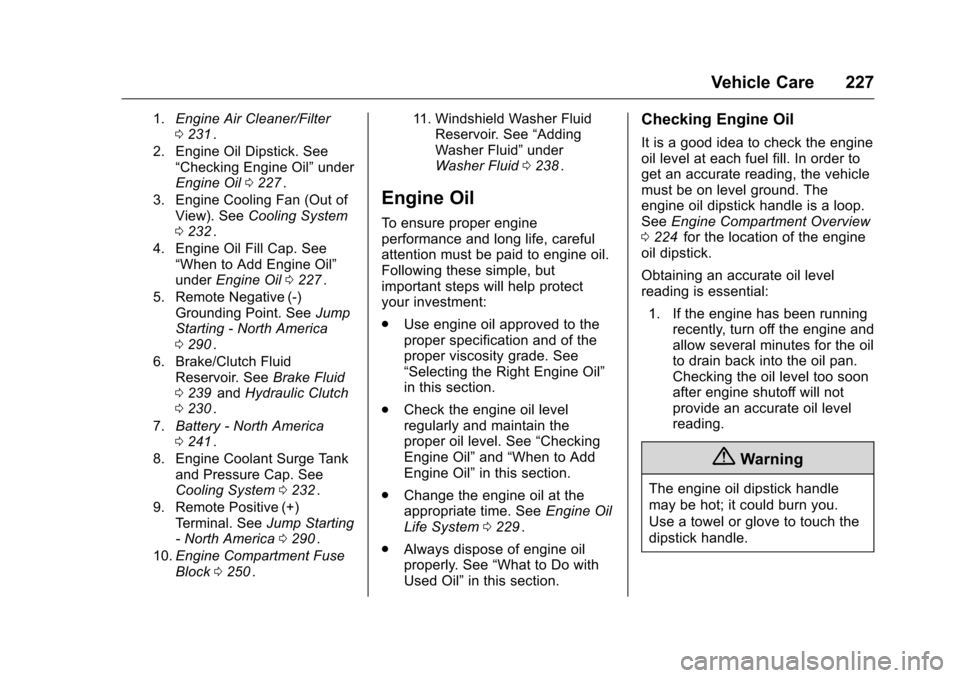
1.Engine Air Cleaner/Filter
0231ii.
2. Engine Oil Dipstick. See “Checking Engine Oil” under
Engine Oil 0227
ii.
3. Engine Cooling Fan (Out of View). See Cooling System
0 232
ii.
4. Engine Oil Fill Cap. See “When to Add Engine Oil”
under Engine Oil 0227
ii.
5. Remote Negative (-) Grounding Point. See Jump
Starting - North America
0 290
ii.
6. Brake/Clutch Fluid Reservoir. See Brake Fluid
0 239
iiand Hydraulic Clutch
0 230ii.
7. Battery - North America
0241
ii.
8. Engine Coolant Surge Tank and Pressure Cap. See
Cooling System 0232
ii.
9. Remote Positive (+) Terminal. See Jump Starting
- North America 0290
ii.
10. Engine Compartment Fuse
Block 0250
ii. 11. Windshield Washer Fluid
Reservoir. See “Adding
Washer Fluid” under
Washer Fluid 0238
ii.
Engine Oil
To ensure proper engine
performance and long life, careful
attention must be paid to engine oil.
Following these simple, but
important steps will help protect
your investment:
.
Use engine oil approved to the
proper specification and of the
proper viscosity grade. See
“Selecting the Right Engine Oil”
in this section.
. Check the engine oil level
regularly and maintain the
proper oil level. See “Checking
Engine Oil” and“When to Add
Engine Oil” in this section.
. Change the engine oil at the
appropriate time. See Engine Oil
Life System 0229
ii.
. Always dispose of engine oil
properly. See “What to Do with
Used Oil” in this section.
Checking Engine Oil
It is a good idea to check the engine
oil level at each fuel fill. In order to
get an accurate reading, the vehicle
must be on level ground. The
engine oil dipstick handle is a loop.
SeeEngine Compartment Overview
0 224
iifor the location of the engine
oil dipstick.
Obtaining an accurate oil level
reading is essential:
1. If the engine has been running recently, turn off the engine and
allow several minutes for the oil
to drain back into the oil pan.
Checking the oil level too soon
after engine shutoff will not
provide an accurate oil level
reading.
{Warning
The engine oil dipstick handle
may be hot; it could burn you.
Use a towel or glove to touch the
dipstick handle.
Page 242 of 357
Chevrolet Cruze Limited Owner Manual (GMNA-Localizing-U.S./Canada-
9282844) - 2016 - crc - 9/3/15
Vehicle Care 241
Battery - North America
The original equipment battery is
maintenance free. Do not remove
the cap and do not add fluid.
Refer to the replacement number on
the original battery label when a
new battery is needed.
{Warning
WARNING:Battery posts,
terminals, and related
accessories contain lead and lead
compounds, chemicals known to
the State of California to cause
cancer and birth defects or other
reproductive harm. Batteries also
contain other chemicals known to
the State of California to cause
cancer. WASH HANDS AFTER
HANDLING. SeeCalifornia
Proposition 65 Warning 0220
ii.
Vehicle Storage
{Warning
Batteries have acid that can burn
you and gas that can explode.
You can be badly hurt if you are
not careful. See Jump Starting -
North America 0290
iifor tips on
working around a battery without
getting hurt.
Infrequent Usage: Remove the
black, negative (−) cable from the
battery to keep the battery from
running down.
Extended Storage: Remove the
black, negative (−) cable from the
battery or use a battery trickle
charger.
Starter Switch Check
{Warning
When you are doing this
inspection, the vehicle could
move suddenly. If the vehicle
moves, you or others could be
injured.
1. Before starting this check, be sure there is enough room
around the vehicle.
2. Apply both the parking brake and the regular brake.
Do not use the accelerator
pedal, and be ready to turn off
the engine immediately if it
starts.
3. For automatic transmission vehicles, try to start the engine
in each gear. The vehicle
should start only in P (Park) or
N (Neutral). If the vehicle starts
in any other position, contact
your dealer for service.
Page 253 of 357
Chevrolet Cruze Limited Owner Manual (GMNA-Localizing-U.S./Canada-
9282844) - 2016 - crc - 9/3/15
252 Vehicle Care
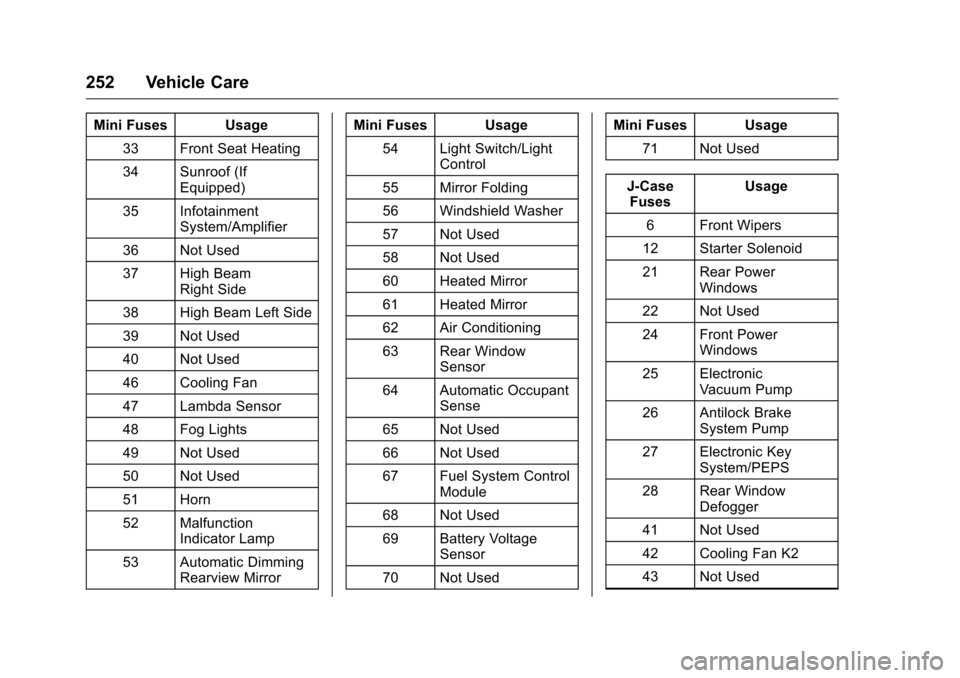
Mini Fuses Usage33 Front Seat Heating
34 Sunroof (If Equipped)
35 Infotainment System/Amplifier
36 Not Used
37 High Beam Right Side
38 High Beam Left Side
39 Not Used
40 Not Used
46 Cooling Fan
47 Lambda Sensor
48 Fog Lights
49 Not Used
50 Not Used
51 Horn
52 Malfunction Indicator Lamp
53 Automatic Dimming Rearview Mirror Mini Fuses Usage
54 Light Switch/Light Control
55 Mirror Folding
56 Windshield Washer
57 Not Used
58 Not Used
60 Heated Mirror
61 Heated Mirror
62 Air Conditioning
63 Rear Window Sensor
64 Automatic Occupant Sense
65 Not Used
66 Not Used
67 Fuel System Control Module
68 Not Used
69 Battery Voltage Sensor
70 Not Used Mini Fuses Usage
71 Not Used
J-Case Fuses Usage
6 Front Wipers
12 Starter Solenoid
21 Rear Power Windows
22 Not Used
24 Front Power Windows
25 Electronic Vacuum Pump
26 Antilock Brake System Pump
27 Electronic Key System/PEPS
28 Rear Window Defogger
41 Not Used
42 Cooling Fan K2
43 Not Used
Page 291 of 357
Chevrolet Cruze Limited Owner Manual (GMNA-Localizing-U.S./Canada-
9282844) - 2016 - crc - 9/3/15
290 Vehicle Care
Check the inflation pressure
regularly. It should be 420 kPa
(60 psi).
Stop as soon as possible and check
that the spare tire is correctly
inflated after being installed on the
vehicle. The compact spare tire is
designed for temporary use only.
The vehicle will perform differently
with the spare tire installed and it is
recommended that the vehicle
speed be limited to 80 km/h
(50 mph). To conserve the tread of
the spare tire, have the standard tire
repaired or replaced as soon as
convenient and return the spare tire
to the storage area.
When using a compact spare tire,
the AWD (if equipped), ABS, and
Traction Control systems may
engage until the spare tire is
recognized by the vehicle,
especially on slippery roads. Adjust
driving to reduce possible
wheel slip.Caution
When the compact spare is
installed, do not take the vehicle
through an automatic car wash
with guide rails. The compact
spare can get caught on the rails
which can damage the tire, wheel,
and other parts of the vehicle.
Do not use the compact spare on
other vehicles.
Do not mix the compact spare tire or
wheel with other wheels or tires.
They will not fit. Keep the spare tire
and its wheel together.
Caution
Tire chains will not fit the compact
spare. Using them can damage
the vehicle and the chains. Do not
use tire chains on the compact
spare.
Jump Starting
Jump Starting - North
America
For more information about the
vehicle battery, see Battery - North
America 0241
ii.
If the battery has run down, try to
use another vehicle and some
jumper cables to start your vehicle.
Be sure to use the following steps to
do it safely.
{Warning
WARNING: Battery posts,
terminals, and related
accessories contain lead and lead
compounds, chemicals known to
the State of California to cause
cancer and birth defects or other
reproductive harm. Batteries also
contain other chemicals known to
the State of California to cause
cancer. WASH HANDS AFTER
HANDLING. SeeCalifornia
Proposition 65 Warning 0220
ii.
Page 292 of 357
Chevrolet Cruze Limited Owner Manual (GMNA-Localizing-U.S./Canada-
9282844) - 2016 - crc - 9/3/15
Vehicle Care 291
{Warning
Batteries can hurt you. They can
be dangerous because:. They contain acid that can
burn you.
. They contain gas that can
explode or ignite.
. They contain enough
electricity to burn you.
If you do not follow these steps
exactly, some or all of these
things can hurt you.
Caution
Ignoring these steps could result
in costly damage to the vehicle
that would not be covered by the
vehicle warranty. Trying to start
the vehicle by pushing or pulling it
will not work, and it could damage
the vehicle.
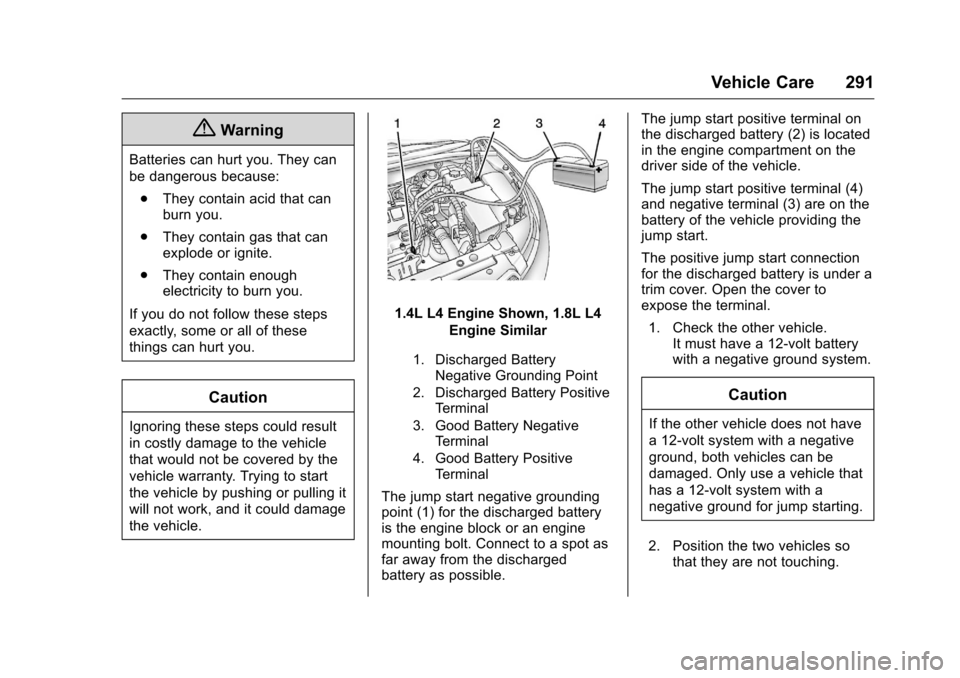
1.4L L4 Engine Shown, 1.8L L4 Engine Similar
1. Discharged BatteryNegative Grounding Point
2. Discharged Battery Positive Terminal
3. Good Battery Negative Terminal
4. Good Battery Positive Terminal
The jump start negative grounding
point (1) for the discharged battery
is the engine block or an engine
mounting bolt. Connect to a spot as
far away from the discharged
battery as possible. The jump start positive terminal on
the discharged battery (2) is located
in the engine compartment on the
driver side of the vehicle.
The jump start positive terminal (4)
and negative terminal (3) are on the
battery of the vehicle providing the
jump start.
The positive jump start connection
for the discharged battery is under a
trim cover. Open the cover to
expose the terminal.
1. Check the other vehicle. It must have a 12-volt battery
with a negative ground system.
Caution
If the other vehicle does not have
a 12-volt system with a negative
ground, both vehicles can be
damaged. Only use a vehicle that
has a 12-volt system with a
negative ground for jump starting.
2. Position the two vehicles so that they are not touching.
Page 293 of 357
Chevrolet Cruze Limited Owner Manual (GMNA-Localizing-U.S./Canada-
9282844) - 2016 - crc - 9/3/15
292 Vehicle Care
3. Set the parking brake firmlyand put the shift lever in
P (Park) with an automatic
transmission, or Neutral with a
manual transmission. See
Shifting Into Park 0188
iiwith
an automatic transmission,
or Parking 0190
iiwith a manual
transmission.
Caution
If any accessories are left on or
plugged in during the jump
starting procedure, they could be
damaged. The repairs would not
be covered by the vehicle
warranty. Whenever possible, turn
off or unplug all accessories on
either vehicle when jump starting.
4. Turn the ignition to LOCK/OFF. Turn off all lights and
accessories in both vehicles,
except the hazard warning
flashers if needed.
{Warning
An electric fan can start up even
when the engine is not running
and can injure you. Keep hands,
clothing, and tools away from any
underhood electric fan.
{Warning
Using a match near a battery can
cause battery gas to explode.
People have been hurt doing this,
and some have been blinded.
Use a flashlight if you need more
light.
Battery fluid contains acid that
can burn you. Do not get it on
you. If you accidentally get it in
your eyes or on your skin, flush
the place with water and get
medical help immediately.
{Warning
Fans or other moving engine
parts can injure you badly. Keep
your hands away from moving
parts once the engine is running.
5. Connect one end of the red positive (+) cable to the
positive (+) terminal on the
discharged battery.
6. Connect the other end of the red positive (+) cable to the
positive (+) terminal of the good
battery.
7. Connect one end of the black negative (–) cable to the
negative (–) terminal of the
good battery.
8. Connect the other end of the black negative (–) cable to the
negative (–) grounding point for
the discharged battery.
9. Start the engine in the vehicle with the good battery and run
the engine at idle speed for at
least four minutes.
Page 294 of 357
Chevrolet Cruze Limited Owner Manual (GMNA-Localizing-U.S./Canada-
9282844) - 2016 - crc - 9/3/15
Vehicle Care 293
10. Try to start the vehicle that hadthe dead battery. If it will not
start after a few tries, it
probably needs service.
Caution
If the jumper cables are
connected or removed in the
wrong order, electrical shorting
may occur and damage the
vehicle. The repairs would not be
covered by the vehicle warranty.
Always connect and remove the
jumper cables in the correct order,
making sure that the cables do
not touch each other or other
metal.
Jumper Cable Removal
Reverse the sequence exactly when
removing the jumper cables.
After starting the disabled vehicle
and removing the jumper cables,
allow it to idle for several minutes.
Towing the Vehicle
Caution
Incorrectly towing a disabled
vehicle may cause damage. The
damage would not be covered by
the vehicle warranty.
Do not lash or hook to
suspension components. Use the
proper straps around the tires to
secure the vehicle.
Have the vehicle towed on a flatbed
car carrier or a wheel lift tow truck. If
a wheel lift tow truck is used, the
drive wheels cannot contact the
road while the vehicle is being
towed. A wheel dolly must be used
to lift all drive wheels off the ground.
Use the tow eye for towing a
disabled vehicle or loading it onto a
flatbed car carrier. The tow eye
should not be used to recover a
vehicle from an off-road situation.
Caution
Improper use of the tow eye can
cause vehicle damage. Use
caution and low speeds to
prevent damage to the vehicle.
Consult your dealer or a
professional towing service if the
disabled vehicle must be towed.
Recreational Vehicle
Towing
Recreational vehicle towing refers to
towing the vehicle behind another
vehicle –such as behind a motor
home. The two most common types
of recreational vehicle towing are
known as dinghy towing and dolly
towing. Dinghy towing is towing the
vehicle with all four wheels on the
ground. Dolly towing is towing the
vehicle with two wheels on the
ground and two wheels up on a
device known as a dolly.
Here are some important things to
consider before recreational vehicle
towing: