2016 CHEVROLET CORVETTE cooling
[x] Cancel search: coolingPage 17 of 351
Chevrolet Corvette Owner Manual (GMNA-Localizing-U.S./Canada/Mexico-
9085364) - 2016 - crc - 9/15/15
16 In Brief
With the ignition in ACC/
ACCESSORY or ON/RUN/START,
move the lever to select the wiper
speed.
HI :Use for fast wipes.
LO : Use for slow wipes.
INT : Move the lever up to INT for
intermittent wipes, then turn the
x
INT band up for more frequent
wipes or down for less frequent
wipes.
OFF : Use to turn the wipers off.
1X : For a single wipe, briefly move
the lever down. For several wipes,
hold the lever down.
n L: Pull the lever toward you to
spray windshield washer fluid and
activate the wipers.
See Windshield Wiper/Washer 092.
Climate Controls
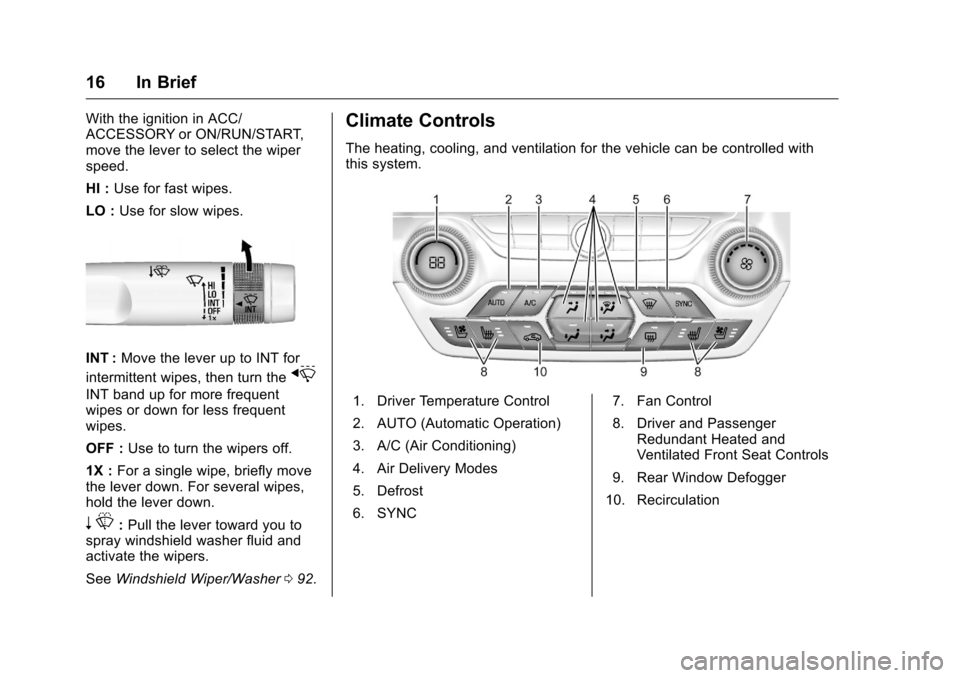
The heating, cooling, and ventilation for the vehicle can be controlled with
this system.
1. Driver Temperature Control
2. AUTO (Automatic Operation)
3. A/C (Air Conditioning)
4. Air Delivery Modes
5. Defrost
6. SYNC 7. Fan Control
8. Driver and Passenger
Redundant Heated and
Ventilated Front Seat Controls
9. Rear Window Defogger
10. Recirculation
Page 92 of 351

Chevrolet Corvette Owner Manual (GMNA-Localizing-U.S./Canada/Mexico-
9085364) - 2016 - crc - 9/15/15
Instruments and Controls 91
Instruments and
Controls
Controls
Steering Wheel Adjustment . . . . 92
Steering Wheel Controls . . . . . . . 92
Horn . . . . . . . . . . . . . . . . . . . . . . . . . . . 92
Windshield Wiper/Washer . . . . . . 92
Compass . . . . . . . . . . . . . . . . . . . . . . 93
Clock . . . . . . . . . . . . . . . . . . . . . . . . . . 94
Power Outlets . . . . . . . . . . . . . . . . . 94
Warning Lights, Gauges, and
Indicators
Warning Lights, Gauges, andIndicators . . . . . . . . . . . . . . . . . . . . 95
Instrument Cluster . . . . . . . . . . . . . 96
Speedometer . . . . . . . . . . . . . . . . . 101
Odometer . . . . . . . . . . . . . . . . . . . . . 101
Trip Odometer . . . . . . . . . . . . . . . . 101
Tachometer . . . . . . . . . . . . . . . . . . . 101
Fuel Gauge . . . . . . . . . . . . . . . . . . . 101
Boost Gauge . . . . . . . . . . . . . . . . . 102
Engine Coolant Temperature Gauge . . . . . . . . . . . . . . . . . . . . . . 103
Safety Belt Reminders . . . . . . . . 104
Airbag Readiness Light . . . . . . . 104
Passenger Airbag Status Indicator . . . . . . . . . . . . . . . . . . . . 105 Charging System Light . . . . . . . 106
Malfunction Indicator Lamp
(Check Engine Light) . . . . . . . . 106
Brake System Warning Light . . . . . . . . . . . . . . . . . . . . . . . . 108
Electric Parking Brake Light . . . . . . . . . . . . . . . . . . . . . . . . 108
Service Electric Parking Brake Light . . . . . . . . . . . . . . . . . . . . . . . . 109
Antilock Brake System (ABS) Warning Light . . . . . . . . . . . . . . . 109
Gear Shifting Light (Canada and Mexico Only) . . . . . . . . . . . 109
Traction Off Light . . . . . . . . . . . . . 110
Traction Control System (TCS)/ Electronic Stability Control
Light . . . . . . . . . . . . . . . . . . . . . . . . 110
Electronic Stability Control (ESC) Off Light . . . . . . . . . . . . . . 110
Engine Coolant Temperature Warning Light . . . . . . . . . . . . . . . 111
Tire Pressure Light . . . . . . . . . . . 111
Engine Oil Pressure Light . . . . . 111
Low Fuel Warning Light . . . . . . . 112
Security Light . . . . . . . . . . . . . . . . . 112
High-Beam On Light . . . . . . . . . . 112
Lamps On Reminder . . . . . . . . . . 113
Cruise Control Light . . . . . . . . . . 113
Door Ajar Light . . . . . . . . . . . . . . . 113
Information Displays
Driver Information Center (DIC) . . . . . . . . . . . . . . . . 113
Head-Up Display (HUD) . . . . . . 115
Vehicle Messages
Vehicle Messages . . . . . . . . . . . . 120
Battery Voltage and Charging Messages . . . . . . . . . . . . . . . . . . . 120
Brake System Messages . . . . . 120
Compass Messages . . . . . . . . . . 121
Convertible Top Messages . . . 121
Cruise Control Messages . . . . . 122
Door Ajar Messages . . . . . . . . . . 122
Engine Cooling System Messages . . . . . . . . . . . . . . . . . . . 123
Engine Oil Messages . . . . . . . . . 123
Engine Power Messages . . . . . 124
Fuel System Messages . . . . . . . 124
Key and Lock Messages . . . . . 124
Lamp Messages . . . . . . . . . . . . . . 125
Ride Control System Messages . . . . . . . . . . . . . . . . . . . 125
Airbag System Messages . . . . 127
Security Messages . . . . . . . . . . . 127
Service Vehicle Messages . . . . 127
Starting the Vehicle Messages . . . . . . . . . . . . . . . . . . . 128
Tire Messages . . . . . . . . . . . . . . . . 128
Transmission Messages . . . . . . 129
Page 124 of 351
Chevrolet Corvette Owner Manual (GMNA-Localizing-U.S./Canada/Mexico-
9085364) - 2016 - crc - 9/15/15
Instruments and Controls 123
Engine Cooling System
Messages
A/C OFF DUE TO HIGH
ENGINE TEMP
This message displays when the
engine coolant becomes hotter than
the normal operating temperature.
To avoid added strain on a hot
engine, the air conditioning
compressor automatically turns off.
When the coolant temperature
returns to normal, the air
conditioning compressor turns back
on. The vehicle can continue to be
driven.
If this message continues to appear,
have the system repaired by your
dealer as soon as possible to avoid
damage to the engine.
ENGINE OVERHEATING—
IDLE ENGINE
This message displays when the
engine coolant temperature is too
hot. Stop and allow the vehicle to
idle until it cools down.
ENGINE OVERHEATED —
TURN VEHICLE OFF
This message displays and a
continuous chime sounds if the
engine cooling system reaches
unsafe temperatures for operation.
Stop and turn off the vehicle as
soon as it is safe to do so to avoid
severe damage. This message
clears when the engine has cooled
to a safe operating temperature.
Engine Oil Messages
CHANGE ENGINE OIL SOON
This message displays when the
engine oil needs to be changed.
When you change the engine oil, be
sure to reset the Oil Life System.
See Engine Oil Life System 0228,
Driver Information Center (DIC)
0 113, Engine Oil 0223, and
Maintenance Schedule 0298.
ENGINE OIL HOT, IDLE
ENGINE
This message displays when the
engine oil temperature is too hot.
Stop and allow the vehicle to idle
until it cools down.
ENGINE OIL LOW —ADD OIL
On some vehicles, this message
displays when the engine oil level
may be too low. Check the oil level
before filling to the recommended
level. If the oil is not low and this
message remains on, take the
vehicle to your dealer for service.
See Engine Oil 0223.
OIL PRESSURE LOW —STOP
ENGINE
This message displays if low oil
pressure levels occur. Stop the
vehicle as soon as safely possible,
turn off the engine, and do not
operate it until the cause of the low
oil pressure has been corrected.
Check the oil as soon as possible
and have the vehicle serviced by
your dealer.
Page 153 of 351
Chevrolet Corvette Owner Manual (GMNA-Localizing-U.S./Canada/Mexico-
9085364) - 2016 - crc - 9/15/15
152 Climate Controls
Climate Controls
Climate Control Systems
Dual Automatic ClimateControl System . . . . . . . . . . . . . 152
Air Vents
Air Vents . . . . . . . . . . . . . . . . . . . . . 156
Maintenance
Passenger Compartment AirFilter . . . . . . . . . . . . . . . . . . . . . . . . 156
Climate Control Systems
Dual Automatic Climate Control System
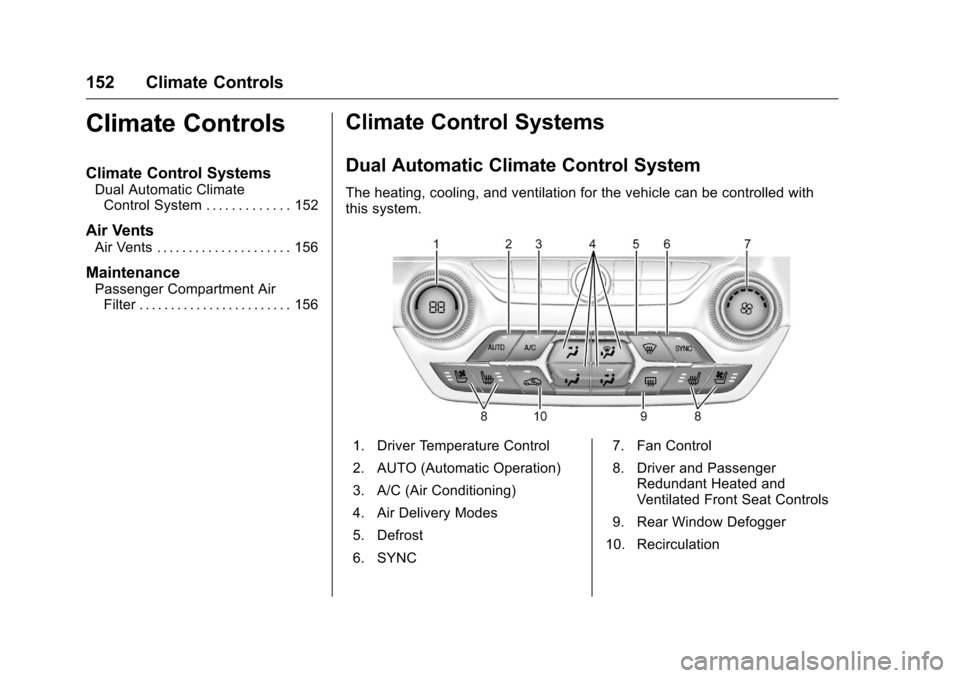
The heating, cooling, and ventilation for the vehicle can be controlled with
this system.
1. Driver Temperature Control
2. AUTO (Automatic Operation)
3. A/C (Air Conditioning)
4. Air Delivery Modes
5. Defrost
6. SYNC 7. Fan Control
8. Driver and Passenger
Redundant Heated and
Ventilated Front Seat Controls
9. Rear Window Defogger
10. Recirculation
Page 155 of 351
Chevrolet Corvette Owner Manual (GMNA-Localizing-U.S./Canada/Mexico-
9085364) - 2016 - crc - 9/15/15
154 Climate Controls
Y(Vent) :Air is directed to the
instrument panel outlets.
[(Floor) : Air is directed to the
floor outlets.
\(Bi-Level) : Air is directed to the
instrument panel outlets and the
floor outlets.
-(Defog) : Air is directed to the
windshield and floor outlets to clear
the windows of fog or moisture. The
recirculation mode cannot be
selected while in the defog mode.
0(Defrost) : Press to clear the
windshield of fog or frost more
quickly. Air is directed to the
windshield and side window outlets.
The recirculation mode cannot be
selected while in defrost mode.
For best results, clear all snow and
ice from the windshield before
defrosting.
Do not drive the vehicle until all the
windows are clear. A/C (Air Conditioning) :
Press to
turn the air conditioning on or off.
If the fan is turned off, the air
conditioner will not run and the
indicator light may turn off.
Press AUTO to return to automatic
operation and the air conditioner
runs as needed. When the indicator
light is on, the air conditioner runs
automatically to cool the air inside
the vehicle or to dry the air as
needed to defog the windshield
faster.
Depending on the engine speed, the
air conditioning compressor may
shut off and turn on again and a
slight change in A/C cooling and
engine performance may be
noticed. This is normal. The system
is designed to make adjustments to
help with fuel economy while still
maintaining the selected
temperature.
If the A/C is turned off, automatic
operation is canceled.
/(Recirculation) : Press to
turn on recirculation. An indicator
light comes on. Air is recirculated to
quickly cool the inside of the vehicle or reduce the entry of outside air
and odors. Recirculation mode is
not available in defrost or
defog mode.
Rear Window Defogger
=(Rear Window Defogger) :
Press to turn the rear window
defogger on or off. An indicator light
on the button comes on to show that
the rear window defogger is on.
The defogger only works when the
ignition is in ON/RUN/START. The
defogger turns off if the ignition is in
the ACC/ACCESSORY or LOCK/
OFF position.
The rear window defogger can be
set to automatic operation. See
“Climate and Air Quality” under
Vehicle Personalization 0130.
When auto rear defog is selected,
the rear window defogger turns on
automatically when the interior
temperature is cold and the outside
temperature is about 4 °C (40 °F)
and below. The auto rear defogger
turns off automatically after about
10 minutes.
Page 165 of 351
Chevrolet Corvette Owner Manual (GMNA-Localizing-U.S./Canada/Mexico-
9085364) - 2016 - crc - 9/15/15
164 Driving and Operating
.Toe: 0.05 degrees toe in
Rear (per corner)
. Caster: 0 degrees
. Camber: -2.0 degrees
. Toe: 0.05 degrees toe in
Thrust Angle: 0 degrees
Rear Axle Fluid
Caution
During a first time track or racing
event, high rear axle
temperatures can occur. Damage
could be caused to the rear axle
and would not be covered by the
vehicle warranty. Do not drive as
long or as fast the first time the
vehicle is driven on the track or
raced.
Axles must have 885 km (500 mi)
before being used in track driving
The rear axle fluid temperatures
may be higher than when driving in
severe conditions. Drain and refill
with new fluid after the first racing or competitive driving event, and then
after every 24 hours of racing or
competitive driving. See
Recommended Fluids and
Lubricants
0307.
General Information
If reduced performance is
experienced during track events or
competitive driving, turning off the
A/C will help to improve engine
performance.
Maintain a mixture of 40%
DEX-COOL coolant and 60% clean,
drinkable water to optimize engine
performance.
The front license plate bracket or
aero panel should be removed for
track events and competitive driving
to improve engine performance.
Rotor Cooling Ring, If
Equipped
The following installation procedure
is for Z51 Performance Package,
and only if the vehicle is equipped
with front dual cast brake rotors
along with the supplied brake
cooling ring kit. See your dealer for
information. If the vehicle has the Z51
Performance Package and
equipped with a one piece brake
rotor, a cooling ring is not required.
Caution
Do not leave rotor cooling rings
installed after a track event, as
this can cause corrosion with
long-term use. Rotor cooling rings
are for track use only. Track
driving without the rotor cooling
rings may result in brake
pedal fade.
Installation: 1. Remove the front wheels.
2. Cut three 150 mm (6 in) lengths of safety wire specified
to T304 Stainless Steel,
0.041 in nominal diameter, not
included.
3. Form each into a U shape with a 20 mm (0.75 in) flat area in
the center of the wire.
Page 166 of 351
Chevrolet Corvette Owner Manual (GMNA-Localizing-U.S./Canada/Mexico-
9085364) - 2016 - crc - 9/15/15
Driving and Operating 165
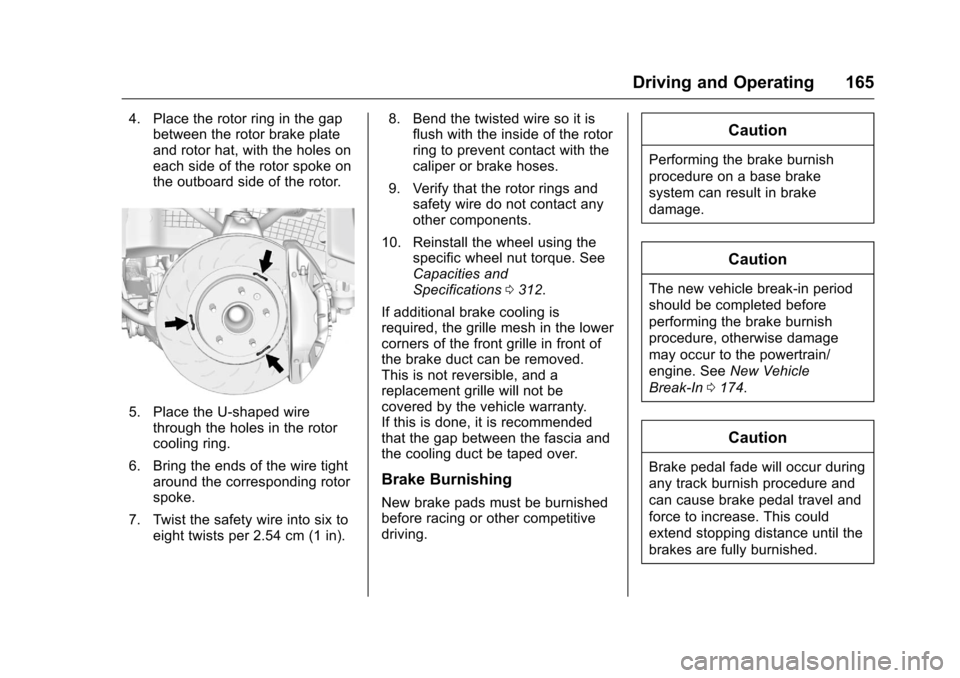
4. Place the rotor ring in the gapbetween the rotor brake plate
and rotor hat, with the holes on
each side of the rotor spoke on
the outboard side of the rotor.
5. Place the U-shaped wire
through the holes in the rotor
cooling ring.
6. Bring the ends of the wire tight around the corresponding rotor
spoke.
7. Twist the safety wire into six to eight twists per 2.54 cm (1 in). 8. Bend the twisted wire so it is
flush with the inside of the rotor
ring to prevent contact with the
caliper or brake hoses.
9. Verify that the rotor rings and safety wire do not contact any
other components.
10. Reinstall the wheel using the specific wheel nut torque. See
Capacities and
Specifications 0312.
If additional brake cooling is
required, the grille mesh in the lower
corners of the front grille in front of
the brake duct can be removed.
This is not reversible, and a
replacement grille will not be
covered by the vehicle warranty.
If this is done, it is recommended
that the gap between the fascia and
the cooling duct be taped over.
Brake Burnishing
New brake pads must be burnished
before racing or other competitive
driving.
Caution
Performing the brake burnish
procedure on a base brake
system can result in brake
damage.
Caution
The new vehicle break-in period
should be completed before
performing the brake burnish
procedure, otherwise damage
may occur to the powertrain/
engine. See New Vehicle
Break-In 0174.
Caution
Brake pedal fade will occur during
any track burnish procedure and
can cause brake pedal travel and
force to increase. This could
extend stopping distance until the
brakes are fully burnished.
Page 169 of 351
Chevrolet Corvette Owner Manual (GMNA-Localizing-U.S./Canada/Mexico-
9085364) - 2016 - crc - 9/15/15
168 Driving and Operating
spoiler is delivered but not installed.
This is intended to be installed for
track use only.
Driving on Wet Roads
Rain and wet roads can reduce
vehicle traction and affect your
ability to stop and accelerate.
Always drive slower in these types
of driving conditions and avoid
driving through large puddles and
deep-standing or flowing water.
{Warning
Wet brakes can cause crashes.
They might not work as well in a
quick stop and could cause
pulling to one side. You could
lose control of the vehicle.
After driving through a large
puddle of water or a car/vehicle
wash, lightly apply the brake
pedal until the brakes work
normally.(Continued)
Warning (Continued)
Flowing or rushing water creates
strong forces. Driving through
flowing water could cause the
vehicle to be carried away. If this
happens, you and other vehicle
occupants could drown. Do not
ignore police warnings and be
very cautious about trying to drive
through flowing water.
Hydroplaning
Hydroplaning is dangerous. Water
can build up under the vehicle's
tires so they actually ride on the
water. This can happen if the road is
wet enough and you are going fast
enough. When the vehicle is
hydroplaning, it has little or no
contact with the road.
There is no hard and fast rule about
hydroplaning. The best advice is to
slow down when the road is wet.
Other Rainy Weather Tips
Besides slowing down, other wet
weather driving tips include:
.Allow extra following distance.
. Pass with caution.
. Keep windshield wiping
equipment in good shape.
. Keep the windshield washer fluid
reservoir filled.
. Have good tires with proper
tread depth. See Tires0254.
. Turn off cruise control.
Hill and Mountain Roads
Driving on steep hills or through
mountains is different than driving
on flat or rolling terrain. Tips include:
.Keep the vehicle serviced and in
good shape.
. Check all fluid levels and brakes,
tires, cooling system, and
transmission.
. Shift to a lower gear when going
down steep or long hills.