2016 CHEVROLET CORVETTE oil dipstick
[x] Cancel search: oil dipstickPage 164 of 351
Chevrolet Corvette Owner Manual (GMNA-Localizing-U.S./Canada/Mexico-
9085364) - 2016 - crc - 9/15/15
Driving and Operating 163
range on the engine oil dipstick.
After the competitive driving,
remove excess oil so that the level
on the dipstick is not above the
upper mark that shows the proper
operating range.
Stingray without Z51 Performance
Package: Additional oil fill above the
upper mark on the dipstick is not
recommended for track events or
other competitive driving. Check the
oil level often during racing or other
competitive driving and keep the
level at or near the upper mark that
shows the proper operating range
on the engine oil dipstick. After the
competitive driving, remove excess
oil so that the level on the dipstick is
not above the upper mark that
shows the proper operating range.
After track use, change the oil back
to 5W-30 for street use. SeeEngine
Oil 0223.
Brake Fluid
Replace existing brake fluid with a
qualified high performance brake
fluid from a sealed container. Brake
fluid with a dry boiling point >279 °C
(534 °F) is qualified. If high performance brake fluid is used,
replace it with GM approved brake
fluid before driving on public roads.
If high performance brake fluid is in
the vehicle and the age of the brake
fluid is over a month old or
unknown, replace the brake fluid
before track events and competitive
driving. Do not use silicone or
DOT-5 brake fluids.
Load Limit
Z51 Performance Package Only:
Limit vehicle load to the driver only,
with no other cargo. Inflate tires to
180 kPa (26 psi) and drive at a
maximum speed of 280 km/h
(174 mph).
Z06 Only: Limit vehicle load to the
driver only, with no other cargo.
Inflate tires to 180 kPa (26 psi) and
drive at a maximum speed of
296 km/h (184 mph).
Wheel Alignment
Caution
Using these wheel alignment
settings may cause excessive tire
wear. Only use these wheel
alignment settings for racing or
competitive driving. Excessive tire
wear is not covered under the
vehicle warranty.
If the vehicle is equipped with the
Z51 Performance Package or is a
Z06, the racing and competitive
driving wheel alignment settings
should be set as follows:
Alignment should only be done by
adjusting the lower control arm cam
bolts and by removing a maximum
of one washer between the upper
control arms and frame.
Alignment values are targets. See
your dealer for tolerances.
Front (per corner)
. Caster: +7.0 degrees
. Camber: -2.0 degrees
Page 220 of 351
Chevrolet Corvette Owner Manual (GMNA-Localizing-U.S./Canada/Mexico-
9085364) - 2016 - crc - 9/15/15
Vehicle Care 219
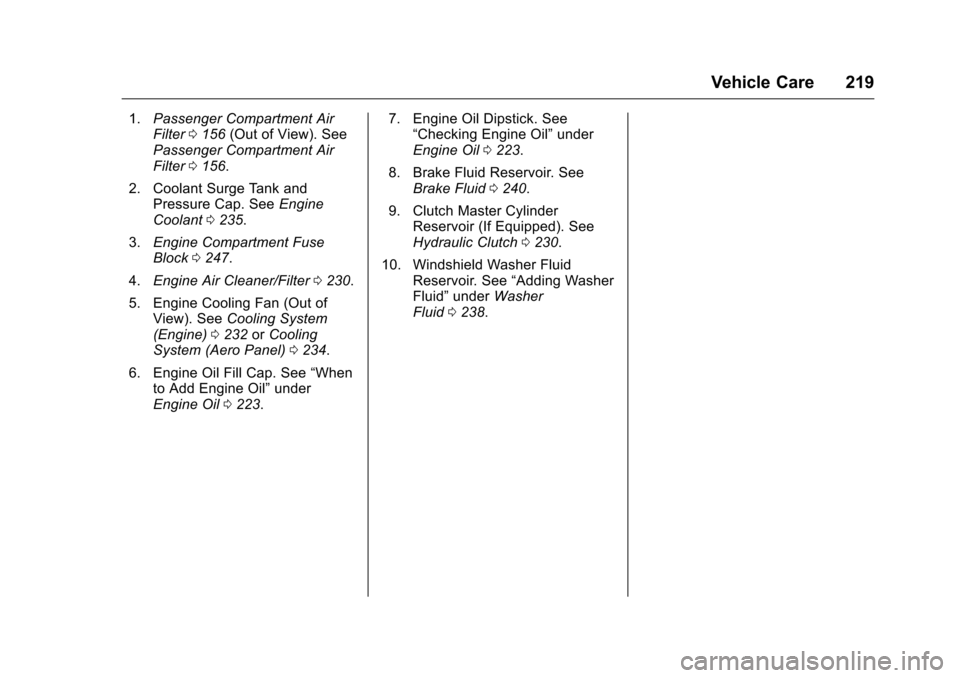
1.Passenger Compartment Air
Filter 0156 (Out of View). See
Passenger Compartment Air
Filter 0156.
2. Coolant Surge Tank and Pressure Cap. See Engine
Coolant 0235.
3. Engine Compartment Fuse
Block 0247.
4. Engine Air Cleaner/Filter 0230.
5. Engine Cooling Fan (Out of View). See Cooling System
(Engine) 0232 orCooling
System (Aero Panel) 0234.
6. Engine Oil Fill Cap. See “When
to Add Engine Oil” under
Engine Oil 0223. 7. Engine Oil Dipstick. See
“Checking Engine Oil” under
Engine Oil 0223.
8. Brake Fluid Reservoir. See Brake Fluid 0240.
9. Clutch Master Cylinder Reservoir (If Equipped). See
Hydraulic Clutch 0230.
10. Windshield Washer Fluid Reservoir. See “Adding Washer
Fluid” under Washer
Fluid 0238.
Page 222 of 351
Chevrolet Corvette Owner Manual (GMNA-Localizing-U.S./Canada/Mexico-
9085364) - 2016 - crc - 9/15/15
Vehicle Care 221
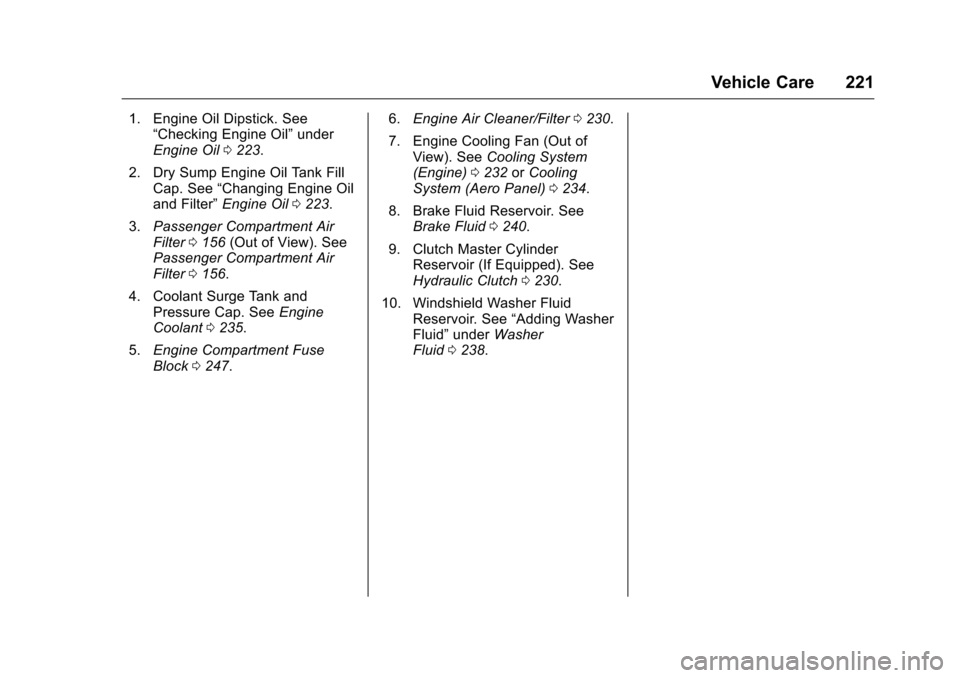
1. Engine Oil Dipstick. See“Checking Engine Oil” under
Engine Oil 0223.
2. Dry Sump Engine Oil Tank Fill Cap. See “Changing Engine Oil
and Filter” Engine Oil 0223.
3. Passenger Compartment Air
Filter 0156 (Out of View). See
Passenger Compartment Air
Filter 0156.
4. Coolant Surge Tank and Pressure Cap. See Engine
Coolant 0235.
5. Engine Compartment Fuse
Block 0247. 6.
Engine Air Cleaner/Filter 0230.
7. Engine Cooling Fan (Out of View). See Cooling System
(Engine) 0232 orCooling
System (Aero Panel) 0234.
8. Brake Fluid Reservoir. See Brake Fluid 0240.
9. Clutch Master Cylinder Reservoir (If Equipped). See
Hydraulic Clutch 0230.
10. Windshield Washer Fluid Reservoir. See “Adding Washer
Fluid” under Washer
Fluid 0238.
Page 224 of 351
Chevrolet Corvette Owner Manual (GMNA-Localizing-U.S./Canada/Mexico-
9085364) - 2016 - crc - 9/15/15
Vehicle Care 223
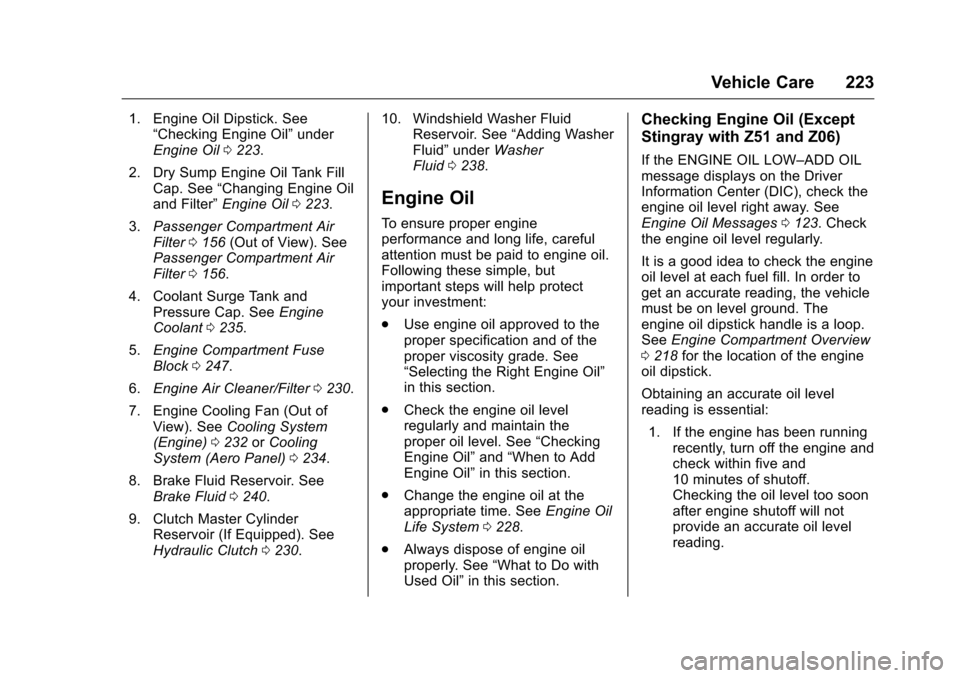
1. Engine Oil Dipstick. See“Checking Engine Oil” under
Engine Oil 0223.
2. Dry Sump Engine Oil Tank Fill Cap. See “Changing Engine Oil
and Filter” Engine Oil 0223.
3. Passenger Compartment Air
Filter 0156 (Out of View). See
Passenger Compartment Air
Filter 0156.
4. Coolant Surge Tank and Pressure Cap. See Engine
Coolant 0235.
5. Engine Compartment Fuse
Block 0247.
6. Engine Air Cleaner/Filter 0230.
7. Engine Cooling Fan (Out of View). See Cooling System
(Engine) 0232 orCooling
System (Aero Panel) 0234.
8. Brake Fluid Reservoir. See Brake Fluid 0240.
9. Clutch Master Cylinder Reservoir (If Equipped). See
Hydraulic Clutch 0230. 10. Windshield Washer Fluid
Reservoir. See “Adding Washer
Fluid” under Washer
Fluid 0238.
Engine Oil
To ensure proper engine
performance and long life, careful
attention must be paid to engine oil.
Following these simple, but
important steps will help protect
your investment:
.
Use engine oil approved to the
proper specification and of the
proper viscosity grade. See
“Selecting the Right Engine Oil”
in this section.
. Check the engine oil level
regularly and maintain the
proper oil level. See “Checking
Engine Oil” and“When to Add
Engine Oil” in this section.
. Change the engine oil at the
appropriate time. See Engine Oil
Life System 0228.
. Always dispose of engine oil
properly. See “What to Do with
Used Oil” in this section.
Checking Engine Oil (Except
Stingray with Z51 and Z06)
If the ENGINE OIL LOW–ADD OIL
message displays on the Driver
Information Center (DIC), check the
engine oil level right away. See
Engine Oil Messages 0123. Check
the engine oil level regularly.
It is a good idea to check the engine
oil level at each fuel fill. In order to
get an accurate reading, the vehicle
must be on level ground. The
engine oil dipstick handle is a loop.
See Engine Compartment Overview
0 218 for the location of the engine
oil dipstick.
Obtaining an accurate oil level
reading is essential:
1. If the engine has been running recently, turn off the engine and
check within five and
10 minutes of shutoff.
Checking the oil level too soon
after engine shutoff will not
provide an accurate oil level
reading.
Page 225 of 351
Chevrolet Corvette Owner Manual (GMNA-Localizing-U.S./Canada/Mexico-
9085364) - 2016 - crc - 9/15/15
224 Vehicle Care
{Warning
The engine oil dipstick handle
may be hot; it could burn you.
Use a towel or glove to touch the
dipstick handle.
2. Pull the dipstick and wipe it with a clean paper towel or
cloth, then push it back in all
the way. Remove it again,
keeping the tip down, and
check the level.
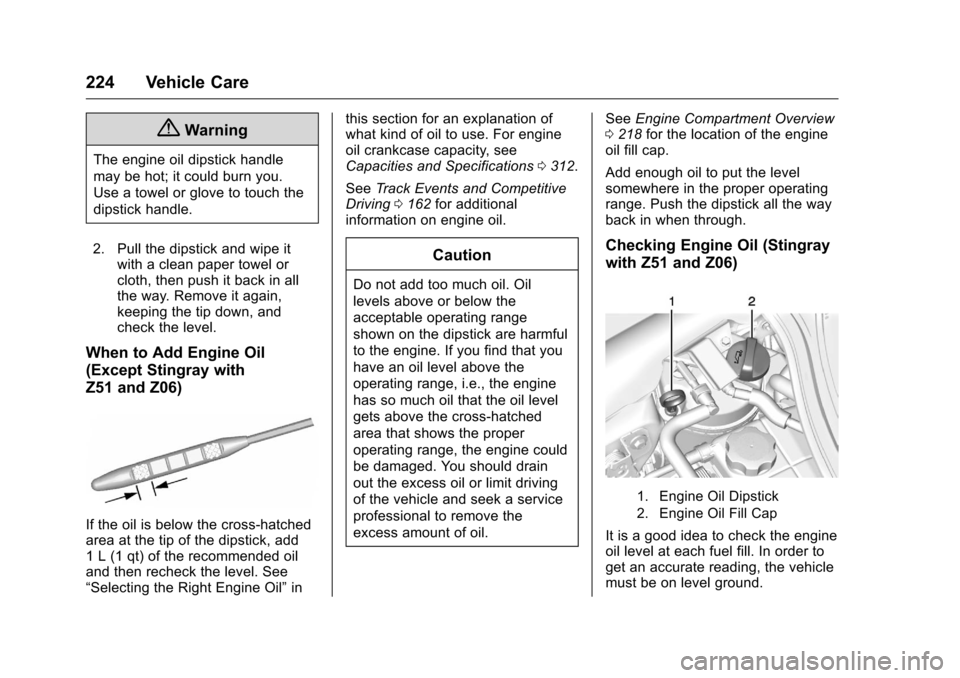
When to Add Engine Oil
(Except Stingray with
Z51 and Z06)
If the oil is below the cross-hatched
area at the tip of the dipstick, add
1 L (1 qt) of the recommended oil
and then recheck the level. See
“Selecting the Right Engine Oil” inthis section for an explanation of
what kind of oil to use. For engine
oil crankcase capacity, see
Capacities and Specifications
0312.
See Track Events and Competitive
Driving 0162 for additional
information on engine oil.
Caution
Do not add too much oil. Oil
levels above or below the
acceptable operating range
shown on the dipstick are harmful
to the engine. If you find that you
have an oil level above the
operating range, i.e., the engine
has so much oil that the oil level
gets above the cross-hatched
area that shows the proper
operating range, the engine could
be damaged. You should drain
out the excess oil or limit driving
of the vehicle and seek a service
professional to remove the
excess amount of oil. See
Engine Compartment Overview
0 218 for the location of the engine
oil fill cap.
Add enough oil to put the level
somewhere in the proper operating
range. Push the dipstick all the way
back in when through.
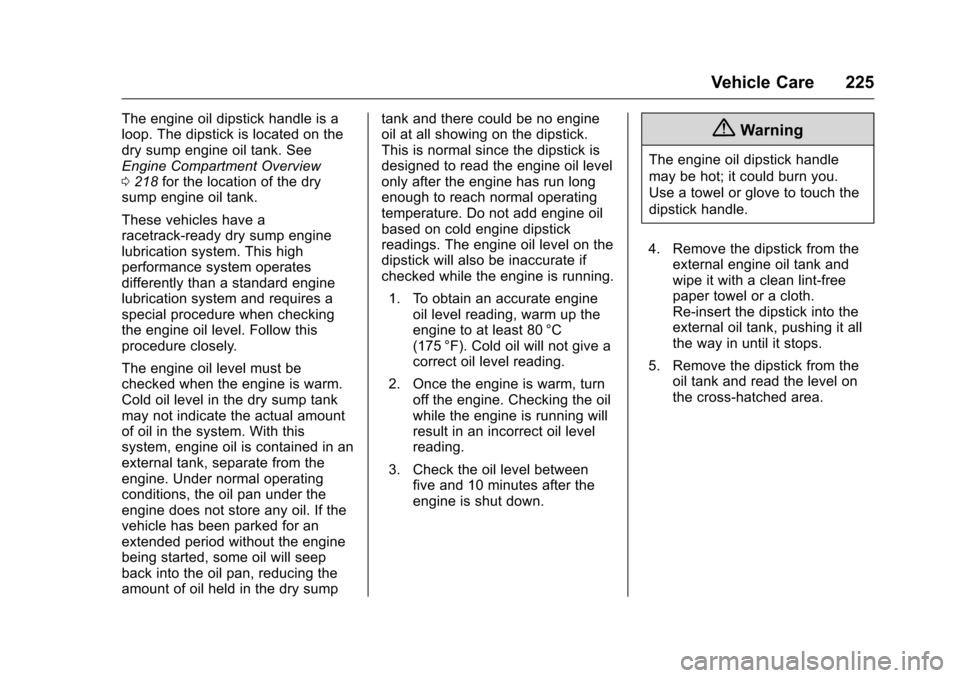
Checking Engine Oil (Stingray
with Z51 and Z06)
1. Engine Oil Dipstick
2. Engine Oil Fill Cap
It is a good idea to check the engine
oil level at each fuel fill. In order to
get an accurate reading, the vehicle
must be on level ground.
Page 226 of 351
Chevrolet Corvette Owner Manual (GMNA-Localizing-U.S./Canada/Mexico-
9085364) - 2016 - crc - 9/16/15
Vehicle Care 225
The engine oil dipstick handle is a
loop. The dipstick is located on the
dry sump engine oil tank. See
Engine Compartment Overview
0218 for the location of the dry
sump engine oil tank.
These vehicles have a
racetrack-ready dry sump engine
lubrication system. This high
performance system operates
differently than a standard engine
lubrication system and requires a
special procedure when checking
the engine oil level. Follow this
procedure closely.
The engine oil level must be
checked when the engine is warm.
Cold oil level in the dry sump tank
may not indicate the actual amount
of oil in the system. With this
system, engine oil is contained in an
external tank, separate from the
engine. Under normal operating
conditions, the oil pan under the
engine does not store any oil. If the
vehicle has been parked for an
extended period without the engine
being started, some oil will seep
back into the oil pan, reducing the
amount of oil held in the dry sump tank and there could be no engine
oil at all showing on the dipstick.
This is normal since the dipstick is
designed to read the engine oil level
only after the engine has run long
enough to reach normal operating
temperature. Do not add engine oil
based on cold engine dipstick
readings. The engine oil level on the
dipstick will also be inaccurate if
checked while the engine is running.
1. To obtain an accurate engine oil level reading, warm up the
engine to at least 80 °C
(175 °F). Cold oil will not give a
correct oil level reading.
2. Once the engine is warm, turn off the engine. Checking the oil
while the engine is running will
result in an incorrect oil level
reading.
3. Check the oil level between five and 10 minutes after the
engine is shut down.{Warning
The engine oil dipstick handle
may be hot; it could burn you.
Use a towel or glove to touch the
dipstick handle.
4. Remove the dipstick from the external engine oil tank and
wipe it with a clean lint-free
paper towel or a cloth.
Re-insert the dipstick into the
external oil tank, pushing it all
the way in until it stops.
5. Remove the dipstick from the oil tank and read the level on
the cross-hatched area.
Page 227 of 351
Chevrolet Corvette Owner Manual (GMNA-Localizing-U.S./Canada/Mexico-
9085364) - 2016 - crc - 9/15/15
226 Vehicle Care
When to Add Engine Oil
(Stingray with Z51 and Z06)
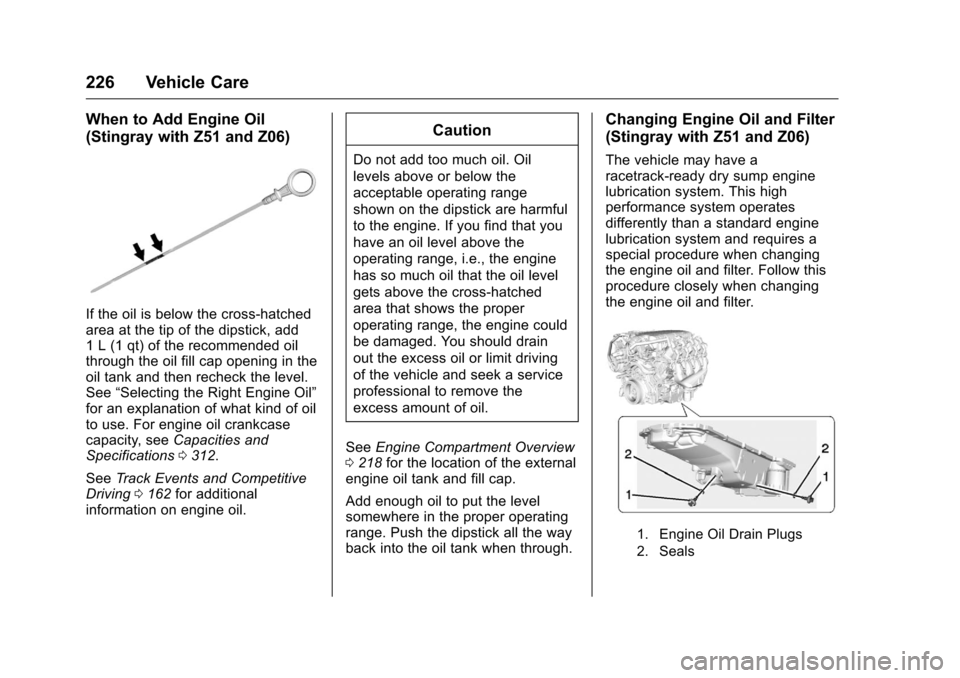
If the oil is below the cross-hatched
area at the tip of the dipstick, add
1 L (1 qt) of the recommended oil
through the oil fill cap opening in the
oil tank and then recheck the level.
See“Selecting the Right Engine Oil”
for an explanation of what kind of oil
to use. For engine oil crankcase
capacity, see Capacities and
Specifications 0312.
See Track Events and Competitive
Driving 0162 for additional
information on engine oil.
Caution
Do not add too much oil. Oil
levels above or below the
acceptable operating range
shown on the dipstick are harmful
to the engine. If you find that you
have an oil level above the
operating range, i.e., the engine
has so much oil that the oil level
gets above the cross-hatched
area that shows the proper
operating range, the engine could
be damaged. You should drain
out the excess oil or limit driving
of the vehicle and seek a service
professional to remove the
excess amount of oil.
See Engine Compartment Overview
0 218 for the location of the external
engine oil tank and fill cap.
Add enough oil to put the level
somewhere in the proper operating
range. Push the dipstick all the way
back into the oil tank when through.
Changing Engine Oil and Filter
(Stingray with Z51 and Z06)
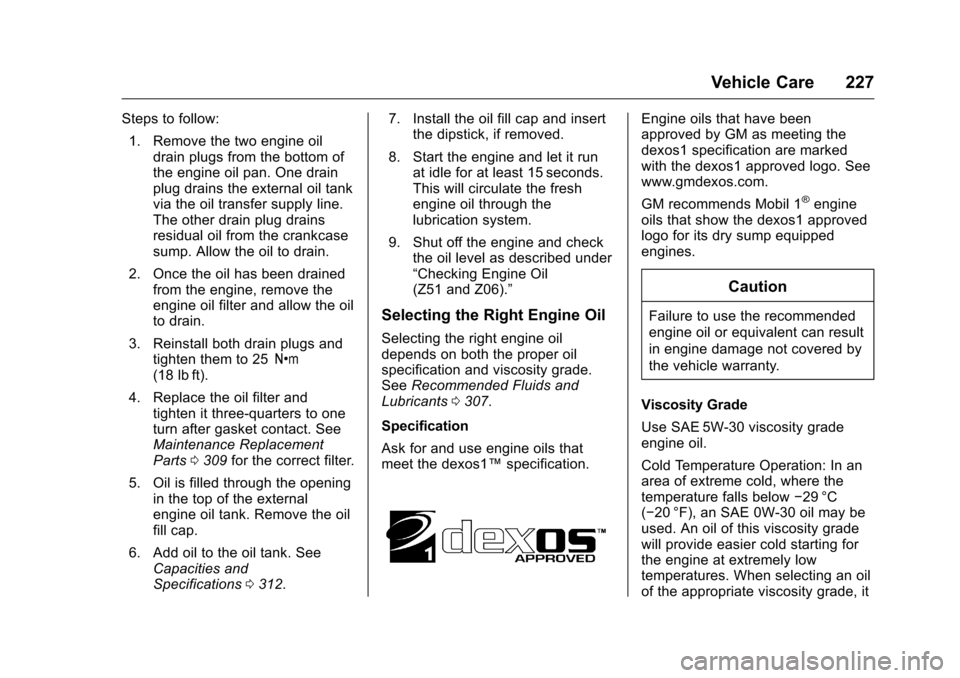
The vehicle may have a
racetrack-ready dry sump engine
lubrication system. This high
performance system operates
differently than a standard engine
lubrication system and requires a
special procedure when changing
the engine oil and filter. Follow this
procedure closely when changing
the engine oil and filter.
1. Engine Oil Drain Plugs
2. Seals
Page 228 of 351
Chevrolet Corvette Owner Manual (GMNA-Localizing-U.S./Canada/Mexico-
9085364) - 2016 - crc - 9/15/15
Vehicle Care 227
Steps to follow:1. Remove the two engine oil drain plugs from the bottom of
the engine oil pan. One drain
plug drains the external oil tank
via the oil transfer supply line.
The other drain plug drains
residual oil from the crankcase
sump. Allow the oil to drain.
2. Once the oil has been drained from the engine, remove the
engine oil filter and allow the oil
to drain.
3. Reinstall both drain plugs and tighten them to 25 Y
(18 lb ft).
4. Replace the oil filter and tighten it three-quarters to one
turn after gasket contact. See
Maintenance Replacement
Parts 0309 for the correct filter.
5. Oil is filled through the opening in the top of the external
engine oil tank. Remove the oil
fill cap.
6. Add oil to the oil tank. See Capacities and
Specifications 0312. 7. Install the oil fill cap and insert
the dipstick, if removed.
8. Start the engine and let it run at idle for at least 15 seconds.
This will circulate the fresh
engine oil through the
lubrication system.
9. Shut off the engine and check the oil level as described under
“Checking Engine Oil
(Z51 and Z06).”
Selecting the Right Engine Oil
Selecting the right engine oil
depends on both the proper oil
specification and viscosity grade.
See Recommended Fluids and
Lubricants 0307.
Specification
Ask for and use engine oils that
meet the dexos1™ specification.
Engine oils that have been
approved by GM as meeting the
dexos1 specification are marked
with the dexos1 approved logo. See
www.gmdexos.com.
GM recommends Mobil 1
®engine
oils that show the dexos1 approved
logo for its dry sump equipped
engines.
Caution
Failure to use the recommended
engine oil or equivalent can result
in engine damage not covered by
the vehicle warranty.
Viscosity Grade
Use SAE 5W-30 viscosity grade
engine oil.
Cold Temperature Operation: In an
area of extreme cold, where the
temperature falls below −29 °C
(−20 °F), an SAE 0W-30 oil may be
used. An oil of this viscosity grade
will provide easier cold starting for
the engine at extremely low
temperatures. When selecting an oil
of the appropriate viscosity grade, it