2016 CHEVROLET CORVETTE steering wheel
[x] Cancel search: steering wheelPage 189 of 351
Chevrolet Corvette Owner Manual (GMNA-Localizing-U.S./Canada/Mexico-
9085364) - 2016 - crc - 9/15/15
188 Driving and Operating
SeeTransmission Messages 0129.
Downshifting
Do not downshift into the gear at a
speed greater than shown:
1 (First) 72 km/h (45 mph)
2 (Second) 107 km/h (67 mph) 3 (Third) 160 km/h (100 mph)
4 (Fourth) 233 km/h (145 mph)
Caution
When downshifting, if more than
one gear is skipped, or the engine
is racing when the clutch pedal is
released, the engine, clutch,
driveshaft or transmission could
be damaged.
If the engine speed drops below
900 rpm, or if the engine is not
running smoothly, downshift to the
next lower gear. It may be
necessary to downshift two or more
gears. The transmission has a spring that
centers the shift lever near 3 (Third)
and 4 (Fourth). This spring helps to
know what gear the shift lever is in
when shifting. Be careful when
shifting from 1 (First) to 2 (Second)
or downshifting from 7 (Seventh) to
6 (Sixth). The spring will try to pull
the shift lever toward 4 (Fourth) and
3 (Third). Move the lever into
2 (Second) or 6 (Sixth) and do not
let the shift lever move in the
direction of the pulling, or it could
shift from 1 (First) to 4 (Fourth) or
from 7 (Seventh) to 4 (Fourth).
If the vehicle is not upshifted as the
engine speed approaches fuel
shutoff rpm, the engine speed will
be limited to protect the engine. See
Tachometer
0101.
Active Rev Match
Vehicles equipped with a manual
transmission have Active Rev Match
(ARM). ARM aids in smoother
shifting by matching the engine
speed to the next selected gear. By
monitoring shift lever and clutch
operation, ARM adjusts engine speed to match a calibrated value
based on gear selection. On
upshifts and downshifts, engine
speed will be increased and
decreased to match vehicle road
speed and transmission gear
position. ARM is maintained for a
few seconds between shifts, then
deactivates if the shift is not
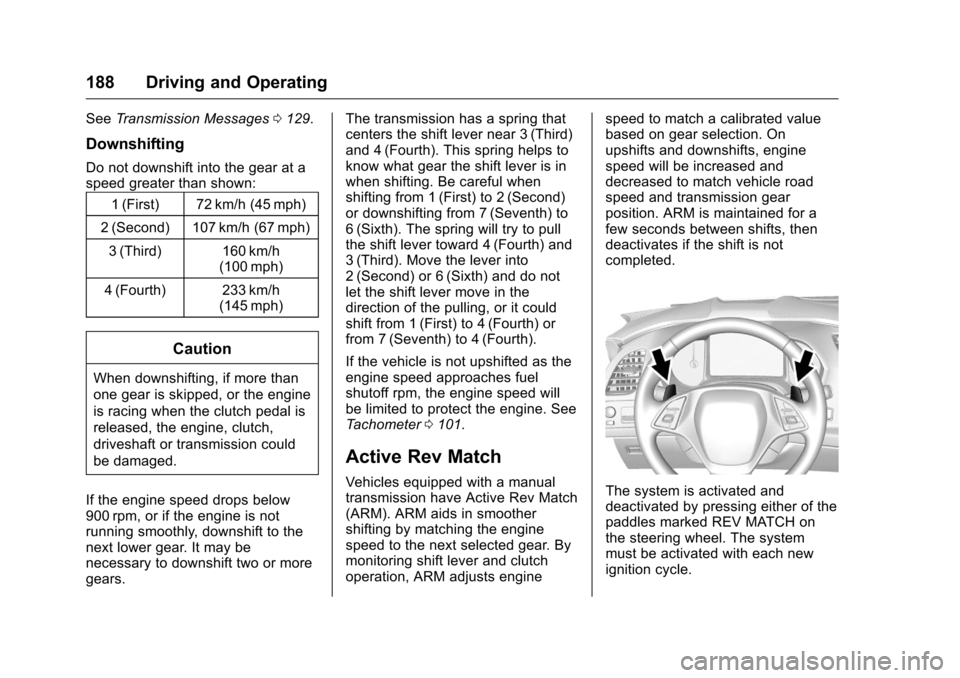
completed.The system is activated and
deactivated by pressing either of the
paddles marked REV MATCH on
the steering wheel. The system
must be activated with each new
ignition cycle.
Page 191 of 351
Chevrolet Corvette Owner Manual (GMNA-Localizing-U.S./Canada/Mexico-
9085364) - 2016 - crc - 9/15/15
190 Driving and Operating
If driving safely on a wet road and it
becomes necessary to slam on the
brakes and continue braking to
avoid a sudden obstacle, a
computer senses the wheels are
slowing down. If one of the wheels
is about to stop rolling, the computer
will separately work the brakes at
each wheel.
ABS can change the brake pressure
to each wheel, as required, faster
than any driver could. This can help
you steer around the obstacle while
braking hard.
As the brakes are applied, the
computer keeps receiving updates
on wheel speed and controls
braking pressure accordingly.
Remember: ABS does not change
the time needed to get a foot up to
the brake pedal or always decrease
stopping distance. If you get too
close to the vehicle in front of you,
there will not be enough time to
apply the brakes if that vehicle
suddenly slows or stops. Always
leave enough room up ahead to
stop, even with ABS.Using ABS
Do not pump the brakes. Just hold
the brake pedal down firmly and let
ABS work. You may hear the ABS
pump or motor operating and feel
the brake pedal pulsate. This is
normal.
Braking in Emergencies
ABS allows you to steer and brake
at the same time. In many
emergencies, steering can help
more than even the very best
braking.
Electric Parking Brake
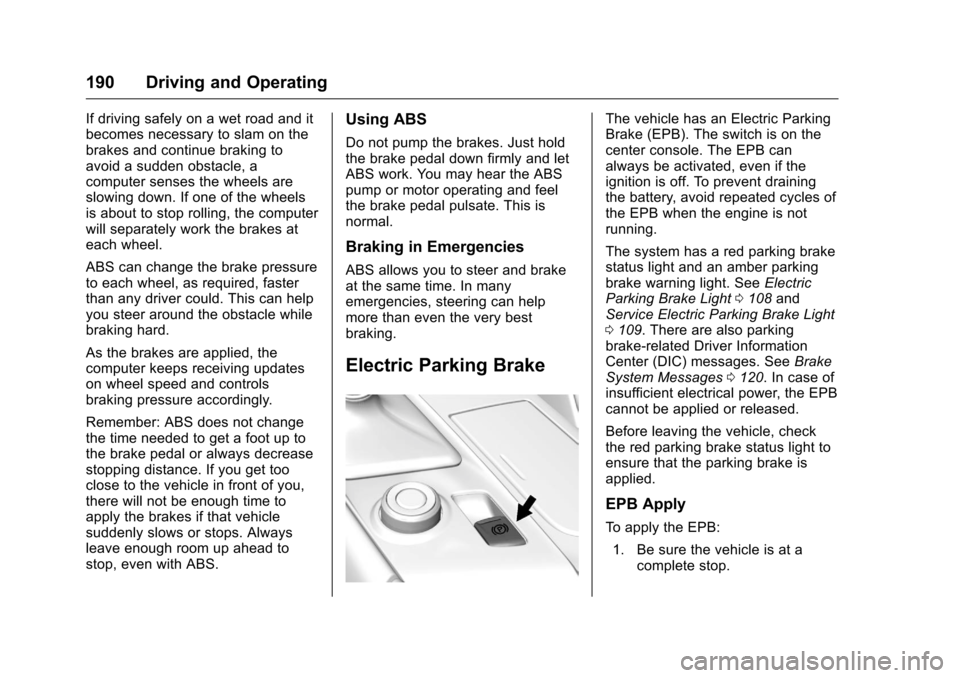
The vehicle has an Electric Parking
Brake (EPB). The switch is on the
center console. The EPB can
always be activated, even if the
ignition is off. To prevent draining
the battery, avoid repeated cycles of
the EPB when the engine is not
running.
The system has a red parking brake
status light and an amber parking
brake warning light. SeeElectric
Parking Brake Light 0108 and
Service Electric Parking Brake Light
0 109. There are also parking
brake-related Driver Information
Center (DIC) messages. See Brake
System Messages 0120. In case of
insufficient electrical power, the EPB
cannot be applied or released.
Before leaving the vehicle, check
the red parking brake status light to
ensure that the parking brake is
applied.
EPB Apply
To apply the EPB:
1. Be sure the vehicle is at a complete stop.
Page 201 of 351
Chevrolet Corvette Owner Manual (GMNA-Localizing-U.S./Canada/Mexico-
9085364) - 2016 - crc - 9/15/15
200 Driving and Operating
.Dry conditions only.
. StabiliTrak is on and engine
power is slightly reduced.
PERF TRAC 3 –SPORT
ACTIVE HANDLING ON
. For use by drivers who are
familiar with the track.
. Dry conditions only.
. Requires more driving skill than
mode 2.
. StabiliTrak is on and more
engine power is available than in
mode 2.
PERF TRAC 4 –SPORT
ACTIVE HANDLING OFF
. For use by drivers who are
familiar with the track.
. Dry conditions only.
. Requires more driving skill than
modes 2 or 3.
. StabiliTrak is off and available
engine power is the same as
mode 3.
PERF TRAC 5 –RACE ACTIVE
HANDLING OFF
. For use by experienced drivers
who are familiar with the track.
. Dry conditions only.
. Requires more driving skill than
in other modes.
. StabiliTrak is off and engine
power is available for maximum
cornering speed.
Press and release the TCS/
StabiliTrak
gbutton to turn off PTM
and return to the traction control and
StabiliTrak systems. The traction off
light
iand StabiliTrak OFF lightg
will go out.
Launch Control (Track
Mode Only)
A Launch Control feature is
available, within Competitive Driving
Mode (except Z51 and Z06 with
Magnetic Ride Control) or
Performance Traction Management
(Z51 and Z06 with Magnetic Ride
Control), on all vehicles to allow the
driver to achieve high levels of vehicle acceleration in a straight
line. Launch Control is a form of
traction control that manages tire
spin while launching the vehicle.
This feature is intended for use
during closed course race events
where consistent zero to
60 and quarter mile times are
desirable.
Launch Control is only available
when the following criteria are met:
.
Competitive Driving Mode is
selected (except Z51 and Z06
with Magnetic Ride Control) or
any of the Performance Traction
Management modes are
selected (Z51 and Z06 with
Magnetic Ride Control). The
TCS light comes on the
instrument cluster and the
appropriate DIC message
displays.
. The vehicle is not moving.
. The steering wheel is pointing
straight.
Page 203 of 351
Chevrolet Corvette Owner Manual (GMNA-Localizing-U.S./Canada/Mexico-
9085364) - 2016 - crc - 9/15/15
202 Driving and Operating
Limited-Slip Differential
(Z51 and Z06 Only)
If equipped, the Electronic
Limited-Slip Differential (ELSD) is
automatically activated. ELSD
actively monitors vehicle sensors
and driver inputs to determine the
amount of change for the
conditions. With ELSD, the
vehicle has:
.Enhanced high-speed control.
. Improved traction through
corners, allowing more
acceleration.
. More precise steering.
. Increased vehicle agility.
. Integration with StabiliTrak.
For vehicles with ELSD, driven
under severe conditions, the rear
axle fluid should be changed. See
Competitive Driving Mode 0198
and Maintenance Schedule 0298.
Cruise Control
With cruise control, a speed of
about 40 km/h (25 mph) or more
can be maintained without keeping
your foot on the accelerator. Cruise
control does not work at speeds
below about 40 km/h (25 mph).
{Warning
Cruise control can be dangerous
where you cannot drive safely at
a steady speed. Do not use
cruise control on winding roads or
in heavy traffic.
Cruise control can be dangerous
on slippery roads. On such roads,
fast changes in tire traction can
cause excessive wheel slip, and
you could lose control. Do not use
cruise control on slippery roads.
If equipped with a manual
transmission, the cruise control will
remain active when the gears are
shifted. The cruise is disengaged if
the clutch is pressed for several
seconds. If the Traction Control System (TCS)
begins to limit wheel spin while you
are using cruise control, the cruise
control automatically disengages.
See
Traction Control/Electronic
Stability Control 0192. When road
conditions allow for using safely
again, cruise control can be turned
back on.
If the brakes are applied, cruise
control disengages.
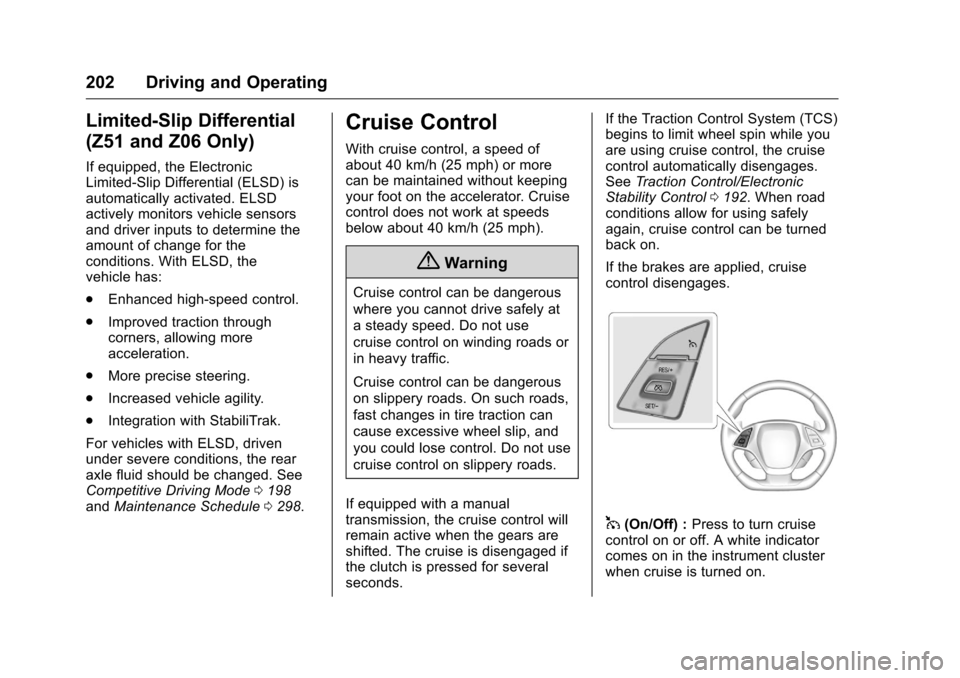
1(On/Off) : Press to turn cruise
control on or off. A white indicator
comes on in the instrument cluster
when cruise is turned on.
Page 204 of 351
Chevrolet Corvette Owner Manual (GMNA-Localizing-U.S./Canada/Mexico-
9085364) - 2016 - crc - 9/15/15
Driving and Operating 203
RES/+ (Resume/Accelerate) :If
there is a set speed in memory,
press briefly to resume to that
speed or press and hold to
accelerate. If cruise control is
already active, use to increase
vehicle speed.
SET/– (Set/Coast) : Press briefly to
set the speed and activate cruise
control. If cruise control is already
active, use to decrease vehicle
speed.
*(Cancel) : Press to disengage
cruise control without erasing the
set speed from memory.
Setting Cruise Control
If
1is on when not in use, SET/– or
RES/+ could get pressed and go
into cruise when not desired. Keep
1off when cruise is not
being used.
1. Press
1to turn the cruise
system on.
2. Get up to the desired speed.
3. Press and release SET/– on
the steering wheel. 4. Remove foot from the
accelerator.
The cruise control indicator on the
instrument cluster turns green after
cruise control has been set to the
desired speed. See Instrument
Cluster 096.
Resuming a Set Speed
If the cruise control is set at a
desired speed and then the brakes
are applied or
*is pressed, the
cruise control is disengaged without
erasing the set speed from memory.
Once the vehicle reaches about
40 km/h (25 mph) or more, briefly
press RES/+. The vehicle returns to
the previous set speed.
Increasing Speed While Using
Cruise Control
If the cruise control system is
already activated,
. Press and hold RES/+ until the
desired speed is reached, then
release it. .
To increase vehicle speed in
small increments, briefly press
RES/+. For each press, the
vehicle goes about 1.6 km/h
(1 mph) faster.
The speedometer reading can be
displayed in either English or metric
units. See Instrument Cluster 096.
The increment value used depends
on the units displayed.
Reducing Speed While Using
Cruise Control
If the cruise control system is
already activated:
. Press and hold SET/– until the
desired lower speed is reached,
then release it.
. To decrease the vehicle speed in
small increments, briefly press
SET/–. For each press, the
vehicle goes about 1.6 km/h
(1 mph) slower.
The speedometer reading can be
displayed in either English or metric
units. See Instrument Cluster 096.
The increment value used depends
on the units displayed.
Page 254 of 351
Chevrolet Corvette Owner Manual (GMNA-Localizing-U.S./Canada/Mexico-
9085364) - 2016 - crc - 9/15/15
Vehicle Care 253
You can remove fuses using the
fuse puller.
The vehicle may not be equipped
with all of the fuses, relays, and
features shown.Fuses Usage
1 Window
2 Driver Power Seat
3 PEPS 2
4 PEPS 1
5 Engine Control Module
6 Heated Mirrors
7 Body Control Module 4
8 Rear Window Defogger
9 GBS
10 Body Control Module 2
11 Steering Wheel
12 Passenger Power Seat Fuses Usage
13 Not Used
14 Outside Rearview Mirror
15 Body Control Module 1
16 Body Control Module 3
17 Sensing Diagnostic Module/Automatic
Occupant Sensing
18 Logistics 2
19 Body Control Module 8
20 Integrated Chassis Control Module
21 Amplifier
22 Rear Accessory Power Outlet
24 Memory Seat Module/
Convertible Top
25 Theft-Deterrent PSM Fuses Usage
26 LCM
27 OnStar (If Equipped)
28 Camera Module
29 Not Used
30 Fuel Pump Power Module
31 LCM Cinch Latch
32 Battery Regulated Voltage Control
33 Not Used
34 Convertible Top Solenoid
35 Not Used
36 Passenger Window Switch
37 Front Accessory Power Outlet
38 Not Used
39 Spare
40 Spare
Page 274 of 351
Chevrolet Corvette Owner Manual (GMNA-Localizing-U.S./Canada/Mexico-
9085364) - 2016 - crc - 9/15/15
Vehicle Care 273
to the generation of heat and its
ability to dissipate heat when
tested under controlled
conditions on a specified indoor
laboratory test wheel. Sustained
high temperature can cause the
material of the tire to degenerate
and reduce tire life, and
excessive temperature can lead
to sudden tire failure. The grade
C corresponds to a level of
performance which all
passenger car tires must meet
under the Federal Motor Safety
Standard No. 109. Grades B and
A represent higher levels of
performance on the laboratory
test wheel than the minimum
required by law. Warning: The
temperature grade for this tire is
established for a tire that is
properly inflated and not
overloaded. Excessive speed,
underinflation, or excessive
loading, either separately or in
combination, can cause heat
buildup and possible tire failure.Wheel Alignment and Tire
Balance
The tires and wheels were aligned
and balanced at the factory to
provide the longest tire life and best
overall performance. Adjustments to
wheel alignment and tire balancing
are not necessary on a regular
basis. Consider an alignment check
if there is unusual tire wear. If the
vehicle is vibrating when driving on
a smooth road, the tires and wheels
may need to be rebalanced. See
your dealer for proper diagnosis.
Road Imperfections/Crown Effects
The vehicle's precise steering and
handling make it very responsive to
road surface feedback. A slight pull
may be felt in the steering
depending on the crown of the road
and/or other road surface variations
such as troughs or ruts. This is
normal and the vehicle does not
require service.Tire Chatter/Hop
When driving at slow speeds and in
very tight turns, the vehicle may
have tire chatter/hop. This is normal
and the vehicle does not require
service.
Wheel Replacement
Replace any wheel that is bent,
cracked, or badly rusted or
corroded. If wheel nuts keep coming
loose, the wheel, wheel bolts, and
wheel nuts should be replaced.
If the wheel leaks air, replace it.
Some aluminum wheels can be
repaired. See your dealer if any of
these conditions exist.
Your dealer will know the kind of
wheel that is needed.
Each new wheel should have the
same load-carrying capacity,
diameter, width, offset, and be
mounted the same way as the one it
replaces.
Replace wheels, wheel bolts,
or wheel nuts with new GM original
equipment parts.
Page 276 of 351
Chevrolet Corvette Owner Manual (GMNA-Localizing-U.S./Canada/Mexico-
9085364) - 2016 - crc - 9/15/15
Vehicle Care 275
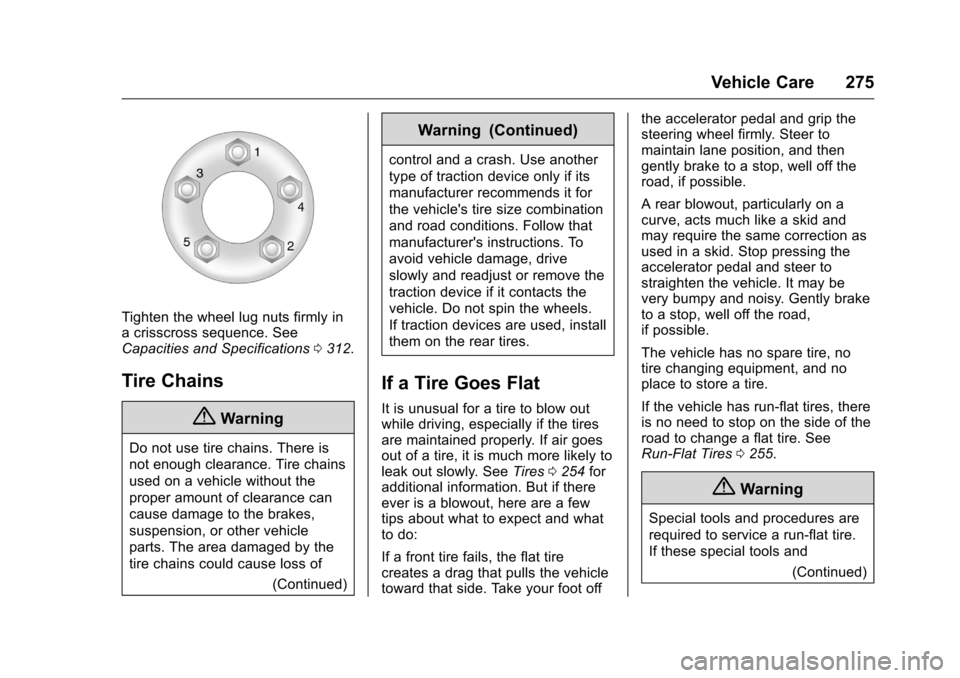
Tighten the wheel lug nuts firmly in
a crisscross sequence. See
Capacities and Specifications0312.
Tire Chains
{Warning
Do not use tire chains. There is
not enough clearance. Tire chains
used on a vehicle without the
proper amount of clearance can
cause damage to the brakes,
suspension, or other vehicle
parts. The area damaged by the
tire chains could cause loss of
(Continued)
Warning (Continued)
control and a crash. Use another
type of traction device only if its
manufacturer recommends it for
the vehicle's tire size combination
and road conditions. Follow that
manufacturer's instructions. To
avoid vehicle damage, drive
slowly and readjust or remove the
traction device if it contacts the
vehicle. Do not spin the wheels.
If traction devices are used, install
them on the rear tires.
If a Tire Goes Flat
It is unusual for a tire to blow out
while driving, especially if the tires
are maintained properly. If air goes
out of a tire, it is much more likely to
leak out slowly. SeeTires0254 for
additional information. But if there
ever is a blowout, here are a few
tips about what to expect and what
to do:
If a front tire fails, the flat tire
creates a drag that pulls the vehicle
toward that side. Take your foot off the accelerator pedal and grip the
steering wheel firmly. Steer to
maintain lane position, and then
gently brake to a stop, well off the
road, if possible.
A rear blowout, particularly on a
curve, acts much like a skid and
may require the same correction as
used in a skid. Stop pressing the
accelerator pedal and steer to
straighten the vehicle. It may be
very bumpy and noisy. Gently brake
to a stop, well off the road,
if possible.
The vehicle has no spare tire, no
tire changing equipment, and no
place to store a tire.
If the vehicle has run-flat tires, there
is no need to stop on the side of the
road to change a flat tire. See
Run-Flat Tires
0255.
{Warning
Special tools and procedures are
required to service a run-flat tire.
If these special tools and
(Continued)