2016 CHEVROLET CORVETTE maintenance
[x] Cancel search: maintenancePage 203 of 351
Chevrolet Corvette Owner Manual (GMNA-Localizing-U.S./Canada/Mexico-
9085364) - 2016 - crc - 9/15/15
202 Driving and Operating
Limited-Slip Differential
(Z51 and Z06 Only)
If equipped, the Electronic
Limited-Slip Differential (ELSD) is
automatically activated. ELSD
actively monitors vehicle sensors
and driver inputs to determine the
amount of change for the
conditions. With ELSD, the
vehicle has:
.Enhanced high-speed control.
. Improved traction through
corners, allowing more
acceleration.
. More precise steering.
. Increased vehicle agility.
. Integration with StabiliTrak.
For vehicles with ELSD, driven
under severe conditions, the rear
axle fluid should be changed. See
Competitive Driving Mode 0198
and Maintenance Schedule 0298.
Cruise Control
With cruise control, a speed of
about 40 km/h (25 mph) or more
can be maintained without keeping
your foot on the accelerator. Cruise
control does not work at speeds
below about 40 km/h (25 mph).
{Warning
Cruise control can be dangerous
where you cannot drive safely at
a steady speed. Do not use
cruise control on winding roads or
in heavy traffic.
Cruise control can be dangerous
on slippery roads. On such roads,
fast changes in tire traction can
cause excessive wheel slip, and
you could lose control. Do not use
cruise control on slippery roads.
If equipped with a manual
transmission, the cruise control will
remain active when the gears are
shifted. The cruise is disengaged if
the clutch is pressed for several
seconds. If the Traction Control System (TCS)
begins to limit wheel spin while you
are using cruise control, the cruise
control automatically disengages.
See
Traction Control/Electronic
Stability Control 0192. When road
conditions allow for using safely
again, cruise control can be turned
back on.
If the brakes are applied, cruise
control disengages.
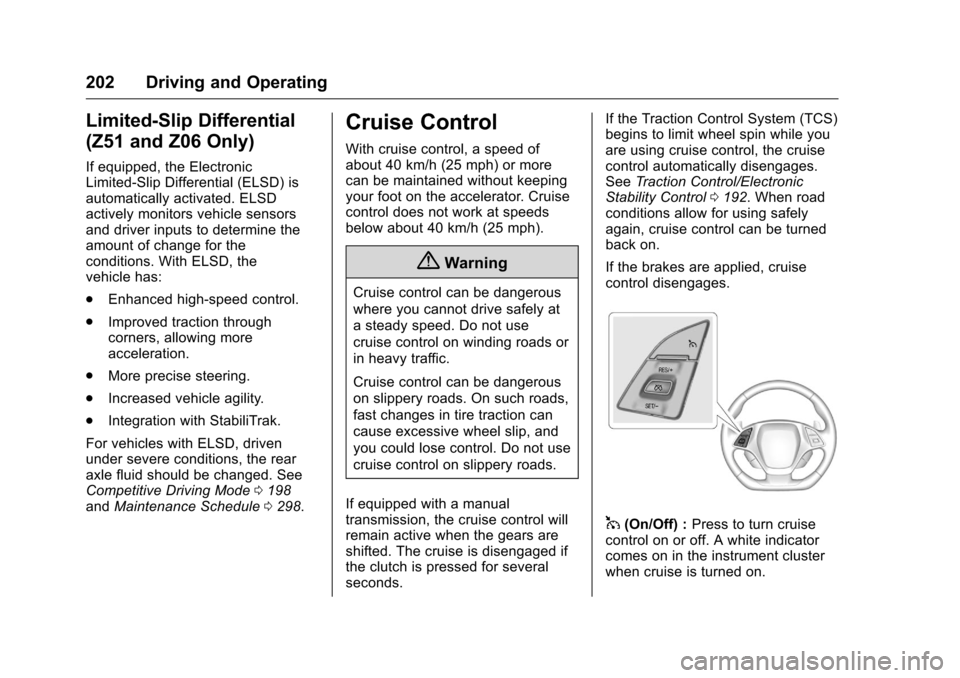
1(On/Off) : Press to turn cruise
control on or off. A white indicator
comes on in the instrument cluster
when cruise is turned on.
Page 207 of 351
Chevrolet Corvette Owner Manual (GMNA-Localizing-U.S./Canada/Mexico-
9085364) - 2016 - crc - 9/15/15
206 Driving and Operating
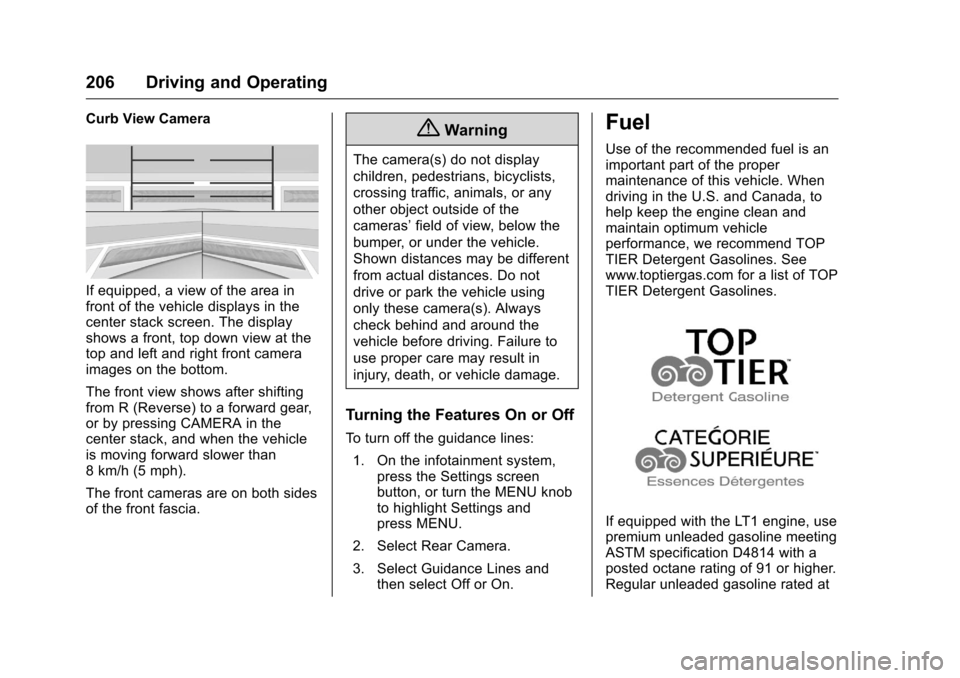
Curb View Camera
If equipped, a view of the area in
front of the vehicle displays in the
center stack screen. The display
shows a front, top down view at the
top and left and right front camera
images on the bottom.
The front view shows after shifting
from R (Reverse) to a forward gear,
or by pressing CAMERA in the
center stack, and when the vehicle
is moving forward slower than
8 km/h (5 mph).
The front cameras are on both sides
of the front fascia.
{Warning
The camera(s) do not display
children, pedestrians, bicyclists,
crossing traffic, animals, or any
other object outside of the
cameras’field of view, below the
bumper, or under the vehicle.
Shown distances may be different
from actual distances. Do not
drive or park the vehicle using
only these camera(s). Always
check behind and around the
vehicle before driving. Failure to
use proper care may result in
injury, death, or vehicle damage.
Turning the Features On or Off
To turn off the guidance lines:
1. On the infotainment system, press the Settings screen
button, or turn the MENU knob
to highlight Settings and
press MENU.
2. Select Rear Camera.
3. Select Guidance Lines and then select Off or On.
Fuel
Use of the recommended fuel is an
important part of the proper
maintenance of this vehicle. When
driving in the U.S. and Canada, to
help keep the engine clean and
maintain optimum vehicle
performance, we recommend TOP
TIER Detergent Gasolines. See
www.toptiergas.com for a list of TOP
TIER Detergent Gasolines.
If equipped with the LT1 engine, use
premium unleaded gasoline meeting
ASTM specification D4814 with a
posted octane rating of 91 or higher.
Regular unleaded gasoline rated at
Page 212 of 351
Chevrolet Corvette Owner Manual (GMNA-Localizing-U.S./Canada/Mexico-
9085364) - 2016 - crc - 9/15/15
Driving and Operating 211
Conversions and
Add-Ons
Add-On Electrical
Equipment
{Warning
The Data Link Connector (DLC) is
used for vehicle service and
Emission Inspection/Maintenance
testing. SeeMalfunction Indicator
Lamp (Check Engine Light)
0 106. A device connected to the
DLC —such as an aftermarket
fleet or driver-behavior tracking
device —may interfere with
vehicle systems. This could affect
vehicle operation and cause a
crash. Such devices may also
access information stored in the
vehicle’s systems.
Caution
Some electrical equipment can
damage the vehicle or cause
components to not work and
would not be covered by the
vehicle warranty. Always check
with your dealer before adding
electrical equipment.
Add-on equipment can drain the
vehicle's 12-volt battery, even if the
vehicle is not operating.
The vehicle has an airbag system.
Before attempting to add anything
electrical to the vehicle, see
Servicing the Airbag-Equipped
Vehicle 076 and Adding Equipment
to the Airbag-Equipped
Vehicle 076.
Page 218 of 351
Chevrolet Corvette Owner Manual (GMNA-Localizing-U.S./Canada/Mexico-
9085364) - 2016 - crc - 9/15/15
Vehicle Care 217
Keep a record with all parts receipts
and list the mileage and the date of
any service work performed. See
Maintenance Records0310.
Caution
Even small amounts of
contamination can cause damage
to vehicle systems. Do not allow
contaminants to contact the fluids,
reservoir caps, or dipsticks.
Hood
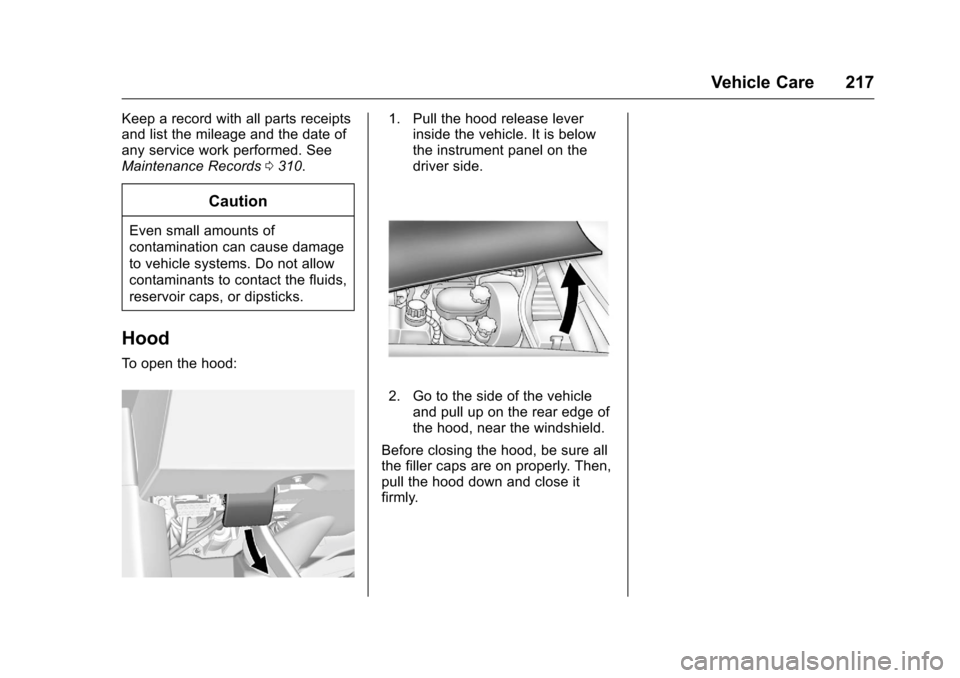
To open the hood:
1. Pull the hood release lever
inside the vehicle. It is below
the instrument panel on the
driver side.
2. Go to the side of the vehicle
and pull up on the rear edge of
the hood, near the windshield.
Before closing the hood, be sure all
the filler caps are on properly. Then,
pull the hood down and close it
firmly.
Page 228 of 351
Chevrolet Corvette Owner Manual (GMNA-Localizing-U.S./Canada/Mexico-
9085364) - 2016 - crc - 9/15/15
Vehicle Care 227
Steps to follow:1. Remove the two engine oil drain plugs from the bottom of
the engine oil pan. One drain
plug drains the external oil tank
via the oil transfer supply line.
The other drain plug drains
residual oil from the crankcase
sump. Allow the oil to drain.
2. Once the oil has been drained from the engine, remove the
engine oil filter and allow the oil
to drain.
3. Reinstall both drain plugs and tighten them to 25 Y
(18 lb ft).
4. Replace the oil filter and tighten it three-quarters to one
turn after gasket contact. See
Maintenance Replacement
Parts 0309 for the correct filter.
5. Oil is filled through the opening in the top of the external
engine oil tank. Remove the oil
fill cap.
6. Add oil to the oil tank. See Capacities and
Specifications 0312. 7. Install the oil fill cap and insert
the dipstick, if removed.
8. Start the engine and let it run at idle for at least 15 seconds.
This will circulate the fresh
engine oil through the
lubrication system.
9. Shut off the engine and check the oil level as described under
“Checking Engine Oil
(Z51 and Z06).”
Selecting the Right Engine Oil
Selecting the right engine oil
depends on both the proper oil
specification and viscosity grade.
See Recommended Fluids and
Lubricants 0307.
Specification
Ask for and use engine oils that
meet the dexos1™ specification.
Engine oils that have been
approved by GM as meeting the
dexos1 specification are marked
with the dexos1 approved logo. See
www.gmdexos.com.
GM recommends Mobil 1
®engine
oils that show the dexos1 approved
logo for its dry sump equipped
engines.
Caution
Failure to use the recommended
engine oil or equivalent can result
in engine damage not covered by
the vehicle warranty.
Viscosity Grade
Use SAE 5W-30 viscosity grade
engine oil.
Cold Temperature Operation: In an
area of extreme cold, where the
temperature falls below −29 °C
(−20 °F), an SAE 0W-30 oil may be
used. An oil of this viscosity grade
will provide easier cold starting for
the engine at extremely low
temperatures. When selecting an oil
of the appropriate viscosity grade, it
Page 230 of 351

Chevrolet Corvette Owner Manual (GMNA-Localizing-U.S./Canada/Mexico-
9085364) - 2016 - crc - 9/15/15
Vehicle Care 229
If the system is ever reset
accidentally, the oil must be
changed at 5 000 km (3,000 mi)
since the last oil change.
Remember to reset the oil life
system whenever the oil is changed.
Dry Sump Engine Break-In Oil
Change
If equipped with a dry sump engine,
the initial oil and filter change must
be performed at 800 km/500 mi.
Follow the engine oil life system for
every oil change thereafter.
How to Reset the Engine Oil
Life System
Reset the system whenever the
engine oil is changed so that the
system can calculate the next
engine oil change. To reset the
system:1. Scroll through the DIC Info Pages menu until the
REMAINING OIL LIFE
percentage is displayed. See
Driver Information Center
(DIC) 0113. 2. Press and hold the SEL button
on the DIC while the Oil Life
display is active. The oil life will
change to 100%.
If the CHANGE ENGINE OIL SOON
message comes back on when the
vehicle is started, the engine oil life
system has not reset. Repeat the
procedure.
Automatic Transmission
Fluid
How to Check Automatic
Transmission Fluid
It is not necessary to check the
transmission fluid level.
A transmission fluid leak is the only
reason for fluid loss. If a leak
occurs, take the vehicle to the
dealer and have it repaired as soon
as possible.
The vehicle is not equipped with a
transmission fluid level dipstick.
There is a special procedure for
checking and changing the
transmission fluid. Because this
procedure is difficult, this should be
done at the dealer. Contact the dealer for additional information or
the procedure can be found in the
service manual. To purchase a
service manual, see
Service
Publications Ordering
Information 0324.
Caution
Use of the incorrect automatic
transmission fluid may damage
the vehicle, and the damage may
not be covered by the vehicle
warranty. Always use the
automatic transmission fluid listed
in Recommended Fluids and
Lubricants 0307.
Change the fluid and filter at the
intervals listed in Maintenance
Schedule 0298, and be sure to use
the fluid listed in Recommended
Fluids and Lubricants 0307.
Manual Transmission
Fluid
It is not necessary to check the
manual transmission fluid level.
A transmission fluid leak is the only
Page 231 of 351
Chevrolet Corvette Owner Manual (GMNA-Localizing-U.S./Canada/Mexico-
9085364) - 2016 - crc - 9/15/15
230 Vehicle Care
reason for fluid loss. If a leak
occurs, take the vehicle to the
dealer and have it repaired as soon
as possible. SeeRecommended
Fluids and Lubricants 0307 for the
proper fluid to use.
Hydraulic Clutch
It is not necessary to regularly
check clutch fluid unless you
suspect there is a leak in the
system. Adding fluid will not correct
a leak. A fluid loss in this system
could indicate a problem. Have the
system inspected and repaired.
The fluid will darken over time. See
Maintenance Schedule 0298 for
when to replace the fluid.
When to Check and What
to Use
The hydraulic clutch fluid reservoir
cap has this symbol on it. See
Engine Compartment Overview
0 218 for reservoir location.
Refer to Recommended Fluids and
Lubricants 0307 for the proper fluid
to use. The fluid requires changing.
See Maintenance Schedule 0298.
How to Check and Add Fluid
Visually check the clutch fluid
reservoir to make sure the fluid level
is at the MIN (minimum) line on the
side of the reservoir. The hydraulic
clutch fluid system should be closed
and sealed.
Do not remove the cap to check the
fluid level or to top off the fluid level.
Remove the cap only when
necessary to add the proper fluid
until the level reaches the MIN line.
Engine Air Cleaner/Filter
See Engine Compartment Overview
0 218 for the location of the engine
air cleaner/filter.
Caution
If water is sprayed and enters the
engine air cleaner/filter intake and
housing, the engine could be
damaged. The repairs would not
be covered by the vehicle
warranty.
When to Inspect the Engine Air
Cleaner/Filter
For intervals on changing and
inspecting the engine air cleaner/
filter, see Maintenance
Schedule 0298.
How to Inspect the Engine Air
Cleaner/Filter
Do not start the engine or have the
engine running with the engine air
cleaner/filter housing open. Before
removing the engine air cleaner/
filter, make sure that the engine air
cleaner/filter housing and nearby
components are free of dirt and
debris. Remove the engine air
cleaner/filter. Lightly tap and shake
the engine air cleaner/filter (away
from the vehicle), to release loose
Page 236 of 351
Chevrolet Corvette Owner Manual (GMNA-Localizing-U.S./Canada/Mexico-
9085364) - 2016 - crc - 9/15/15
Vehicle Care 235
Engine Coolant
The cooling system in the vehicle is
filled with DEX-COOL®engine
coolant. See Recommended Fluids
and Lubricants 0307. The fluid
requires changing at certain
intervals. See Maintenance
Schedule 0298.
The following explains the cooling
system and how to check and add
coolant when it is low. If there is a
problem with engine overheating,
see Engine Overheating 0237.
What to Use
{Warning
Adding only plain water or some
other liquid to the cooling system
can be dangerous. Plain water
and other liquids, can boil before
the proper coolant mixture will.
The vehicle's coolant warning
system is set for the proper
coolant mixture. With plain water
or the wrong mixture, the engine
(Continued)
Warning (Continued)
could get too hot but you would
not get the overheat warning. The
engine could catch fire and you or
others could be burned. Use a
mixture of 40% DEX-COOL
coolant and 60% clean, drinkable
water.
Use a mixture of 40% DEX-COOL
coolant and 60% clean, drinkable
water. If using this mixture, nothing
else needs to be added. This
mixture:
. Gives freezing protection down
to−28 °C (−18 °F), outside
temperature.
. Gives boiling protection up to
129 °C (265 °F), engine
temperature.
. Protects against rust and
corrosion.
. Will not damage aluminum parts.
. Helps keep the proper engine
temperature.
Caution
If improper coolant mixture,
inhibitors, or additives are used in
the vehicle cooling system, the
engine could overheat and be
damaged. Too much water in the
mixture can freeze and crack
engine cooling parts. The repairs
would not be covered by the
vehicle warranty. Use only the
proper mixture of engine coolant
for the cooling system. See
Recommended Fluids and
Lubricants 0307.
Never dispose of engine coolant by
putting it in the trash, pouring it on
the ground, or into sewers, streams,
or bodies of water. Have the coolant
changed by an authorized service
center, familiar with legal
requirements regarding used
coolant disposal. This will help
protect the environment and your
health.