2016 CHEVROLET CORVETTE brake light
[x] Cancel search: brake lightPage 195 of 351
Chevrolet Corvette Owner Manual (GMNA-Localizing-U.S./Canada/Mexico-
9085364) - 2016 - crc - 9/15/15
194 Driving and Operating
Caution
Do not repeatedly brake or
accelerate heavily when TCS is
off. The vehicle driveline could be
damaged.
To turn off only TCS, press and
release the
gbutton. The Traction
Off light
iilluminates in the
instrument cluster. To turn TCS on
again, press and release the
g
button. The Traction Off lighti
displayed in the instrument cluster
will turn off.
If TCS is limiting wheel spin when
the
gbutton is pressed, the system
will not turn off until the wheels stop
spinning.
To turn off both TCS and StabiliTrak,
press and hold the
gbutton until
the Traction Off light
iand
StabiliTrak OFF light
gilluminate
and stay on in the instrument
cluster. To turn TCS and StabiliTrak on
again, press and release the
g
button. The Traction Off lightiand
StabiliTrak OFF light
gin the
instrument cluster turn off.
If the Tire Pressure Monitor System
(TPMS) system is malfunctioning
and the DIC displays SERVICE
TIRE MONITOR SYSTEM,
StabiliTrak will be affected as
follows:
. StabiliTrak cannot be turned off
by the driver.
. If StabiliTrak is off, it will be
turned on automatically.
. Competitive Driving Mode or
Performance Traction
Management is unavailable.
. StabiliTrak will feel different in
aiding and maintaining
directional control.
Adding accessories can affect the
vehicle performance. See
Accessories and
Modifications 0213.
Driver Mode Control
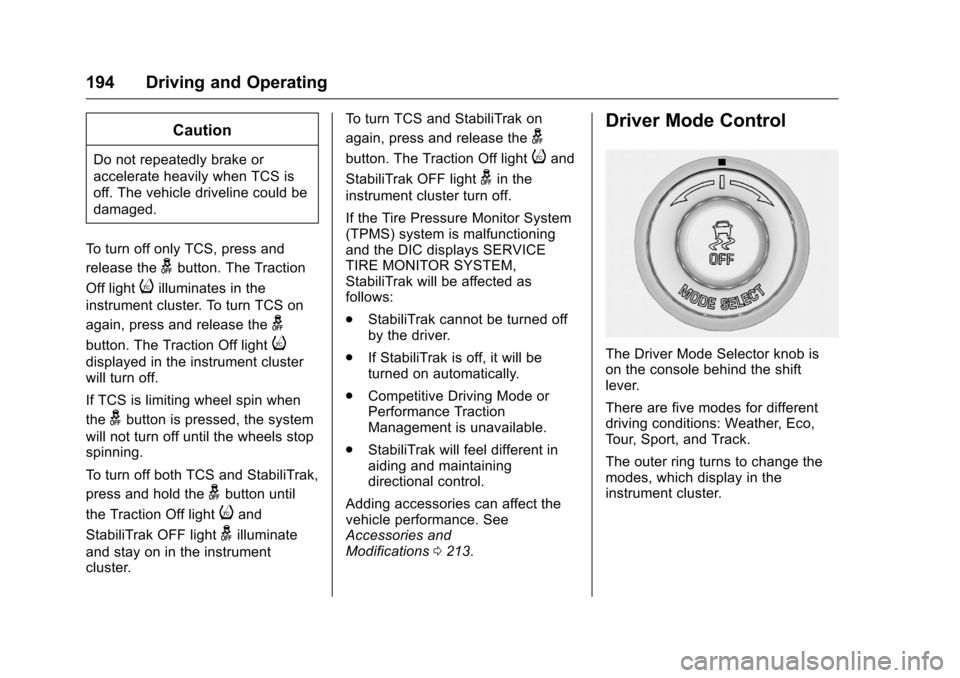
The Driver Mode Selector knob is
on the console behind the shift
lever.
There are five modes for different
driving conditions: Weather, Eco,
Tour, Sport, and Track.
The outer ring turns to change the
modes, which display in the
instrument cluster.
Page 199 of 351
Chevrolet Corvette Owner Manual (GMNA-Localizing-U.S./Canada/Mexico-
9085364) - 2016 - crc - 9/15/15
198 Driving and Operating
Competitive Driving Mode
If equipped, Competitive Driving
Mode, Performance Traction
Management, and Launch Control
are systems designed to allow
increased performance while
accelerating and/or cornering. This
is accomplished by regulating and
optimizing the engine, brakes, and
suspension performance. These
modes are for use at a closed
course race track and are not
intended for use on public roads.
They will not compensate for driver
inexperience or lack of familiarity
with the race track. Drivers who
prefer to allow the system to have
more control of the engine, brake,
and suspension are advised to turn
the normal traction control and
StabiliTrak systems on.
Caution
Attempting to shift when the drive
wheels are spinning and do not
have traction may cause damage
to the transmission. Damage(Continued)
Caution (Continued)
caused by misuse of the vehicle
is not covered by the vehicle
warranty. Do not attempt to shift
when the drive wheels do not
have traction.
Competitive Driving Mode
(Except Z51 and Z06 with
Magnetic Ride Control)
Competitive Driving Mode allows full
engine power while StabiliTrak
helps maintain directional control of
the vehicle by selective brake
application. In this mode, TCS is off
and Launch Control is available.
Adjust your driving style to account
for the available engine power. See
“Launch Control”later in this
section.
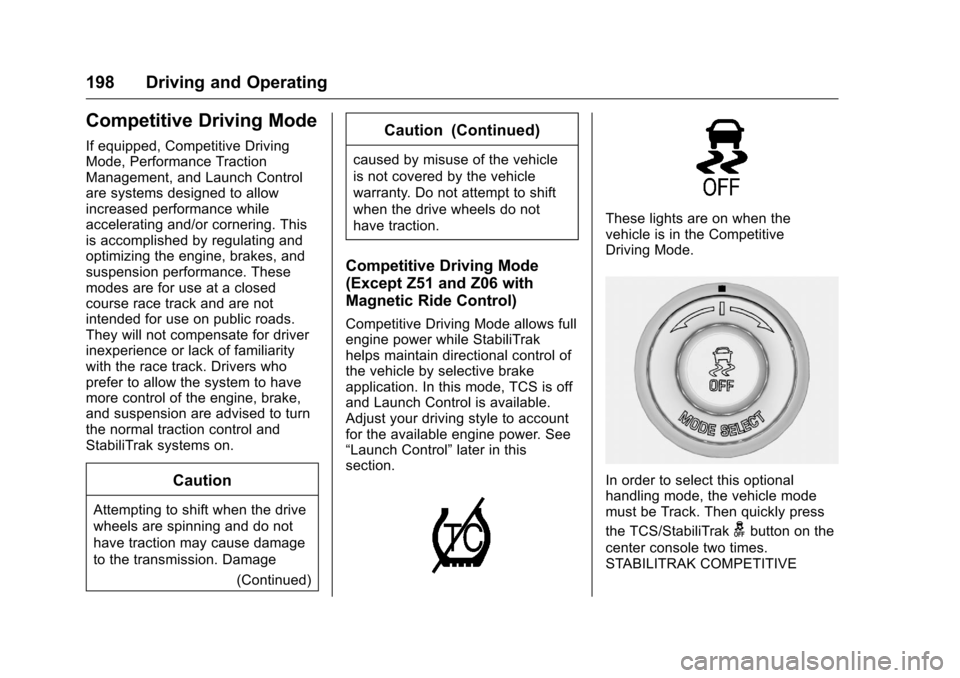
These lights are on when the
vehicle is in the Competitive
Driving Mode.
In order to select this optional
handling mode, the vehicle mode
must be Track. Then quickly press
the TCS/StabiliTrak
gbutton on the
center console two times.
STABILITRAK COMPETITIVE
Page 205 of 351
Chevrolet Corvette Owner Manual (GMNA-Localizing-U.S./Canada/Mexico-
9085364) - 2016 - crc - 9/15/15
204 Driving and Operating
Passing Another Vehicle While
Using Cruise Control
Use the accelerator pedal to
increase the vehicle speed. When
you take your foot off the pedal, the
vehicle will slow down to the
previously set cruise speed.
While pressing the accelerator pedal
or shortly following the release to
override cruise control, briefly
pressing SET/–will result in cruise
set to the current vehicle speed.
Using Cruise Control on Hills
How well the cruise control works
on hills depends upon the vehicle
speed, load, and the steepness of
the hills. When going up steep hills,
you might have to step on the
accelerator pedal to maintain your
speed. When going downhill, you
might have to brake or shift to a
lower gear to keep your speed
down. If the brake pedal is applied,
cruise control will disengage. Cruise Control in Manual Paddle
Shift Gear Selection
When the vehicle is in M (Manual
Mode) and the manual paddle shift
controls are not being used, cruise
control operates in the same
manner as D (Drive).
When the vehicle is in M (Manual
Mode) and the manual paddle shift
controls are being used, cruise
control operates as follows:
.
If cruise control is active and a
gear is selected with the manual
paddle shift controls, the vehicle
speed is maintained in the driver
selected gear and will not
automatically upshift or
downshift the transmission while
the driver ’s gear selection is
active.
. If driving in hilly terrain, cruise
control may not be able to
maintain vehicle speed if an
upshift or downshift is not
selected by the driver. While
driving on hilly terrain and cruise
control is active with a manual
paddle shift gear selection, the
driver must select the proper gear for the terrain or select D
(Drive) on the shift lever for full
automatic transmission
operation.
Ending Cruise Control
. Step lightly on the brake pedal.
. Press the clutch pedal for
several seconds or shift to
N (Neutral) (manual
transmissions).
. Shift the transmission to
N (Neutral) (automatic
transmissions).
. Press
*.
. To turn off cruise control,
press
1.
Erasing Speed Memory
The cruise control set speed is
erased from memory if
1is pressed
or if the ignition is turned off.
Page 213 of 351
Chevrolet Corvette Owner Manual (GMNA-Localizing-U.S./Canada/Mexico-
9085364) - 2016 - crc - 9/15/15
212 Vehicle Care
Vehicle Care
General Information
General Information . . . . . . . . . . 213
California Proposition65 Warning . . . . . . . . . . . . . . . . . 213
California Perchlorate Materials Requirements . . . . . 213
Accessories and Modifications . . . . . . . . . . . . . . . . 213
Lifting the Vehicle . . . . . . . . . . . . 214
Vehicle Checks
Doing Your Own Service Work . . . . . . . . . . . . . . . 216
Hood . . . . . . . . . . . . . . . . . . . . . . . . . 217
Engine Compartment Overview . . . . . . . . . . . . . . . . . . . . 218
Engine Oil . . . . . . . . . . . . . . . . . . . . 223
Engine Oil Life System . . . . . . . 228
Automatic Transmission Fluid . . . . . . . . . . . . . . . . . . . . . . . . 229
Manual Transmission Fluid . . . 229
Hydraulic Clutch . . . . . . . . . . . . . . 230
Engine Air Cleaner/Filter . . . . . . 230
Cooling System (Engine) . . . . . 232
Cooling System (Aero Panel) . . . . . . . . . . . . . . . . . . . . . . . 234
Engine Coolant . . . . . . . . . . . . . . . 235
Engine Overheating . . . . . . . . . . 237 Washer Fluid . . . . . . . . . . . . . . . . . 238
Brakes . . . . . . . . . . . . . . . . . . . . . . . 239
Brake Fluid . . . . . . . . . . . . . . . . . . . 240
Battery - North America . . . . . . 241
Rear Axle . . . . . . . . . . . . . . . . . . . . 242
Starter Switch Check . . . . . . . . . 243
Automatic Transmission Shift
Lock Control Function
Check . . . . . . . . . . . . . . . . . . . . . . . 243
Park Brake and P (Park) Mechanism Check . . . . . . . . . . 244
Wiper Blade Replacement . . . . 244
Windshield Replacement . . . . . 245Headlamp Aiming
Headlamp Aiming . . . . . . . . . . . . 245
Bulb Replacement
Bulb Replacement . . . . . . . . . . . . 245
High Intensity Discharge (HID) Lighting . . . . . . . . . . . . . . . . . . . . . 245
LED Lighting . . . . . . . . . . . . . . . . . 246
License Plate Lamp . . . . . . . . . . 246
Replacement Bulbs . . . . . . . . . . . 246
Electrical System
Electrical System Overload . . . 247
Fuses . . . . . . . . . . . . . . . . . . . . . . . . 247
Engine Compartment Fuse Block . . . . . . . . . . . . . . . . . . . . . . . . 247
Rear Compartment Fuse Block . . . . . . . . . . . . . . . . . . . . . . . . 251
Wheels and Tires
Tires . . . . . . . . . . . . . . . . . . . . . . . . . . 254
Winter Tires . . . . . . . . . . . . . . . . . . 255
Run-Flat Tires . . . . . . . . . . . . . . . . 255
Low-Profile Tires . . . . . . . . . . . . . 256
Competition Oriented Tires . . . 257
Summer Tires . . . . . . . . . . . . . . . . 258
Tire Sidewall Labeling . . . . . . . . 258
Tire Designations . . . . . . . . . . . . . 259
Tire Terminology andDefinitions . . . . . . . . . . . . . . . . . . 260
Tire Pressure . . . . . . . . . . . . . . . . . 262
Tire Pressure for High-Speed Operation . . . . . . . . . . . . . . . . . . . 264
Tire Pressure Monitor System . . . . . . . . . . . . . . . . . . . . . . 265
Tire Pressure Monitor Operation . . . . . . . . . . . . . . . . . . . 266
Tire Inspection . . . . . . . . . . . . . . . . 268
Tire Rotation . . . . . . . . . . . . . . . . . 268
When It Is Time for New Tires . . . . . . . . . . . . . . . . . . . . . . . . 269
Buying New Tires . . . . . . . . . . . . . 270
Different Size Tires and Wheels . . . . . . . . . . . . . . . . . . . . . . 271
Uniform Tire Quality Grading . . . . . . . . . . . . . . . . . . . . . 271
Wheel Alignment and Tire Balance . . . . . . . . . . . . . . . . . . . . . 273
Wheel Replacement . . . . . . . . . . 273
Tire Chains . . . . . . . . . . . . . . . . . . . 275
Page 242 of 351
Chevrolet Corvette Owner Manual (GMNA-Localizing-U.S./Canada/Mexico-
9085364) - 2016 - crc - 9/15/15
Vehicle Care 241
Warning (Continued)
Add brake fluid only when work is
done on the brake hydraulic
system.
When the brake fluid falls to a low
level, the brake warning light comes
on. See Brake System Warning
Light 0108.
Brake fluid absorbs water over time
which degrades the effectiveness of
the brake fluid. Replace brake fluid
at the specified intervals to prevent
increased stopping distance. See
Maintenance Schedule 0298.
What to Add
Use only GM approved DOT 3
brake fluid from a clean, sealed
container. See Recommended
Fluids and Lubricants 0307.
{Warning
The wrong or contaminated brake
fluid could result in damage to the
brake system. This could result in
the loss of braking leading to a
possible injury. Always use the
proper GM approved brake fluid.
Caution
If brake fluid is spilled on the
vehicle's painted surfaces, the
paint finish can be damaged.
Immediately wash off any painted
surface.
Battery - North America
The original equipment battery is
maintenance free. Do not remove
the cap and do not add fluid.
Refer to the replacement number on
the original battery label when a
new battery is needed. For battery replacement, see your
dealer or the service manual. To
purchase a service manual, see
Service Publications Ordering
Information
0324.
{Warning
WARNING: Battery posts,
terminals, and related
accessories contain lead and lead
compounds, chemicals known to
the State of California to cause
cancer and birth defects or other
reproductive harm. Batteries also
contain other chemicals known to
the State of California to cause
cancer. WASH HANDS AFTER
HANDLING. SeeCalifornia
Proposition 65 Warning 0213.
Page 286 of 351
Chevrolet Corvette Owner Manual (GMNA-Localizing-U.S./Canada/Mexico-
9085364) - 2016 - crc - 9/15/15
Vehicle Care 285
The battery is under a battery cover
in the hatch/trunk area on the
passenger side under the carpet.
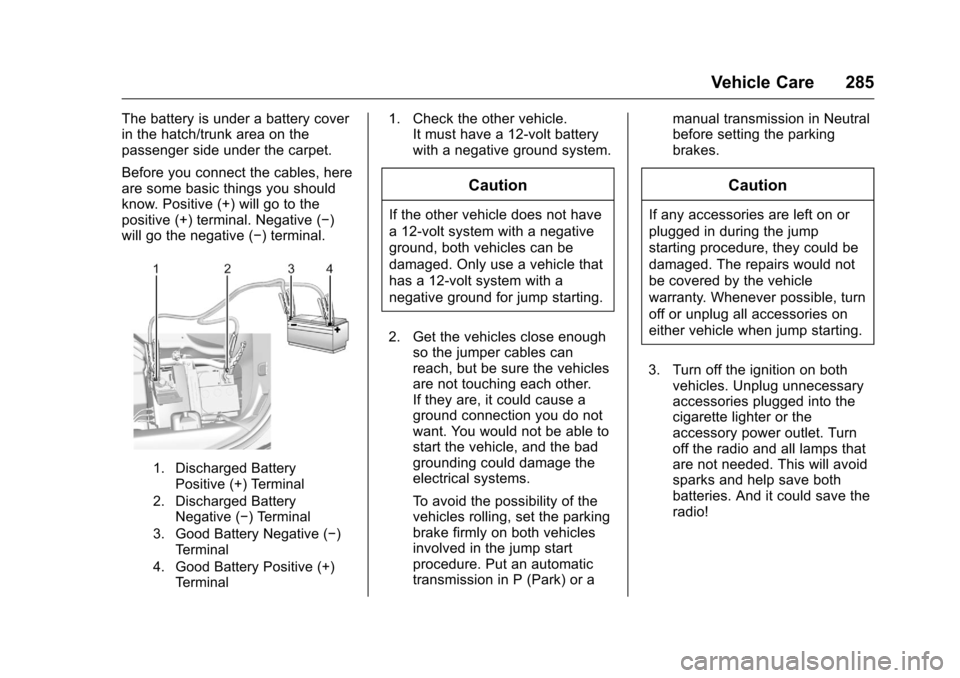
Before you connect the cables, here
are some basic things you should
know. Positive (+) will go to the
positive (+) terminal. Negative (−)
will go the negative (−) terminal.
1. Discharged BatteryPositive (+) Terminal
2. Discharged Battery Negative (−) Terminal
3. Good Battery Negative (−) Terminal
4. Good Battery Positive (+) Terminal
1. Check the other vehicle. It must have a 12-volt battery
with a negative ground system.
Caution
If the other vehicle does not have
a 12-volt system with a negative
ground, both vehicles can be
damaged. Only use a vehicle that
has a 12-volt system with a
negative ground for jump starting.
2. Get the vehicles close enough so the jumper cables can
reach, but be sure the vehicles
are not touching each other.
If they are, it could cause a
ground connection you do not
want. You would not be able to
start the vehicle, and the bad
grounding could damage the
electrical systems.
To avoid the possibility of the
vehicles rolling, set the parking
brake firmly on both vehicles
involved in the jump start
procedure. Put an automatic
transmission in P (Park) or a manual transmission in Neutral
before setting the parking
brakes.
Caution
If any accessories are left on or
plugged in during the jump
starting procedure, they could be
damaged. The repairs would not
be covered by the vehicle
warranty. Whenever possible, turn
off or unplug all accessories on
either vehicle when jump starting.
3. Turn off the ignition on both vehicles. Unplug unnecessary
accessories plugged into the
cigarette lighter or the
accessory power outlet. Turn
off the radio and all lamps that
are not needed. This will avoid
sparks and help save both
batteries. And it could save the
radio!
Page 305 of 351
Chevrolet Corvette Owner Manual (GMNA-Localizing-U.S./Canada/Mexico-
9085364) - 2016 - crc - 9/15/15
304 Service and Maintenance
Additional
Maintenance and Care
Your vehicle is an important
investment and caring for it properly
may help to avoid future costly
repairs. To maintain vehicle
performance, additional
maintenance services may be
required.
It is recommended that your dealer
perform these services—their
trained dealer technicians know
your vehicle best. Your dealer can
also perform a thorough
assessment with a multi-point
inspection to recommend when your
vehicle may need attention.
The following list is intended to
explain the services and conditions
to look for that may indicate
services are required.
Battery
The 12-volt battery supplies power
to start the engine and operate any
additional electrical accessories. .
To avoid break-down or failure to
start the vehicle, maintain a
battery with full cranking power.
. Trained dealer technicians have
the diagnostic equipment to test
the battery and ensure that the
connections and cables are
corrosion-free.
Belts
. Belts may need replacing if they
squeak or show signs of
cracking or splitting.
. Trained dealer technicians have
access to tools and equipment
to inspect the belts and
recommend adjustment or
replacement when necessary.
Brakes
Brakes stop the vehicle and are
crucial to safe driving.
. Signs of brake wear may include
chirping, grinding, or squealing
noises, or difficulty stopping. .
Trained dealer technicians have
access to tools and equipment
to inspect the brakes and
recommend quality parts
engineered for the vehicle.
Fluids
Proper fluid levels and approved
fluids protect the vehicle’s systems
and components. See
Recommended Fluids and
Lubricants 0307 for GM approved
fluids.
. Engine oil and windshield
washer fluid levels should be
checked at every fuel fill.
. Instrument cluster lights may
come on to indicate that fluids
may be low and need to be
filled.
Hoses
Hoses transport fluids and should
be regularly inspected to ensure
that there are no cracks or leaks.
With a multi-point inspection, your
dealer can inspect the hoses and
advise if replacement is needed.
Page 306 of 351
Chevrolet Corvette Owner Manual (GMNA-Localizing-U.S./Canada/Mexico-
9085364) - 2016 - crc - 9/15/15
Service and Maintenance 305
Lamps
Properly working headlamps,
taillamps, and brake lamps are
important to see and be seen on
the road.
.Signs that the headlamps need
attention include dimming, failure
to light, cracking, or damage.
The brake lamps need to be
checked periodically to ensure
that they light when braking.
. With a multi-point inspection,
your dealer can check the lamps
and note any concerns.
Shocks and Struts
Shocks and struts help aid in control
for a smoother ride.
. Signs of wear may include
steering wheel vibration, bounce/
sway while braking, longer
stopping distance, or uneven
tire wear.
. As part of the multi-point
inspection, trained dealer
technicians can visually inspect
the shocks and struts for signs of leaking, blown seals,
or damage, and can advise
when service is needed.
Tires
Tires need to be properly inflated,
rotated, and balanced. Maintaining
the tires can save money and fuel,
and can reduce the risk of tire
failure.
. Signs that the tires need to be
replaced include three or more
visible treadwear indicators; cord
or fabric showing through the
rubber; cracks or cuts in the
tread or sidewall; or a bulge or
split in the tire.
. Trained dealer technicians can
inspect and recommend the right
tires. Your dealer can also
provide tire/wheel balancing
services to ensure smooth
vehicle operation at all speeds.
Your dealer sells and services
name brand tires.
Vehicle Care
To help keep the vehicle looking like
new, vehicle care products are
available from your dealer. For information on how to clean and
protect the vehicle’s interior and
exterior, see
Interior Care 0292 and
Exterior Care 0288.
Wheel Alignment
Wheel alignment is critical for
ensuring that the tires deliver
optimal wear and performance.
. Signs that the alignment may
need to be adjusted include
pulling, improper vehicle
handling, or unusual tire wear.
. Your dealer has the required
equipment to ensure proper
wheel alignment.
Windshield
For safety, appearance, and the
best viewing, keep the windshield
clean and clear.
. Signs of damage include
scratches, cracks, and chips.
. Trained dealer technicians can
inspect the windshield and
recommend proper replacement
if needed.