2016 CHEVROLET CORVETTE automatic transmission
[x] Cancel search: automatic transmissionPage 47 of 351
Chevrolet Corvette Owner Manual (GMNA-Localizing-U.S./Canada/Mexico-
9085364) - 2016 - crc - 9/15/15
46 Keys, Doors, and Windows
Roof
Roof Panel
If equipped with a removable roof
panel, use the following procedures
to remove or install it.
Caution
If a roof panel is dropped or
rested on its edges, the roof
panel, paint, and/or
weatherstripping may be
damaged. Always place the roof
panel in the stowage receivers
after removing it from the vehicle.
Removing the Roof Panel
{Warning
Do not remove a roof panel while
the vehicle is moving. The panel
could fall into the vehicle and
strike an occupant and cause you
to lose control. It could also fly off(Continued)
Warning (Continued)
and strike another vehicle.
Remove the roof panel only when
the vehicle is parked.
It may be necessary to have help
removing the roof panel.
To remove: 1. Shift an automatic transmission into P (Park) or a manual
transmission into 1 (First) or
R (Reverse).
2. Turn the ignition off and set the parking brake.
3. Lower both sun visors.
4. Open the rear hatch/trunk and remove any items that may
interfere with proper storage of
the roof panel.
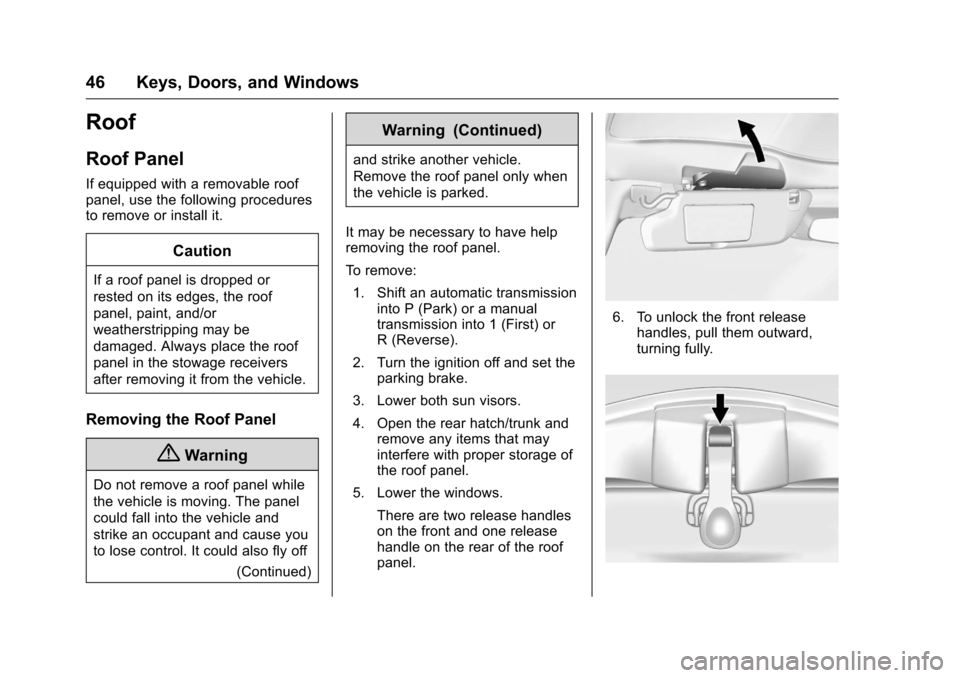
5. Lower the windows. There are two release handles
on the front and one release
handle on the rear of the roof
panel.
6. To unlock the front releasehandles, pull them outward,
turning fully.
Page 49 of 351
Chevrolet Corvette Owner Manual (GMNA-Localizing-U.S./Canada/Mexico-
9085364) - 2016 - crc - 9/15/15
48 Keys, Doors, and Windows
Installing the Roof Panel
{Warning
An improperly attached roof panel
may fall into or fly off the vehicle.
You or others could be injured.
After installing the roof panel,
always check that it is firmly
attached by pushing up on the
underside of the panel. Check
now and then to be sure the roof
panel is firmly in place.
Caution
Installing the roof with the release
handles in the closed position
could cause damage to the
interior trim. Always move
handles to the open position
when installing the roof.
It is easier if two people install the
roof panel. 1. Shift an automatic transmission
into P (Park). Shift a manual
transmission into 1 (First) or
R (Reverse).
2. Turn the ignition off and set the parking brake.
3. To remove the roof panel, pull up on the rear edge and
remove it from the
storage area.
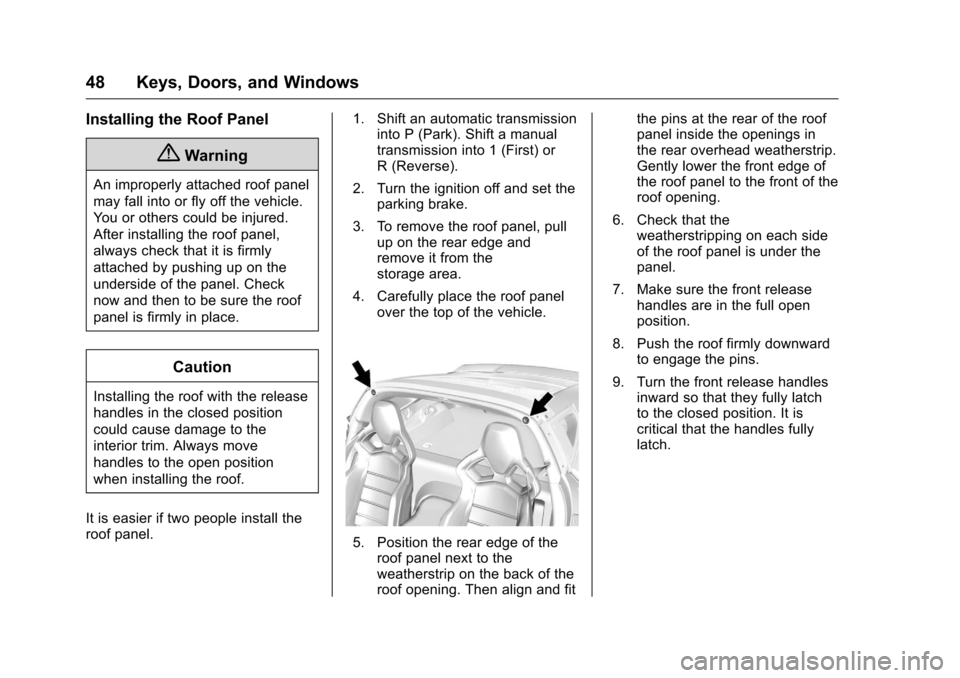
4. Carefully place the roof panel over the top of the vehicle.
5. Position the rear edge of theroof panel next to the
weatherstrip on the back of the
roof opening. Then align and fit the pins at the rear of the roof
panel inside the openings in
the rear overhead weatherstrip.
Gently lower the front edge of
the roof panel to the front of the
roof opening.
6. Check that the weatherstripping on each side
of the roof panel is under the
panel.
7. Make sure the front release handles are in the full open
position.
8. Push the roof firmly downward to engage the pins.
9. Turn the front release handles inward so that they fully latch
to the closed position. It is
critical that the handles fully
latch.
Page 117 of 351
Chevrolet Corvette Owner Manual (GMNA-Localizing-U.S./Canada/Mexico-
9085364) - 2016 - crc - 9/15/15
116 Instruments and Controls
If equipped with HUD, some
information concerning the
operation of the vehicle is projected
onto the windshield.
The HUD information appears as an
image focused out toward the front
of the vehicle.
Caution
If you try to use the HUD image
as a parking aid, you may
misjudge the distance and
damage your vehicle. Do not use
the HUD image as a parking aid.
The HUD information can be
displayed in various languages. The
speedometer reading and other
numerical values can be displayed
in either English or metric units.
The language selection is changed
through the radio and the units of
measurement is changed through
the instrument cluster. See Vehicle
Personalization 0130 and“Settings”
under Instrument Cluster 096. The HUD may display different
alerts and information for vehicles
equipped with these features:
.
Speedometer
. Tachometer
. Manual Transmission Gear (If
Equipped)
. Manual Paddle Shift Gear
Indicator (If Equipped)
These displays on the HUD are
for use when using the manual
paddle shift controls to shift the
transmission. See “Manual
Paddle Shift” inAutomatic
Transmission 0182.
. Shift Light
This light is used for
performance driving to indicate
that the vehicle's best
performance level has been
reached to shift the transmission
into the next higher gear. An
arrow pointing up will light up on
the display just prior to reaching
the engine fuel cut-off mode.
. G-Force Gauge
. Audio Information .
Upcoming Maneuver from
OnBoard Navigation
. Upcoming Maneuver from
OnStar
. Incoming Call
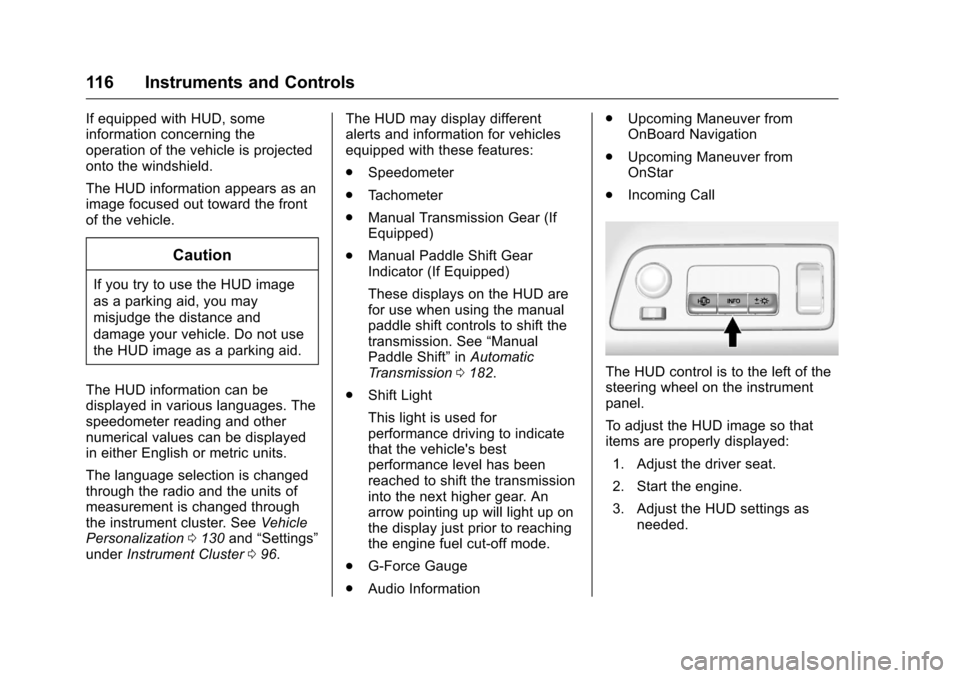
The HUD control is to the left of the
steering wheel on the instrument
panel.
To adjust the HUD image so that
items are properly displayed:
1. Adjust the driver seat.
2. Start the engine.
3. Adjust the HUD settings as needed.
Page 125 of 351
Chevrolet Corvette Owner Manual (GMNA-Localizing-U.S./Canada/Mexico-
9085364) - 2016 - crc - 9/15/15
124 Instruments and Controls
UPSHIFT NOW, ENGINE
PROTECTION ACTIVE
This message indicates the engine
controls have taken action to
prevent an oil starvation condition.
This may reduce the available
engine power, or on automatic
transmission equipped vehicles
force an upshift to a higher gear.
Engine Power Messages
ENGINE POWER IS REDUCED
This message displays when the
vehicle's engine power is reduced.
Reduced engine power can affect
the vehicle's ability to accelerate.
If this message is on, but there is no
reduction in performance, proceed
to your destination. The
performance may be reduced the
next time the vehicle is driven. The
vehicle may be driven at a reduced
speed while this message is on, but
maximum acceleration and speed
may be reduced. Anytime this
message stays on, the vehicle
should be taken to your dealer for
service as soon as possible.
Fuel System Messages
FUEL LEVEL LOW
This message displays when the
vehicle is low on fuel. Refuel as
soon as possible.
Key and Lock Messages
# KEYS PROGRAMMED
This message displays when
programming new keys to the
vehicle.
NO REMOTE DETECTED
This message displays when the
transmitter battery may be weak.
See“Starting the Vehicle with a Low
Transmitter Battery” underRemote
Keyless Entry (RKE) System
Operation 026.
NO REMOTE KEY WAS
DETECTED PLACE KEY IN
TRANSMITTER POCKET THEN
START YOUR VEHICLE
This message displays when trying
to start the vehicle if an RKE
transmitter is not detected. The transmitter battery may be weak.
See
“Starting the Vehicle with a Low
Transmitter Battery” underRemote
Keyless Entry (RKE) System
Operation 026.
NO REMOTE PRESS BRAKE
TO RESTART
This message displays if the RKE
transmitter is no longer detected in
the vehicle. Press the brake pedal
to restart the vehicle.
REMOTE LEFT IN VEHICLE
This message displays when
leaving the vehicle with the RKE
transmitter still inside.
REPLACE BATTERY IN
REMOTE KEY
This message displays when the
battery in the RKE transmitter needs
to be replaced.
Page 129 of 351

Chevrolet Corvette Owner Manual (GMNA-Localizing-U.S./Canada/Mexico-
9085364) - 2016 - crc - 9/15/15
128 Instruments and Controls
SERVICE POWER STEERING
This message displays and a chime
may sound when there may be a
problem with the power steering
system. If this message displays
and a reduction in steering
performance or loss of power
steering assistance is noticed, see
your dealer.
SERVICE REAR AXLE
If there is a problem detected with
the Electronic Limited-Slip
Differential, this message displays.
When displayed, the system is not
operational and driving should be
adjusted accordingly. Take the
vehicle to your dealer for service as
soon as possible.
When this message is displayed,
the vehicle’s handling capabilities
will be reduced during severe
maneuvers. Stability Control will be
affected. See Traction Control/
Electronic Stability Control 0192.
SERVICE VEHICLE SOON
This message is displayed if there is
a problem with the vehicle. Take the
vehicle to your dealer for service.
Starting the Vehicle
Messages
PRESS BRAKE TO START
This message is displayed when
attempting to start an automatic
transmission equipped vehicle
without first pressing the brake
pedal.
PRESS CLUTCH TO START
This message is displayed when
attempting to start a manual
transmission equipped vehicle
without first pressing the clutch
pedal.
SERVICE KEYLESS START
SYSTEM
This message is displayed if there is
a problem with the pushbutton start
system. Take the vehicle to your
dealer for service.
Tire Messages
SERVICE TIRE MONITOR
SYSTEM
This message displays if there is a
problem with the Tire Pressure
Monitor System (TPMS). See Tire
Pressure Monitor Operation 0266.
TIRE LEARNING ACTIVE
This message displays when the
system is learning new tires. See
Tire Pressure Monitor
Operation 0266.
TIRE PRESSURE LOW ADD
AIR TO TIRE
This message displays when the
pressure in one or more of the tires
is low.
This message also displays LEFT
FRONT, RIGHT FRONT, LEFT
REAR, or RIGHT REAR to indicate
the location of the low tire.
The low tire pressure warning light
will also come on. See Tire
Pressure Light 0111.
Page 134 of 351
Chevrolet Corvette Owner Manual (GMNA-Localizing-U.S./Canada/Mexico-
9085364) - 2016 - crc - 9/15/15
Instruments and Controls 133
Auto Memory Recall
This feature automatically recalls
the current driver’s previously stored
1 or 2 button positions when
entering the vehicle. See Memory
Seats 057.
Select Off or On.
Easy Exit Options
This feature automatically recalls
the current driver ’s previously stored
Exit button position when exiting the
vehicle. See Memory Seats 057.
Select Off or On.
Chime Volume
This allows the selection of the
chime volume level.
Press + or −to adjust the volume.
Reverse Tilt Mirror
This allows the feature to be turned
on or off.
Select Off, On - Driver and
Passenger, On - Driver, or On -
Passenger. Lighting
Select and the following may
display:
.
Vehicle Locator Lights
. Exit Lighting
Vehicle Locator Lights
This feature will flash the turn signal
lamps and turn on some of the
exterior lamps when
Kon the
Remote Keyless Entry (RKE)
transmitter is pressed to locate the
vehicle.
Select Off or On.
Exit Lighting
This allows the selection of how
long the exterior lamps stay on
when leaving the vehicle when it is
dark outside.
Select Off, 30 Seconds, 60
Seconds, or 120 Seconds.
Power Door Locks
Select and the following may
display:
. Unlocked Door Anti-Lockout .
Auto Door Unlock
. Delayed Door Lock
Unlocked Door Anti-Lockout
When on, this feature will keep the
driver door from locking when the
door is open. If Off is selected, the
Delayed Door Lock menu will be
available.
Select Off or On.
Auto Door Unlock
This allows selection of which of the
doors will automatically unlock when
the vehicle is shifted into P (Park)
with an automatic transmission or
when the vehicle is turned off with a
manual transmission.
Select Off, All Doors, or Driver Door.
Delayed Door Lock
When on, this feature will delay the
locking of the doors. To override the
delay, press the power door lock
switch on the door.
Select Off or On.
Page 142 of 351
Chevrolet Corvette Owner Manual (GMNA-Localizing-U.S./Canada/Mexico-
9085364) - 2016 - crc - 9/15/15
Lighting 141
Headlamp High/
Low-Beam Changer
Push the turn signal lever away
from you and release to turn the
high beams on. To return to low
beams, push the lever again or pull
it toward you and release.
This indicator light turns on in the
instrument cluster when the
high-beam headlamps are on.
Flash-to-Pass
To use the flash-to-pass feature,
briefly pull the turn signal lever
toward you. The high-beam
indicator flashes to indicate to the
other driver that you intend to pass.
Daytime Running
Lamps (DRL)
DRL can make it easier for others to
see the front of your vehicle during
the day. DRL are required on all
vehicles first sold in Canada.
The DRL system makes the
dedicated lamps come on when the
following conditions are met:
.It is still daylight and the ignition
is on.
. The exterior lamp control is in
the AUTO position.
. The transmission is not in
P (Park) or the parking brake
is off.
When DRL are on, only the front
lamps will be on. The parking
lamps, taillamps, instrument panel
lights, or other exterior lamps will
not be on when the DRL are
being used.
When it is dark enough outside, the
front lamps dim to parking lamps
and the normal low-beam
headlamps turn on. When it is bright enough outside,
the regular lamps go off, and the
front DRL will take over. If the
vehicle is started in a dark garage,
the automatic headlamp system
comes on immediately. Once the
vehicle leaves the garage, it takes
approximately one minute for the
automatic headlamp system to
change to DRL if it is light outside.
During that delay, the instrument
cluster may not be as bright as
usual. Make sure the instrument
panel brightness knob is in the full
bright position. See
Instrument
Panel Illumination Control 0144.
If it is dark enough outside and the
exterior lamp control is off, a Driver
Information Center (DIC) message
may display. See Lamp
Messages 0125.
Turning the exterior lamp control to
off a second time, or turning on the
headlamps will remove the DIC
message. If the parking lamps were
turned on instead, the DIC message
will continue to be displayed.
The regular headlamp system
should be turned on when needed.
Page 150 of 351
Chevrolet Corvette Owner Manual (GMNA-Localizing-U.S./Canada/Mexico-
9085364) - 2016 - crc - 9/15/15
Infotainment System 149
.Track
. Performance Timing
No Overlay:
No vehicle data displays on top of
the recorded video. Vehicle data is
still available with the video when
accessed in the toolbox software.
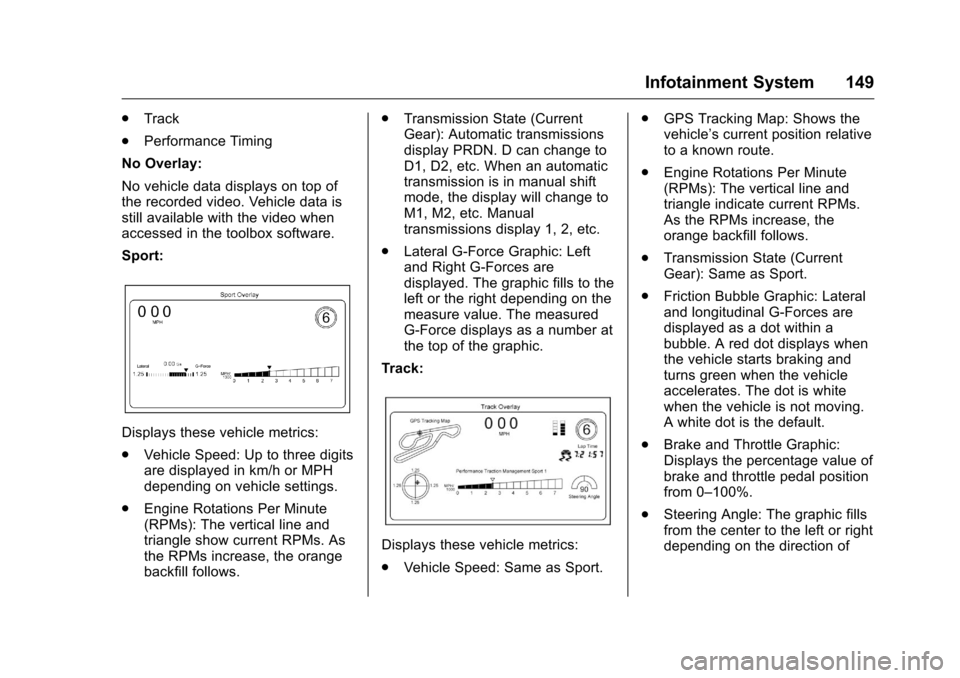
Sport:
Displays these vehicle metrics:
. Vehicle Speed: Up to three digits
are displayed in km/h or MPH
depending on vehicle settings.
. Engine Rotations Per Minute
(RPMs): The vertical line and
triangle show current RPMs. As
the RPMs increase, the orange
backfill follows. .
Transmission State (Current
Gear): Automatic transmissions
display PRDN. D can change to
D1, D2, etc. When an automatic
transmission is in manual shift
mode, the display will change to
M1, M2, etc. Manual
transmissions display 1, 2, etc.
. Lateral G-Force Graphic: Left
and Right G-Forces are
displayed. The graphic fills to the
left or the right depending on the
measure value. The measured
G-Force displays as a number at
the top of the graphic.
Track:
Displays these vehicle metrics:
. Vehicle Speed: Same as Sport. .
GPS Tracking Map: Shows the
vehicle’s current position relative
to a known route.
. Engine Rotations Per Minute
(RPMs): The vertical line and
triangle indicate current RPMs.
As the RPMs increase, the
orange backfill follows.
. Transmission State (Current
Gear): Same as Sport.
. Friction Bubble Graphic: Lateral
and longitudinal G-Forces are
displayed as a dot within a
bubble. A red dot displays when
the vehicle starts braking and
turns green when the vehicle
accelerates. The dot is white
when the vehicle is not moving.
A white dot is the default.
. Brake and Throttle Graphic:
Displays the percentage value of
brake and throttle pedal position
from 0–100%.
. Steering Angle: The graphic fills
from the center to the left or right
depending on the direction of