2016 CHEVROLET COLORADO Z71 engine
[x] Cancel search: enginePage 288 of 396
Chevrolet Colorado Owner Manual (GMNA-Localizing-U.S/Canada/Mexico-
9159327) - 2016 - crc - 8/28/15
Vehicle Care 287
Exterior Lamp BulbNumber
Center
High-Mounted
Stoplamp
(CHMSL) 921LL
Front Turn Signal
Lamp and
Parking Lamp 7444NA-T
Sidemarker Lamp W5W LL
High-Beam
Headlamp 9005 LL
Low-Beam
Headlamp H11 LL
Stoplamp/Taillamp/
Turn Signal Lamp 7443 W21/
5W LL-T
Stoplamp/Turn
Signal Lamp/
Taillamp* 1157
* Chassis Cab Models
For replacement bulbs not listed
here, contact your dealer.Electrical System
Electrical System
Overload
The vehicle has fuses to protect
against an electrical system
overload. Fuses also protect power
devices in the vehicle.
Replace a bad fuse with a new one
of the identical size and rating.
If there is a problem on the road and
a fuse needs to be replaced, there
is a fuse puller in the Engine
Compartment Fuse Block. Replace
the fuse as soon as possible with
one of the same amperage rating.
Headlamp Wiring
An electrical overload may cause
the lamps to go on and off, or in
some cases to remain off. Have the
headlamp wiring checked right away
if the lamps go on and off or
remain off.
Windshield Wipers
If the wiper motor overheats due to
heavy snow or ice, the windshield
wipers will stop until the motor cools
and will then restart.
Although the circuit is protected
from electrical overload, overload
due to heavy snow or ice may
cause wiper linkage damage.
Always clear ice and heavy snow
from the windshield before using the
windshield wipers.
If the overload is caused by an
electrical problem and not snow or
ice, be sure to get it fixed.
Fuses
The wiring circuits in the vehicle are
protected from short circuits by
fuses. This greatly reduces the
chance of fires caused by electrical
problems.
Look at the silver-colored band
inside the fuse. If the band is broken
or melted, replace the fuse. Be sure
you replace a bad fuse with a new
one of the identical size and rating.
Page 289 of 396
Chevrolet Colorado Owner Manual (GMNA-Localizing-U.S/Canada/Mexico-
9159327) - 2016 - crc - 8/28/15
288 Vehicle Care
If a fuse goes out, replace the fuse
as soon as you can.
Engine Compartment
Fuse Block
If the vehicle has a diesel engine,
see the Duramax diesel
supplement.
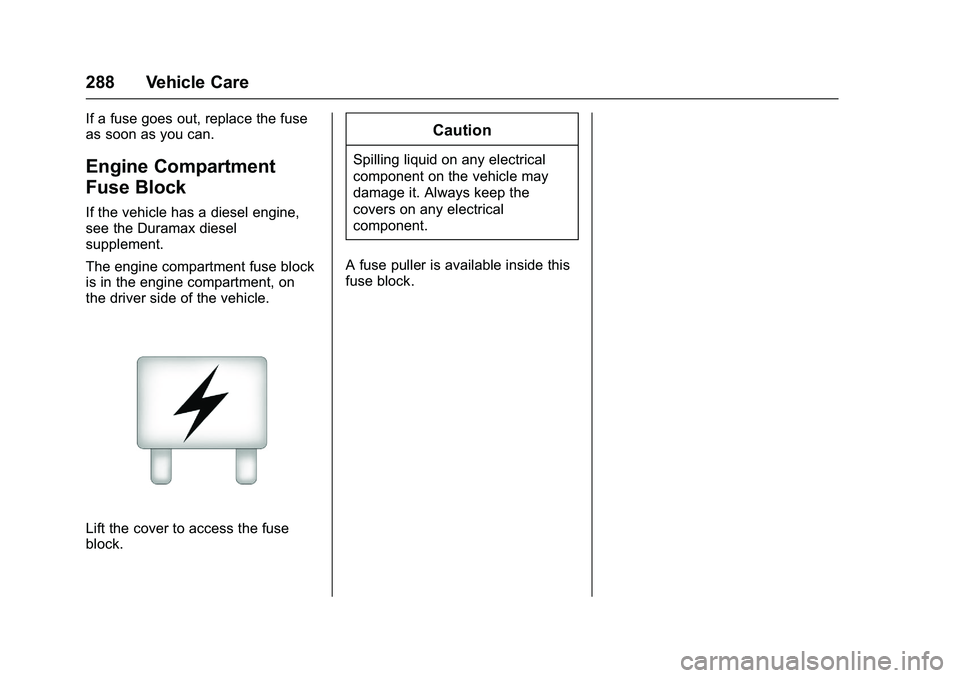
The engine compartment fuse block
is in the engine compartment, on
the driver side of the vehicle.
Lift the cover to access the fuse
block.
Caution
Spilling liquid on any electrical
component on the vehicle may
damage it. Always keep the
covers on any electrical
component.
A fuse puller is available inside this
fuse block.
Page 291 of 396

Chevrolet Colorado Owner Manual (GMNA-Localizing-U.S/Canada/Mexico-
9159327) - 2016 - crc - 8/28/15
290 Vehicle Care
The vehicle may not be equipped
with all of the fuses, relays, and
features shown.Mini Fuses (2 pin) Usage
F01 Traction Control Module Power
F02 Engine Control Module Power
F03 Air Conditioning Compressor Clutch
F04 Not Used
F05 Fuel Module Ignition
F07 Cargo Lamp
F08 Fuel Injectors - Even
F09 Fuel Injectors - Odd
F10 Engine Control Module
F11 Miscellaneous 1 Ignition
F13 Traction Control Module Mini Fuses
(2 pin) Usage
F14 Not Used
F15 Not Used
F16 Not Used
F17 Front Axle Actuator
F18 Not Used
F19 Aeroshutters
F20 Not Used
F23 Not Used
F29 Not Used
F30 Heated Seat Power 1
F31 Not Used
F32 Heated Seat Power 2
F33 Body Control Module 3
F34 Fuel System Control Module
F35 Not Used Mini Fuses
(2 pin) Usage
F36 Center High Mounted
Stop Lamp
F37 Right High-Beam Headlamp
F38 Left High-Beam Headlamp
F39 Not Used
F40 Not Used
F46 Not Used
F47 Miscellaneous 2 Ignition
F48 Fog Lamps (If Equipped)
F49 Not Used
F50 Trailer Park Lamps
F51 Horn
F52 Not Used
F53 Not Used
F54 Not Used
F55 Not Used
Page 300 of 396
Chevrolet Colorado Owner Manual (GMNA-Localizing-U.S/Canada/Mexico-
9159327) - 2016 - crc - 8/28/15
Vehicle Care 299
(5) Tire Inflation:The
temporary use tire or compact
spare tire should be inflated to
420 kPa (60 psi). For more
information on tire pressure and
inflation see Tire Pressure
0 302
ii.
(6) Tire Size
:A combination of
letters and numbers define a
tire's width, height, aspect ratio,
construction type, and service
description. The letter T as the
first character in the tire size
means the tire is for temporary
use only.
(7) TPC Spec (Tire
Performance Criteria
Specification)
:Original
equipment tires designed to
GM's specific tire performance
criteria have a TPC specification
code molded onto the sidewall.
GM's TPC specifications meet or
exceed all federal safety
guidelines.
Tire Designations
Tire Size
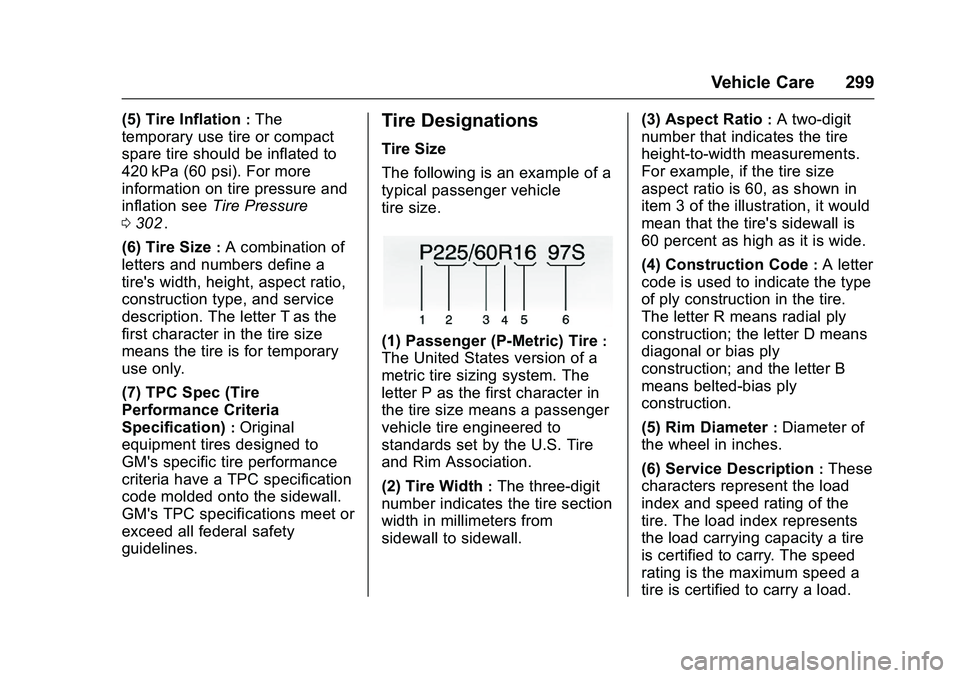
The following is an example of a
typical passenger vehicle
tire size.
(1) Passenger (P-Metric) Tire:
The United States version of a
metric tire sizing system. The
letter P as the first character in
the tire size means a passenger
vehicle tire engineered to
standards set by the U.S. Tire
and Rim Association.
(2) Tire Width
:The three-digit
number indicates the tire section
width in millimeters from
sidewall to sidewall. (3) Aspect Ratio
:A two-digit
number that indicates the tire
height-to-width measurements.
For example, if the tire size
aspect ratio is 60, as shown in
item 3 of the illustration, it would
mean that the tire's sidewall is
60 percent as high as it is wide.
(4) Construction Code
:A letter
code is used to indicate the type
of ply construction in the tire.
The letter R means radial ply
construction; the letter D means
diagonal or bias ply
construction; and the letter B
means belted-bias ply
construction.
(5) Rim Diameter
:Diameter of
the wheel in inches.
(6) Service Description
:These
characters represent the load
index and speed rating of the
tire. The load index represents
the load carrying capacity a tire
is certified to carry. The speed
rating is the maximum speed a
tire is certified to carry a load.
Page 307 of 396

Chevrolet Colorado Owner Manual (GMNA-Localizing-U.S/Canada/Mexico-
9159327) - 2016 - crc - 8/28/15
306 Vehicle Care
.The TPMS sensor matching
process was not done or not
completed successfully after
rotating the tires. The
malfunction light and the DIC
message should go off after
successfully completing the
sensor matching process. See
“TPMS Sensor Matching
Process” later in this section.
. One or more TPMS sensors are
missing or damaged. The
malfunction light and the DIC
message should go off when the
TPMS sensors are installed and
the sensor matching process is
performed successfully. See
your dealer for service.
. Replacement tires or wheels do
not match the original equipment
tires or wheels. Tires and wheels
other than those recommended
could prevent the TPMS from
functioning properly. See Buying
New Tires 0310
ii. .
Operating electronic devices or
being near facilities using radio
wave frequencies similar to the
TPMS could cause the TPMS
sensors to malfunction.
If the TPMS is not functioning
properly, it cannot detect or signal a
low tire condition. See your dealer
for service if the TPMS malfunction
light and DIC message come on
and stay on.
TPMS Sensor Matching
Process
Each TPMS sensor has a unique
identification code. The identification
code needs to be matched to a new
tire/wheel position after rotating the
vehicle’s tires or replacing one or
more of the TPMS sensors. Also,
the TPMS sensor matching process
should be performed after replacing
a spare tire with a road tire
containing the TPMS sensor. The
malfunction light and the DIC
message should go off at the next
ignition cycle. The sensors are
matched to the tire/wheel positions,
using a TPMS relearn tool, in the
following order: driver side front tire, passenger side front tire, passenger
side rear tire, and driver side rear.
See your dealer for service or to
purchase a relearn tool. A TPMS
relearn tool can also be purchased.
See Tire Pressure Monitor Sensor
Activation Tool at
www.gmtoolsandequipment.com or
call 1-800-GM TOOLS
(1-800-468-6657).
There are two minutes to match the
first tire/wheel position, and
five minutes overall to match all four
tire/wheel positions. If it takes
longer, the matching process stops
and must be restarted.
The TPMS sensor matching
process is:
1. Set the parking brake.
2. Turn the ignition to ON/RUN with the engine off.
3. If the vehicle has an uplevel DIC, make sure the Tire
Pressure info page option is
turned on. The info pages on
the DIC can be turned on and
off through the Settings menu.
Page 317 of 396
Chevrolet Colorado Owner Manual (GMNA-Localizing-U.S/Canada/Mexico-
9159327) - 2016 - crc - 8/28/15
316 Vehicle Care
If a tire goes flat, avoid further tire
and wheel damage by driving slowly
to a level place, well off the road,
if possible. Turn on the hazard
warning flashers. SeeHazard
Warning Flashers 0146
ii.
{Warning
Changing a tire can be
dangerous. The vehicle can slip
off the jack and roll over or fall
causing injury or death. Find a
level place to change the tire. To
help prevent the vehicle from
moving:
1. Set the parking brake firmly.
2. Put an automatictransmission in P (Park) or a
manual transmission in
1 (First) or R (Reverse).
3. For four-wheel-drive vehicles, be sure the
transfer case is in a drive
gear– not in N (Neutral).
(Continued)
Warning (Continued)
4. Turn off the engine and donot restart while the vehicle
is raised.
5. Do not allow passengers to remain in the vehicle.
6. Place wheel blocks, if equipped, on both sides of
the tire at the opposite
corner of the tire being
changed.
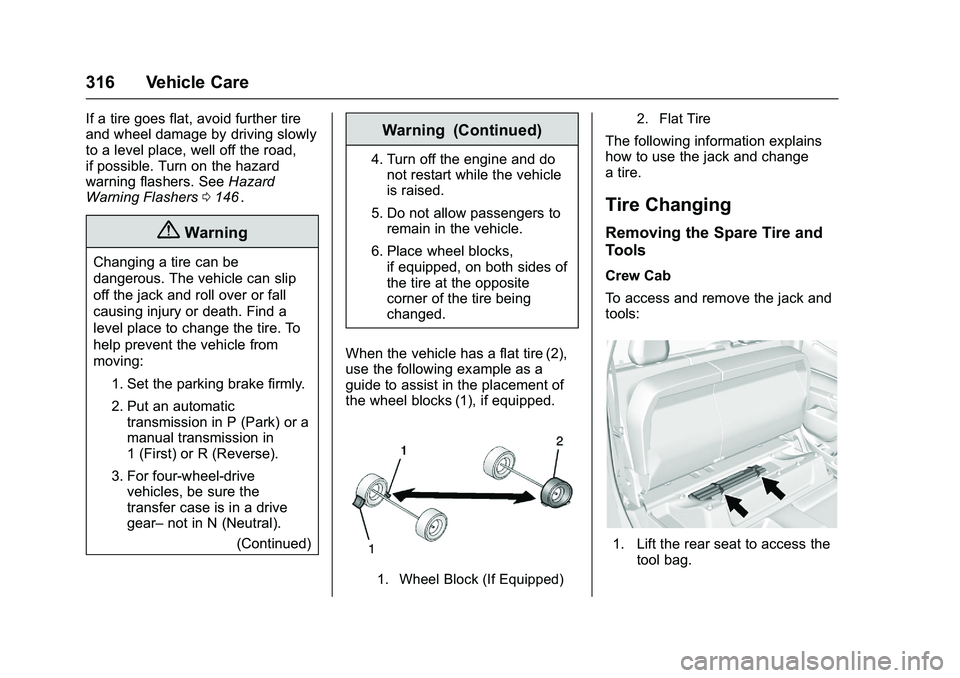
When the vehicle has a flat tire (2),
use the following example as a
guide to assist in the placement of
the wheel blocks (1), if equipped.
1. Wheel Block (If Equipped) 2. Flat Tire
The following information explains
how to use the jack and change
a tire.
Tire Changing
Removing the Spare Tire and
Tools
Crew Cab
To access and remove the jack and
tools:
1. Lift the rear seat to access the
tool bag.
Page 328 of 396
Chevrolet Colorado Owner Manual (GMNA-Localizing-U.S/Canada/Mexico-
9159327) - 2016 - crc - 8/28/15
Vehicle Care 327
Jump Starting
Jump Starting - North
America
For more information about the
vehicle battery, seeBattery - North
America 0279
ii.
If the battery has run down, try to
use another vehicle and some
jumper cables to start your vehicle.
Be sure to use the following steps to
do it safely.
{Warning
WARNING: Battery posts,
terminals, and related
accessories contain lead and lead
compounds, chemicals known to
the State of California to cause
cancer and birth defects or other
reproductive harm. Batteries also
contain other chemicals known to
the State of California to cause
cancer. WASH HANDS AFTER
HANDLING. SeeCalifornia
Proposition 65 Warning 0259
ii.
{Warning
Batteries can hurt you. They can
be dangerous because:
. They contain acid that can
burn you.
. They contain gas that can
explode or ignite.
. They contain enough
electricity to burn you.
If you do not follow these steps
exactly, some or all of these
things can hurt you.
Caution
Ignoring these steps could result
in costly damage to the vehicle
that would not be covered by the
vehicle warranty. Trying to start
the vehicle by pushing or pulling it
will not work, and it could damage
the vehicle.
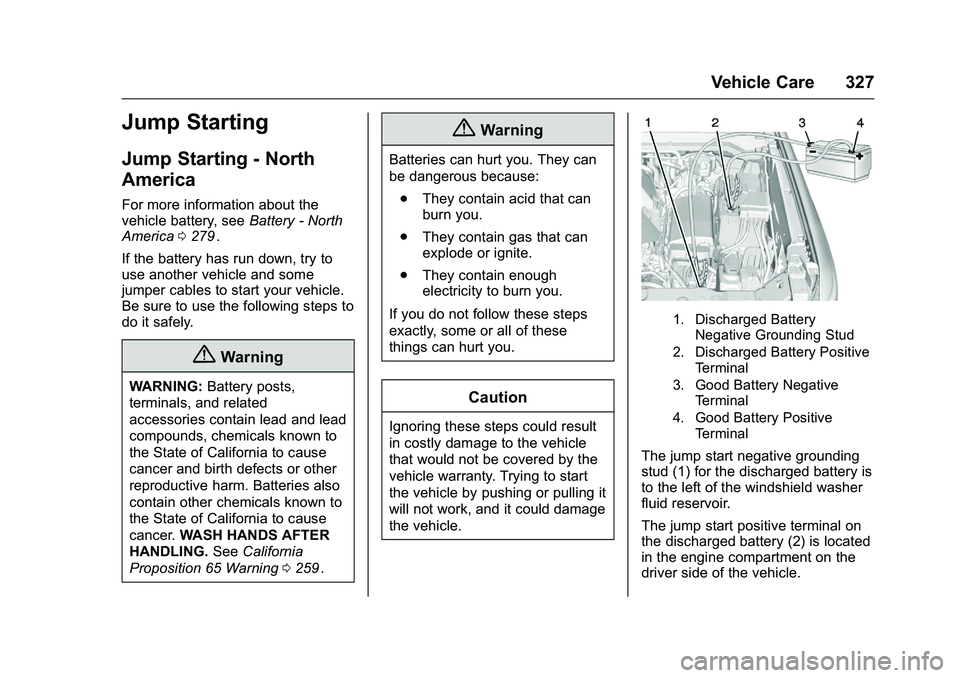
1. Discharged Battery Negative Grounding Stud
2. Discharged Battery Positive Terminal
3. Good Battery Negative Terminal
4. Good Battery Positive Terminal
The jump start negative grounding
stud (1) for the discharged battery is
to the left of the windshield washer
fluid reservoir.
The jump start positive terminal on
the discharged battery (2) is located
in the engine compartment on the
driver side of the vehicle.
Page 329 of 396
Chevrolet Colorado Owner Manual (GMNA-Localizing-U.S/Canada/Mexico-
9159327) - 2016 - crc - 8/28/15
328 Vehicle Care
The jump start positive terminal (3)
and negative terminal (4) are on the
battery of the vehicle providing the
jump start.
The positive jump start connection
for the discharged battery is under a
trim cover. Open the cover to
expose the terminal.1. Check the other vehicle. It must have a 12-volt battery
with a negative ground system.
Caution
If the other vehicle does not have
a 12-volt system with a negative
ground, both vehicles can be
damaged. Only use a vehicle that
has a 12-volt system with a
negative ground for jump starting.
2. Position the two vehicles so that they are not touching.
3. Set the parking brake firmly and put the shift lever in
P (Park) with an automatic
transmission, or N (Neutral)
with a manual transmission.
Caution
If any accessories are left on or
plugged in during the jump
starting procedure, they could be
damaged. The repairs would not
be covered by the vehicle
warranty. Whenever possible, turn
off or unplug all accessories on
either vehicle when jump starting.
4. Turn the ignition to LOCK/OFF. Turn off all lights and
accessories in both vehicles,
except the hazard warning
flashers if needed.
{Warning
An electric fan can start up even
when the engine is not running
and can injure you. Keep hands,
clothing, and tools away from any
underhood electric fan.
{Warning
Using a match near a battery can
cause battery gas to explode.
People have been hurt doing this,
and some have been blinded.
Use a flashlight if you need more
light.
Battery fluid contains acid that
can burn you. Do not get it on
you. If you accidentally get it in
your eyes or on your skin, flush
the place with water and get
medical help immediately.
{Warning
Fans or other moving engine
parts can injure you badly. Keep
your hands away from moving
parts once the engine is running.
5. Connect one end of the red positive (+) cable to the
positive (+) terminal on the
discharged battery.