Page 318 of 396
Chevrolet Colorado Owner Manual (GMNA-Localizing-U.S/Canada/Mexico-
9159327) - 2016 - crc - 8/28/15
Vehicle Care 317
2. Remove the straps to removethe tool bag.
3. Fold the rear seat to access the jack.
4. Turn the knob on the jack (2)counterclockwise to lower the
jack head to release the jack
from its holder.
5. Turn the wing nut (1) counterclockwise to remove the
jack and wheel blocks. Extended Cab
1. Jack Cover
2. Tool Bag Cover
To access and remove the jack and
tools:
1. Pull the bottom of the jack cover (1) forward to remove it.
2. Pull the lower access pocket forward and then upward to
remove the tool bag cover (2).
3. Turn the knob on the jack (1)counterclockwise to lower the
jack head to release the jack
from its holder.
4. Turn the wing nut (2) counterclockwise to remove the
jack and wheel blocks.
5. Turn the wing nut (3) counterclockwise to remove the
tool bag.
Use the jack handle extensions and
the wheel wrench to remove the
underbody-mounted spare tire.
Page 319 of 396
Chevrolet Colorado Owner Manual (GMNA-Localizing-U.S/Canada/Mexico-
9159327) - 2016 - crc - 8/28/15
318 Vehicle Care
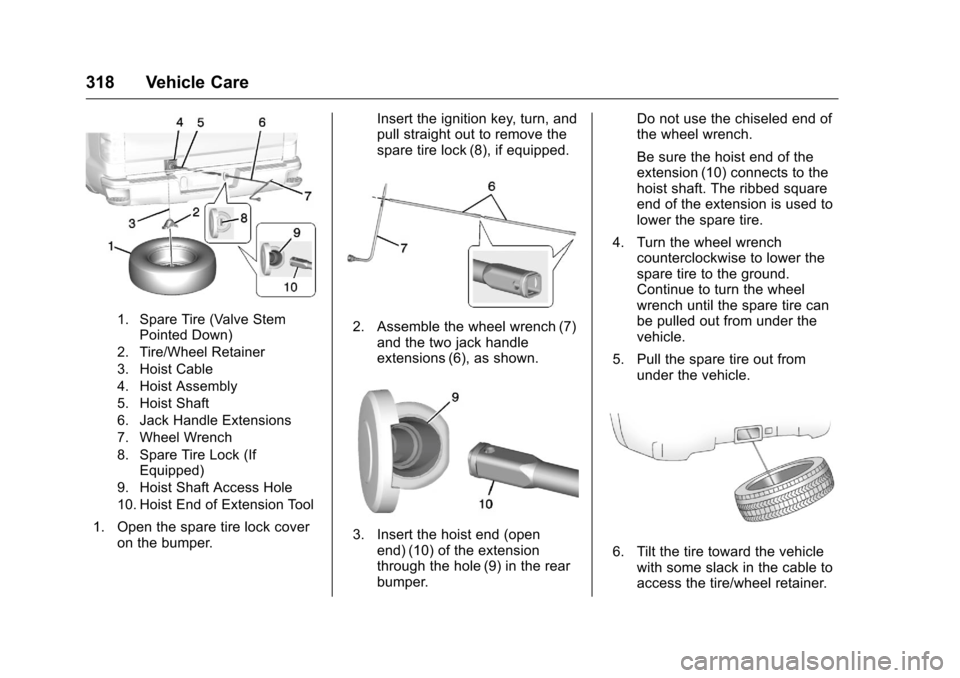
1. Spare Tire (Valve StemPointed Down)
2. Tire/Wheel Retainer
3. Hoist Cable
4. Hoist Assembly
5. Hoist Shaft
6. Jack Handle Extensions
7. Wheel Wrench
8. Spare Tire Lock (If Equipped)
9. Hoist Shaft Access Hole
10. Hoist End of Extension Tool
1. Open the spare tire lock cover on the bumper. Insert the ignition key, turn, and
pull straight out to remove the
spare tire lock (8), if equipped.
2. Assemble the wheel wrench (7)
and the two jack handle
extensions (6), as shown.
3. Insert the hoist end (openend) (10) of the extension
through the hole (9) in the rear
bumper. Do not use the chiseled end of
the wheel wrench.
Be sure the hoist end of the
extension (10) connects to the
hoist shaft. The ribbed square
end of the extension is used to
lower the spare tire.
4. Turn the wheel wrench counterclockwise to lower the
spare tire to the ground.
Continue to turn the wheel
wrench until the spare tire can
be pulled out from under the
vehicle.
5. Pull the spare tire out from under the vehicle.
6. Tilt the tire toward the vehiclewith some slack in the cable to
access the tire/wheel retainer.
Page 320 of 396
Chevrolet Colorado Owner Manual (GMNA-Localizing-U.S/Canada/Mexico-
9159327) - 2016 - crc - 8/28/15
Vehicle Care 319
Tilt the retainer and pull it
through the center of the wheel
along with the cable and
spring.
7. Put the spare tire near the flat tire.
Removing the Flat Tire and
Installing the Spare Tire
Use the following pictures and
instructions to remove the flat tire
and raise the vehicle.
1. Jack
2. Wheel Blocks
3. Jack Handle
4. Jack Handle Extensions 5. Wheel Wrench
1. Do a safety check before
proceeding. See If a Tire Goes
Flat 0315
ii.
2. If the wheel has a center cap
that covers the lug nuts, place
the chisel end of the wheel
wrench in each of the slots in
the cap, and gently pry it out.
3. Use the wheel wrench and turnit counterclockwise to loosen
the wheel nuts. Do not remove
the wheel nuts yet.
Page 321 of 396
Chevrolet Colorado Owner Manual (GMNA-Localizing-U.S/Canada/Mexico-
9159327) - 2016 - crc - 8/28/15
320 Vehicle Care
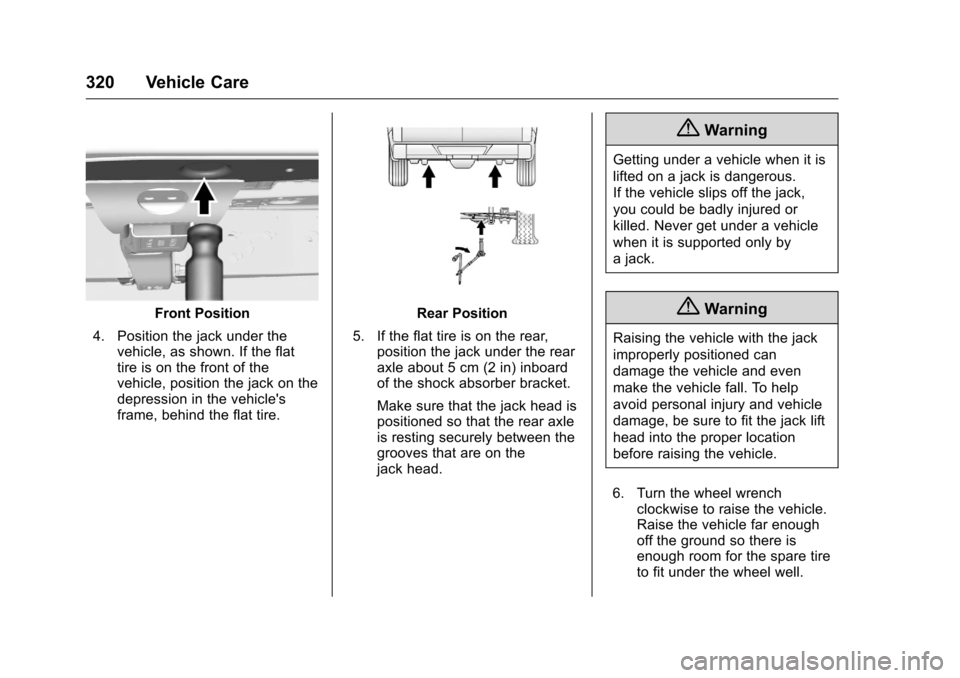
Front Position
4. Position the jack under the vehicle, as shown. If the flat
tire is on the front of the
vehicle, position the jack on the
depression in the vehicle's
frame, behind the flat tire.Rear Position
5. If the flat tire is on the rear, position the jack under the rear
axle about 5 cm (2 in) inboard
of the shock absorber bracket.
Make sure that the jack head is
positioned so that the rear axle
is resting securely between the
grooves that are on the
jack head.
{Warning
Getting under a vehicle when it is
lifted on a jack is dangerous.
If the vehicle slips off the jack,
you could be badly injured or
killed. Never get under a vehicle
when it is supported only by
a jack.
{Warning
Raising the vehicle with the jack
improperly positioned can
damage the vehicle and even
make the vehicle fall. To help
avoid personal injury and vehicle
damage, be sure to fit the jack lift
head into the proper location
before raising the vehicle.
6. Turn the wheel wrench clockwise to raise the vehicle.
Raise the vehicle far enough
off the ground so there is
enough room for the spare tire
to fit under the wheel well.
Page 322 of 396
Chevrolet Colorado Owner Manual (GMNA-Localizing-U.S/Canada/Mexico-
9159327) - 2016 - crc - 8/28/15
Vehicle Care 321
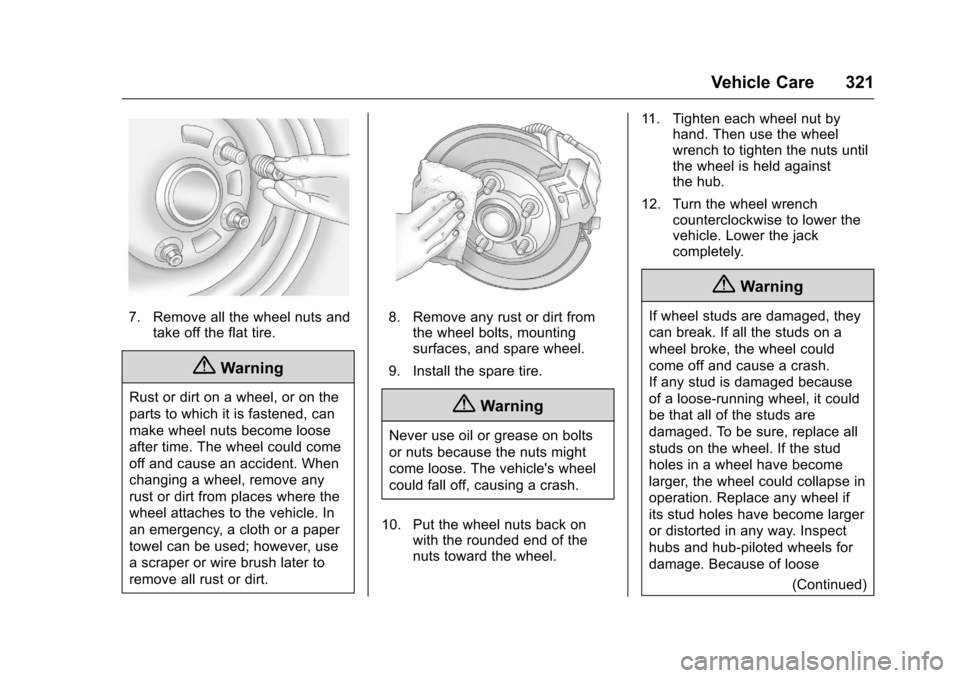
7. Remove all the wheel nuts andtake off the flat tire.
{Warning
Rust or dirt on a wheel, or on the
parts to which it is fastened, can
make wheel nuts become loose
after time. The wheel could come
off and cause an accident. When
changing a wheel, remove any
rust or dirt from places where the
wheel attaches to the vehicle. In
an emergency, a cloth or a paper
towel can be used; however, use
a scraper or wire brush later to
remove all rust or dirt.
8. Remove any rust or dirt fromthe wheel bolts, mounting
surfaces, and spare wheel.
9. Install the spare tire.
{Warning
Never use oil or grease on bolts
or nuts because the nuts might
come loose. The vehicle's wheel
could fall off, causing a crash.
10. Put the wheel nuts back on with the rounded end of the
nuts toward the wheel. 11. Tighten each wheel nut by
hand. Then use the wheel
wrench to tighten the nuts until
the wheel is held against
the hub.
12. Turn the wheel wrench counterclockwise to lower the
vehicle. Lower the jack
completely.
{Warning
If wheel studs are damaged, they
can break. If all the studs on a
wheel broke, the wheel could
come off and cause a crash.
If any stud is damaged because
of a loose-running wheel, it could
be that all of the studs are
damaged. To be sure, replace all
studs on the wheel. If the stud
holes in a wheel have become
larger, the wheel could collapse in
operation. Replace any wheel if
its stud holes have become larger
or distorted in any way. Inspect
hubs and hub‐piloted wheels for
damage. Because of loose
(Continued)
Page 323 of 396
Chevrolet Colorado Owner Manual (GMNA-Localizing-U.S/Canada/Mexico-
9159327) - 2016 - crc - 8/28/15
322 Vehicle Care
Warning (Continued)
running wheels, piloting pad
damage may occur and require
replacement of the entire hub, for
proper centering of the wheels.
When replacing studs, hubs,
wheel nuts or wheels, be sure to
use GM original equipment parts.
{Warning
Wheel nuts that are improperly or
incorrectly tightened can cause
the wheels to become loose or
come off. The wheel nuts should
be tightened with a torque wrench
to the proper torque specification
after replacing. Follow the torque
specification supplied by the
aftermarket manufacturer when
using accessory locking wheel
nuts. SeeCapacities and
Specifications 0358
iifor original
equipment wheel nut torque
specifications.
Caution
Improperly tightened wheel nuts
can lead to brake pulsation and
rotor damage. To avoid expensive
brake repairs, evenly tighten the
wheel nuts in the proper
sequence and to the proper
torque specification. See
Capacities and Specifications
0 358
iifor the wheel nut torque
specification.
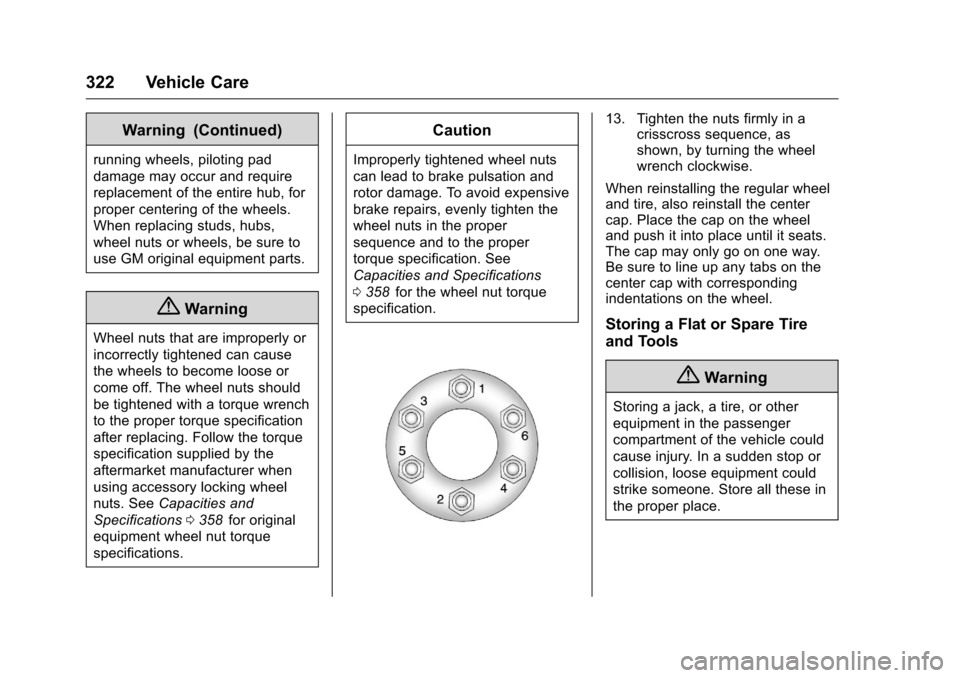
13. Tighten the nuts firmly in a crisscross sequence, as
shown, by turning the wheel
wrench clockwise.
When reinstalling the regular wheel
and tire, also reinstall the center
cap. Place the cap on the wheel
and push it into place until it seats.
The cap may only go on one way.
Be sure to line up any tabs on the
center cap with corresponding
indentations on the wheel.
Storing a Flat or Spare Tire
and Tools
{Warning
Storing a jack, a tire, or other
equipment in the passenger
compartment of the vehicle could
cause injury. In a sudden stop or
collision, loose equipment could
strike someone. Store all these in
the proper place.
Page 324 of 396
Chevrolet Colorado Owner Manual (GMNA-Localizing-U.S/Canada/Mexico-
9159327) - 2016 - crc - 8/28/15
Vehicle Care 323
Caution
Storing an aluminum wheel with a
flat tire under your vehicle for an
extended period of time or with
the valve stem pointing up can
damage the wheel. Always stow
the wheel with the valve stem
pointing down and have the
wheel/tire repaired as soon as
possible.
Caution
The tire hoist can be damaged if
there is no tension on the cable
when using it. To have the
necessary tension, the spare or
road tire and wheel assembly
must be installed on the tire hoist
to use it.
Store the tire under the rear of the
vehicle in the spare tire carrier.
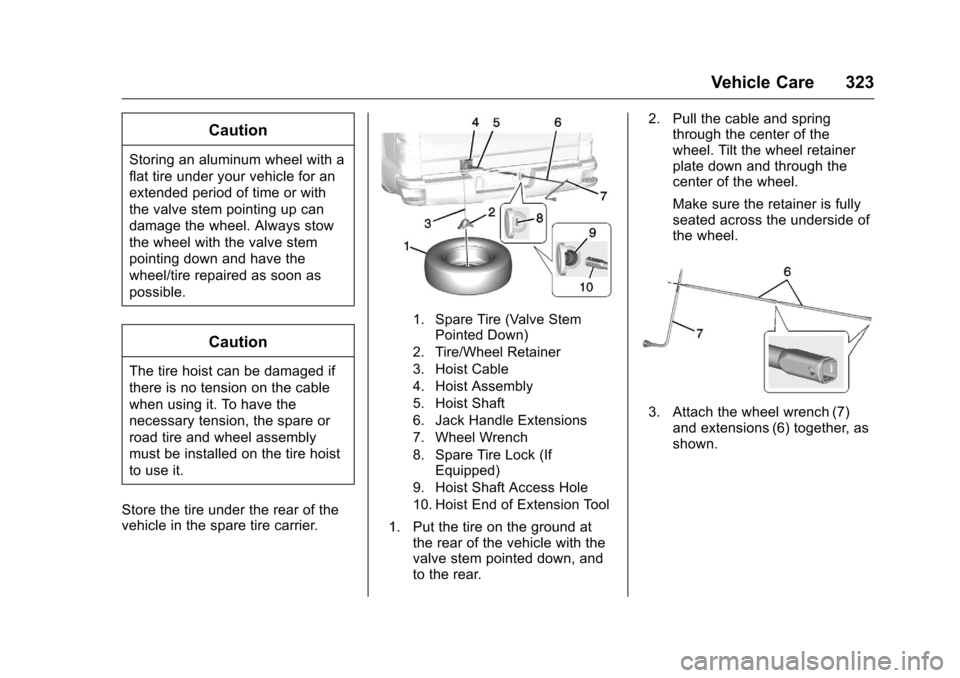
1. Spare Tire (Valve Stem Pointed Down)
2. Tire/Wheel Retainer
3. Hoist Cable
4. Hoist Assembly
5. Hoist Shaft
6. Jack Handle Extensions
7. Wheel Wrench
8. Spare Tire Lock (If Equipped)
9. Hoist Shaft Access Hole
10. Hoist End of Extension Tool
1. Put the tire on the ground at the rear of the vehicle with the
valve stem pointed down, and
to the rear. 2. Pull the cable and spring
through the center of the
wheel. Tilt the wheel retainer
plate down and through the
center of the wheel.
Make sure the retainer is fully
seated across the underside of
the wheel.
3. Attach the wheel wrench (7)
and extensions (6) together, as
shown.
Page 325 of 396
Chevrolet Colorado Owner Manual (GMNA-Localizing-U.S/Canada/Mexico-
9159327) - 2016 - crc - 8/28/15
324 Vehicle Care
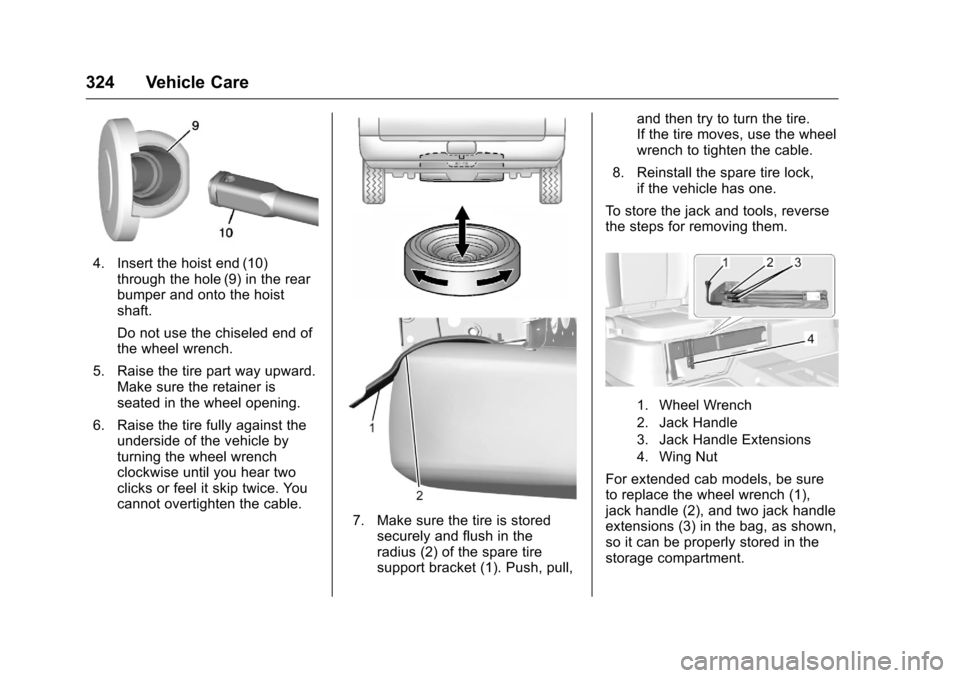
4. Insert the hoist end (10)through the hole (9) in the rear
bumper and onto the hoist
shaft.
Do not use the chiseled end of
the wheel wrench.
5. Raise the tire part way upward. Make sure the retainer is
seated in the wheel opening.
6. Raise the tire fully against the underside of the vehicle by
turning the wheel wrench
clockwise until you hear two
clicks or feel it skip twice. You
cannot overtighten the cable.
7. Make sure the tire is storedsecurely and flush in the
radius (2) of the spare tire
support bracket (1). Push, pull, and then try to turn the tire.
If the tire moves, use the wheel
wrench to tighten the cable.
8. Reinstall the spare tire lock, if the vehicle has one.
To store the jack and tools, reverse
the steps for removing them.
1. Wheel Wrench
2. Jack Handle
3. Jack Handle Extensions
4. Wing Nut
For extended cab models, be sure
to replace the wheel wrench (1),
jack handle (2), and two jack handle
extensions (3) in the bag, as shown,
so it can be properly stored in the
storage compartment.