2016 CHEVROLET COLORADO lock
[x] Cancel search: lockPage 249 of 396
Chevrolet Colorado Owner Manual (GMNA-Localizing-U.S/Canada/Mexico-
9159327) - 2016 - crc - 8/28/15
248 Driving and Operating
When replacing the fuel cap, turn it
clockwise until it clicks. Make sure
the cap is fully installed. The
diagnostic system can determine if
the fuel cap has been left off or
improperly installed. This would
allow fuel to evaporate into the
atmosphere. If the fuel cap is not
properly installed, a message
appears on the Driver Information
Center (DIC) and the check engine
light will be lit on the instrument
cluster. SeeFuel System Messages
0 132
iiand Malfunction Indicator
Lamp (Check Engine Light) 0115ii.
{Warning
If a fire starts while you are
refueling, do not remove the
nozzle. Shut off the flow of fuel by
shutting off the pump or by
notifying the station attendant.
Leave the area immediately.
Caution
If a new fuel cap is needed, be
sure to get the right type of cap
from your dealer. The wrong type
of fuel cap may not fit properly,
may cause the malfunction
indicator lamp to light, and could
damage the fuel tank and
emissions system. See
Malfunction Indicator Lamp
(Check Engine Light) 0115
ii.
Filling a Portable Fuel
Container
{Warning
Never fill a portable fuel container
while it is in the vehicle. Static
electricity discharge from the
container can ignite the fuel
vapor. You can be badly burned
and the vehicle damaged if this
occurs. To help avoid injury to you
and others:
(Continued)
Warning (Continued)
.Dispense fuel only into
approved containers.
. Do not fill a container while
it is inside a vehicle, in a
vehicle's trunk, pickup bed,
or on any surface other than
the ground.
. Bring the fill nozzle in
contact with the inside of
the fill opening before
operating the nozzle.
Contact should be
maintained until the filling is
complete.
. Do not smoke while
pumping fuel.
. Do not use a cellular phone
while pumping fuel.
Page 259 of 396
Chevrolet Colorado Owner Manual (GMNA-Localizing-U.S/Canada/Mexico-
9159327) - 2016 - crc - 8/28/15
258 Vehicle Care
Vehicle Care
General Information
General Information . . . . . . . . . . 259
California Proposition65 Warning . . . . . . . . . . . . . . . . . 259
California Perchlorate Materials Requirements . . . . . 259
Accessories and Modifications . . . . . . . . . . . . . . . . 259
Vehicle Checks
Doing Your OwnService Work . . . . . . . . . . . . . . . 260
Hood . . . . . . . . . . . . . . . . . . . . . . . . . 261
Engine Compartment Overview . . . . . . . . . . . . . . . . . . . . 262
Engine Oil . . . . . . . . . . . . . . . . . . . . 265
Engine Oil Life System . . . . . . . 267
Automatic Transmission Fluid . . . . . . . . . . . . . . . . . . . . . . . . 268
Manual Transmission Fluid . . . 269
Hydraulic Clutch . . . . . . . . . . . . . . 269
Engine Air Cleaner/Filter . . . . . . 269
Cooling System . . . . . . . . . . . . . . 271
Engine Coolant . . . . . . . . . . . . . . . 272
Engine Overheating . . . . . . . . . . 274
Engine Fan . . . . . . . . . . . . . . . . . . . 276
Washer Fluid . . . . . . . . . . . . . . . . . 276
Brakes . . . . . . . . . . . . . . . . . . . . . . . 277 Brake Fluid . . . . . . . . . . . . . . . . . . . 278
Battery - North America . . . . . . 279
Four-Wheel Drive . . . . . . . . . . . . . 279
Front Axle . . . . . . . . . . . . . . . . . . . . 280
Rear Axle . . . . . . . . . . . . . . . . . . . . 280
Starter Switch Check . . . . . . . . . 281
Automatic Transmission Shift
Lock Control Function
Check . . . . . . . . . . . . . . . . . . . . . . . 282
Ignition Transmission Lock Check . . . . . . . . . . . . . . . . . . . . . . . 282
Park Brake and P (Park) Mechanism Check . . . . . . . . . . 282
Wiper Blade Replacement . . . . 283
Headlamp Aiming
Headlamp Aiming . . . . . . . . . . . . 284
Bulb Replacement
Bulb Replacement . . . . . . . . . . . . 284
Halogen Bulbs . . . . . . . . . . . . . . . . 284
Headlamps, Front Turn Signal, Sidemarker, and Parking
Lamps . . . . . . . . . . . . . . . . . . . . . . 284
Taillamps, Turn Signal, Stoplamps, and Back-Up
Lamps . . . . . . . . . . . . . . . . . . . . . . 285
Center High-Mounted Stoplamp (CHMSL) and
Cargo Lamp . . . . . . . . . . . . . . . . . 286
Replacement Bulbs . . . . . . . . . . . 286
Electrical System
Electrical System Overload . . . 287
Fuses . . . . . . . . . . . . . . . . . . . . . . . . 287
Engine Compartment Fuse Block . . . . . . . . . . . . . . . . . . . . . . . . 288
Instrument Panel Fuse
Block . . . . . . . . . . . . . . . . . . . . . . . . 292
Wheels and Tires
Tires . . . . . . . . . . . . . . . . . . . . . . . . . . 295
All-Season Tires . . . . . . . . . . . . . . 296
Winter Tires . . . . . . . . . . . . . . . . . . 296
All-Terrain Tires . . . . . . . . . . . . . . . 297
Tire Sidewall Labeling . . . . . . . . 297
Tire Designations . . . . . . . . . . . . . 299
Tire Terminology andDefinitions . . . . . . . . . . . . . . . . . . 300
Tire Pressure . . . . . . . . . . . . . . . . . 302
Tire Pressure Monitor
System . . . . . . . . . . . . . . . . . . . . . . 303
Tire Pressure Monitor Operation . . . . . . . . . . . . . . . . . . . 304
Tire Inspection . . . . . . . . . . . . . . . . 307
Tire Rotation . . . . . . . . . . . . . . . . . 308
When It Is Time for New Tires . . . . . . . . . . . . . . . . . . . . . . . . 309
Buying New Tires . . . . . . . . . . . . . 310
Different Size Tires and Wheels . . . . . . . . . . . . . . . . . . . . . . 311
Uniform Tire Quality Grading . . . . . . . . . . . . . . . . . . . . . 312
Page 261 of 396
Chevrolet Colorado Owner Manual (GMNA-Localizing-U.S/Canada/Mexico-
9159327) - 2016 - crc - 8/28/15
260 Vehicle Care
airbags, braking, stability, ride and
handling, emissions systems,
aerodynamics, durability, and
electronic systems like antilock
brakes, traction control, and stability
control. These accessories or
modifications could even cause
malfunction or damage not covered
by the vehicle warranty.
Damage to suspension components
caused by modifying vehicle height
outside of factory settings will not be
covered by the warranty.
Damage to vehicle components
resulting from modifications or the
installation or use of non-GM
certified parts, including control
module or software modifications, is
not covered under the terms of the
vehicle warranty and may affect
remaining warranty coverage for
affected parts.GM Accessories are designed to
complement and function with other
systems on the vehicle. See your
dealer to accessorize the vehicle
using genuine GM Accessories
installed by a dealer technician.
Also, see
Adding Equipment to the
Airbag-Equipped Vehicle 067
ii.
Vehicle Checks
Doing Your Own
Service Work
{Warning
It can be dangerous to work on
your vehicle if you do not have
the proper knowledge, service
manual, tools, or parts. Always
follow owner manual procedures
and consult the service manual
for your vehicle before doing any
service work.
If doing some of your own service
work, use the proper service
manual. It tells you much more
about how to service the vehicle
than this manual can. To order the
proper service manual, see Service
Publications Ordering Information
0 370
ii.
This vehicle has an airbag system.
Before attempting to do your own
service work, see Servicing the
Airbag-Equipped Vehicle 066
ii.
Page 264 of 396
Chevrolet Colorado Owner Manual (GMNA-Localizing-U.S/Canada/Mexico-
9159327) - 2016 - crc - 8/28/15
Vehicle Care 263
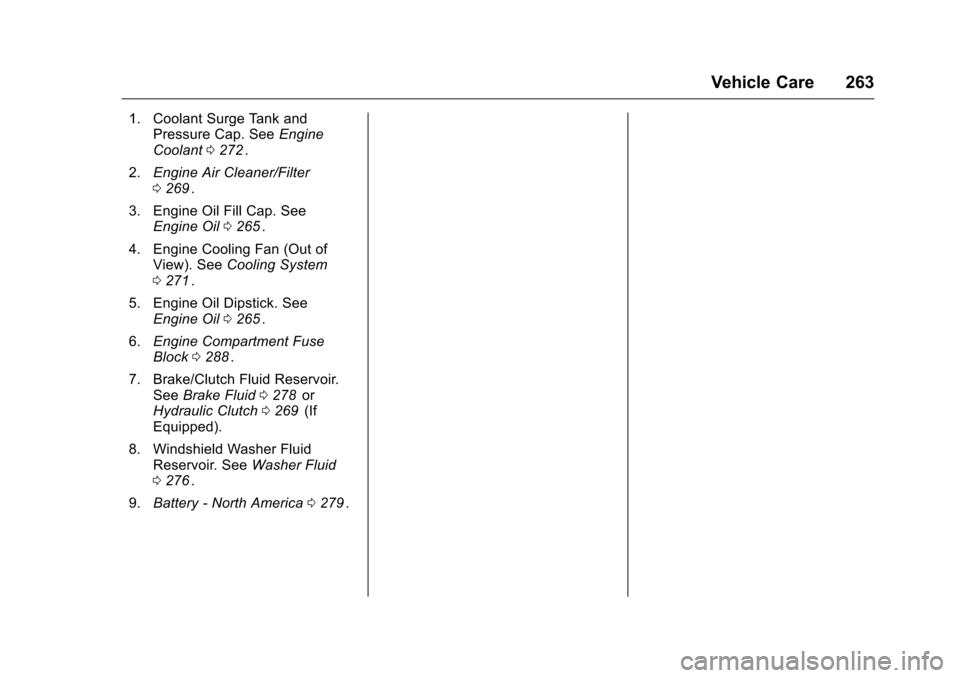
1. Coolant Surge Tank andPressure Cap. See Engine
Coolant 0272
ii.
2. Engine Air Cleaner/Filter
0269
ii.
3. Engine Oil Fill Cap. See Engine Oil 0265
ii.
4. Engine Cooling Fan (Out of View). See Cooling System
0 271
ii.
5. Engine Oil Dipstick. See Engine Oil 0265
ii.
6. Engine Compartment Fuse
Block 0288
ii.
7. Brake/Clutch Fluid Reservoir. See Brake Fluid 0278
iior
Hydraulic Clutch 0269ii(If
Equipped).
8. Windshield Washer Fluid Reservoir. See Washer Fluid
0 276
ii.
9. Battery - North America 0279
ii.
Page 266 of 396
Chevrolet Colorado Owner Manual (GMNA-Localizing-U.S/Canada/Mexico-
9159327) - 2016 - crc - 8/28/15
Vehicle Care 265
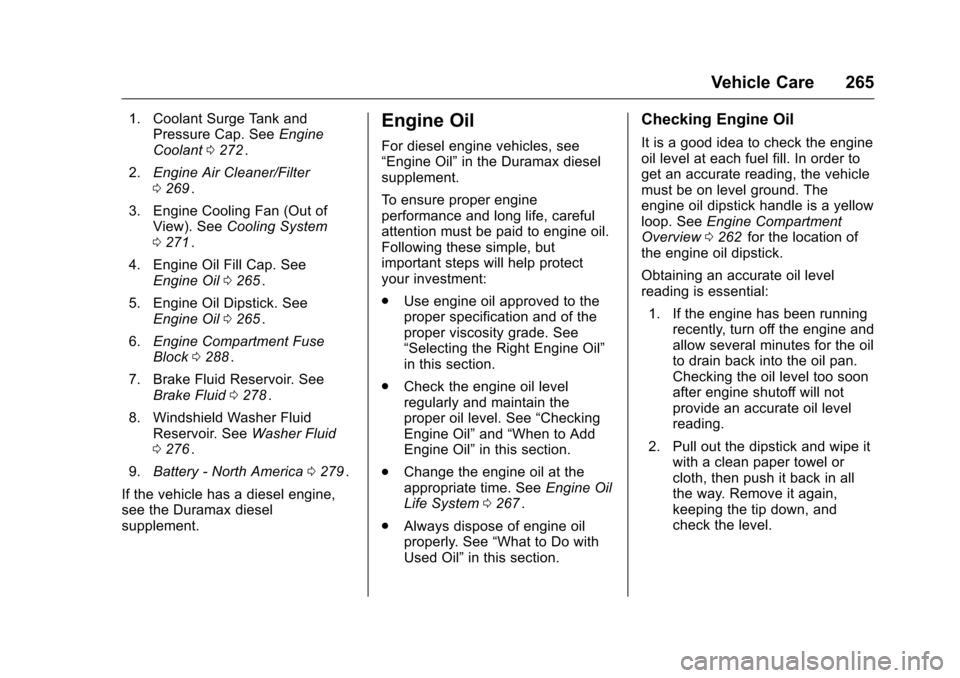
1. Coolant Surge Tank andPressure Cap. See Engine
Coolant 0272
ii.
2. Engine Air Cleaner/Filter
0269
ii.
3. Engine Cooling Fan (Out of View). See Cooling System
0 271
ii.
4. Engine Oil Fill Cap. See Engine Oil 0265
ii.
5. Engine Oil Dipstick. See Engine Oil 0265
ii.
6. Engine Compartment Fuse
Block 0288
ii.
7. Brake Fluid Reservoir. See Brake Fluid 0278
ii.
8. Windshield Washer Fluid Reservoir. See Washer Fluid
0 276
ii.
9. Battery - North America 0279
ii.
If the vehicle has a diesel engine,
see the Duramax diesel
supplement.
Engine Oil
For diesel engine vehicles, see
“Engine Oil” in the Duramax diesel
supplement.
To ensure proper engine
performance and long life, careful
attention must be paid to engine oil.
Following these simple, but
important steps will help protect
your investment:
. Use engine oil approved to the
proper specification and of the
proper viscosity grade. See
“Selecting the Right Engine Oil”
in this section.
. Check the engine oil level
regularly and maintain the
proper oil level. See “Checking
Engine Oil” and“When to Add
Engine Oil” in this section.
. Change the engine oil at the
appropriate time. See Engine Oil
Life System 0267
ii.
. Always dispose of engine oil
properly. See “What to Do with
Used Oil” in this section.
Checking Engine Oil
It is a good idea to check the engine
oil level at each fuel fill. In order to
get an accurate reading, the vehicle
must be on level ground. The
engine oil dipstick handle is a yellow
loop. See Engine Compartment
Overview 0262
iifor the location of
the engine oil dipstick.
Obtaining an accurate oil level
reading is essential:
1. If the engine has been running recently, turn off the engine and
allow several minutes for the oil
to drain back into the oil pan.
Checking the oil level too soon
after engine shutoff will not
provide an accurate oil level
reading.
2. Pull out the dipstick and wipe it with a clean paper towel or
cloth, then push it back in all
the way. Remove it again,
keeping the tip down, and
check the level.
Page 275 of 396
Chevrolet Colorado Owner Manual (GMNA-Localizing-U.S/Canada/Mexico-
9159327) - 2016 - crc - 8/28/15
274 Vehicle Care
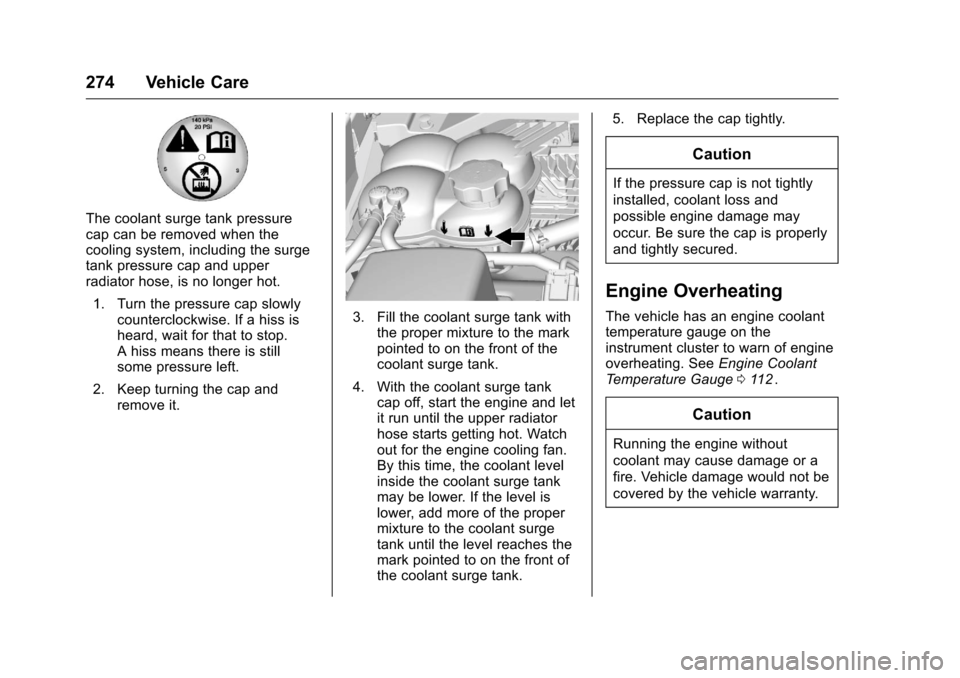
The coolant surge tank pressure
cap can be removed when the
cooling system, including the surge
tank pressure cap and upper
radiator hose, is no longer hot.1. Turn the pressure cap slowly counterclockwise. If a hiss is
heard, wait for that to stop.
A hiss means there is still
some pressure left.
2. Keep turning the cap and remove it.
3. Fill the coolant surge tank withthe proper mixture to the mark
pointed to on the front of the
coolant surge tank.
4. With the coolant surge tank cap off, start the engine and let
it run until the upper radiator
hose starts getting hot. Watch
out for the engine cooling fan.
By this time, the coolant level
inside the coolant surge tank
may be lower. If the level is
lower, add more of the proper
mixture to the coolant surge
tank until the level reaches the
mark pointed to on the front of
the coolant surge tank. 5. Replace the cap tightly.
Caution
If the pressure cap is not tightly
installed, coolant loss and
possible engine damage may
occur. Be sure the cap is properly
and tightly secured.
Engine Overheating
The vehicle has an engine coolant
temperature gauge on the
instrument cluster to warn of engine
overheating. See
Engine Coolant
Temperature Gauge 0112
ii.
Caution
Running the engine without
coolant may cause damage or a
fire. Vehicle damage would not be
covered by the vehicle warranty.
Page 283 of 396
Chevrolet Colorado Owner Manual (GMNA-Localizing-U.S/Canada/Mexico-
9159327) - 2016 - crc - 8/28/15
282 Vehicle Care
Automatic Transmission
Shift Lock Control
Function Check
{Warning
When you are doing this
inspection, the vehicle could
move suddenly. If the vehicle
moves, you or others could be
injured.
1. Before starting this check, be sure there is enough room
around the vehicle. It should be
parked on a level surface.
2. Apply the parking brake. Be ready to apply the regular
brake immediately if the vehicle
begins to move.
3. With the engine off, turn the ignition on, but do not start the
engine. Without applying the
regular brake, try to move the
shift lever out of P (Park) with
normal effort. If the shift lever
moves out of P (Park), contact
your dealer for service.
Ignition Transmission
Lock Check
While parked, and with the parking
brake set, try to turn the ignition to
LOCK/OFF in each shift lever
position.
.For automatic transmission
vehicles, the ignition should turn
to LOCK/OFF only when the
shift lever is in P (Park).
. For manual transmission
vehicles, the ignition should turn
to LOCK/OFF only when you
press the key release button.
On all vehicles, the ignition key
should come out only in LOCK/OFF.
Contact your dealer if service is
required.
Park Brake and P (Park)
Mechanism Check
{Warning
When you are doing this check,
the vehicle could begin to move.
You or others could be injured
and property could be damaged.
Make sure there is room in front
of the vehicle in case it begins to
roll. Be ready to apply the regular
brake at once should the vehicle
begin to move.
Park on a fairly steep hill, with the
vehicle facing downhill. Keeping
your foot on the regular brake, set
the parking brake.
. To check the parking brake's
holding ability: With the engine
running and the transmission in
N (Neutral), slowly remove foot
pressure from the regular brake
pedal. Do this until the vehicle is
held by the parking brake only.
Page 286 of 396
Chevrolet Colorado Owner Manual (GMNA-Localizing-U.S/Canada/Mexico-
9159327) - 2016 - crc - 8/28/15
Vehicle Care 285
Headlamp
1. Open the hood.
2. Remove the headlamp bulbcover by turning it
counterclockwise.
3. Turn the bulb socket counterclockwise to remove it
from the headlamp assembly
and pull it straight out.
4. Unplug the electrical connector from the old bulb by releasing
the clip on the bulb socket.
Turn Signal/Sidemarker/
Parking Lamp
1. Open the hood.
2. Turn the bulb socket
counterclockwise to remove it
from the headlamp assembly
and pull it straight out.
3. Remove the bulb by pulling it straight out of the bulb socket.
Taillamps, Turn Signal,
Stoplamps, and Back-Up
Lamps
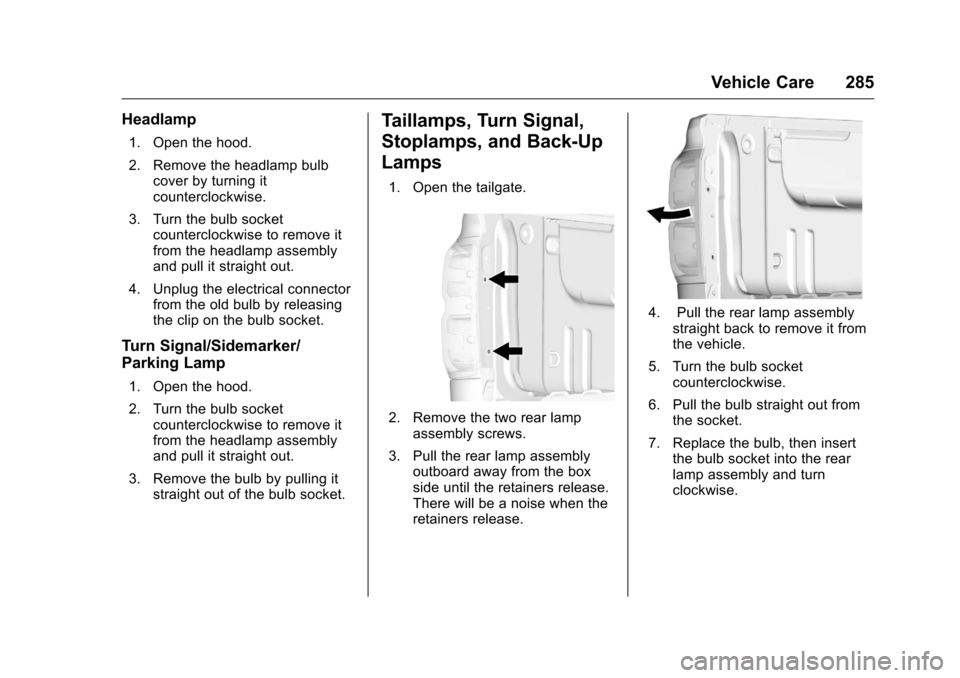
1. Open the tailgate.
2. Remove the two rear lampassembly screws.
3. Pull the rear lamp assembly outboard away from the box
side until the retainers release.
There will be a noise when the
retainers release.
4. Pull the rear lamp assembly
straight back to remove it from
the vehicle.
5. Turn the bulb socket counterclockwise.
6. Pull the bulb straight out from the socket.
7. Replace the bulb, then insert the bulb socket into the rear
lamp assembly and turn
clockwise.