Page 49 of 113
 - 2016 - CRC - 8/10/15
48 Rear Seat Infotainment
Headphones
1. Power Button
2. Volume Control
3. Channel 1 or 2 Switch
RSE in")
Chevrolet MyLink Infotainment System (GMNA-Localizing-U.S/Canada-
9085900) - 2016 - CRC - 8/10/15
48 Rear Seat Infotainment
Headphones
1. Power Button
2. Volume Control
3. Channel 1 or 2 Switch
RSE includes two or four 2-channel
wireless headphones, depending on
the vehicle model.
Press the power button to turn on
the headphones. A light on the
headphones comes on. If it does not
come on, check the batteries.
Intermittent sound or static can also
indicate weak batteries. See
“Battery Replacement”later in this
section.
Turn the headphones off when not
in use. Move the channel switch to channel
1 or channel 2. Channel 1 will play
audio from screen 1 and channel 2
will play audio from screen 2. When
a third row screen is available, the
screen will display the selection
related to
“1”on the remote control.
If 1 is not available, press “2”on the
remote control. Channel 2 will
provide audio based on its setting.
. Screen 1 is overhead in the
second row.
. Screen 2 is overhead in the
third row.
Infrared transmitters are on the top
of the second row video screen. The
headphones shut off automatically if
the RSE system is off or if the
headphones are out of range of the
transmitters for more than
three minutes. Moving too far
forward or stepping out of the
vehicle can cause the headphones
to lose the signal or have static.
Use the volume control on the
headphones to adjust the volume. For best audio performance, wear
the headphones as indicated with
L (Left) and R (Right) on the ear
pads. Do not let anything cover the
ear pads.
Caution
Do not store the headphones in
heat or direct sunlight. This could
damage the headphones and
repairs will not be covered by the
warranty. Storage in extreme cold
can weaken the batteries. Keep
the headphones stored in a cool,
dry place.
If the foam ear pads become worn
or damaged, the pads can be
replaced separately. To purchase
replacement ear pads, call
1-888-293-3332 or contact your
dealer.
Battery Replacement
To change the batteries: 1. Loosen the screw to the battery door on the left side of the
headphones.
Page 50 of 113
 - 2016 - CRC - 8/10/15
Rear Seat Infotainment 49
2. Open the battery door.
3. Replace the two AAA batteries.
4. Replace the b")
Chevrolet MyLink Infotainment System (GMNA-Localizing-U.S/Canada-
9085900) - 2016 - CRC - 8/10/15
Rear Seat Infotainment 49
2. Open the battery door.
3. Replace the two AAA batteries.
4. Replace the battery door andtighten the screw.
Auxiliary Inputs
Audio/Video (A/V) Jacks
1. Wired Headphone Volume
Control
2. Wired Headphone Jack
3. A/V Jacks
4. USB Port
5. SD Card Slot
If equipped with RSE, features
above will be in the rear of the
center console. These ports are for
the primary use of the rear
passengers and not all media is
available to the front passengers.
The A/V jacks allow audio or video
cables to be connected from an
auxiliary device such as a
camcorder, video game system,
or Apple device. A cable from Apple
is required.
The A/V jacks are color coded:
. Yellow for video input.
. White for left audio input.
. Red for right audio input.
Power for auxiliary devices is not
supplied by the infotainment system.
To use the auxiliary inputs of the
RSE system:
1. Connect the auxiliary device cables to the A/V jacks.
2. Power on both the auxiliary device and the RSE video
screen. 3. Press Media on the remote
control and use the left or right
arrows to change the source
to AUX.
USB/SD
This allows for video and audio
playback of supported media.
Audio from these ports can only be
heard and controlled by the rear
seat passengers. Video can be
heard, shown, and controlled by the
rear and front passengers.
To use the USB and SD: 1. Insert the device into the appropriate slot.
2. Select the source from the rear screen menu with the remote
control MEDIA button.
3. Select the source from the front by pressing the Video
application on the HOME
screen.
Page 51 of 113
 - 2016 - CRC - 8/10/15
50 Rear Seat Infotainment
Audio Output
Audio from a Blu-ray/DVD/CD
player or auxiliary inputs can be
h")
Chevrolet MyLink Infotainment System (GMNA-Localizing-U.S/Canada-
9085900) - 2016 - CRC - 8/10/15
50 Rear Seat Infotainment
Audio Output
Audio from a Blu-ray/DVD/CD
player or auxiliary inputs can be
heard through:
.Wireless headphones: Available
for any source depending on the
selected channel.
. Vehicle speakers: Touch the
VIDEO screen button. Select
any other source to stop the
speaker audio.
. Vehicle wired headphone jack:
See “Wired Headphone Jack”
following.
The RSE system transmits the
audio signal to the wireless
headphones if an audio signal is
available. See “Headphones” earlier
in this section.
Front seat passengers can listen to
playback from the A/V jacks through
the vehicle speakers by selecting
Rear A/V as the source on the radio.
Wired Headphone Jack
Select MENU on the remote control,
then select Settings and then Wired
Headphones to listen to audio on the wired headphones. The
headphone audio plays depending
on which screen is selected. The
default is screen 1 audio.
Remote Control
Remote Control Buttons
1.
7(Previous/Reverse)
. Radio: Press to seek the
previous radio station.
. CD: Press to seek the
previous track.
. Blu-ray/DVD: Press to seek
the previous chapter.
. Press and hold for fast
reverse. 2. MEDIA
.Press to scroll through the
menus including: CD, AUX,
Blu-ray/DVD, SD, USB.
3.
J(Play/Pause)
. Press to start playing.
Press to pause. Press
again to continue playing.
4.
6(Next/Fast Forward)
. Radio: Press to seek the
next radio station.
. CD: Press to seek the next
track.
. Blu-ray/DVD: Press to seek
the next chapter.
. Press and hold to fast
forward.
5. SCREEN 1 .For dual seatback screens:
Press to select the left
screen. Once pressed, all
remote control commands
will only pertain to screen 1.
. For single overhead
screens:
Page 52 of 113
 - 2016 - CRC - 8/10/15
Rear Seat Infotainment 51
Press to change the source
displayed on the overhead
screen to SCREEN 1
sele")
Chevrolet MyLink Infotainment System (GMNA-Localizing-U.S/Canada-
9085900) - 2016 - CRC - 8/10/15
Rear Seat Infotainment 51
Press to change the source
displayed on the overhead
screen to SCREEN 1
selected source. Select
audio sources. Only one
video can be played on the
screen at a time. Audio for
both sources will continue
on the headphones. Once
pressed, all remote control
commands will correspond
to SCREEN 1.
. For dual overhead screens:
Press to select the second
row overhead screen. Once
pressed, all remote control
commands will correspond
to SCREEN 1.
6.
O(Power)
. Press to turn the video
screens on and off. 7. SCREEN 2
.For dual seatback screens:
Press to select the right
screen. Once pressed, all
remote control commands
will only pertain to
SCREEN 2.
. For single overhead
screens:
Press to change the source
displayed on the overhead
screen to SCREEN 2
selected source. Only one
video can be played on the
screen at a time. Audio for
both sources will continue
on the headphones. Once
pressed, all remote control
commands will correspond
to SCREEN 2.
. For dual overhead screens:
Press to select the optional
third row overhead screen.
Once pressed, all remote
control commands will
correspond to SCREEN 2. 8.
o(Previous/Reverse/
Decrease)
. Radio and CD: Press to go
to the previous station or
track.
. Press to go to the
previous menu.
. Press to decrease the
brightness of the RSE
screen.
9.
w(Up Arrow)
. Press to scroll up a list.
10.
r/ENTER
. Press to select the
highlighted choice in
any menu.
. Press and hold for
quick play.
11.
p(Next/Forward/Increase)
. Radio and CD: Press to go
to the next station or track.
. Press to go to the
next menu.
Page 53 of 113
 - 2016 - CRC - 8/10/15
52 Rear Seat Infotainment
.Press to increase the
brightness of the RSE
screen.
12.
x(Down Arrow)
. Pre")
Chevrolet MyLink Infotainment System (GMNA-Localizing-U.S/Canada-
9085900) - 2016 - CRC - 8/10/15
52 Rear Seat Infotainment
.Press to increase the
brightness of the RSE
screen.
12.
x(Down Arrow)
. Press to go down a list.
13.
4(Back)
. Press to go back to the
previous menu.
. Press and hold to go back
to the now playing screen.
14. MENU .Press to go to the menu of
the now playing screen.
15. RADIO .Press to scroll through the
radio sources including AM
or FM.
To use the remote control, aim it at
the overhead transmitter window
and press the buttons firmly. Direct
sunlight or very bright light could
affect how the RSE receives signals
from the remote control. Check the batteries if the remote control does
not seem to be working. See
“Battery Replacement”
following.
Objects blocking the line of sight
could also affect the function of the
remote control.
If a CD, Blu-ray/DVD, or MP3 disc is
in the CD slot, the remote controlO
button can be used to turn on the
video screen display and start the
disc. The infotainment system can
also turn on the video screen
display.
Caution
Storing the remote control in a hot
area or in direct sunlight can
damage it, and the repairs will not
be covered by the warranty.
Storage in extreme cold can
weaken the batteries. Keep the
remote control stored in a cool,
dry place. Battery Replacement
To change the remote control
batteries:
1. Insert a coin or key to pull up the rear cover on the remote
control.
2. Replace the two AAA batteries in the compartment.
3. Replace the battery cover.
Remove the batteries from the
remote control if it will not be used
for an extended period of time.
RSE Troubleshooting
No power : The ignition might not
be in ON/RUN or ACC/
ACCESSORY.
The picture does not fill the
screen. There are black borders
on the top and bottom or on both
sides, or it looks stretched out :
Press the MENU button on the
remote control to change the display
mode setting.
In auxiliary mode, the picture
moves or scrolls : Check the
auxiliary input connections at both
devices.
Page 54 of 113
 - 2016 - CRC - 8/10/15
Rear Seat Infotainment 53
The remote control does not
work :Check to make sure the
remote control is p")
Chevrolet MyLink Infotainment System (GMNA-Localizing-U.S/Canada-
9085900) - 2016 - CRC - 8/10/15
Rear Seat Infotainment 53
The remote control does not
work :Check to make sure the
remote control is programmed to the
correct screen. Make sure there is
no obstruction between the remote
control and the transmitter window
and check the batteries to make
sure they are not dead or installed
incorrectly.
There is no sound from the
headphones with the indicator
light on : If the batteries are good,
make sure the headphones are
programmed to the correct screen
and on the correct channel for the
screen being viewed.
The auxiliary source is running
but there is no picture or sound :
Check that the RSE video screen is
in the auxiliary source mode by
pressing the MEDIA button on the
remote control. Check the auxiliary
input connections at both devices. Sometimes the wireless
headphone audio cuts out or
buzzes :
Check for obstructions,
low batteries, reception range, and
interference from cell phone towers
or from cellular telephone use in the
vehicle. Check that the headphones
are on correctly using the L (Left)
and R (Right) on the headphones.
Check that the headphones are
positioned properly with the
headband across the top of
the head.
I lost the remote and/or the
headphones : See your dealer for
assistance.
The Blu-ray/DVD is playing, but
there is no picture or sound :
Check that the RSE video screen is
sourced to the Blu-ray/DVD player
by pressing the MEDIA button on
the remote control.Video Display Error Messages
The video screen may display one
of the following:
Disc Error : There are disc load or
eject problems, the disc is inserted
with the disc label wrong side up,
the disc is damaged, or the disc is
not from the correct region.
No Disc Inserted : No disc is
present.
Disc Player Error : The
temperature is outside the operating
range of the RSE system. If the
temperature is within range, see
your dealer.
Video Distortion
Video distortion can occur when
operating cellular phones, scanners,
CB radios, Global Positioning
Systems (GPS), two-way radios,
mobile faxes, or walkie talkies.
It might be necessary to turn off the
video player when operating one of
these devices in or near the vehicle.
Page 55 of 113
 - 2016 - CRC - 8/10/15
54 Navigation
Navigation
Using the Navigation
System
Touch the NAV button on the Home
Page or the Nav")
Chevrolet MyLink Infotainment System (GMNA-Localizing-U.S/Canada-
9085900) - 2016 - CRC - 8/10/15
54 Navigation
Navigation
Using the Navigation
System
Touch the NAV button on the Home
Page or the Nav icon in the
applications tray to access the
navigation application.
Touch MENU from the map view to
access the Navigation Menu.
Features displayed in the
Navigation Menu can be selected to
adjust navigation preferences.
It is advised to set up preferences
before setting a destination. To set a
destination, seeDestination062. The buttons on the infotainment
screen display will time out when
not interacting. Tap anywhere on the
screen to reveal the controls, then
select the desired control.Additional navigation features are:
.
Cancel Route/Resume To
. Navigation Voice Preferences
. Current Location
. Map View
. Traffic
. Display “Places of Interest”
Icons
. Routing Preferences
. Personal Data Cancel/Resume Route
.
While under route guidance, this
screen button displays Cancel
Route. Touch Cancel Route to
cancel route guidance. No
further prompts will be given.
The list item then changes to
Resume To.
. Touch the Resume To screen
button to resume route guidance
to the last entered destination.
. The last location that the system
has provided guidance to can be
resumed by touching on this
list item.
. If the route includes waypoints,
the entire route can be
suspended using the Cancel
Guidance list item. When
Resume Guidance is touched,
all waypoints are resumed for
guidance.
Navigation Voice Preferences
Touch the Navigation Voice
Preferences list item to adjust the
voice preferences.
Page 56 of 113
 - 2016 - CRC - 8/10/15
Navigation 55
The following options can be
adjusted:
.Voice Prompts ON-OFF
. Voice Volume
. Prompts Du")
Chevrolet MyLink Infotainment System (GMNA-Localizing-U.S/Canada-
9085900) - 2016 - CRC - 8/10/15
Navigation 55
The following options can be
adjusted:
.Voice Prompts ON-OFF
. Voice Volume
. Prompts During Phone Calls
ON-OFF
Voice Prompts
Touch the Voice Prompts list item to
toggle voice prompts ON and OFF.
Voice Volume
Adjust the loudness of the audio
feedback by touching the −or +
button. If a maneuver prompt is
being played, and the main volume
is adjusted, the prompt volume will
update and be saved. Prompts During Phone Calls
When enabled, the system plays a
shorter prompt while on a phone
call. This setting can be configured
as to whether a prompt would be
heard during a phone conversation.
When this setting is OFF, only the
short alert tone is played when
approaching the maneuver.
Current Location
Touch the Current Location list item
to display a Current Location list.
The following information is
displayed on the Current
Location list:
.
Nearest Address
. Lat/Long .
Nearest Hospital
. Nearest Police
. Nearest Fuel
. Nearest Service
Touch on any of the options to
display the destination details view
for the selected location to begin
guidance.
Touch the Nearest Address button
and then the Save screen button to
store the current location to the
Address Book.
Map View
Touch to select the desired map
view. A checkmark appears to
indicate a view has been selected.
 1
1 2
2 3
3 4
4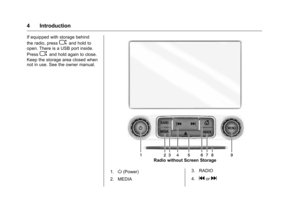 5
5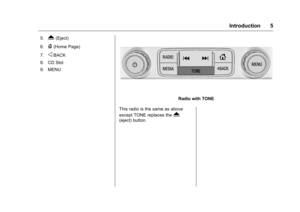 6
6 7
7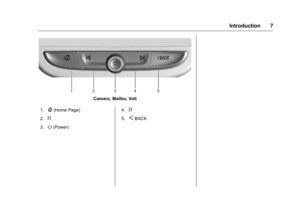 8
8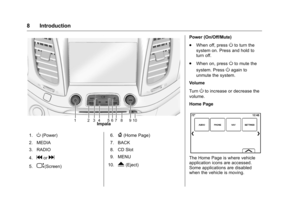 9
9 10
10 11
11 12
12 13
13 14
14 15
15 16
16 17
17 18
18 19
19 20
20 21
21 22
22 23
23 24
24 25
25 26
26 27
27 28
28 29
29 30
30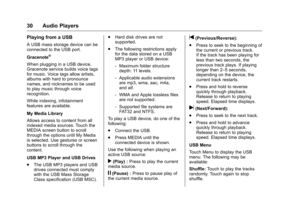 31
31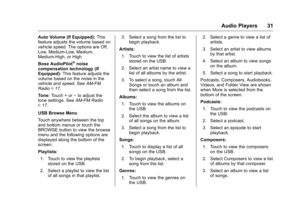 32
32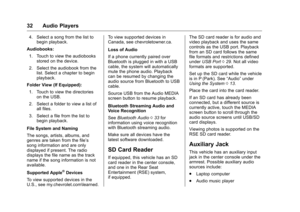 33
33 34
34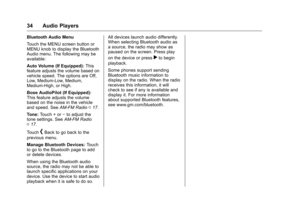 35
35 36
36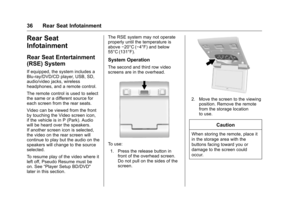 37
37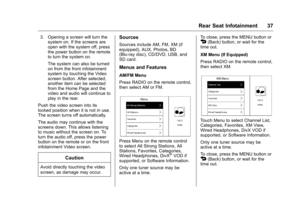 38
38 39
39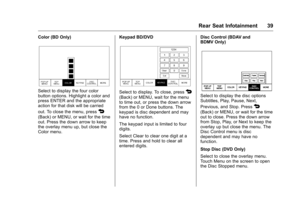 40
40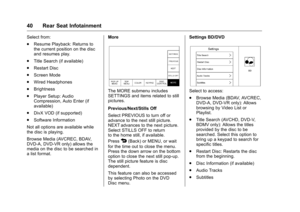 41
41 42
42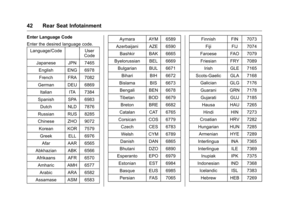 43
43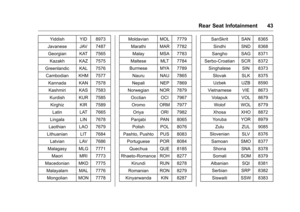 44
44 45
45 46
46 47
47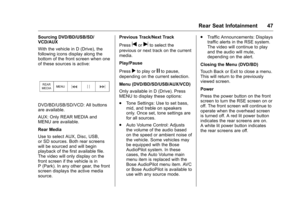 48
48 49
49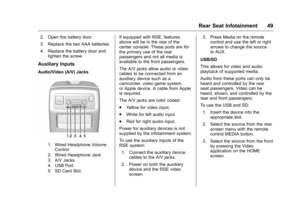 50
50 51
51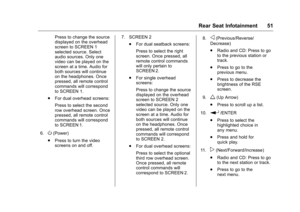 52
52 53
53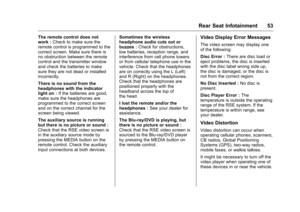 54
54 55
55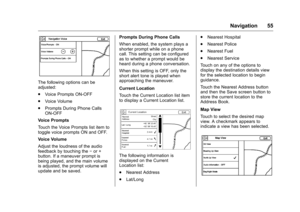 56
56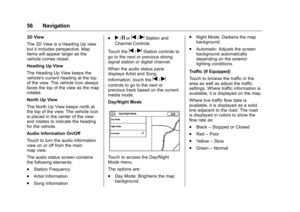 57
57 58
58 59
59 60
60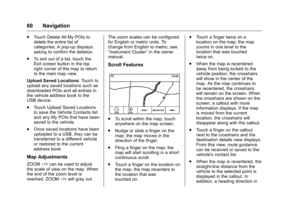 61
61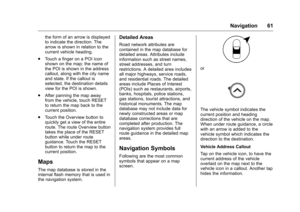 62
62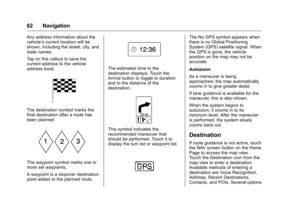 63
63 64
64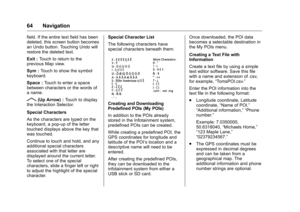 65
65 66
66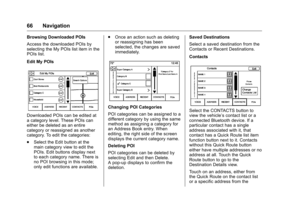 67
67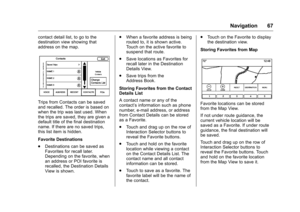 68
68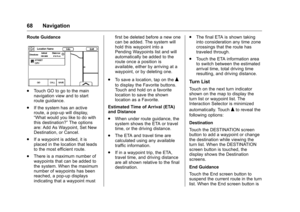 69
69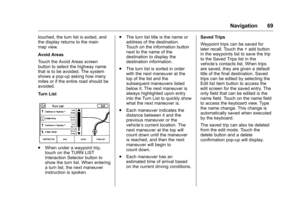 70
70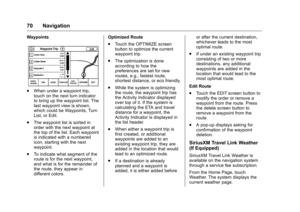 71
71 72
72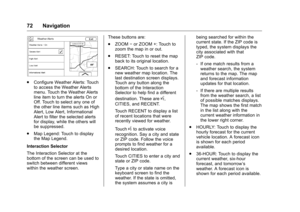 73
73 74
74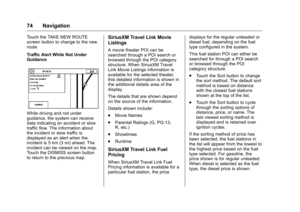 75
75 76
76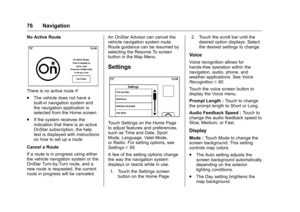 77
77 78
78 79
79 80
80 81
81 82
82 83
83 84
84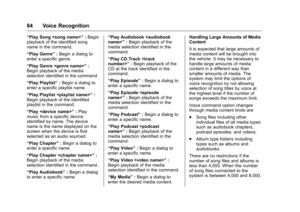 85
85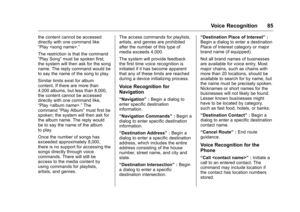 86
86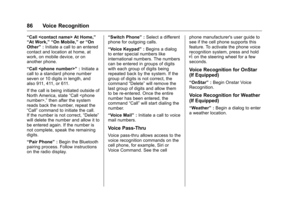 87
87 88
88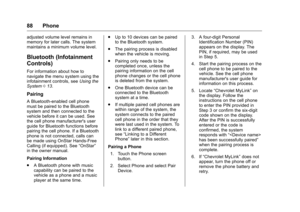 89
89 90
90 91
91 92
92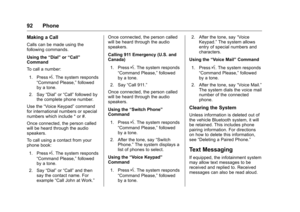 93
93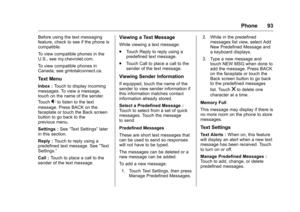 94
94 95
95 96
96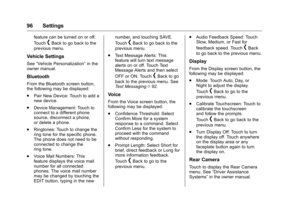 97
97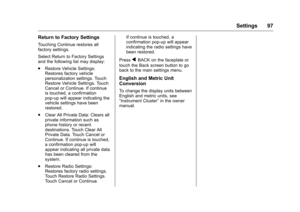 98
98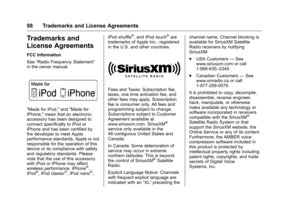 99
99 100
100 101
101 102
102 103
103 104
104 105
105 106
106 107
107 108
108 109
109 110
110 111
111 112
112