Page 1 of 16
1
Review this Quick Reference Guide for an overview of some important
features in your Buick Enclave. More detailed information can be
found in your Owner Manual. Some optional equipment
described
in this guide may not be included in your vehicle. For easy reference,
keep this guide with your Owner Manual in your glove box.
www.buick.com
2016 Enclave
Getting to Know Your
Page 2 of 16
2
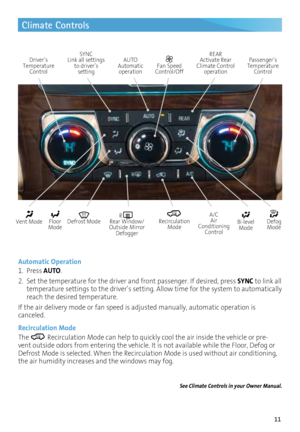
Ambient Light Control
Exterior Lamps
Control
Instrument Panel
Tilt/Telescope
Steering Wheel Lever
Instrument Panel
Illumination Control/ Dome Lamp Off Button
Symbols
Low Fuel
Traction Control Off
Engine Coolant
Temperature
Brake System
Cruise Control Set
Low Tire Pressure
StabiliTrak Active
StabiliTrak Off
Security
Check Engine
Cruise Control Buttons/
Heated Steering
Wheel ButtonFDriver Information Center Audio Steering
Wheel ControlsF
Turn Signal Lever/
Windshield Wipers Lever
Page 3 of 16
3
Refer to your Owner Manual
to learn about the information
being relayed by the lights,
gauges and indicators on the
instrument cluster.
See In Brief in your Owner Manual.
Driver Information Center ButtonsF
Audio System/ Navigation System
FHazard Warning Flashers Button
Accessory Power
Outlet
USB
Port
Driver’s Heated/
Cooled Seat Buttons
F
Rear Wiper Switch/ Traction Control Off Button/Tow/ Haul Mode ButtonF/ Power Liftgate SwitchF
Passenger’s
Heated/Cooled Seat Buttons
F
Lane Departure
Warning ButtonF/
Forward Collision Alert Button
F
Climate
Controls
F Optional equipment
Oil Pressure
Charging System
Safety Belt Reminder
Airbag Readiness
Antilock Brake System
Side Blind Zone Alert
Page 4 of 16
4
Front Seats
A. Seat Adjustment
Move the horizontal control to move
the seat forward or rearward and to
raise, lower or tilt the seat.
B. Seatback Recline Adjustment
Move the vertical control to recline or
raise the seatback.
C. Lumbar Adjustment
F
Press the switch to adjust the amount
of lumbar support.
D. Lumbar Adjustment
Pull up/push down the lever on the
inboard side of the seatback to adjust
the amount of lumbar support.
Power Seats
Head Restraints Manual Lumbar
The driver and front passenger head
restraints are adjustable.
Press the button on the left side of the
head restraint to raise or lower the
head restraint, or move it rearward.
Move the head restraint forward by
pulling it forward.
See Seats and Restraints in your Owner Manual.
F Optional equipment
D
A
BC
Page 5 of 16
 and make sure
the safety belt is unfastened and i")
5
2nd-Row Seats
Slide the Seat1.
Make sure nothing is on the 2nd-row
seat or the floor in front of or behind
the seat.
2. Fold up the armrest(s) and make sure
the safety belt is unfastened and in the
stowed position.
3. Rotate the release lever (A) on the
upper-outboard side of the seatback
forward.
4. Push the top of the seatback forward.
The seat cushion will fold and the
entire seat will slide forward.
5. After entering/exiting, push the top of
the seatback rearward until the seat
-back and floor tracks lock.
6. Push down at the rear of the seat
cushion to lock it in place.
1. Make sure nothing is on the floor in
front of or behind the 2nd-row seat.
2. Pull outward on the handle (B) on the
outboard side of the seat cushion and
slide the seat forward or rearward.
3. Release the handle.
1. Make sure the seat is all the way
rearward (when folding the seat), the
armrest(s) are upright and the safety
belt is unfastened.
2. Pull forward on the strap (C) on the
outboard side of the seatback.
3. Fold down or recline the seatback.
Fold/Recline the Seatback
See Seats and Restraints in your Owner Manual.
Enter or Exit the 3rd-Row Seats
A
B
C
Page 6 of 16
 in the daytime
and the headlamps and other exterior lamps at night or
when necessary.
Parking Lamps")
6
Lighting
Off/On
AUTO Automatic Headlamp System
Activates the Daytime Running Lamps (DRLs) in the daytime
and the headlamps and other exterior lamps at night or
when necessary.
Parking Lamps
Headlamps
Ambient Off
The ambient lighting illuminates across the instrument
panel. Press the button to turn the ambient lighting on or
off. Turn the instrument panel brightness knob to adjust
the lighting. The headlamps must be on for the ambient
lighting to operate.
Note: Only the instrument panel ambient lighting, not the door
panel ambient lighting, can be turned off.
Instrument Panel Brightness
Press the small knob to extend it. Turn the knob to adjust
the instrument panel lighting. Turn the knob fully to turn
on the dome lamps when all doors are closed.
Dome Off
Press the button to turn off the dome lamps. The button
indicator will illuminate when the dome lamps are turned
off. With the button depressed, the dome lamps will not
turn on when a door is open.
Press the button again to have the dome lamps turn on
when a door is open.
See Lighting in your Owner Manual.
Exterior Lamps
Rotate the knob to operate
the exterior lamps.
Ambient Lighting
Interior Lighting
Dome Lamps
Page 7 of 16

7
Audio Steering Wheel Controls
Cruise Control
Volume
Pull up the + or – button to adjust the
volume.
SRCE Source
Press to select an audio source. Next/Previous
Press the up or down arrow to go to the
next or previous favorite radio station,
track, or file.
Seek
Press to go to the next radio station on the
same band or CD track.
Push to Talk/Mute
Press to start voice recognition to
interact with the audio, OnStar
®, Bluetooth
or navigationF system.
Press and hold for two seconds to mute
the speakers.
End Call
Press to end or reject an OnStar or a
Bluetooth call.
Setting Cruise Control
1. Press the
On/Off button. The
Cruise Control symbol will illuminate in
white on the instrument cluster.
2. When traveling at the desired speed,
press the SET/– button to set the speed.
The
symbol will illuminate in green
on the instrument cluster.
Adjusting Cruise Control
RES/+ Resume/Accelerate
Press to resume a set speed.
When the system is active, press to
increase speed.
SET/– Set/Coast
When the system is active, press to
decrease speed.
Cancel
Press to cancel the cruise control
but retain the set speed in memory.
Pressing the brake pedal also will cancel
the cruise control.
The cruise control set speed is erased
when cruise control or the vehicle ignition
is turned off.
See Driving and Operating in your Owner Manual.
See Instruments and Controls in your Owner Manual.
F Optional equipment
Page 8 of 16
8
Infotainment System
Volume/Power Eject discTune/Menu:
Tune radio stations/
Open and select menus
Applications: Touch the screen icon to
access the application
FAV
Display pages
of favorite radio stationsHOME Home page
BACK Move back one
level in the menus SEEK Previous/Next radio station, track or file
SRCE Select the audio
or media source Auxiliary
input jack
Refer to your Owner Manual for important safety information about using the infotainment system
while driving.
The infotainment system is controlled using the faceplate buttons, touch screen, voice
recognition and audio steering wheel controls.
See Infotainment System in your Owner Manual.
Setting the Time
1. Touch the Time Display on the touch screen.
2. Touch the desired
down or up screen button to adjust the time.
3. Touch the OK screen button to confirm the setting.