2016 BMW Z4 SDRIVE35I tow
[x] Cancel search: towPage 136 of 289
▷Heavy cargo: stow as far forward and as
low as possible, ideally directly behind the
cargo area separating wall.▷Cover sharp edges and corners.
Loading with the hardtop open
Before opening the hardtop, fold down
the cargo area partition and make sure the
cargo area is loaded correctly; otherwise, parts
of the hardtop could be damaged.◀
Fold down the cargo area partition, refer to
page 43.
Rear storage shelf Loading the rear storage shelf
When loading the rear storage shelf, do
not move both seats all the way forward while
moving them to their uppermost position and
leaning the backrests forward. Otherwise, the
seats could hit and damage the seal on the
windshield and the sun visor.◀
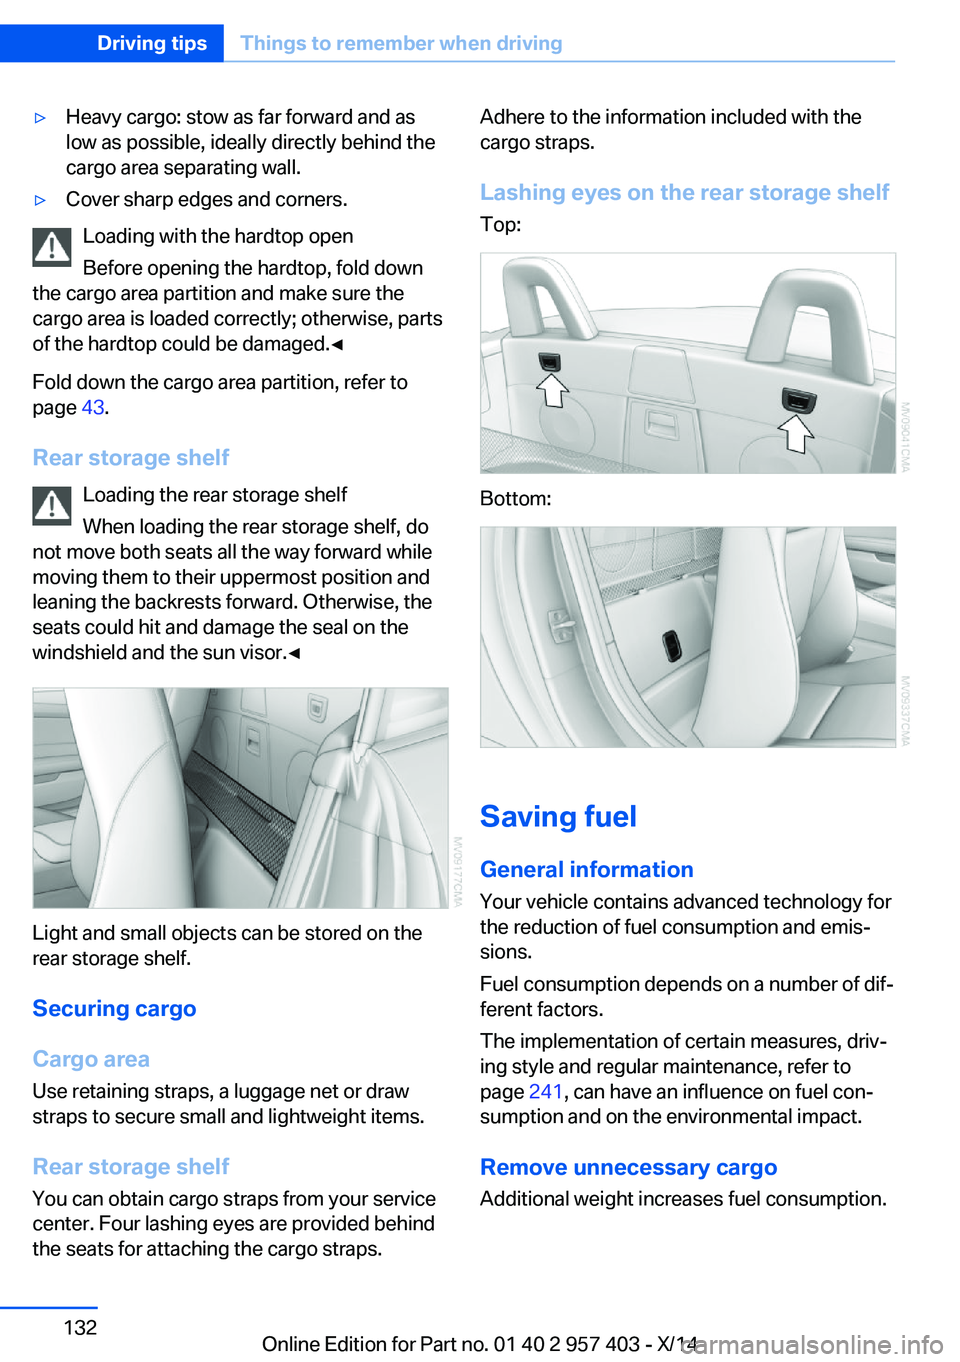
Light and small objects can be stored on the
rear storage shelf.
Securing cargo
Cargo area
Use retaining straps, a luggage net or draw
straps to secure small and lightweight items.
Rear storage shelf You can obtain cargo straps from your service
center. Four lashing eyes are provided behind
the seats for attaching the cargo straps.
Adhere to the information included with the
cargo straps.
Lashing eyes on the rear storage shelf
Top:
Bottom:
Saving fuel
General information
Your vehicle contains advanced technology for
the reduction of fuel consumption and emis‐
sions.
Fuel consumption depends on a number of dif‐
ferent factors.
The implementation of certain measures, driv‐
ing style and regular maintenance, refer to
page 241, can have an influence on fuel con‐
sumption and on the environmental impact.
Remove unnecessary cargo
Additional weight increases fuel consumption.
Seite 132Driving tipsThings to remember when driving132
Online Edition for Part no. 01 40 2 957 403 - X/14
Page 144 of 289

Destination entryVehicle equipment
This chapter describes all series equipment as
well as country-specific and special equipment
offered for this model series. Therefore, it also
describes equipment that may not be found in
your vehicle, for instance due to the selected
special equipment or the country version. This
also applies to safety-related functions and
systems.
When using the features and systems descri‐
bed here, adhere to local regulations.
At a glance In entering your destination you can select
from the following options:▷Enter the destination manually, see below.▷Select the destination from the address
book, refer to page 142.▷Last destinations, refer to page 143.▷Special destinations, refer to page 143.▷Destination entry via map, refer to
page 145.▷Using the home address as the destina‐
tion, refer to page 143.▷Destination entry by voice, refer to
page 146.▷Destination entry via the Concierge serv‐
ice, refer to page 145.
You can also store a navigation destination on
the programmable memory buttons, refer to
page 23.
Entries in stationary vehicle
Enter data only when the vehicle is sta‐
tionary, and always give priority to the applica‐
ble traffic regulations in the event of any con‐
tradiction between traffic and road conditions
and the instructions issued by the navigation
system. Failure to take to this precaution can
place you in violation of the law and put vehicle
occupants and other road users in danger.◀
Manual destination entry General information
The system supports you in entering street
names and house numbers by automatically
completing the entry and providing entry com‐
parisons, refer to page 23.
Stored town/city and street names can be
called up quickly.▷If the existing entries should not be
changed, the entries for the state/province
and town/city can be skipped.▷Destination guidance is started to the
town/city center if no street is entered.
Entering a state/province
1. Press the button.2."Navigation"3."Enter address"4.Select "State/Province" or the displayed
state/province.Seite 140NavigationDestination entry140
Online Edition for Part no. 01 40 2 957 403 - X/14
Page 145 of 289
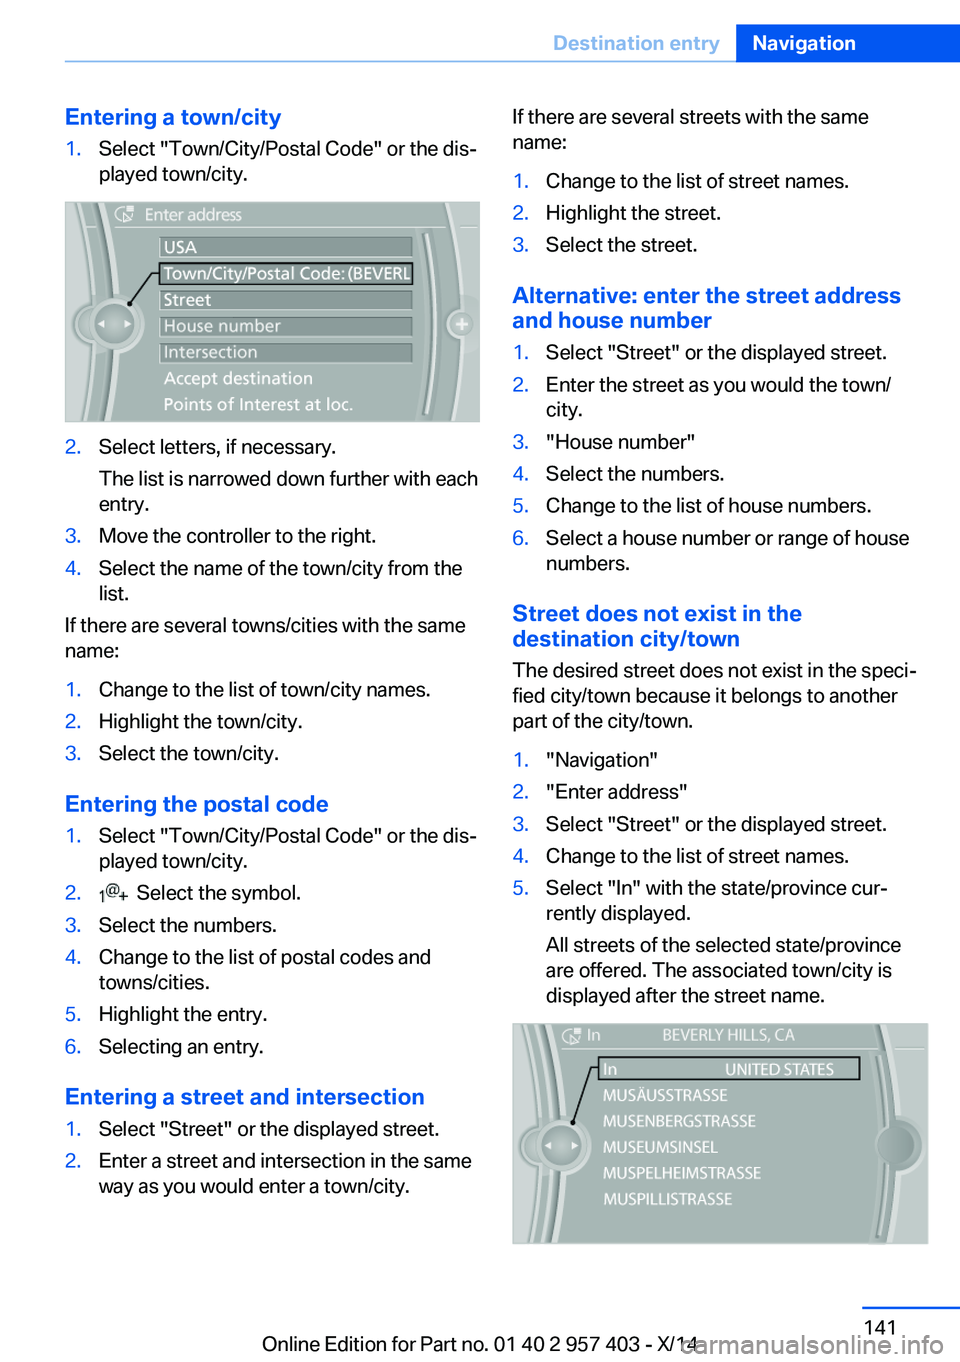
Entering a town/city1.Select "Town/City/Postal Code" or the dis‐
played town/city.2.Select letters, if necessary.
The list is narrowed down further with each
entry.3.Move the controller to the right.4.Select the name of the town/city from the
list.
If there are several towns/cities with the same
name:
1.Change to the list of town/city names.2.Highlight the town/city.3.Select the town/city.
Entering the postal code
1.Select "Town/City/Postal Code" or the dis‐
played town/city.2. Select the symbol.3.Select the numbers.4.Change to the list of postal codes and
towns/cities.5.Highlight the entry.6.Selecting an entry.
Entering a street and intersection
1.Select "Street" or the displayed street.2.Enter a street and intersection in the same
way as you would enter a town/city.If there are several streets with the same
name:1.Change to the list of street names.2.Highlight the street.3.Select the street.
Alternative: enter the street address
and house number
1.Select "Street" or the displayed street.2.Enter the street as you would the town/
city.3."House number"4.Select the numbers.5.Change to the list of house numbers.6.Select a house number or range of house
numbers.
Street does not exist in the
destination city/town
The desired street does not exist in the speci‐
fied city/town because it belongs to another
part of the city/town.
1."Navigation"2."Enter address"3.Select "Street" or the displayed street.4.Change to the list of street names.5.Select "In" with the state/province cur‐
rently displayed.
All streets of the selected state/province
are offered. The associated town/city is
displayed after the street name.Seite 141Destination entryNavigation141
Online Edition for Part no. 01 40 2 957 403 - X/14
Page 148 of 289

changed; for example, gas stations might not
be in operation.
Opening the search for specialdestinations
Selection of special destinations, such as ho‐
tels or tourist attractions.1."Navigation"2."Points of Interest"3.Select the search function.
Online Search
1."Google™ Local Search"2.Select a special destination.3. Select the symbol.4."Start guidance"
A-Z search
1."A-Z search"2."Town/City"3.Select or enter the town/city.4."Category"5.Select the category.6."Category details"
For some special destinations, multiple
category details can be selected. Move the
controller to the left to leave the category
details.7."Keyword"8.Enter the keyword.
A list of the special destinations is dis‐
played.9.Select a special destination.
Details are displayed.
If multiple details are stored, you can leaf
through the pages.
If a phone number is available, a connec‐
tion can be established if necessary.10. Select the symbol.11."Start guidance" or "Add as another
destination"
Add a destination as a further destination,
refer to page 147.
"Start search": if a search term is not entered,
the search is repeated with the previous
search term.
Category search
1."Category search"2."Town/City"3.Select or enter the town/city.4."Category"5.Select the category.6."Category details"
For some special destinations, multiple
category details can be selected. Move the
controller to the left to leave the category
details.7."Start search"
A list of the special destinations is dis‐
played.8.Select a special destination.
Details are displayed.
If multiple details are stored, you can leaf
through the pages.
If a phone number is available, a connec‐
tion can be established if necessary.9. Select the symbol.10."Start guidance" or "Add as another
destination"
Add a destination as a further destination,
refer to page 147.
Display of special destinations
List of special destinations: special destina‐
tions are arranged by distance and appear with
a directional arrow pointing to the special des‐
tination.
Seite 144NavigationDestination entry144
Online Edition for Part no. 01 40 2 957 403 - X/14
Page 150 of 289
Add a destination as a further destination,
refer to page 147.▷"Exit interactive map": return to the map
view.▷"View in northern direction" or "View in driving direction"▷"Display destination": the map section
around the destination is displayed.▷"Display current location": the map section
around your current location is displayed.▷"Find points of interest": the search for
special destinations is started.
Destination entry by voice
General information
▷Instructions for voice activation system, re‐
fer to page 25.▷When making a destination entry by voice,
you can change between voice operation
and iDrive.▷To have the available spoken instructions
read out loud: ›Voice commands‹.
Saying the entries
▷The town/city, street, and house number
can be entered using a single command.▷Countries, towns and cities, streets, and
intersections can be said as whole words
or spelled in the language of the system,
refer to page 78.
Example: to enter a town/city in a US states
as a whole word, the language of the sys‐
tem must be English.▷Spell the entry if the spoken language and
the language of the system differ.▷Say the letters smoothly, and avoid exag‐
gerating the pronunciation and inserting
lengthy pauses between the letters.▷The methods of entry depend on the navi‐
gation data in use and the country and lan‐
guage settings.
Entering the address in a command
1. Press the button on the steering
wheel.2.›Enter address‹3.Wait for a request from the system.4.Say the address in the suggested order.5.Continue making the entry as prompted by
the system.
If necessary, individually name the sepa‐
rate components of the address, e.g., the
town/city.
Entering a town/city separately
The town/city can be said as a complete word.
With the destination entry menu displayed:
1. Press the button on the steering
wheel.2.›City‹ or ›Spell city‹3.Wait for the system to prompt you for the
town/city.4.Say the name of the town/city, or name at
least the first three letters.
Depending on the entry, up to 20 towns/
cities may be suggested.5.Select a location:▷Select a recommended town/
city: ›Yes‹.▷Select a different town/city: ›New
entry‹.▷Select an entry: ›Entry ...‹, for instance,
entry 2.▷Spell an entry: ›Spell city‹.6.Continue making the entry as prompted by
the system.Seite 146NavigationDestination entry146
Online Edition for Part no. 01 40 2 957 403 - X/14
Page 151 of 289
If there are several towns/cities with the same
name:
Towns/cities of the same name are grouped in
a list and displayed as one location followed by
an ellipsis.1.Select an entry: ›Yes‹ or ›Entry ...‹, e. g., En‐
try 2.2.Select the desired town/city.
Entering a street or intersection
separately
Enter a street and intersection in the same way
as you would enter a town/city.
Entering a house number separately Depending on the data in the navigation sys‐
tem, house numbers up to number 2,000 can
be entered.
1.›House number‹2.Say the house number.
Say each digit separately.3.Continue making the entry as prompted by
the system.
Starting destination guidance
›Start guidance‹
Planning a trip with
intermediate destinations
New trip
A trip can be planned with several intermediate
destinations.
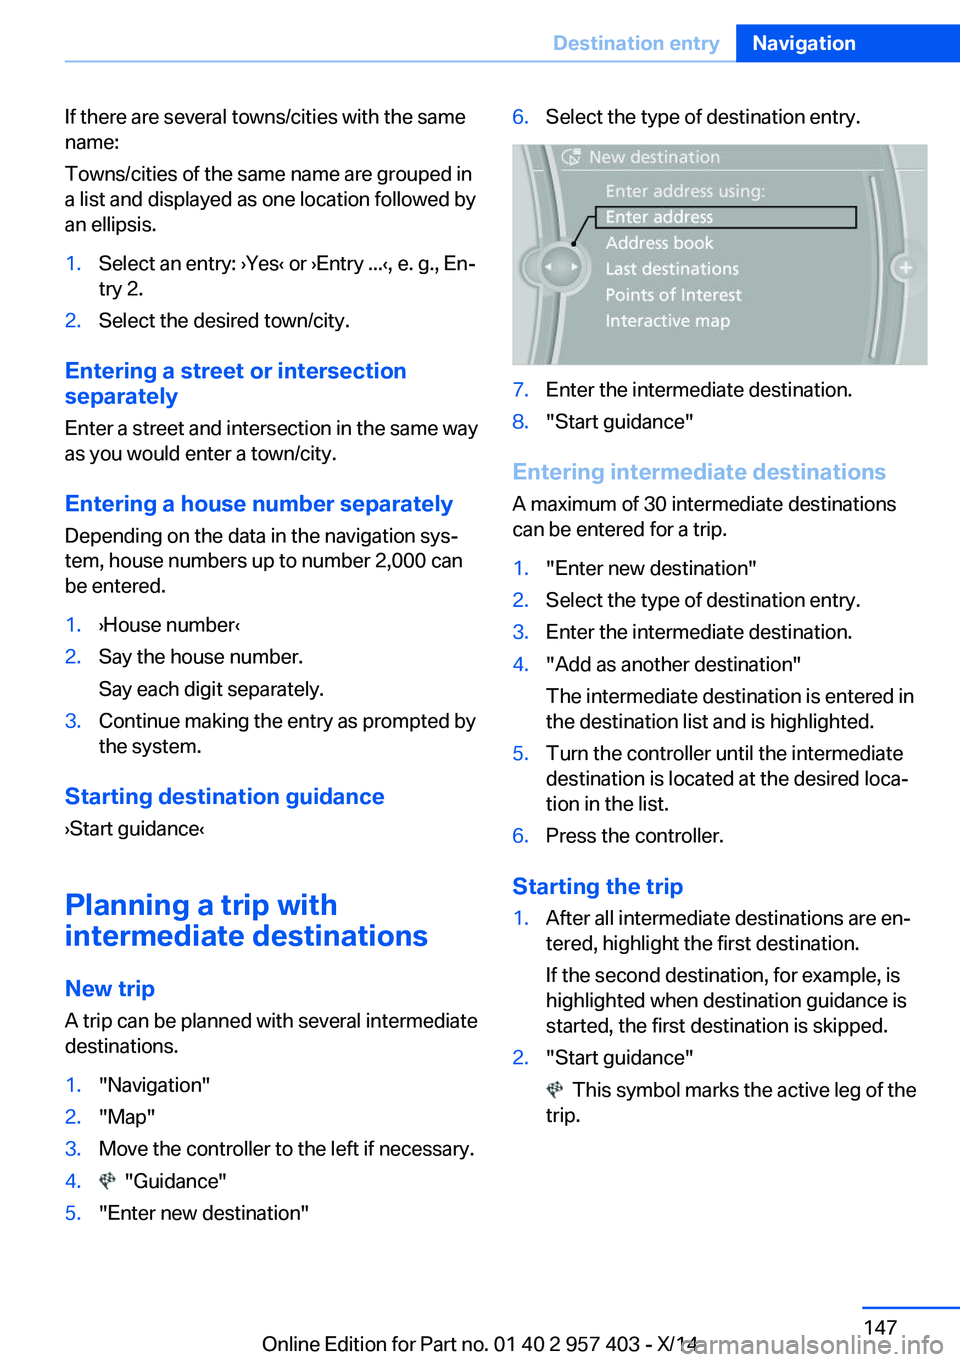
1."Navigation"2."Map"3.Move the controller to the left if necessary.4. "Guidance"5."Enter new destination"6.Select the type of destination entry.7.Enter the intermediate destination.8."Start guidance"
Entering intermediate destinations
A maximum of 30 intermediate destinations
can be entered for a trip.
1."Enter new destination"2.Select the type of destination entry.3.Enter the intermediate destination.4."Add as another destination"
The intermediate destination is entered in
the destination list and is highlighted.5.Turn the controller until the intermediate
destination is located at the desired loca‐
tion in the list.6.Press the controller.
Starting the trip
1.After all intermediate destinations are en‐
tered, highlight the first destination.
If the second destination, for example, is
highlighted when destination guidance is
started, the first destination is skipped.2."Start guidance"
This symbol marks the active leg of the
trip.
Seite 147Destination entryNavigation147
Online Edition for Part no. 01 40 2 957 403 - X/14
Page 161 of 289
What to do if...Vehicle equipmentThis chapter describes all series equipment as
well as country-specific and special equipment
offered for this model series. Therefore, it also
describes equipment that may not be found in
your vehicle, for instance due to the selected
special equipment or the country version. This
also applies to safety-related functions and
systems.
When using the features and systems descri‐
bed here, adhere to local regulations.
What to do if...▷The current transmission position cannot
be displayed?
The vehicle is located in an unrecognized
region, is in a poor reception area, or the
system is currently determining the posi‐
tion. Reception is usually best when you
have an unobstructed view of the sky.▷The destination without street information
is not used for route guidance?
When city has been input, no downtown
can be determined. Input any street in the
selected city and start destination guid‐
ance.▷The destination is not used for route guid‐
ance?
The destination data are not contained in
the navigation data. Select a destination
that is as close as possible to the original.▷Letters for destination input cannot be se‐
lected?
The stored data do not contain the data of
the destination. Select a goal that is as
close as possible to the original.▷Is the map displayed in shades of gray?
"Traffic conditions/gray map" active:The Control Display changes to a black
and white display. This enables a better
view of the traffic bulletins.▷Spoken instructions are no longer output
during route guidance in front of intersec‐
tions?
The area has not yet been fully recorded,
or you have left the recommended route
and the system requires a few seconds to
calculate a new route suggestion.Seite 157What to do if...Navigation157
Online Edition for Part no. 01 40 2 957 403 - X/14
Page 205 of 289
Snap-in adapter
General information More information on compatible snap-in
adapters that support the functions of the mo‐
bile phone is available at the service center.
Notes At high temperatures, the charging function of
the mobile phone may be limited and functions
may not be executed.
When using the mobile phone via the vehicle,
note the operating instructions of the mobile
phone.
Installation position
In the center armrest.
Inserting/removing the snap-in
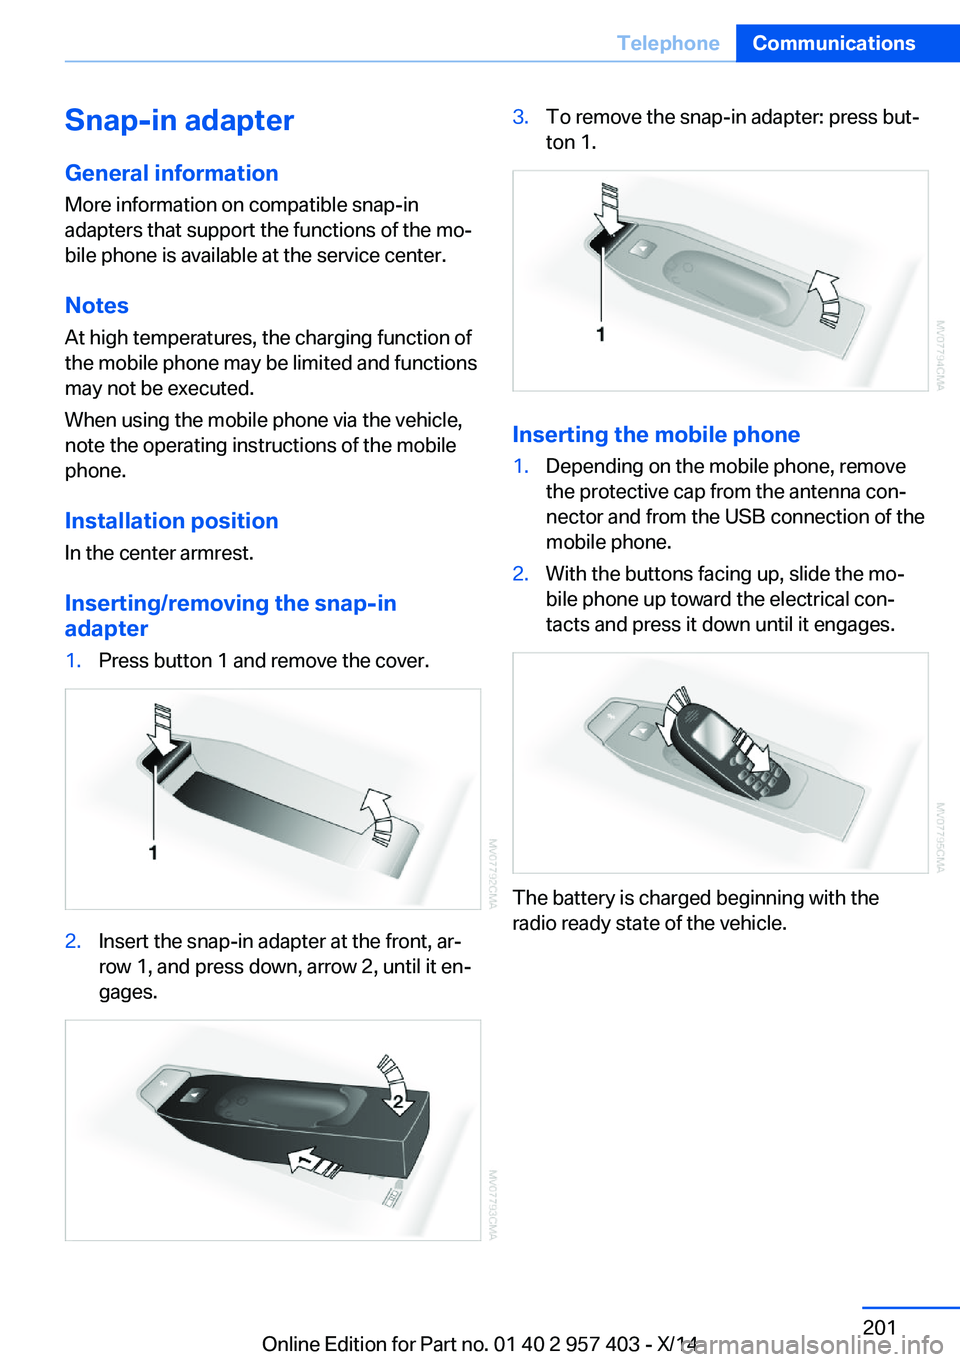
adapter1.Press button 1 and remove the cover.2.Insert the snap-in adapter at the front, ar‐
row 1, and press down, arrow 2, until it en‐
gages.3.To remove the snap-in adapter: press but‐
ton 1.
Inserting the mobile phone
1.Depending on the mobile phone, remove
the protective cap from the antenna con‐
nector and from the USB connection of the
mobile phone.2.With the buttons facing up, slide the mo‐
bile phone up toward the electrical con‐
tacts and press it down until it engages.
The battery is charged beginning with the
radio ready state of the vehicle.
Seite 201TelephoneCommunications201
Online Edition for Part no. 01 40 2 957 403 - X/14