2016 BMW X6M engine overheat
[x] Cancel search: engine overheatPage 70 of 255

The radio-ready state remains active if, e.g.,
the ignition is automatically switched off for the
following reasons:▷Opening or closing the driver's door.▷Unfastening of the driver's safety belt.▷When automatically switching from low
beams to parking lights.
If the engine is switched off and the ignition is
switched on, the system automatically
switches to the radio-ready state if the lights
are turned off or, if correspondingly equipped,
the daytime running lights are activated.
Starting the engine
Information DANGER
If the exhaust pipe is blocked or ventila‐
tion is insufficient, harmful exhaust gases can
enter into the vehicle. The exhaust gases con‐
tain carbon monoxide, an odorless and color‐
less but highly toxic gas. In enclosed areas, ex‐
haust gases can also accumulate outside of
the vehicle. There is danger to life. Keep the
exhaust pipe free and ensure sufficient ventila‐
tion.◀
WARNING
An unsecured vehicle can put itself into
motion and roll away. There is risk of an acci‐
dent. Before exiting, secure the vehicle against
rolling.
In order to ensure that the vehicle is secured
against rolling away, observe the following:
▷Set the parking brake.▷On uphill grades or on a slope, turn the
front wheels in the direction of the curb.▷On uphill grades or on a slope, also secure
the vehicle, e.g. with a wheel chock.◀CAUTION
In the case of repeated starting attempts
or repeated starting in quick succession, the
fuel is not burned or is inadequately burned.
The catalytic converter can overheat. There is
risk of property damage. Avoid repeated start‐
ing in quick succession.◀
M Steptronic Sport transmission
Starting the engine1.Depress the brake pedal.2.Press the Start/Stop button.
The ignition is activated automatically for a
certain time and is stopped as soon as the en‐
gine starts.
Engine stop
Information WARNING
Unattended children or animals can
move the vehicle and endanger themselves
and traffic, e.g. with the following actions:
▷Pressing the Start/Stop button.▷Releasing the parking brake.▷Opening and closing of doors or windows.▷Shifting the selector lever into neutral.▷Using vehicle equipment.
There is risk of accidents or injuries. Do not
leave children or animals unattended in the ve‐
hicle. Carry remote control along when exiting
and lock the vehicle.◀
WARNING
An unsecured vehicle can put itself into
motion and roll away. There is risk of an acci‐
dent. Before exiting, secure the vehicle against
rolling.
In order to ensure that the vehicle is secured
against rolling away, observe the following:
Seite 70ControlsDriving70
Online Edition for Part no. 01 40 2 964 090 - VI/15
Page 168 of 255

The highest cooling power is active when
two LEDs are lit.
If the cooler was switched on the last time the
ignition was switched on, it will likewise be
switched on the next time the ignition is
switched on.
Switch off
Press button repeatedly until the LEDs go out.
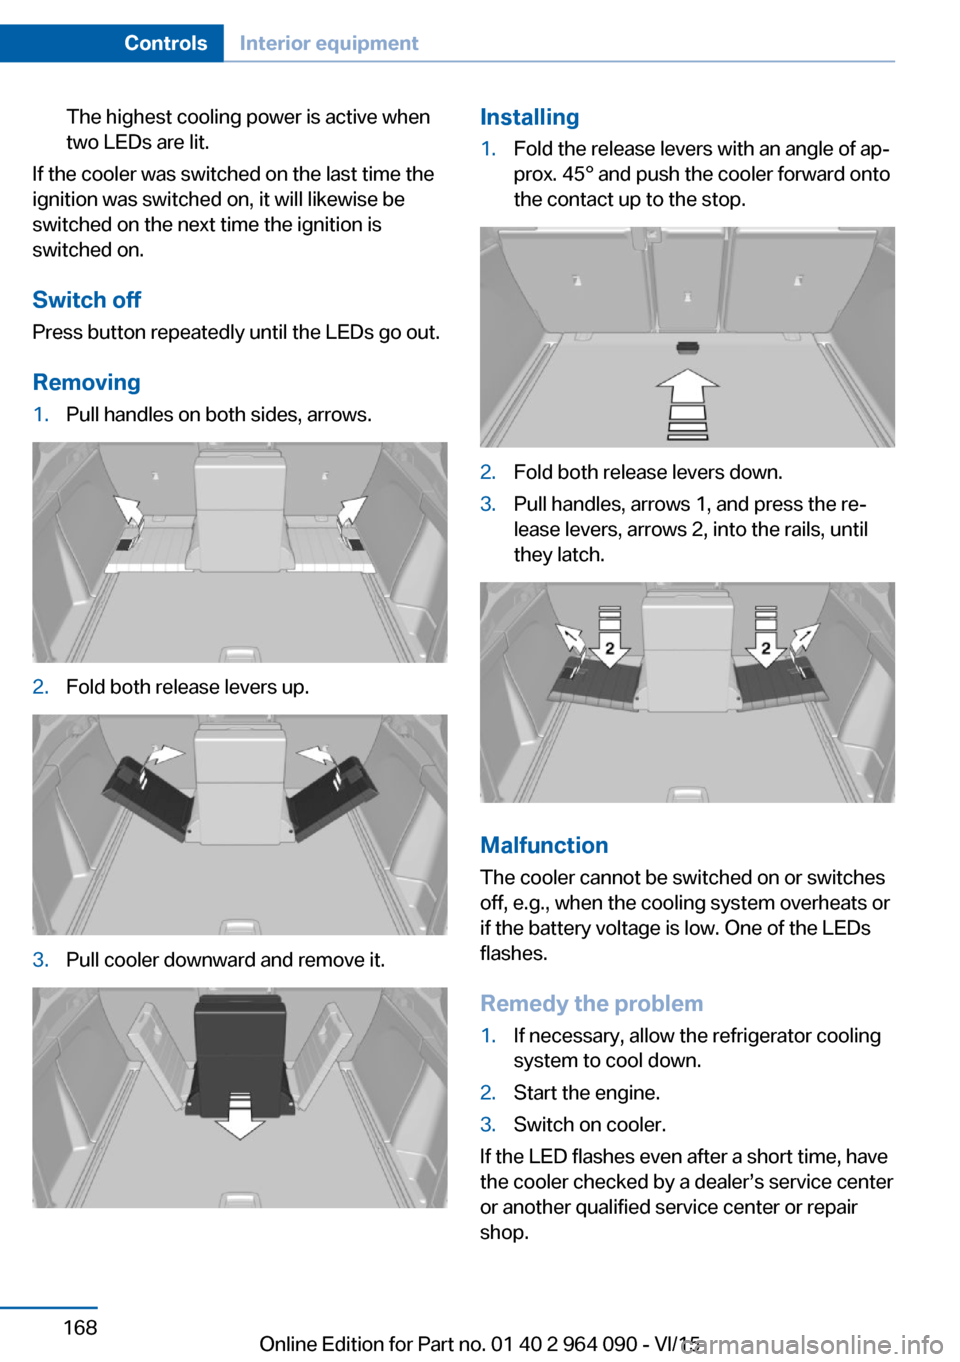
Removing
1.Pull handles on both sides, arrows.2.Fold both release levers up.3.Pull cooler downward and remove it.Installing1.Fold the release levers with an angle of ap‐
prox. 45° and push the cooler forward onto
the contact up to the stop.2.Fold both release levers down.3.Pull handles, arrows 1, and press the re‐
lease levers, arrows 2, into the rails, until
they latch.
Malfunction
The cooler cannot be switched on or switches
off, e.g., when the cooling system overheats or
if the battery voltage is low. One of the LEDs
flashes.
Remedy the problem
1.If necessary, allow the refrigerator cooling
system to cool down.2.Start the engine.3.Switch on cooler.
If the LED flashes even after a short time, have
the cooler checked by a dealer’s service center
or another qualified service center or repair
shop.
Seite 168ControlsInterior equipment168
Online Edition for Part no. 01 40 2 964 090 - VI/15
Page 186 of 255

are securely fastened again after they were re‐
moved, e.g. for cleaning.◀
Driving in wet conditions
When roads are wet, salted, or in heavy rain,
press brake pedal ever so gently every few
miles.
Ensure that this action does not endanger
other traffic.
The heat generated in this process helps dry
the brake discs and pads.
In this way braking efficiency will be available
when you need it.
Hills WARNING
Light but consistent brake pressure can
lead to high temperatures, brakes wearing out
and possibly even brake failure. There is risk of
an accident. Avoid placing excessive stress on
the brake system.◀
WARNING
In idle or with the engine switched off,
safety-relevant functions are restricted or not
available anymore, e.g. braking effect of the
engine or braking force and steering support.
There is risk of an accident. Do not drive in idle
or with the engine switched off.◀
Drive long or steep downhill gradients in the
gear that requires least braking efforts. Other‐
wise the brakes may overheat and reduce
brake efficiency.
You can increase the engine's braking effect
by shifting down in sequential mode, refer to
page 81.
Brake disc corrosion Corrosion on the brake discs and contamina‐
tion on the brake pads are furthered by the fol‐
lowing circumstances:▷Low mileage.▷Extended periods when the vehicle is not
used at all.▷Infrequent use of the brakes.
Corrosion will built up when the maximum
pressure applied to the brake pads during
braking is not reached - thus discs don't get
cleaned.
Corrosion buildup on the brake discs will cause
a pulsating effect on the brakes in their re‐
sponse - generally that cannot be corrected.
Condensation under the parked
vehicle
When using the automatic climate control,
condensation water develops collecting under‐
neath the vehicle.
These traces of water under the vehicle are
normal.
Ground clearance CAUTION
If ground clearance is insufficient, there
might be contact with the front or rear spoiler
e.g. when driving over curbs or entering into
underground car parking garages. There is risk
of property damage. Ensure that there is suffi‐
cient ground clearance available.◀
Driving on poor roads The vehicle combines all-wheel drive with the
advantages of a normal automobile.
CAUTION
Objects in unpaved areas, e.g. stones or
branches, can damage the vehicle. There is
risk of property damage. Do not drive on un‐
paved terrain.◀
For your own safety, for the safety of passen‐
gers and of the vehicle, heed the following
points:
▷Become familiar with the vehicle before
starting a trip; do not take risks in driving.Seite 186Driving tipsThings to remember when driving186
Online Edition for Part no. 01 40 2 964 090 - VI/15
Page 208 of 255

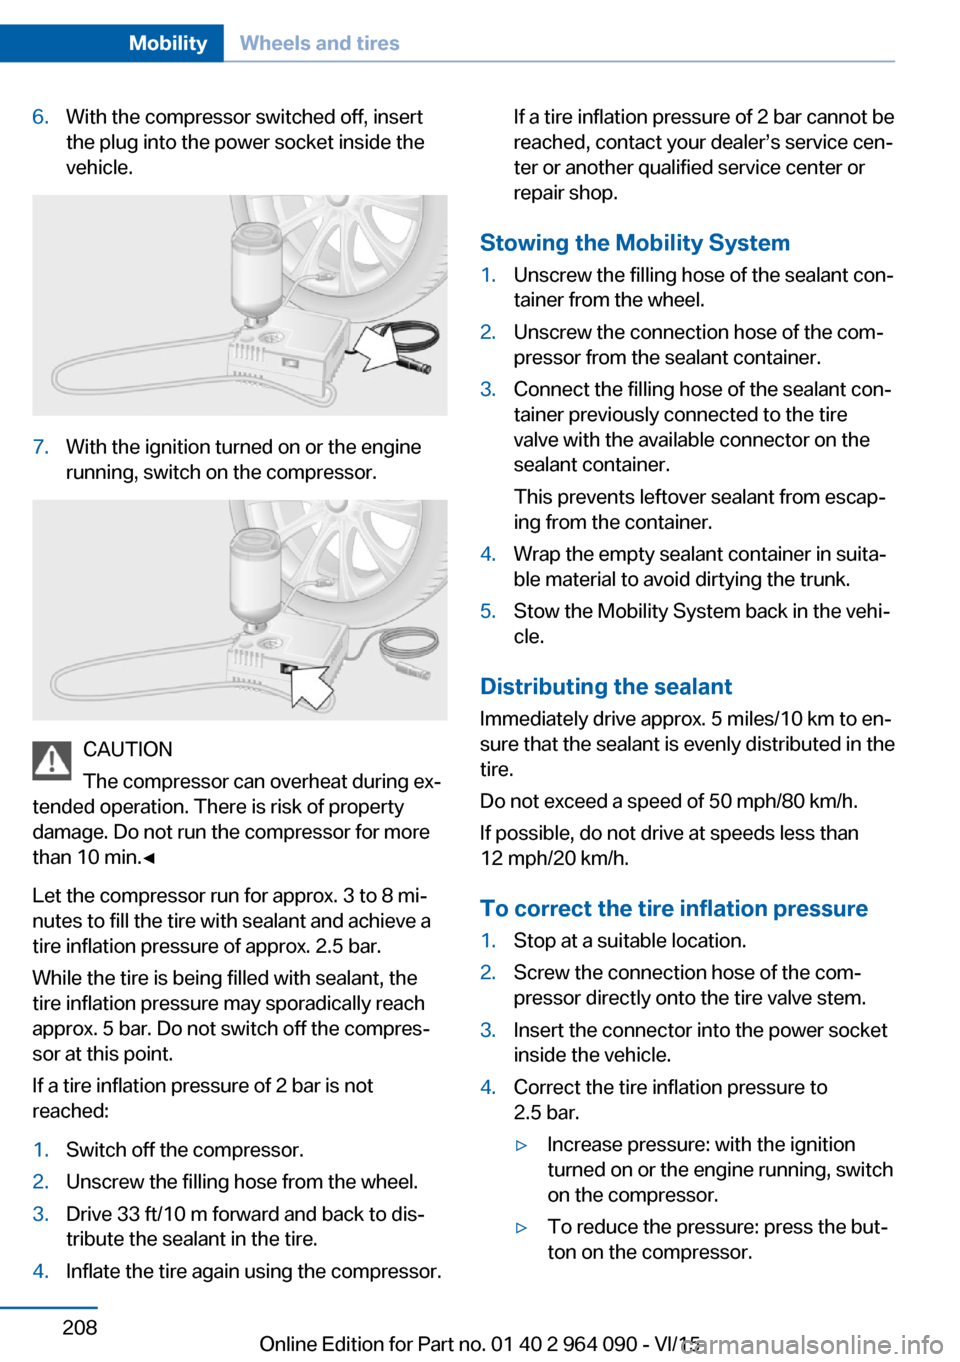
6.With the compressor switched off, insert
the plug into the power socket inside the
vehicle.7.With the ignition turned on or the engine
running, switch on the compressor.
CAUTION
The compressor can overheat during ex‐
tended operation. There is risk of property
damage. Do not run the compressor for more
than 10 min.◀
Let the compressor run for approx. 3 to 8 mi‐
nutes to fill the tire with sealant and achieve a
tire inflation pressure of approx. 2.5 bar.
While the tire is being filled with sealant, the
tire inflation pressure may sporadically reach
approx. 5 bar. Do not switch off the compres‐
sor at this point.
If a tire inflation pressure of 2 bar is not
reached:
1.Switch off the compressor.2.Unscrew the filling hose from the wheel.3.Drive 33 ft/10 m forward and back to dis‐
tribute the sealant in the tire.4.Inflate the tire again using the compressor.If a tire inflation pressure of 2 bar cannot be
reached, contact your dealer’s service cen‐
ter or another qualified service center or
repair shop.
Stowing the Mobility System
1.Unscrew the filling hose of the sealant con‐
tainer from the wheel.2.Unscrew the connection hose of the com‐
pressor from the sealant container.3.Connect the filling hose of the sealant con‐
tainer previously connected to the tire
valve with the available connector on the
sealant container.
This prevents leftover sealant from escap‐
ing from the container.4.Wrap the empty sealant container in suita‐
ble material to avoid dirtying the trunk.5.Stow the Mobility System back in the vehi‐
cle.
Distributing the sealant
Immediately drive approx. 5 miles/10 km to en‐
sure that the sealant is evenly distributed in the
tire.
Do not exceed a speed of 50 mph/80 km/h.
If possible, do not drive at speeds less than
12 mph/20 km/h.
To correct the tire inflation pressure
1.Stop at a suitable location.2.Screw the connection hose of the com‐
pressor directly onto the tire valve stem.3.Insert the connector into the power socket
inside the vehicle.4.Correct the tire inflation pressure to
2.5 bar.▷Increase pressure: with the ignition
turned on or the engine running, switch
on the compressor.▷To reduce the pressure: press the but‐
ton on the compressor.Seite 208MobilityWheels and tires208
Online Edition for Part no. 01 40 2 964 090 - VI/15
Page 250 of 255

Operating concept, iDrive 18
Optional equipment, standard equipment 7
Outside air, refer to Auto‐ matic recirculated-air con‐
trol 157
Overheating of engine, see Coolant temperature 91
Own Safety 7
P Paint, vehicle 234
Panoramic glass sunroof 50
Parallel parking assistant 151
Park Distance Control PDC 142
Parked-car ventilation 160
Parked vehicle, condensa‐ tion 186
Parking aid, see PDC 142
Parking assistant 151
Parking brake 73
Parking lights 104
Parking with Automatic Hold 74
Parts and accessories 7
Passenger side mirror, tilting downward 61
Pathway lines, rearview cam‐ era 146
PDC Park Distance Con‐ trol 142
Pedestrian detection, see Night Vision 122
Pedestrian warning with city braking function 120
Personal Profile 35
Personal Profile, exporting profiles 36
Pinch protection system, glass sunroof 51
Pinch protection system, win‐ dows 49
Plastic, care 235
Power failure 226 Power sunroof, glass 50
Power windows 48
Prescribed engine oil types 215
Pressure, tire air pres‐ sure 200
Pressure warning FTM, tires 115
Preventing Auto Start Stop 72
Profile, see Personal Pro‐ file 35
Programmable memory but‐ tons, iDrive 24
Protective function, glass sunroof 51
Protective function, win‐ dows 49
Push-and-turn switch, see Controller 19
R Radiator fluid 216
Radio-operated key, see Re‐ mote control 34
Radio ready state 69
Radio, see user's manual for Navigation, Entertainment
and Communication
Rain sensor 78
Rear automatic climate con‐ trol 159
Rear center armrest 175
Rear cooler 167
Rear drink holder 176
Rear lights 223
Rear seats 56
Rearview camera 145
Rearview mirror 61
Rear window defroster 158
Recirculated-air mode 157
Recommended fuel grade 198
Recommended tire brands 205 Refueling 196
Remaining range 92
Remote control/key 34
Remote control, malfunc‐ tion 39
Remote control, univer‐ sal 162
Replacement fuse 226
Replacing parts 220
Replacing wheels/tires 204
Reporting safety malfunc‐ tions 10
RES button, see Cruise con‐ trol 140
Reserve warning, see Range 92
Reset, Tire Pressure Monitor TPM 113
Residual heat, automatic cli‐ mate control 157
Retaining straps, securing cargo 189
Retreaded tires 205
Roadside parking lights 105
Roller sunblinds 50
RON recommended fuel grade 198
Roofliner 17
Roof load capacity 241
Roof-mounted luggage rack 190
Rope for tow-starting/ towing 231
Rubber components, care 235
S Safe braking 185
Safety belt reminder for driv‐ er's seat and front passen‐
ger seat 57
Safety belts 56
Safety belts, care 236
Safety Package, see Active Protection 130 Seite 250ReferenceEverything from A to Z250
Online Edition for Part no. 01 40 2 964 090 - VI/15