Page 129 of 220
Manual air distributionTurn the wheel to select the de‐
sired program or the desired in‐
termediate setting.▷ Windows.▷ Upper body region.▷ Windows, upper body region, and floor
area.▷ Floor area.
Defrosts windows and removes
condensation
Direct the air distribution toward windows, in‐
crease the air flow and temperature, and, if
needed, use the cooling function.
Rear window defroster
Press button.
The rear window defroster switches
off automatically after a certain period of time.
Microfilter In external and recirculated air mode the mi‐
crofilter filters dust and pollen from the air.
This filter should be replaced during scheduled
maintenance, refer to page 184, of your vehi‐
cle.
Automatic climate control with enhanced features
1Seat heating, left 522Temperature, left3AUTO program4Display5Maximum cooling6Temperature, rightSeite 129Climate controlControls129
Online Edition for Part no. 01 40 2 970 518 - II/16
Page 130 of 220

7Seat heating, right 528Cooling function9Automatic recirculated-air control/recircu‐
lated-air mode10Air distribution, right11Air flow, AUTO intensity12Air distribution, left13Rear window defroster14Interior temperature sensor — always keep
clear15Defrosts windows and removes condensa‐
tionClimate control functions in detail
Switching the system on/off
Switching on
Press any button except▷Rear window defroster.▷Seat heating.
Switching off
Press the left button for the minimum
speed.
Temperature Turn the ring to set the desired
temperature.
The automatic climate control reaches this
temperature as quickly as possible, if needed
by increasing the cooling or heating output,
and then keeps it constant.
Do not rapidly switch between different tem‐
perature settings. Otherwise, the automatic cli‐
mate control will not have sufficient time to ad‐
just the set temperature.
Cooling function The air in the car's interior will be cooled and
dehumidified and, depending on the tempera‐
ture setting, warmed again.
The car's interior can only be cooled with the
engine running.
Press button.
Air conditioning is switched on or off.
Depending on the weather, the windshield and
side windows may fog up briefly when the en‐
gine is started.
The cooling function is switched on automati‐
cally with the AUTO program.
When using the automatic climate control,
condensation water, refer to page 154, devel‐
ops that exits underneath the vehicle.
Maximum cooling Press button.
The system is set to the lowest tem‐
perature, optimum air flow and recirculated-air
mode.
Air flows out of the vents to the upper body re‐
gion. The vents need to be open for this.
The function is available above an external
temperature of approx. 32 ℉/0 ℃ And with the engine running.
Adjust air flow with the program active.
AUTO program Press button.
Air flow, air distribution and tempera‐
ture are controlled automatically.
Depending on the selected temperature,
AUTO intensity program and outside influen‐
ces, the air is directed to the windshield, side
windows, upper body, and into the floor area.Seite 130ControlsClimate control130
Online Edition for Part no. 01 40 2 970 518 - II/16
Page 131 of 220

The cooling function, refer to page 130, is
switched on automatically with the AUTO pro‐
gram.
At the same time, a condensation sensor con‐
trols the program so as to prevent window
condensation as much as possible.
Intensity of the AUTO program
With the AUTO program activated, the auto‐
matic intensity control can be changed.
Press the left or right side of the but‐
ton: decrease or increase intensity.
The selected intensity is shown on the display
of the automatic climate control.
Automatic recirculated-air control/
recirculated-air mode
You may respond to unpleasant odors or pollu‐
tants in the immediate environment by tempo‐
rarily suspending the supply of outside air. The
system then recirculates the air currently
within the vehicle.
Press button repeatedly to select an
operating mode:▷LEDs off: outside air flows in continuously.▷Left LED on, automatic recirculated-air
control: a sensor detects pollutants in the
outside air and shuts off automatically.▷Right LED on, recirculated-air mode: the
supply of outside air into the vehicle is per‐
manently blocked.
Recirculated-air mode switches off automati‐
cally at low external temperatures after a cer‐
tain amount of time in order to avoid window
fogging.
With constant recirculated-air mode, the air
quality in the car's interior deteriorates and the
fogging of the windows increases.
If the windows are fogged over, switch off the
recirculated-air mode and press the AUTO
button to utilize the condensation sensor.
Make sure that air can flow to the windshield.
Air flow, manual
To manually adjust air flow turn off AUTO pro‐
gram first.
Press the left or right side of the but‐
ton: decrease or increase air flow.
The selected air flow is shown on the display of
the automatic climate control.
The air flow of the automatic climate control
may be reduced automatically to save battery
power.
Manual air distribution Press button repeatedly to select a
program:▷Upper body region.▷Upper body region and floor area.▷Floor area.▷Windows and floor area: driver's side only.▷Windows, upper body region and floor
area: driver's side only.
If the windows are fogged over, press the
AUTO button to utilize the condensation sen‐
sor.
Defrosts windows and removes
condensation
Press button.
Ice and condensation are quickly re‐
moved from the windshield and the front side
windows.
For this purpose, point the side vents onto the
side windows as needed.
Adjust air flow with the program active.
If the windows are fogged over, you can also
switch on the cooling function or press the
AUTO button to utilize the condensation sen‐
sor.
Seite 131Climate controlControls131
Online Edition for Part no. 01 40 2 970 518 - II/16
Page 132 of 220

Rear window defrosterPress button.
The rear window defroster switches
off automatically after a certain period of time.
Microfilter/activated-charcoal filter In external and recirculated air mode the mi‐crofilter/activated charcoal filter filters dust,
pollen, and gaseous pollutants out of the air.
This filter should be replaced during vehicle
maintenance, refer to page 184.
Ventilation Front ventilation▷Lever for changing the air flow direction,
arrow 1.▷Thumbwheels for opening and closing the
vents continuously, arrows 2.▷Thumbwheel to vary the ventilation tem‐
perature in the upper body region, arrow 3.
Toward blue: colder.
Toward red: warmer.
This does not change the set interior tem‐
perature for the driver and front passenger.
Adjusting the ventilation
▷Ventilation for cooling:
Direct vent in your direction when vehicle's
interior is too hot.▷Draft-free ventilation:Adjust the vent to let the air flow past you.
Ventilation in the rear
▷Thumbwheel for continuous opening and
closing of the vents, arrow 1.▷Thumbwheel to vary the ventilation tem‐
perature, arrow 2.
Toward blue: colder.
Toward red: warmer.
This does not change the adjusted interior
temperature.▷Lever for changing the air flow direction,
arrow 3.
Parked-car ventilation
The concept The parked-car ventilation ventilates the vehi‐
cle interior and lowers its temperature, if
needed.
The system can be switched on and off at any
external temperature, either directly or by us‐
ing two preset activation times. It remains
switched on for 30 minutes.
Open the vents to allow air to flow out.
Switching on/off directly
On the Control Display:
1."Settings"2."Climate"3."Activate comf. ventilation"Seite 132ControlsClimate control132
Online Edition for Part no. 01 40 2 970 518 - II/16
Page 133 of 220
The symbol on the automatic climate con‐
trol flashes if the system is switched on.
Preselecting the activation time
On the Control Display:1."Settings"2."Climate"3."Timer 1:" or "Timer 2:"4.Set the desired time.
Activating the activation time On the Control Display:
1."Settings"2."Climate"3."Activate timer 1" or "Activate timer 2"
The symbol on the automatic climate con‐
trol lights up when the switch-on time is acti‐
vated.
The symbol on the automatic climate con‐
trol flashes when the system has been
switched on.
The system will only be switched on within the
next 24 hours. After that, it needs to be reacti‐
vated.
Seite 133Climate controlControls133
Online Edition for Part no. 01 40 2 970 518 - II/16
Page 134 of 220

Interior equipmentVehicle features and optionsThis chapter describes all standard, country-
specific and optional features offered with the
series. It also describes features that are not
necessarily available in your car, e. g., due to
the selected options or country versions. This
also applies to safety-related functions and
systems. The respectively applicable country
provisions must be observed when using the
respective features and systems.
Universal Integrated Remote Control
The concept The Universal Integrated Remote Control can
operate up to 3 functions of remote-controlled
systems such as garage door drives or lighting
systems. The Universal Integrated Remote
Control replaces up to 3 different hand-held
transmitters. To operate the remote control,
the buttons on the interior mirror must be pro‐
grammed with the desired functions. The
hand-held transmitter for the particular system
is required in order to program the remote con‐
trol.
Before selling the vehicle, delete the stored
functions for the sake of security.
Information WARNING
Body parts can be jammed when operat‐
ing remote-controlled systems, e.g., the ga‐
rage door, using the integrated universal re‐
mote control. There is a risk of injury or risk of
property damage. Make sure that the area of
movement of the respective system is clear
during programming and operation. Also followthe safety instructions of the hand-held trans‐
mitter.◀
Compatibility If this symbol is printed on the packag‐
ing or in the owner's manual of the sys‐
tem to be controlled, the system is
generally compatible with the Universal Inte‐
grated Remote Control.
If you have any questions, please contact:▷A dealer’s service center or another quali‐
fied service center or repair shop.▷www.homelink.com on the Internet.
HomeLink is a registered trademark of Gentex
Corporation.
Control elements on the interior mirror
▷LED, arrow 1.▷Buttons, arrow 2.▷The hand-held transmitter, arrow 3, is re‐
quired for programming.
Programming
General information
1.Switch on the ignition.2.Initial setup:
Press and hold the left and right button on
the interior mirror simultaneously for ap‐Seite 134ControlsInterior equipment134
Online Edition for Part no. 01 40 2 970 518 - II/16
Page 135 of 220

proximately 20 seconds until the LED on
the interior mirror flashes. This erases all
programming of the buttons on the interior
mirror.3.Hold the hand-held transmitter for the sys‐
tem to be controlled approx. 1 to 3 in‐
ches/2.5 to 8 cm away from the buttons of
the interior mirror. The required distance
depends on the manual transmitter.4.Simultaneously press and hold the button
of the desired function on the hand-held
transmitter and the button to be program‐
med on the interior mirror. The LED on the
interior mirror will begin flashing slowly.5.Release both buttons as soon as the LED
flashes more rapidly. The LED flashing
faster indicates that the button on the inte‐
rior mirror has been programmed.
If the LED does not flash faster after at
least 60 seconds, change the distance be‐
tween the interior mirror and the hand-held
transmitter and repeat the step. Several
more attempts at different distances may
be necessary. Wait at least 15 seconds be‐
tween attempts.
Canada: if programming with the hand-
held transmitter was interrupted, hold
down the interior mirror button and repeat‐
edly press and release the hand-held
transmitter button for 2 seconds.6.To program other functions on other but‐
tons, repeat steps 3 to 5.
The systems can be controlled using the inte‐
rior mirror buttons.
Special feature of the alternating-code wireless system
If you are unable to operate the system after
repeated programming, please check if the
system to be controlled features an alternat‐
ing-code radio system.
Read the system's owner's manual, or press
the programmed button on the interior mirror
longer. If the LED on the interior mirror starts
flashing rapidly and then stays lit constantly for
2 seconds, the system features an alternating-
code radio system. Flashing and continuous il‐
lumination of the LED will repeat for approxi‐
mately 20 seconds.
For systems with an alternating-code radio
system, the universal remote control and the
system also have to be synchronized.
Please read the owner's manual to find out
how to synchronize the system.
Synchronizing is easier with the aid of a sec‐
ond person.
Synchronizing the universal remote control
with the system:1.Park the vehicle within range of the re‐
mote-controlled system.2.Program the relevant button on the interior
mirror as described.3.Locate and press the synchronizing button
on the system being programmed. You
have approx. 30 seconds for the next step.4.Hold down the programmed button on the
interior mirror for approximately 3 seconds
and then release it. If necessary, repeat this
step up to three times in order to finish
synchronization. Once synchronization is
complete, the programmed function will be
carried out.
Reprogramming individual buttons
1.Switch on the ignition.2.Press and hold the interior mirror button to
be programmed.3.As soon as the interior mirror LED starts
flashing slowly, hold the hand-held trans‐
mitter for the system to be controlled ap‐
prox. 1 to 3 inches/2.5 to 8 cm away from
the buttons of the interior mirror. The re‐
quired distance depends on the manual
transmitter.Seite 135Interior equipmentControls135
Online Edition for Part no. 01 40 2 970 518 - II/16
Page 136 of 220

4.Likewise, press and hold the button of the
desired function on the hand-held trans‐
mitter.5.Release both buttons as soon as the inte‐
rior mirror LED flashes more rapidly. The
LED flashing faster indicates that the but‐
ton on the interior mirror has been pro‐
grammed. The system can then be con‐
trolled by the button on the interior mirror.
If the LED does not flash faster after at
least 60 seconds, change the distance and
repeat the step. Several more attempts at
different distances may be necessary. Wait
at least 15 seconds between attempts.
Canada: if programming with the hand-
held transmitter was interrupted, hold
down the interior mirror button and repeat‐
edly press and release the hand-held
transmitter button for 2 seconds.
Controls
WARNING
Body parts can be jammed when operat‐
ing remote-controlled systems, e.g., the ga‐
rage door, using the integrated universal re‐
mote control. There is a risk of injury or risk of
property damage. Make sure that the area of
movement of the respective system is clear
during programming and operation. Also follow
the safety instructions of the hand-held trans‐
mitter.◀
The system, such as the garage door, can be
operated using the button on the interior mirror
while the engine is running or when the ignition is started. To do this, hold down the button
within receiving range of the system until the
function is activated. The interior mirror LED
stays lit while the wireless signal is being
transmitted.
Deleting stored functions Press and hold the left and right button on the
interior mirror simultaneously for approxi‐
mately 20 seconds until the LED flashes rap‐
idly. All stored functions will be deleted. The
functions cannot be deleted individually.
Digital compass
Overview1Control button2Mirror display
Mirror display
The point of the compass is displayed in the
mirror when driving straight.
Operating concept
Various functions can be called up by pressing
the control button with a pointed object, such
as the tip of a ballpoint pen or similar object.
The following setting options are displayed in
succession, depending on how long the con‐
trol button is pressed:
▷Pressed briefly: turns display on/off.▷3 to 6 seconds: compass zone setting.▷6 to 9 seconds: compass calibration.▷9 to 12 seconds: left/right-hand steering
setting.▷12 to 15 seconds: language setting.
Setting the compass zones
Sets the particular compass zones on the vehi‐
cle so that the compass operates correctly; re‐
fer to World map with compass zones.
Seite 136ControlsInterior equipment136
Online Edition for Part no. 01 40 2 970 518 - II/16
 1
1 2
2 3
3 4
4 5
5 6
6 7
7 8
8 9
9 10
10 11
11 12
12 13
13 14
14 15
15 16
16 17
17 18
18 19
19 20
20 21
21 22
22 23
23 24
24 25
25 26
26 27
27 28
28 29
29 30
30 31
31 32
32 33
33 34
34 35
35 36
36 37
37 38
38 39
39 40
40 41
41 42
42 43
43 44
44 45
45 46
46 47
47 48
48 49
49 50
50 51
51 52
52 53
53 54
54 55
55 56
56 57
57 58
58 59
59 60
60 61
61 62
62 63
63 64
64 65
65 66
66 67
67 68
68 69
69 70
70 71
71 72
72 73
73 74
74 75
75 76
76 77
77 78
78 79
79 80
80 81
81 82
82 83
83 84
84 85
85 86
86 87
87 88
88 89
89 90
90 91
91 92
92 93
93 94
94 95
95 96
96 97
97 98
98 99
99 100
100 101
101 102
102 103
103 104
104 105
105 106
106 107
107 108
108 109
109 110
110 111
111 112
112 113
113 114
114 115
115 116
116 117
117 118
118 119
119 120
120 121
121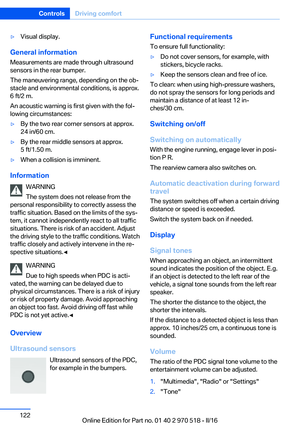 122
122 123
123 124
124 125
125 126
126 127
127 128
128 129
129 130
130 131
131 132
132 133
133 134
134 135
135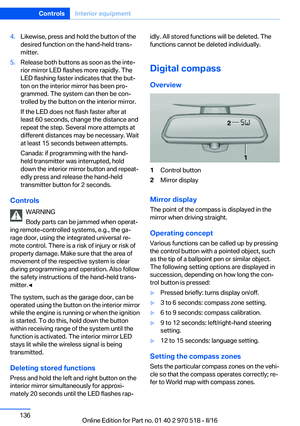 136
136 137
137 138
138 139
139 140
140 141
141 142
142 143
143 144
144 145
145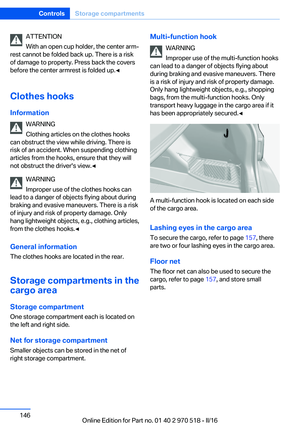 146
146 147
147 148
148 149
149 150
150 151
151 152
152 153
153 154
154 155
155 156
156 157
157 158
158 159
159 160
160 161
161 162
162 163
163 164
164 165
165 166
166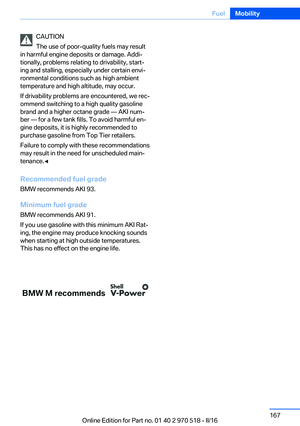 167
167 168
168 169
169 170
170 171
171 172
172 173
173 174
174 175
175 176
176 177
177 178
178 179
179 180
180 181
181 182
182 183
183 184
184 185
185 186
186 187
187 188
188 189
189 190
190 191
191 192
192 193
193 194
194 195
195 196
196 197
197 198
198 199
199 200
200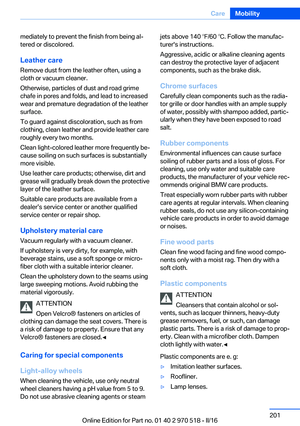 201
201 202
202 203
203 204
204 205
205 206
206 207
207 208
208 209
209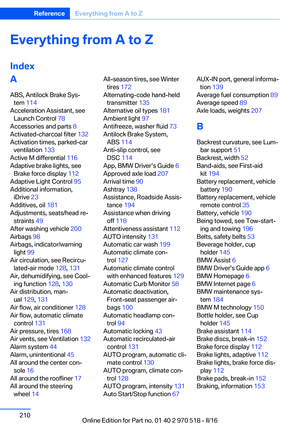 210
210 211
211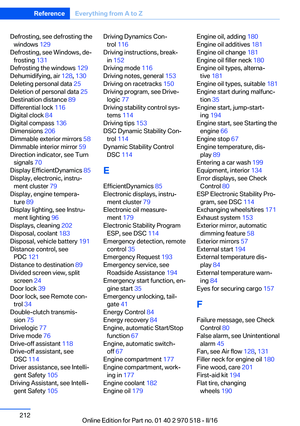 212
212 213
213 214
214 215
215 216
216 217
217 218
218 219
219
