2016 BMW M2 COUPE mirror
[x] Cancel search: mirrorPage 137 of 220
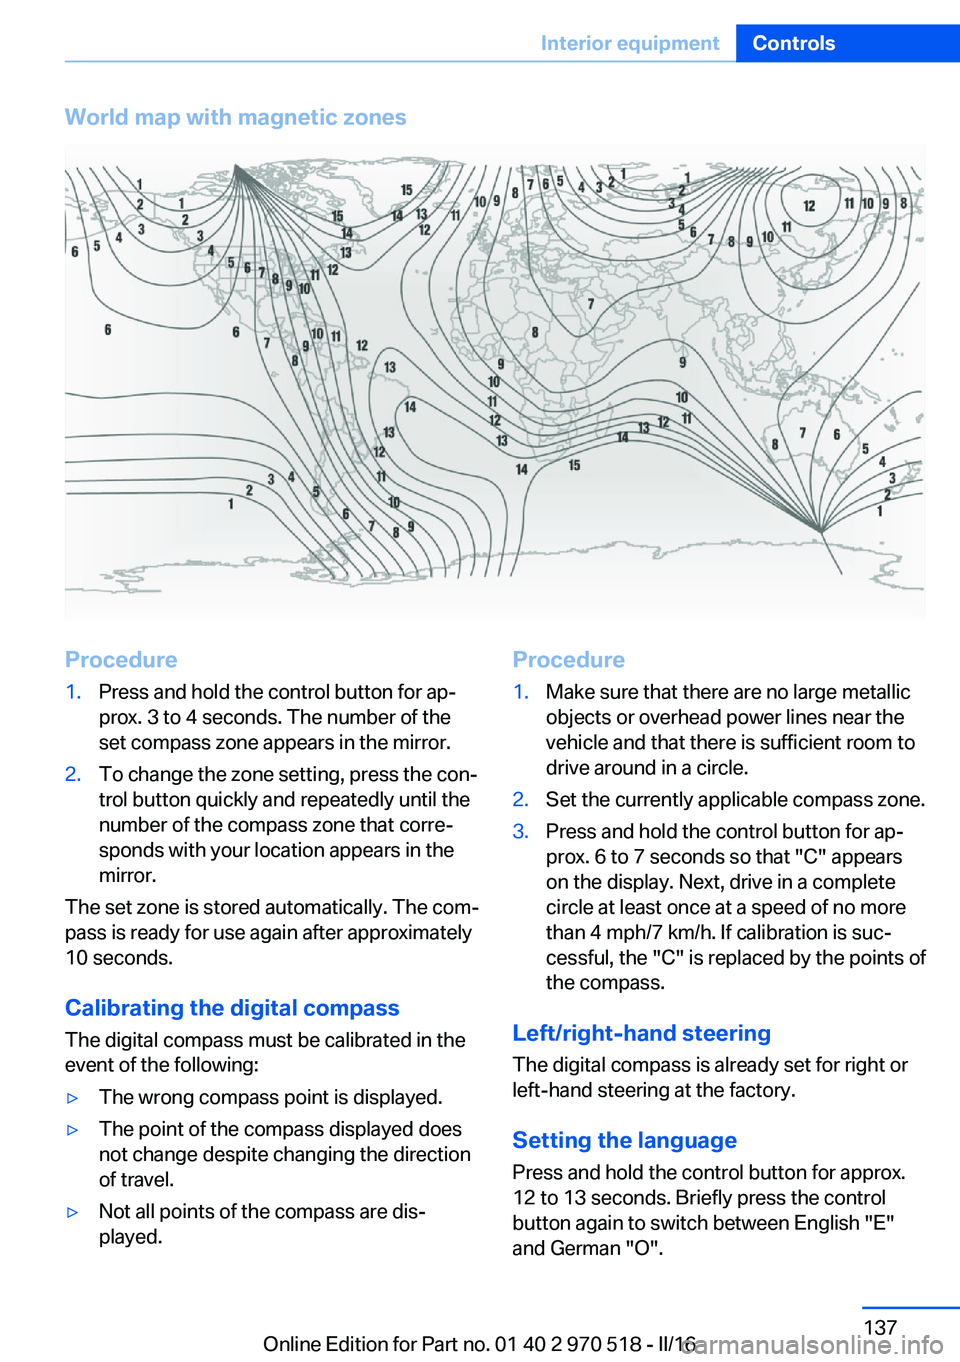
World map with magnetic zonesProcedure1.Press and hold the control button for ap‐
prox. 3 to 4 seconds. The number of the
set compass zone appears in the mirror.2.To change the zone setting, press the con‐
trol button quickly and repeatedly until the
number of the compass zone that corre‐
sponds with your location appears in the
mirror.
The set zone is stored automatically. The com‐
pass is ready for use again after approximately
10 seconds.
Calibrating the digital compass
The digital compass must be calibrated in the
event of the following:
▷The wrong compass point is displayed.▷The point of the compass displayed does
not change despite changing the direction
of travel.▷Not all points of the compass are dis‐
played.Procedure1.Make sure that there are no large metallic
objects or overhead power lines near the
vehicle and that there is sufficient room to
drive around in a circle.2.Set the currently applicable compass zone.3.Press and hold the control button for ap‐
prox. 6 to 7 seconds so that "C" appears
on the display. Next, drive in a complete
circle at least once at a speed of no more
than 4 mph/7 km/h. If calibration is suc‐
cessful, the "C" is replaced by the points of
the compass.
Left/right-hand steering
The digital compass is already set for right or
left-hand steering at the factory.
Setting the language
Press and hold the control button for approx.
12 to 13 seconds. Briefly press the control
button again to switch between English "E"
and German "O".
Seite 137Interior equipmentControls137
Online Edition for Part no. 01 40 2 970 518 - II/16
Page 138 of 220
Settings are stored automatically after approxi‐
mately 10 seconds.
Sun visor
Glare shield Fold the sun visor down or up.
Vanity mirror A vanity mirror is located in the sun visor be‐
hind a cover. When the cover is opened, the
mirror lighting switches on.
Ashtray/cigarette lighterAshtray
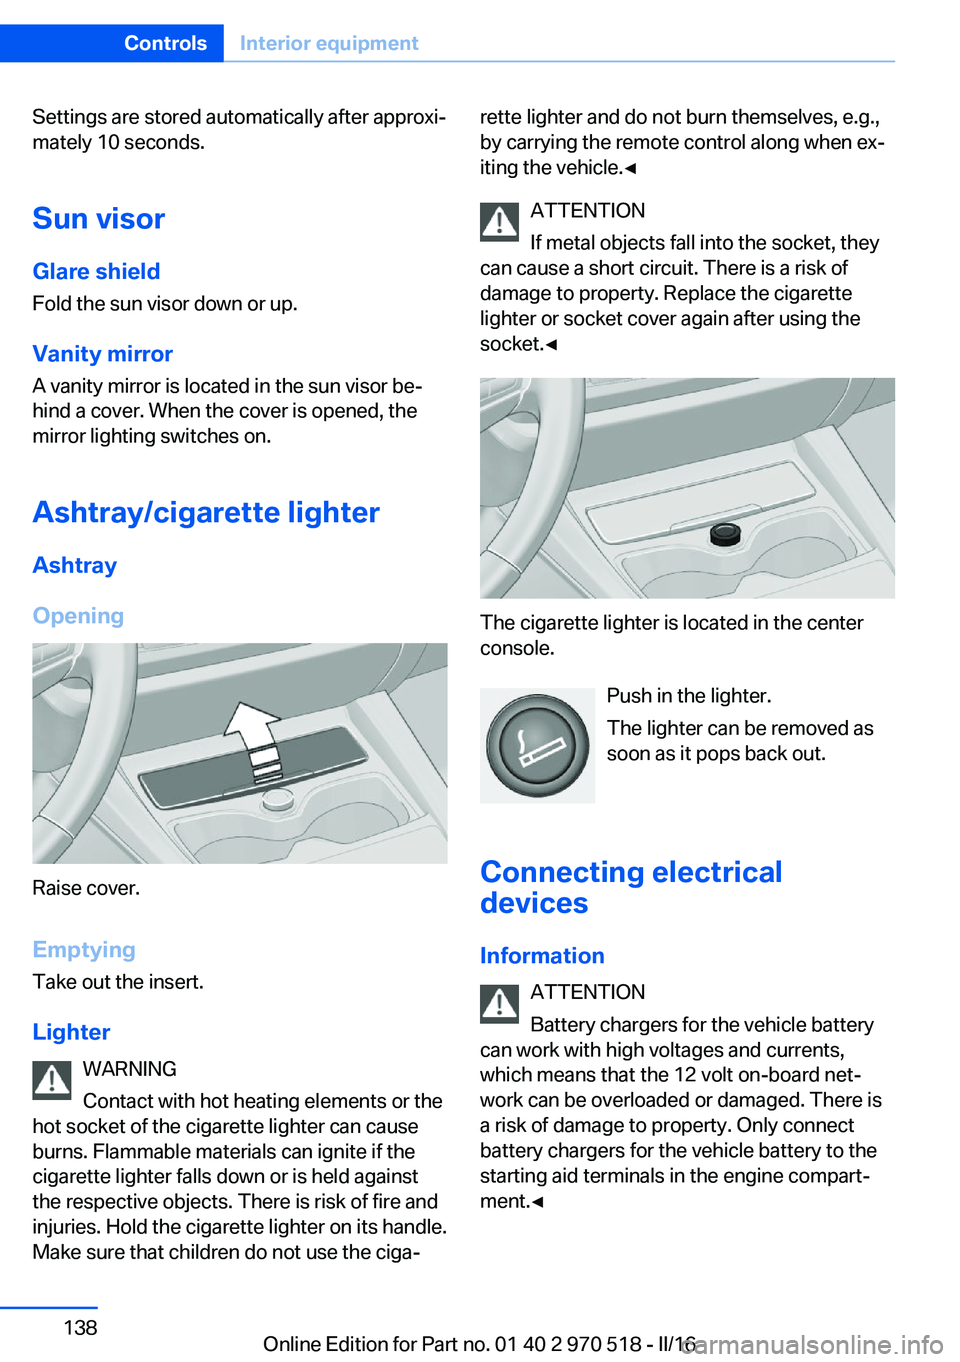
Opening
Raise cover.
EmptyingTake out the insert.
Lighter WARNING
Contact with hot heating elements or the
hot socket of the cigarette lighter can cause
burns. Flammable materials can ignite if the cigarette lighter falls down or is held against
the respective objects. There is risk of fire and
injuries. Hold the cigarette lighter on its handle.
Make sure that children do not use the ciga‐
rette lighter and do not burn themselves, e.g.,
by carrying the remote control along when ex‐
iting the vehicle.◀
ATTENTION
If metal objects fall into the socket, they
can cause a short circuit. There is a risk of
damage to property. Replace the cigarette
lighter or socket cover again after using the
socket.◀
The cigarette lighter is located in the center
console.
Push in the lighter.
The lighter can be removed as
soon as it pops back out.
Connecting electrical devices
Information ATTENTION
Battery chargers for the vehicle battery
can work with high voltages and currents,
which means that the 12 volt on-board net‐
work can be overloaded or damaged. There is
a risk of damage to property. Only connect
battery chargers for the vehicle battery to the
starting aid terminals in the engine compart‐
ment.◀
Seite 138ControlsInterior equipment138
Online Edition for Part no. 01 40 2 970 518 - II/16
Page 188 of 220
For checking and adjusting headlamp aim,
contact a dealer’s service center or another
qualified service center or repair shop.
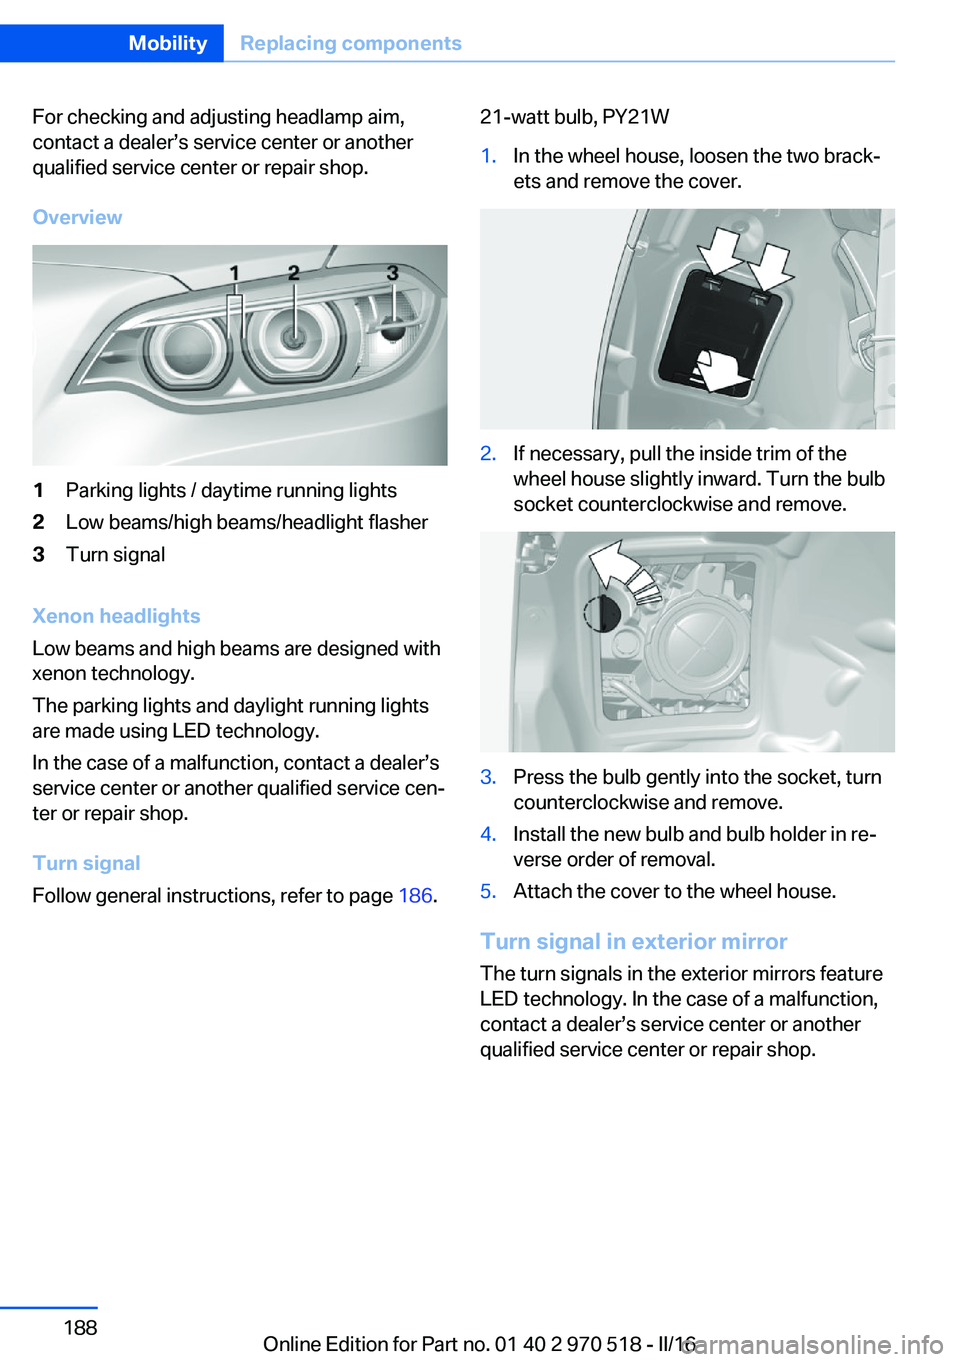
Overview1Parking lights / daytime running lights2Low beams/high beams/headlight flasher3Turn signal
Xenon headlights
Low beams and high beams are designed with
xenon technology.
The parking lights and daylight running lights
are made using LED technology.
In the case of a malfunction, contact a dealer’s
service center or another qualified service cen‐
ter or repair shop.
Turn signal
Follow general instructions, refer to page 186.
21-watt bulb, PY21W1.In the wheel house, loosen the two brack‐
ets and remove the cover.2.If necessary, pull the inside trim of the
wheel house slightly inward. Turn the bulb
socket counterclockwise and remove.3.Press the bulb gently into the socket, turn
counterclockwise and remove.4.Install the new bulb and bulb holder in re‐
verse order of removal.5.Attach the cover to the wheel house.
Turn signal in exterior mirror
The turn signals in the exterior mirrors feature
LED technology. In the case of a malfunction,
contact a dealer’s service center or another
qualified service center or repair shop.
Seite 188MobilityReplacing components188
Online Edition for Part no. 01 40 2 970 518 - II/16
Page 191 of 220
Check Control messages of these comfort fea‐
tures are no longer displayed.
Charging the battery
General information
Make sure that the battery is always suffi‐
ciently charged to guarantee that the battery
remains usable for its full service life.
The battery may need to be charged in the fol‐
lowing cases:▷When making frequent short-distance
drives.▷If the vehicle is not used for more than a
month.
Information
ATTENTION
Battery chargers for the vehicle battery
can work with high voltages and currents,
which means that the 12 volt on-board net‐
work can be overloaded or damaged. There is
a risk of damage to property. Only connect
battery chargers for the vehicle battery to the
starting aid terminals in the engine compart‐
ment.◀
Starting aid terminals In the vehicle, only charge the battery via the
starting aid terminals, refer to page 195, in the
engine compartment with the engine off.
Power failure After a power loss, some equipment needs to
be newly initialized or individual settings up‐
dated, for example:
▷Seat and mirror memory: store the posi‐
tions again.▷Time: update.▷Date: update.▷Glass sunroof and sliding visor: initialize
the system, refer to page 48.Disposing of old batteries
Have old batteries disposed of by a
dealer’s service center or another
qualified service center or repair shop
or take them to a collection point.
Maintain the battery in an upright position for
transport and storage. Secure the battery so
that it does not tip over during transport.
Fuses Information WARNING
Incorrect and repaired fuses can overload
electrical lines and components. There is risk
of fire. Never attempt to repair a blown fuse.
Do not replace a nonworking fuse with a sub‐
stitute of another color or amperage rating.◀
Plastic tweezers and information on the fuse
types and locations are stored in the fuse box
in the cargo area.
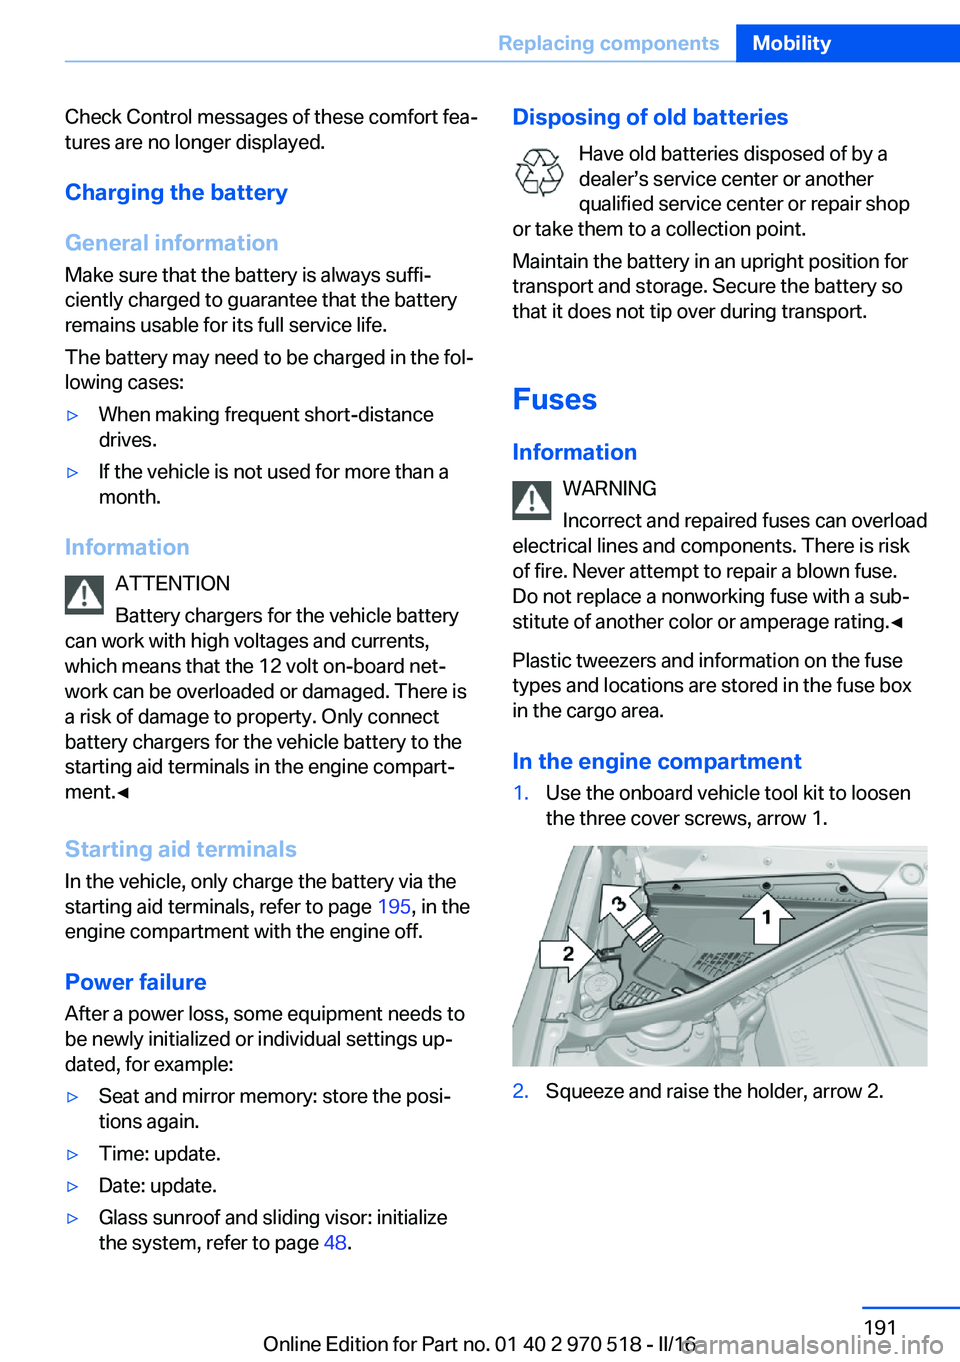
In the engine compartment1.Use the onboard vehicle tool kit to loosen
the three cover screws, arrow 1.2.Squeeze and raise the holder, arrow 2.Seite 191Replacing componentsMobility191
Online Edition for Part no. 01 40 2 970 518 - II/16
Page 199 of 220
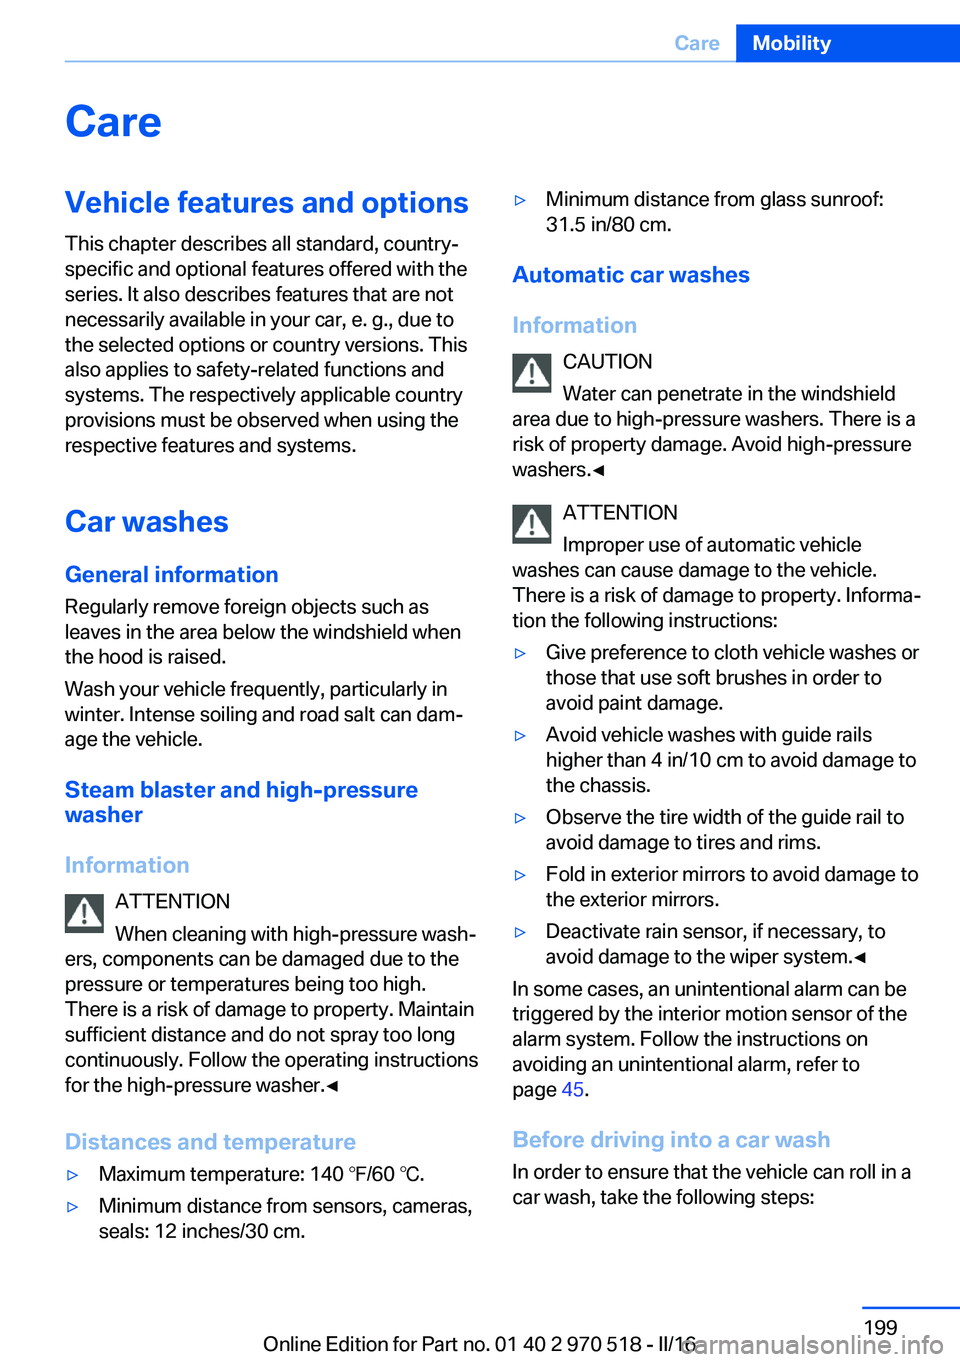
CareVehicle features and optionsThis chapter describes all standard, country-
specific and optional features offered with the
series. It also describes features that are not
necessarily available in your car, e. g., due to
the selected options or country versions. This
also applies to safety-related functions and
systems. The respectively applicable country
provisions must be observed when using the
respective features and systems.
Car washes General information
Regularly remove foreign objects such as
leaves in the area below the windshield when
the hood is raised.
Wash your vehicle frequently, particularly in
winter. Intense soiling and road salt can dam‐
age the vehicle.
Steam blaster and high-pressure
washer
Information ATTENTION
When cleaning with high-pressure wash‐
ers, components can be damaged due to the
pressure or temperatures being too high.
There is a risk of damage to property. Maintain
sufficient distance and do not spray too long
continuously. Follow the operating instructions
for the high-pressure washer.◀
Distances and temperature▷Maximum temperature: 140 ℉/60 ℃.▷Minimum distance from sensors, cameras,
seals: 12 inches/30 cm.▷Minimum distance from glass sunroof:
31.5 in/80 cm.
Automatic car washes
Information CAUTION
Water can penetrate in the windshield
area due to high-pressure washers. There is a
risk of property damage. Avoid high-pressure
washers.◀
ATTENTION
Improper use of automatic vehicle
washes can cause damage to the vehicle.
There is a risk of damage to property. Informa‐
tion the following instructions:
▷Give preference to cloth vehicle washes or
those that use soft brushes in order to
avoid paint damage.▷Avoid vehicle washes with guide rails
higher than 4 in/10 cm to avoid damage to
the chassis.▷Observe the tire width of the guide rail to
avoid damage to tires and rims.▷Fold in exterior mirrors to avoid damage to
the exterior mirrors.▷Deactivate rain sensor, if necessary, to
avoid damage to the wiper system.◀
In some cases, an unintentional alarm can be
triggered by the interior motion sensor of the
alarm system. Follow the instructions on
avoiding an unintentional alarm, refer to
page 45.
Before driving into a car wash In order to ensure that the vehicle can roll in a
car wash, take the following steps:
Seite 199CareMobility199
Online Edition for Part no. 01 40 2 970 518 - II/16
Page 206 of 220
Technical dataVehicle features and options
This chapter describes all standard, country-
specific and optional features offered with the
series. It also describes features that are not
necessarily available in your car, e. g., due tothe selected options or country versions. This
also applies to safety-related functions and
systems. The respectively applicable country
provisions must be observed when using the
respective features and systems.
Information
The technical data and specifications in this
Owner's Manual are used as guidance values.
The vehicle-specific data can deviate from this,
for example, due to the selected special equip‐
ment, country version or country-specific
measurement method. Detailed values can be
found in the approval documents, on labels onthe vehicle or can be obtained from a dealer’s
service center or another qualified service cen‐
ter or repair shop.
The information in the vehicle documents al‐
ways has priority over the information in this
Owner's Manual.
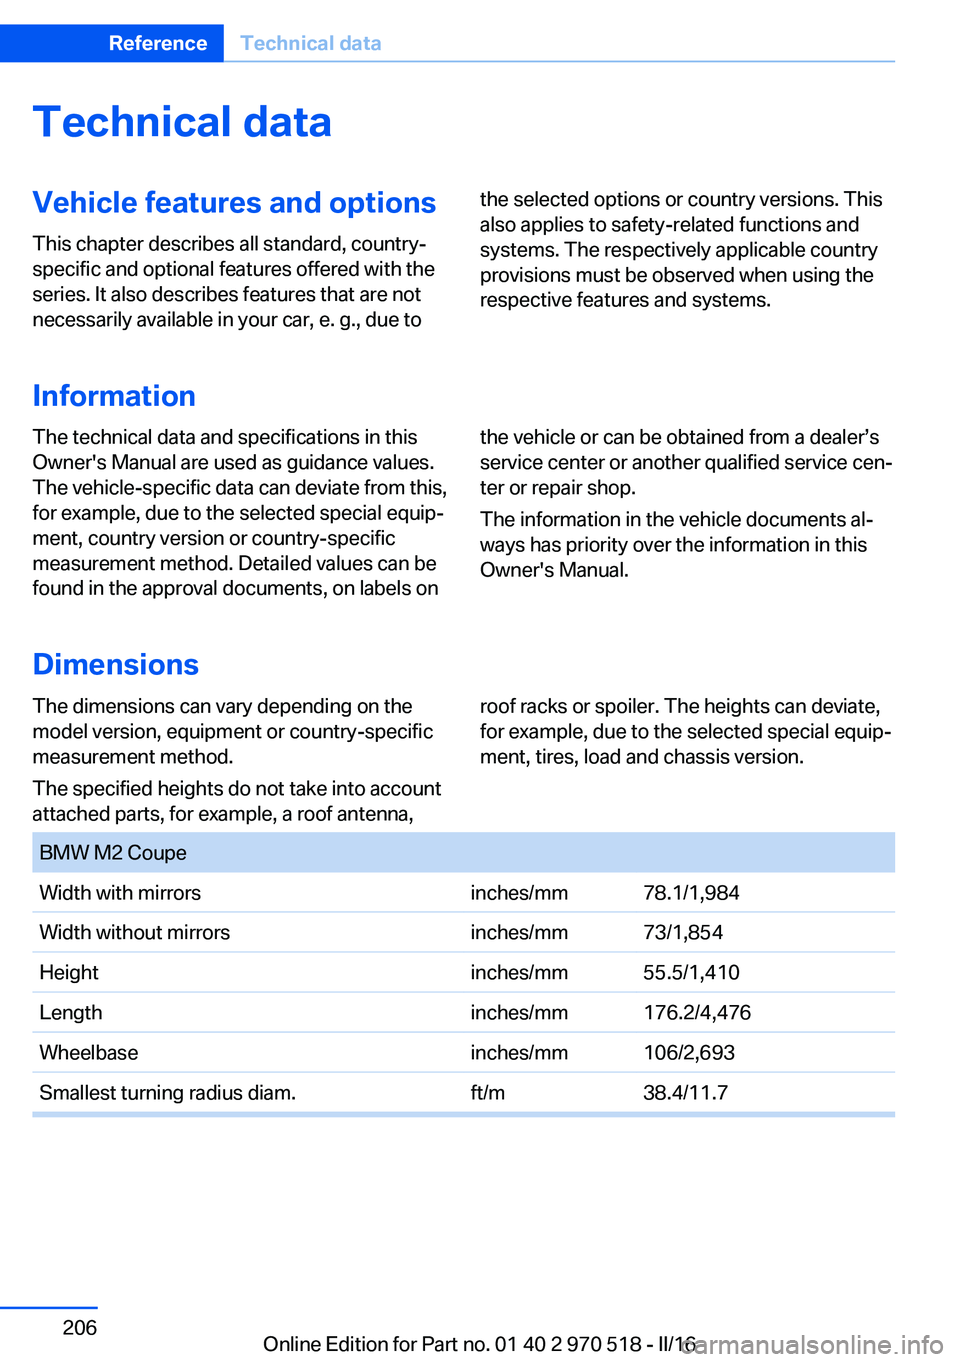
Dimensions
The dimensions can vary depending on the
model version, equipment or country-specific
measurement method.
The specified heights do not take into account
attached parts, for example, a roof antenna,roof racks or spoiler. The heights can deviate,
for example, due to the selected special equip‐
ment, tires, load and chassis version. BMW M2 CoupeWidth with mirrorsinches/mm78.1/1,984Width without mirrorsinches/mm73/1,854Heightinches/mm55.5/1,410Lengthinches/mm176.2/4,476Wheelbaseinches/mm106/2,693Smallest turning radius diam.ft/m38.4/11.7Seite 206ReferenceTechnical data206
Online Edition for Part no. 01 40 2 970 518 - II/16
Page 211 of 220
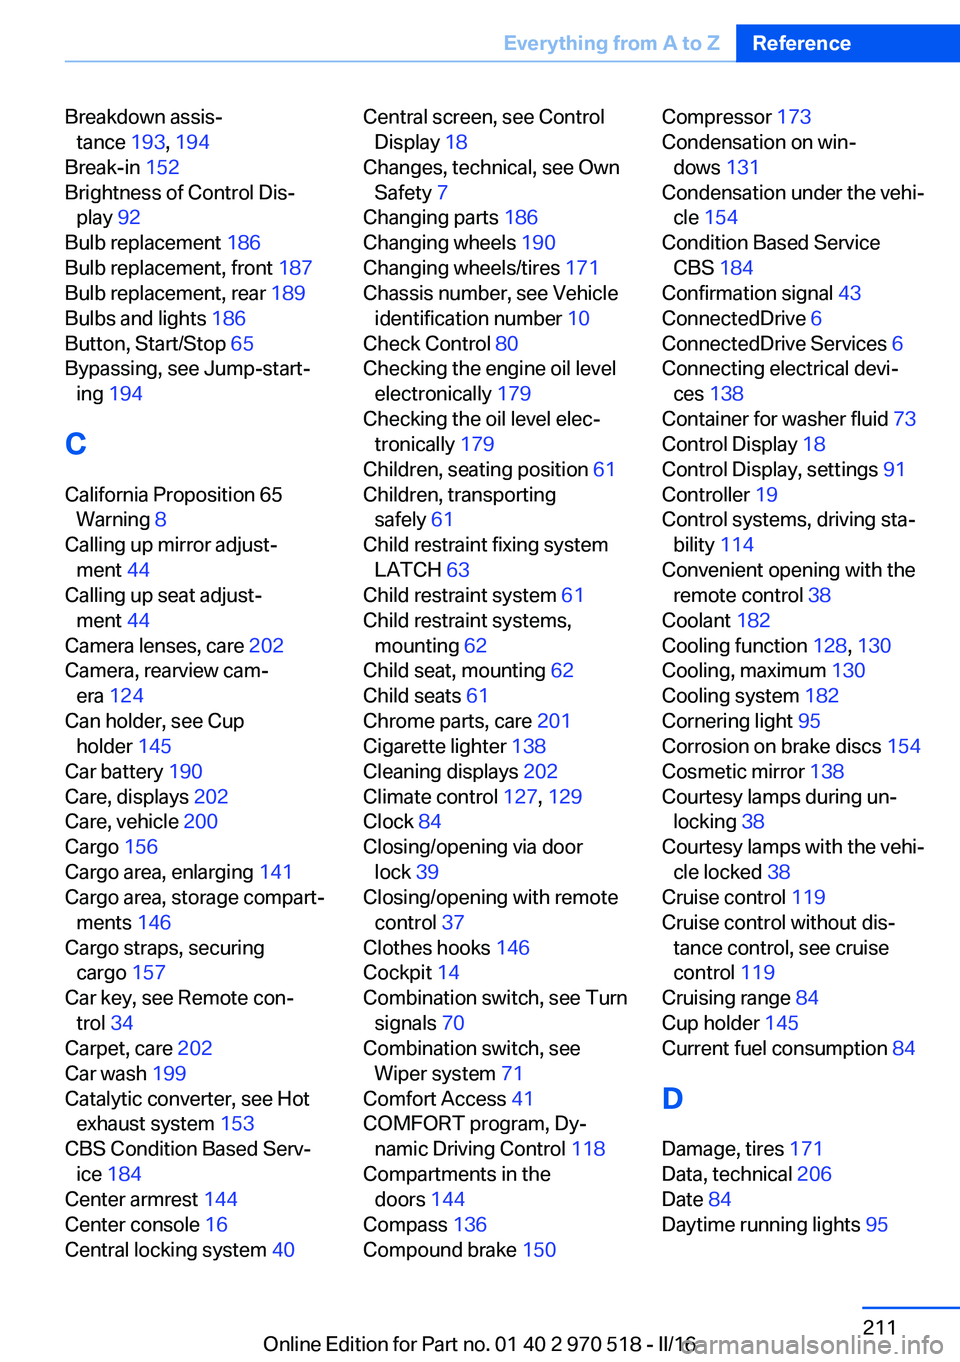
Breakdown assis‐tance 193, 194
Break-in 152
Brightness of Control Dis‐ play 92
Bulb replacement 186
Bulb replacement, front 187
Bulb replacement, rear 189
Bulbs and lights 186
Button, Start/Stop 65
Bypassing, see Jump-start‐ ing 194
C
California Proposition 65 Warning 8
Calling up mirror adjust‐ ment 44
Calling up seat adjust‐ ment 44
Camera lenses, care 202
Camera, rearview cam‐ era 124
Can holder, see Cup holder 145
Car battery 190
Care, displays 202
Care, vehicle 200
Cargo 156
Cargo area, enlarging 141
Cargo area, storage compart‐ ments 146
Cargo straps, securing cargo 157
Car key, see Remote con‐ trol 34
Carpet, care 202
Car wash 199
Catalytic converter, see Hot exhaust system 153
CBS Condition Based Serv‐ ice 184
Center armrest 144
Center console 16
Central locking system 40 Central screen, see Control
Display 18
Changes, technical, see Own Safety 7
Changing parts 186
Changing wheels 190
Changing wheels/tires 171
Chassis number, see Vehicle identification number 10
Check Control 80
Checking the engine oil level electronically 179
Checking the oil level elec‐ tronically 179
Children, seating position 61
Children, transporting safely 61
Child restraint fixing system LATCH 63
Child restraint system 61
Child restraint systems, mounting 62
Child seat, mounting 62
Child seats 61
Chrome parts, care 201
Cigarette lighter 138
Cleaning displays 202
Climate control 127, 129
Clock 84
Closing/opening via door lock 39
Closing/opening with remote control 37
Clothes hooks 146
Cockpit 14
Combination switch, see Turn signals 70
Combination switch, see Wiper system 71
Comfort Access 41
COMFORT program, Dy‐ namic Driving Control 118
Compartments in the doors 144
Compass 136
Compound brake 150 Compressor 173
Condensation on win‐ dows 131
Condensation under the vehi‐ cle 154
Condition Based Service CBS 184
Confirmation signal 43
ConnectedDrive 6
ConnectedDrive Services 6
Connecting electrical devi‐ ces 138
Container for washer fluid 73
Control Display 18
Control Display, settings 91
Controller 19
Control systems, driving sta‐ bility 114
Convenient opening with the remote control 38
Coolant 182
Cooling function 128, 130
Cooling, maximum 130
Cooling system 182
Cornering light 95
Corrosion on brake discs 154
Cosmetic mirror 138
Courtesy lamps during un‐ locking 38
Courtesy lamps with the vehi‐ cle locked 38
Cruise control 119
Cruise control without dis‐ tance control, see cruise
control 119
Cruising range 84
Cup holder 145
Current fuel consumption 84
D
Damage, tires 171
Data, technical 206
Date 84
Daytime running lights 95 Seite 211Everything from A to ZReference211
Online Edition for Part no. 01 40 2 970 518 - II/16
Page 212 of 220
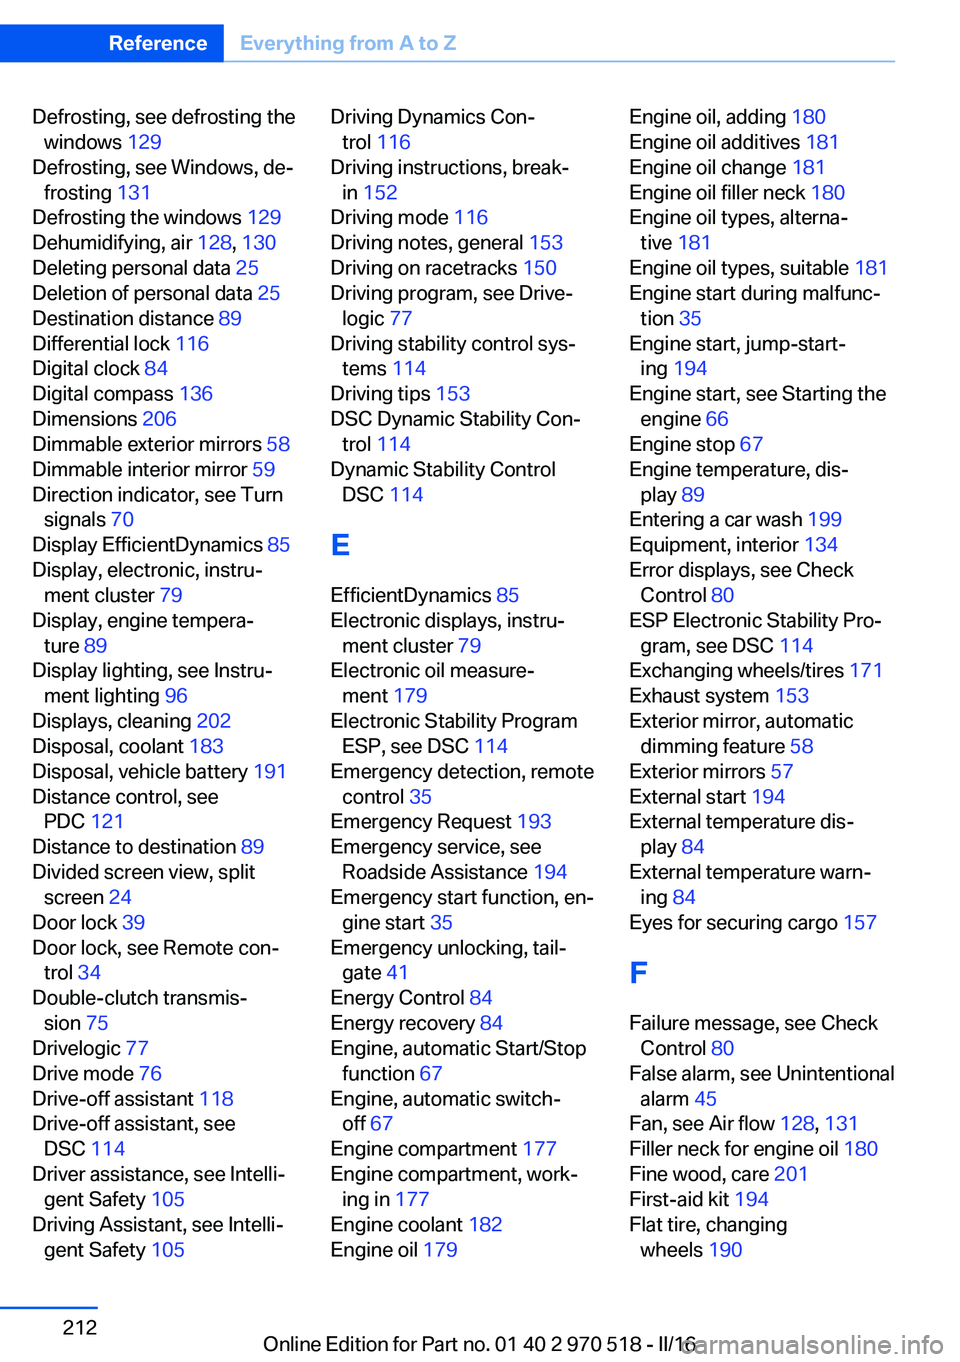
Defrosting, see defrosting thewindows 129
Defrosting, see Windows, de‐ frosting 131
Defrosting the windows 129
Dehumidifying, air 128, 130
Deleting personal data 25
Deletion of personal data 25
Destination distance 89
Differential lock 116
Digital clock 84
Digital compass 136
Dimensions 206
Dimmable exterior mirrors 58
Dimmable interior mirror 59
Direction indicator, see Turn signals 70
Display EfficientDynamics 85
Display, electronic, instru‐ ment cluster 79
Display, engine tempera‐ ture 89
Display lighting, see Instru‐ ment lighting 96
Displays, cleaning 202
Disposal, coolant 183
Disposal, vehicle battery 191
Distance control, see PDC 121
Distance to destination 89
Divided screen view, split screen 24
Door lock 39
Door lock, see Remote con‐ trol 34
Double-clutch transmis‐ sion 75
Drivelogic 77
Drive mode 76
Drive-off assistant 118
Drive-off assistant, see DSC 114
Driver assistance, see Intelli‐ gent Safety 105
Driving Assistant, see Intelli‐ gent Safety 105 Driving Dynamics Con‐
trol 116
Driving instructions, break- in 152
Driving mode 116
Driving notes, general 153
Driving on racetracks 150
Driving program, see Drive‐ logic 77
Driving stability control sys‐ tems 114
Driving tips 153
DSC Dynamic Stability Con‐ trol 114
Dynamic Stability Control DSC 114
E
EfficientDynamics 85
Electronic displays, instru‐ ment cluster 79
Electronic oil measure‐ ment 179
Electronic Stability Program ESP, see DSC 114
Emergency detection, remote control 35
Emergency Request 193
Emergency service, see Roadside Assistance 194
Emergency start function, en‐ gine start 35
Emergency unlocking, tail‐ gate 41
Energy Control 84
Energy recovery 84
Engine, automatic Start/Stop function 67
Engine, automatic switch- off 67
Engine compartment 177
Engine compartment, work‐ ing in 177
Engine coolant 182
Engine oil 179 Engine oil, adding 180
Engine oil additives 181
Engine oil change 181
Engine oil filler neck 180
Engine oil types, alterna‐ tive 181
Engine oil types, suitable 181
Engine start during malfunc‐ tion 35
Engine start, jump-start‐ ing 194
Engine start, see Starting the engine 66
Engine stop 67
Engine temperature, dis‐ play 89
Entering a car wash 199
Equipment, interior 134
Error displays, see Check Control 80
ESP Electronic Stability Pro‐ gram, see DSC 114
Exchanging wheels/tires 171
Exhaust system 153
Exterior mirror, automatic dimming feature 58
Exterior mirrors 57
External start 194
External temperature dis‐ play 84
External temperature warn‐ ing 84
Eyes for securing cargo 157
F
Failure message, see Check Control 80
False alarm, see Unintentional alarm 45
Fan, see Air flow 128, 131
Filler neck for engine oil 180
Fine wood, care 201
First-aid kit 194
Flat tire, changing wheels 190 Seite 212ReferenceEverything from A to Z212
Online Edition for Part no. 01 40 2 970 518 - II/16