Page 188 of 280

ENGINE OIL
Check that the oil level is between the MIN and MAX references on the
dipstick A.
If the oil level is near or under the MIN reference, add oil through the
filler B until it reaches the MAX reference.
The oil level must never exceed the MAX reference.
1.4 Petrol, 1.4 Turbo MultiAir, 1.3 JTDM-2, 1.6 JTDMversions
Take out the engine oil dipstick A, clean it with a lint-free cloth and
reinsert it. Extract it again and check that the level is between the MIN
and MAX marks on the dipstick.
Turbo TwinAir versions
The engine oil dipstick A is integral with plug B. Undo the plug, clean
the dipstick with a cloth that does not leave traces, reinsert the dipstick
and re-tighten the plug.
Unscrew the plug again and check that the engine oil level is between
the MIN and MAX marks on the dipstick.
Engine oil consumption
The maximum engine oil consumption is usually 400 grams every
1,000 km. When the car is new, the engine needs to be run in;
therefore the engine oil consumption can only be considered stabilised
after the first 5,000 - 6,000 km.
Do not add oil with specifications other than those of the oil
already in the engine.
Used engine oil and oil filters contain substances which are
harmful to the environment. We recommend having the
oil and filters replaced by Alfa Romeo Authorised Services.
ENGINE COOLANT
If the level is too low, unscrew reservoir cap C and add the fluid
described in the "Technical Specifications" section.
PARAFLUUPanti-freeze is used in the engine cooling
system. Use the same fluid as in the cooling system when
topping up. PARAFLU
UPcannot be mixed with any other
type of fluid. If this accidentally occurs, do not start the engine under
any circumstances. Contact Alfa Romeo Authorised Services.
The cooling system is pressurised. If necessary, only
replace the cap with another genuine one or the
operation of the system may be adversely affected. Do
not remove the reservoir cap when the engine is hot: you risk
scalding yourself.
184
GETTING TO KNOW
YOUR CAR
SAFETY
STARTING AND
DRIVING
IN AN EMERGENCY
SERVICING AND
MAINTENANCE
TECHNICAL
SPECIFICATIONS
INDEX
Page 189 of 280

WINDSCREEN/REAR WINDOW
WASHER FLUID
If the level is too low, lift reservoir cap D and add the fluid described in
the chapter "Technical Specifications".
Do not travel if the windscreen washer reservoir is
empty: using the windscreen washer is essential for
improving visibility. Some commercial windscreen
washer additives are flammable. The engine compartment
contains hot components which may set it on fire.
BRAKE FLUID
Check that the fluid is at the max. level.
If the fluid level in the reservoir is too low, undo reservoir cap E and
add the fluid described in the chapter "Technical Specifications".
Prevent brake fluid, which is highly corrosive, from coming
into contact with painted parts. Should it happen, wash
immediately with water.
Brake fluid is poisonous and highly corrosive. In the
event of accidental contact, immediately wash the
affected parts with water and mild soap. Then rinse
thoroughly. Call a doctor immediately if swallowed.
Symbolon the container identifies synthetic brake
fluids, distinguishing them from the mineral type.
Using a mineral-type fluid will damage the special
rubber seals of the braking system beyond repair.
185
GETTING TO KNOW
YOUR CAR
SAFETY
STARTING AND
DRIVING
IN AN EMERGENCY
SERVICING AND
MAINTENANCE
TECHNICAL
SPECIFICATIONS
INDEX
Page 190 of 280
AIR CLEANER/POLLEN
FILTER/DIESEL FILTER
Contact Alfa Romeo Authorized Services to replace the filters.
BATTERY
Battery F (see previous pages) does not require the electrolyte to be
topped up with distilled water. A periodic check carried out at Alfa
Romeo Authorized Services is, however, necessary to check efficiency.
REPLACING THE BATTERY
If necessary, replace the battery with another genuine battery with the
same specifications. Follow the battery manufacturer's instructions
for maintenance.
USEFUL ADVICE FOR EXTENDING THE
LIFE OF YOUR BATTERY
To avoid draining your battery rapidly and maintain its efficiency over
time, carefully observe the following instructions:
❒when you park the car, ensure that the doors, bonnet and flaps are
closed correctly, to prevent any roof lights from remaining on inside
the passenger compartment;
❒switch off all roof lights inside the car: the car is however equipped
with a system which switches all internal lights off automatically;
❒do not keep accessories (e.g. sound system, hazard lights, etc.)
switched on for a long time when the engine is not running;
❒before performing any operation on the electrical system, disconnect
the negative battery pole;
IMPORTANT If the charge level remains under 50% for a long time, the
battery is damaged by sulphation, reducing its capacity and
efficiency at start-up.
186
GETTING TO KNOW
YOUR CAR
SAFETY
STARTING AND
DRIVING
IN AN EMERGENCY
SERVICING AND
MAINTENANCE
TECHNICAL
SPECIFICATIONS
INDEX
The battery will also be more at risk of freezing (this can happen as
early as –10°C). Refer to “Storing the car” in “Starting and driving” if
the car is left parked for a long time.
If after having purchased your car you decide to add accessories
requiring permanent electrical power (alarm etc.) or accessories that
require large amounts of power, contact Alfa Romeo Authorized
Services. They can calculate the overall electrical requirement.
Page 191 of 280
Battery liquid is poisonous and corrosive. Avoid
contact with the skin and the eyes. Keep naked flames
and sources of sparks away from the battery: risk of
explosion and fire.
Using the battery with insufficient fluid irreparably
damages the battery and may cause an explosion.
Incorrect installation of electric and electronic devices may
cause severe damage to your car. After purchasing your
car, if you wish to install any accessories (anti-theft, radio
phone etc.), contact Alfa Romeo Authorized Services, who will suggest
the most appropriate devices for your vehicle and will, most
importantly, advise you if a higher capacity battery needs to be
installed.
Batteries contain substances which are very dangerous for
the environment. For the replacement of the battery,
contact Alfa Romeo Authorized Services.
If the car will be unused for an extended period of
time in extremely cold weather conditions, remove the
battery and store it in a heated area to prevent it
from freezing.
When performing any operation on the battery or near
it, always protect your eyes with special goggles.
187
GETTING TO KNOW
YOUR CAR
SAFETY
STARTING AND
DRIVING
IN AN EMERGENCY
SERVICING AND
MAINTENANCE
TECHNICAL
SPECIFICATIONS
INDEX
Page 192 of 280
WHEELS AND TYRES
Before embarking on a long trip, and every two weeks, check the tyre
inflation pressure and space-saver wheel. Check the tyres when cold.
While driving the car, the pressure increases under standard
conditions: for the correct tyre inflation pressure, see "Wheels"
paragraph in the "Technical specifications" chapter.
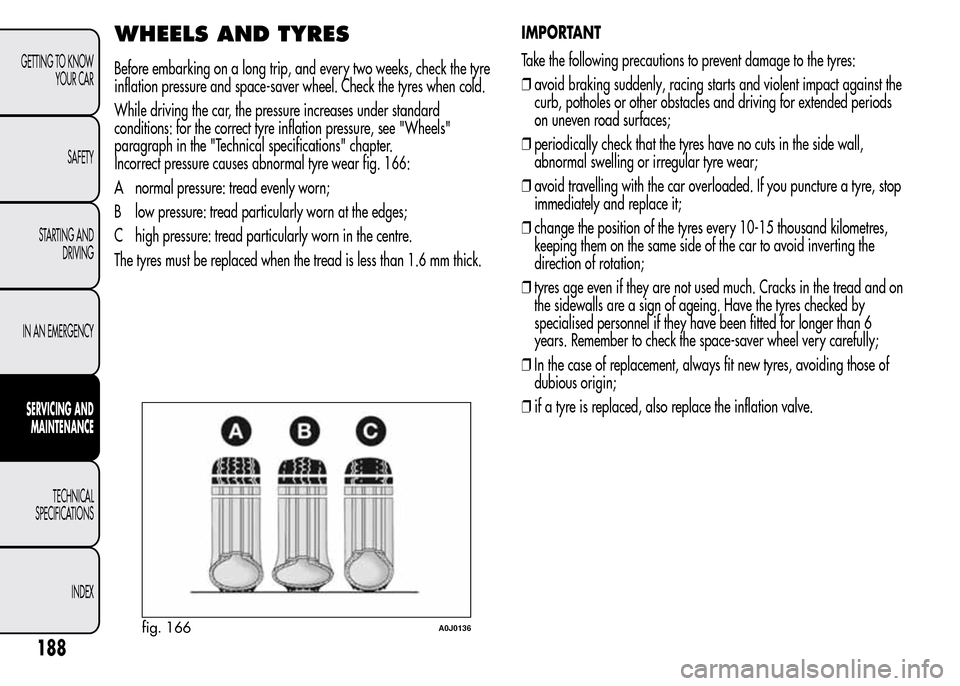
Incorrect pressure causes abnormal tyre wear fig. 166:
A normal pressure: tread evenly worn;
B low pressure: tread particularly worn at the edges;
C high pressure: tread particularly worn in the centre.
The tyres must be replaced when the tread is less than 1.6 mm thick.IMPORTANT
Take the following precautions to prevent damage to the tyres:
❒avoid braking suddenly, racing starts and violent impact against the
curb, potholes or other obstacles and driving for extended periods
on uneven road surfaces;
❒periodically check that the tyres have no cuts in the side wall,
abnormal swelling or irregular tyre wear;
❒avoid travelling with the car overloaded. If you puncture a tyre, stop
immediately and replace it;
❒change the position of the tyres every 10-15 thousand kilometres,
keeping them on the same side of the car to avoid inverting the
direction of rotation;
❒tyres age even if they are not used much. Cracks in the tread and on
the sidewalls are a sign of ageing. Have the tyres checked by
specialised personnel if they have been fitted for longer than 6
years. Remember to check the space-saver wheel very carefully;
❒In the case of replacement, always fit new tyres, avoiding those of
dubious origin;
❒if a tyre is replaced, also replace the inflation valve.
fig. 166A0J0136
188
GETTING TO KNOW
YOUR CAR
SAFETY
STARTING AND
DRIVING
IN AN EMERGENCY
SERVICING AND
MAINTENANCE
TECHNICAL
SPECIFICATIONS
INDEX
Page 193 of 280
Remember that the road holding qualities of your car
also depend on the correct inflation pressure of the
tyres.
If the pressure is too low the tyre overheats and can be
seriously damaged.
Do not cross switch the tyres, moving them from the
right of the car to the left and vice versa.
Never submit alloy rims to repainting treatments
requiring the use of temperatures exceeding 150°C.
The mechanical properties of the wheels could be
impaired.
WINDSCREEN/REAR WINDOW
WIPER
BLADES
We recommend replacing the blades once a year.
A few simple precautions can reduce the possibility of damage to the
blades:
❒if the temperature falls below zero, make sure that ice has not frozen
the rubber against the glass. Use a de-icing product to release it if
required;
❒remove any snow from the window;
❒do not operate the windscreen/rear window wipers on dry glass.
Driving with worn windscreen/rear window wiper
blades is a serious hazard, because visibility is reduced
in bad weather.
189
GETTING TO KNOW
YOUR CAR
SAFETY
STARTING AND
DRIVING
IN AN EMERGENCY
SERVICING AND
MAINTENANCE
TECHNICAL
SPECIFICATIONS
INDEX
Page 194 of 280
Replacing the wiper blades
Proceed as follows:
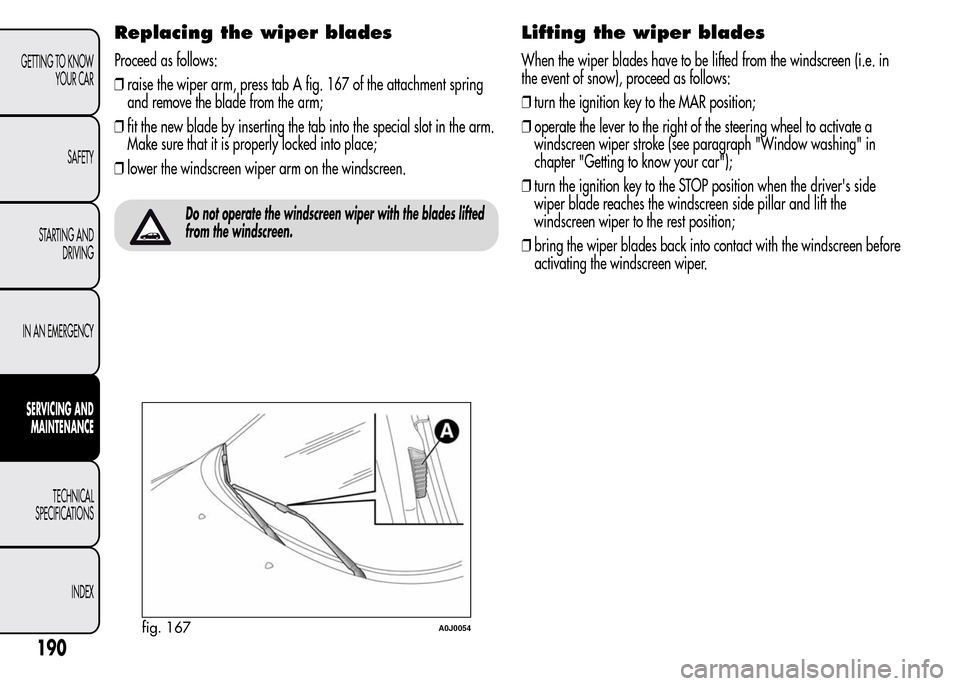
❒raise the wiper arm, press tab A fig. 167 of the attachment spring
and remove the blade from the arm;
❒fit the new blade by inserting the tab into the special slot in the arm.
Make sure that it is properly locked into place;
❒lower the windscreen wiper arm on the windscreen.
Do not operate the windscreen wiper with the blades lifted
from the windscreen.
Lifting the wiper blades
When the wiper blades have to be lifted from the windscreen (i.e. in
the event of snow), proceed as follows:
❒turn the ignition key to the MAR position;
❒operate the lever to the right of the steering wheel to activate a
windscreen wiper stroke (see paragraph "Window washing" in
chapter "Getting to know your car");
❒turn the ignition key to the STOP position when the driver's side
wiper blade reaches the windscreen side pillar and lift the
windscreen wiper to the rest position;
❒bring the wiper blades back into contact with the windscreen before
activating the windscreen wiper.
fig. 167A0J0054
190
GETTING TO KNOW
YOUR CAR
SAFETY
STARTING AND
DRIVING
IN AN EMERGENCY
SERVICING AND
MAINTENANCE
TECHNICAL
SPECIFICATIONS
INDEX
Page 195 of 280
Replacing the rear window wiper
blade
Proceed as follows:
❒raise cover A fig. 168, undo nut B and remove arm C;
❒correctly position the new arm, fully tighten nut B then lower cover
A.
SPRAY NOZZLES
Windscreen washer
The window washer jets are fixed fig. 169.
If the jet of fluid is inadequate, firstly check that there is fluid in the
reservoir: see “Checking fluid levels” in this section).
Then check that the nozzle holes are not clogged, if necessary using a
needle.
fig. 168A0J0057fig. 169A0J0053
191
GETTING TO KNOW
YOUR CAR
SAFETY
STARTING AND
DRIVING
IN AN EMERGENCY
SERVICING AND
MAINTENANCE
TECHNICAL
SPECIFICATIONS
INDEX