2016 Acura MDX center console
[x] Cancel search: center consolePage 5 of 84

2 || 3 SAFETY VISUAL INDEX
TABLE OF
CONTENTS
INDEX
VISUAL INDEX
VOICE COMMAND
INDEX
SAFETY
INFORMATION
CLIENT
INFORMATION
INSTRUMENT
PANEL
SPECIFICATIONS
VEHICLE
CONTROLS
MAINTENANCE
AUDIO AND
CONNECTIVITY
HANDLING THE
UNEXPECTED
BLUETOOTH®
HANDSFREELINK®
DRIVING
ACURALINK®
NAVIGATION
Your safety—and the safety of others—is very important, and operating this vehicle
safely is an important responsibility. While we strive to help you make informed
decisions about safety, it is not practical or possible to warn you about all the
hazards associated with operating or maintaining your vehicle. Therefore, you must
use your own good judgment.
Important Safety Information
This guide explains many of your vehicle’s safety features and how to use them.
Please read this information carefully. Following the instructions below will also
help to keep you and your passengers safe.
Important Safety Precautions
• Always wear your seat belt.
• Secure all children in the proper restraint system.
• Be aware of airbag hazards.
• Don’t drink and drive.
• Pay appropriate attention to the task of driving safely.
• Control your speed.
• Keep your vehicle in safe condition.
Engaging in cell phone conversation or other activities that keep you from paying
close attention to the road, other vehicles, and pedestrians could lead to a crash.
Remember, situations can change quickly, and only you can decide when it is safe
to divert some attention away from driving.
Important Handling Information
Your vehicle has a higher ground clearance than a passenger vehicle designed for
use only on pavement. Higher ground clearance has many advantages for off-
highway driving. It allows you to travel over bumps, obstacles, and rough terrain.
It also provides good visibility so you can anticipate problems earlier.
These advantages come at some cost. Because your vehicle is taller and rides
higher off the ground, it has a higher center of gravity, making it more susceptible
to tipping or rollover if you make abrupt turns. Utility vehicles have a signifi cantly
higher rollover rate than other types of vehicles. In a rollover crash, an unbelted
person is signifi cantly more likely to die than a person wearing a seat belt. As a
reminder, make sure you and your passengers always wear seat belts.
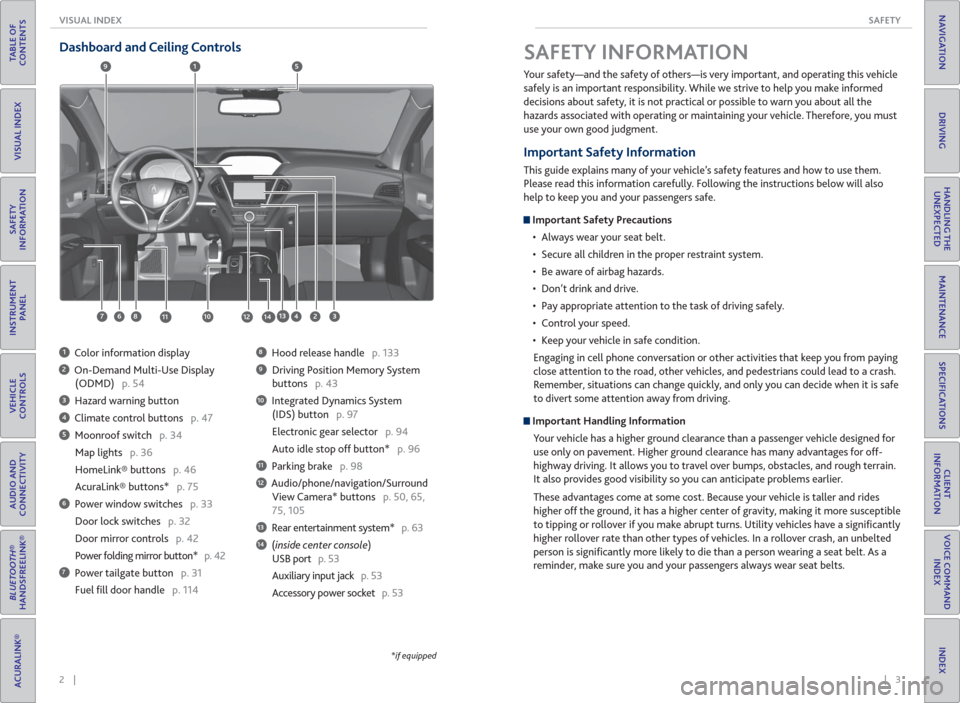
SAFETY INFORMATION Dashboard and Ceiling Controls
1 Color information display
2 On-Demand Multi-Use Display
(ODMD) p. 54
3 Hazard warning button
4 Climate control buttons p. 47
5 Moonroof switch p. 34
Map lights p. 36
HomeLink® buttons p. 46
AcuraLink® buttons* p. 75
6 Power window switches p. 33
Door lock switches p. 32
Door mirror controls p. 42
Power folding mirror button* p. 42
7 Power tailgate button p. 31
Fuel fi ll door handle p. 114
8 Hood release handle p. 133
9 Driving Position Memory System
buttons p. 43
10 Integrated Dynamics System
(IDS) button p. 97
Electronic gear selector p. 94
Auto idle stop off button* p. 96
11 Parking brake p. 98
12 Audio/phone/navigation/Surround
View Camera* buttons p. 50, 65,
75, 105
13 Rear entertainment system* p. 63
14 (inside center console)
USB port p. 53
Auxiliary input jack p. 53
Accessory power socket p. 53
1
281134
5
67
9
101213
*if equipped
14
Page 28 of 84

48 || 49 VEHICLE CONTROLS VEHICLE CONTROLS
TABLE OF
CONTENTS
INDEX
VISUAL INDEX
VOICE COMMAND
INDEX
SAFETY
INFORMATION
CLIENT
INFORMATION
INSTRUMENT
PANEL
SPECIFICATIONS
VEHICLE
CONTROLS
MAINTENANCE
AUDIO AND
CONNECTIVITY
HANDLING THE
UNEXPECTED
BLUETOOTH®
HANDSFREELINK®
DRIVING
ACURALINK®
NAVIGATION
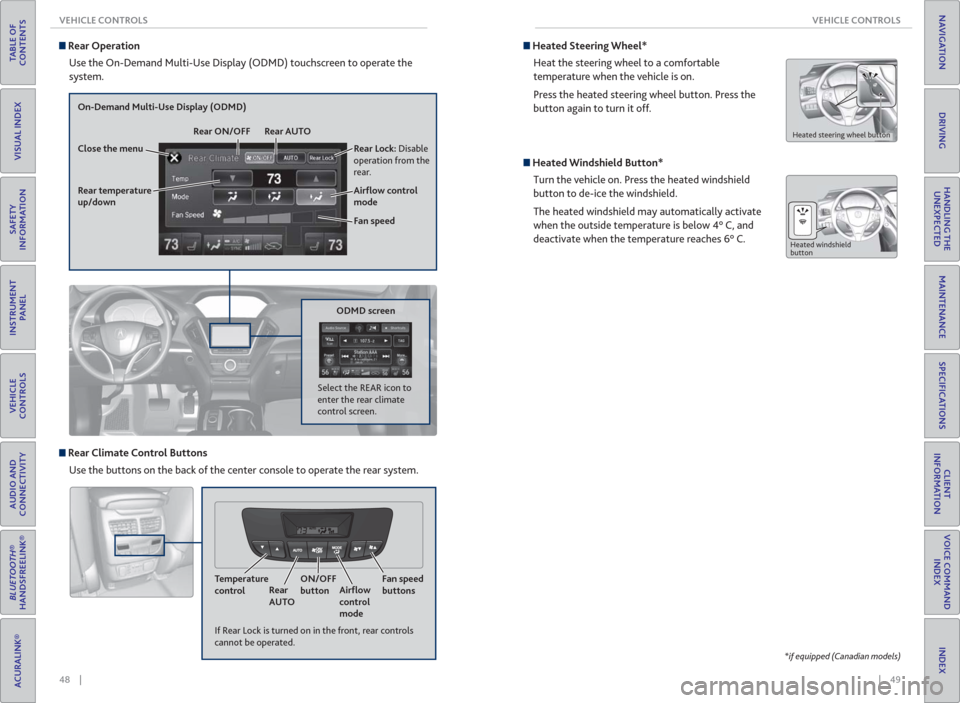
Rear Operation
Use the On-Demand Multi-Use Display (ODMD) touchscreen to operate the
system.
Rear Lock: Disable
operation from the
rear.
Rear temperature
up/down
On-Demand Multi-Use Display (ODMD)
Close the menuRear ON/OFF Rear AUTO
Fan speed Air� ow control
mode
If Rear Lock is turned on in the front, rear controls
cannot be operated.
ODMD screen
Select the REAR icon to
enter the rear climate
control screen.
Rear Climate Control Buttons
Use the buttons on the back of the center console to operate the rear system.
Temperature
controlRear
AUTOON/OFF
buttonAir� ow
control
modeFan speed
buttons
Heated Steering Wheel*
Heat the steering wheel to a comfortable
temperature when the vehicle is on.
Press the heated steering wheel button. Press the
button again to turn it off.
Heated steering wheel button
Heated Windshield Button*
Turn the vehicle on. Press the heated windshield
button to de-ice the windshield.
The heated windshield may automatically activate
when the outside temperature is below 4° C, and
deactivate when the temperature reaches 6° C.
Heated windshield
button
*if equipped (Canadian models)
Page 29 of 84

50 || 51 VEHICLE CONTROLS VEHICLE CONTROLS
TABLE OF
CONTENTS
INDEX
VISUAL INDEX
VOICE COMMAND
INDEX
SAFETY
INFORMATION
CLIENT
INFORMATION
INSTRUMENT
PANEL
SPECIFICATIONS
VEHICLE
CONTROLS
MAINTENANCE
AUDIO AND
CONNECTIVITY
HANDLING THE
UNEXPECTED
BLUETOOTH®
HANDSFREELINK®
DRIVING
ACURALINK®
NAVIGATION
Seat Heaters and Ventilation*
Quickly warm or ventilate the seats when the vehicle is on.
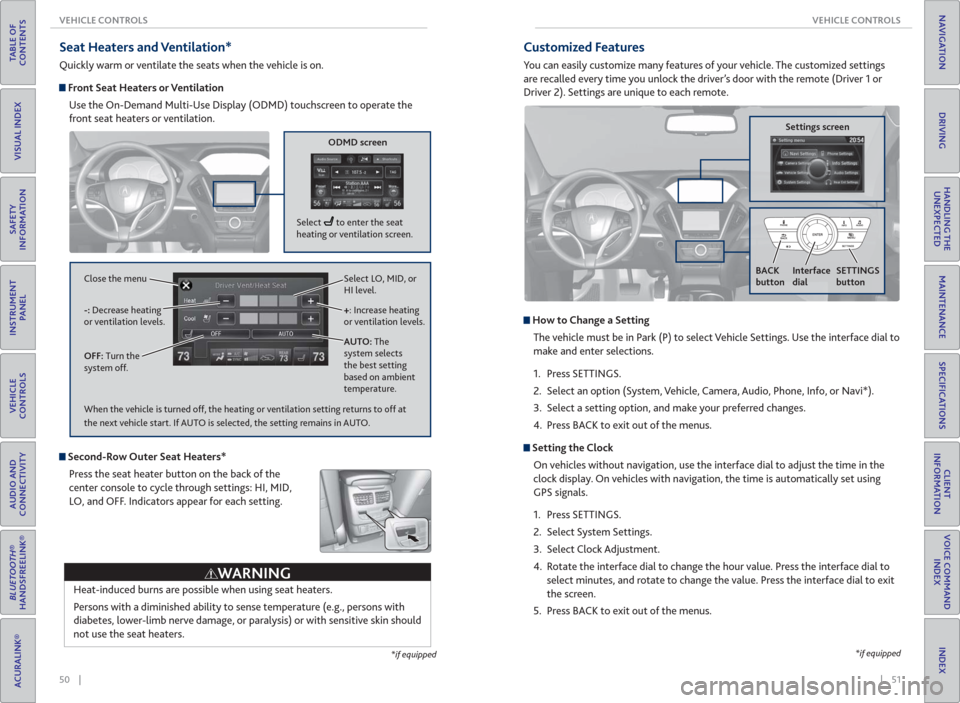
Front Seat Heaters or Ventilation
Use the On-Demand Multi-Use Display (ODMD) touchscreen to operate the
front seat heaters or ventilation.
Select LO, MID, or
HI level.
+: Increase heating
or ventilation levels.
AUTO: The
system selects
the best setting
based on ambient
temperature. OFF: Turn the
system off. -: Decrease heating
or ventilation levels. Close the menu
ODMD screen
Select to enter the seat
heating or ventilation screen.
*if equipped
Second-Row Outer Seat Heaters*
Press the seat heater button on the back of the
center console to cycle through settings: HI, MID,
LO, and OFF. Indicators appear for each setting.
Heat-induced burns are possible when using seat heaters.
Persons with a diminished ability to sense temperature (e.g., persons with
diabetes, lower-limb nerve damage, or paralysis) or with sensitive skin should
not use the seat heaters.
WARNING
When the vehicle is turned off, the heating or ventilation setting returns to off at
the next vehicle start. If AUTO is selected, the setting remains in AUTO.
*if equipped
Customized Features
You can easily customize many features of your vehicle. The customized settings
are recalled every time you unlock the driver’s door with the remote (Driver 1 or
Driver 2). Settings are unique to each remote.
How to Change a Setting
The vehicle must be in Park (P) to select Vehicle Settings. Use the interface dial to
make and enter selections.
1. Press SETTINGS.
2. Select an option (System, Vehicle, Camera, Audio, Phone, Info, or Navi*).
3. Select a setting option, and make your preferred changes.
4. Press BACK to exit out of the menus.
Setting the Clock
On vehicles without navigation, use the interface dial to adjust the time in the
clock display. On vehicles with navigation, the time is automatically set using
GPS signals.
1. Press SETTINGS.
2. Select System Settings.
3. Select Clock Adjustment.
4. Rotate the interface dial to change the hour value. Press the interface dial to
select minutes, and rotate to change the value. Press the interface dial to exit
the screen.
5. Press BACK to exit out of the menus.
Settings screen
BACK
button
Interface
dialSETTINGS
button
Page 30 of 84

52 || 53 AUDIO AND CONNECTIVITY AUDIO AND CONNECTIVITY
TABLE OF
CONTENTS
INDEX
VISUAL INDEX
VOICE COMMAND
INDEX
SAFETY
INFORMATION
CLIENT
INFORMATION
INSTRUMENT
PANEL
SPECIFICATIONS
VEHICLE
CONTROLS
MAINTENANCE
AUDIO AND
CONNECTIVITY
HANDLING THE
UNEXPECTED
BLUETOOTH®
HANDSFREELINK®
DRIVING
ACURALINK®
NAVIGATION
Basic Audio Operation
Connect audio devices and operate buttons and displays for the audio system.
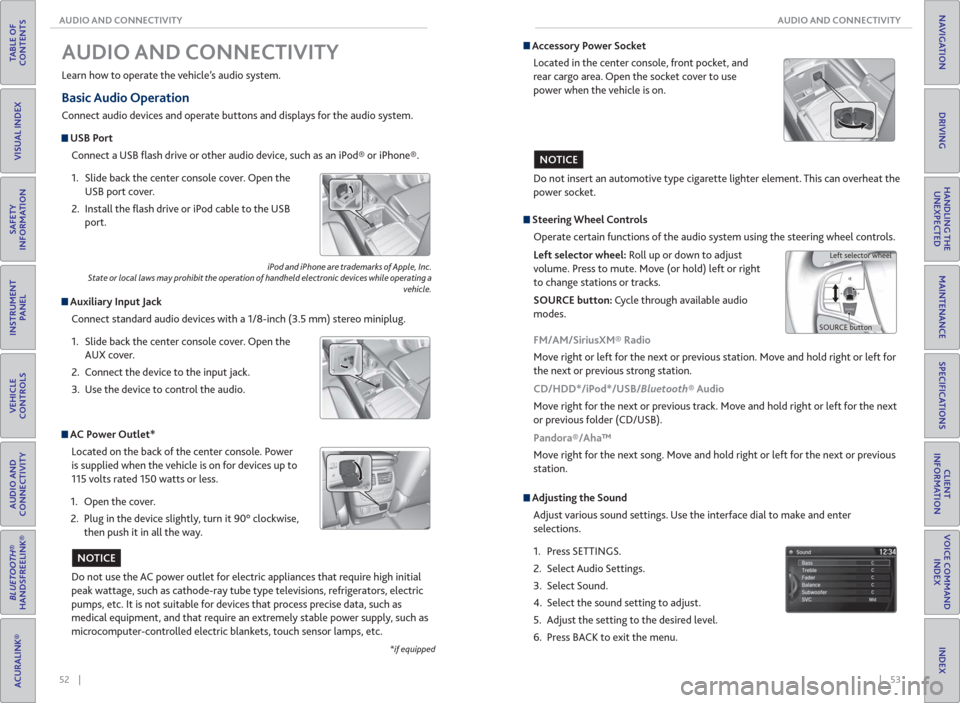
USB Port
Connect a USB fl ash drive or other audio device, such as an iPod® or iPhone®.
1. Slide back the center console cover. Open the
USB port cover.
2. Install the fl ash drive or iPod cable to the USB
port.
Auxiliary Input Jack
Connect standard audio devices with a 1/8-inch (3.5 mm) stereo miniplug.
1. Slide back the center console cover. Open the
AUX cover.
2. Connect the device to the input jack.
3. Use the device to control the audio.
iPod and iPhone are trademarks of Apple, Inc.
State or local laws may prohibit the operation of handheld electronic devices while operating a
vehicle.
AUDIO AND CONNECTIVITY
Learn how to operate the vehicle’s audio system.
AC Power Outlet*
Located on the back of the center console. Power
is supplied when the vehicle is on for devices up to
115 volts rated 150 watts or less.
1. Open the cover.
2. Plug in the device slightly, turn it 90° clockwise,
then push it in all the way.
Do not use the AC power outlet for electric appliances that require high initial
peak wattage, such as cathode-ray tube type televisions, refrigerators, electric
pumps, etc. It is not suitable for devices that process precise data, such as
medical equipment, and that require an extremely stable power supply, such as
microcomputer-controlled electric blankets, touch sensor lamps, etc.
NOTICE
*if equipped
Accessory Power Socket
Located in the center console, front pocket, and
rear cargo area. Open the socket cover to use
power when the vehicle is on.
Do not insert an automotive type cigarette lighter element. This can overheat the
power socket.
NOTICE
Adjusting the Sound
Adjust various sound settings. Use the interface dial to make and enter
selections.
1. Press SETTINGS.
2. Select Audio Settings.
3. Select Sound.
4. Select the sound setting to adjust.
5. Adjust the setting to the desired level.
6. Press BACK to exit the menu.
Steering Wheel Controls
Operate certain functions of the audio system using the steering wheel controls.
Left selector wheel: Roll up or down to adjust
volume. Press to mute. Move (or hold) left or right
to change stations or tracks.
SOURCE button: Cycle through available audio
modes.
SOURCE buttonLeft selector wheel
FM/AM/SiriusXM® Radio
Move right or left for the next or previous station. Move and hold right or left for
the next or previous strong station.
CD/HDD*/iPod*/USB/Bluetooth® Audio
Move right for the next or previous track. Move and hold right or left for the next
or previous folder (CD/USB).
Pandora®/Aha™
Move right for the next song. Move and hold right or left for the next or previous
station.