2016 Abarth 500 radio
[x] Cancel search: radioPage 12 of 215

.
RADIO
❒System ............................................... 60
HAZARD WARNING LIGHTS
❒Operation ........................................... 35
HEATER/CLIMATE CONTROL
SYSTEM
❒Manual climate control ........................ 24
❒Automatic climate control .................... 26
MANUAL GEARBOX
❒Using the gearbox ..............................124
4AB0A0221
8
GRAPHICAL INDEX
Page 13 of 215

GETTING TO KNOW YOUR CAR
In-depth knowledge of your new vehicle
starts here.
The handbook that you are reading
simply and directly explains how it
is made and how it works.
That’s why we advise you to read it
seated comfortably on board, so that
you can see what is described here for
yourself.SYMBOLS ...................................... 10
FIAT CODE SYSTEM ....................... 10
THE KEYS....................................... 11
IGNITION SWITCH .......................... 14
SEATS ............................................ 15
HEAD RESTRAINTS ........................ 17
STEERING WHEEL ......................... 18
REAR VIEW MIRRORS .................... 19
CLIMATIC COMFORT ..................... 21
HEATING AND VENTILATION.......... 22
MANUAL CLIMATE CONTROL
SYSTEM ......................................... 24
AUTOMATIC CLIMATE CONTROL
SYSTEM ......................................... 26
EXTERNAL LIGHTS......................... 30
WINDOW CLEANING ...................... 32
ROOF LIGHTS ................................ 33
CONTROLS .................................... 34
INTERIOR FITTINGS ....................... 36
FIXED GLASS ROOF ....................... 40
ELECTRIC SUN ROOF .................... 40
DOORS ........................................... 42
ELECTRIC WINDOWS .................... 44
LUGGAGE COMPARTMENT ........... 45
BONNET ......................................... 48
ROOF RACK/SKI RACK .................. 50
HEADLIGHTS.................................. 51ESC SYSTEM ................................. 52
ITPMS (INDIRECT TYRE
PRESSURE MONITORING
SYSTEM) ........................................ 56
EOBD SYSTEM............................... 59
DUALDRIVE ELECTRIC POWER
STEERING ...................................... 59
RADIO SYSTEM .............................. 60
ACCESSORIES PURCHASED BY
THE OWNER................................... 60
PARKING SENSORS....................... 62
REFUELLING THE CAR .................. 64
PROTECTING THE
ENVIRONMENT .............................. 65
9
Page 18 of 215

IGNITION SWITCH
The key can be turned to three different
positions fig. 10:
❒STOP: engine off, key can be
removed, steering column locked.
Some electrical devices (e.g. radio,
central door locking system, alarm,
etc.) are enabled;
❒MAR-ON: driving position. All
electrical devices are enabled;
❒AVV: engine start-up.
The ignition switch is fitted with a safety
system that requires the ignition key
to be turned back to STOP if the engine
does not start, before the starting
operation can be repeated.
2) 3) 4) 5)
STEERING LOCK
Activation
When the key is at STOP, remove the
key and turn the steering wheel until
it locks.
Deactivation
Move the steering wheel slightly as you
turn the ignition key to MAR-ON.
WARNING
2) If the ignition switch has been
tampered with (e.g. an attempted
theft), have it checked over by
an Abarth Dealership before
driving again.
3) Always remove the key when you
leave your car to prevent someone
from accidentally operating the
controls. Remember to engage
the handbrake. If the car is parked
on a slope uphill, engage the first
gear; if the car is facing downhill,
engage reverse. Never leave
children unattended in the
vehicle.4) Never extract the key while the
vehicle is moving. The steering
wheel will automatically lock
as soon as it is turned. This holds
true for cars being towed as well.
5) It is absolutely forbidden to carry
out any after-market operation
involving steering system or
steering column modifications
(e.g. installation of anti-theft
device) that could adversely affect
performance and safety,
invalidate the warranty and also
result in non-compliance of the
car with type-approval
requirements.
10AB0A0009
14
GETTING TO KNOW YOUR CAR
Page 64 of 215

RADIO SYSTEM
For the operation of the radio with
CD/MP3 player (for versions/markets,
where provided), read the supplement
attached to this Owner Handbook.
RADIO
The complete system consists of:
❒two 165 mm diameter 40 W
mid-woofer speakers, on the front
doors
❒two 38 mm diameter 30 W tweeter
speakers, in the front pillars
❒two 165 mm diameter 40 W full
range speakers, in the rear side
panels
❒an aerial on the vehicle roof
❒radio with CD/MP3 player (for
specifications and operation, refer to
the supplement "Radio" attached
to this handbook).
If there is a Hi-Fi system (where
provided):
❒two 165 mm diameter 60 W
mid-woofer speakers
❒two 40 W tweeter speakers in the
front pillars
❒two 40 W max. full range speakers in
the rear side panels❒a 60 W subwoofer under the
right-hand front seat
❒a 4x30 W amplifier in the right-hand
rear side panel
❒an aerial on the roof
❒radio with CD/MP3 player (for
specifications and operation, refer to
the supplement "Radio" attached
to this handbook).
ACCESSORIES
PURCHASED BY THE
OWNER
If after buying the car, you decide to
install electrical accessories that require
a permanent electrical supply (radio,
satellite anti-theft system, etc.) or
accessories that in any case burden the
electrical supply, contact an Abarth
Dealership, whose qualified personnel,
besides suggesting the most suitable
devices from Lineaccessori Abarth, will
also evaluate the overall electric
consumption, checking whether the
car's electrical system is able to
withstand the load required, or whether
it needs to be integrated with a more
powerful battery.
56)
60
GETTING TO KNOW YOUR CAR
Page 65 of 215

INSTALLING
ELECTRICAL/
ELECTRONIC DEVICES
Electrical and electronic devices
installed after buying the car in the
context of after-sales service must carry
the following label:
Fiat Group Automobiles S.p.A.
authorises the installation of transceiver
devices on condition that such
installations are carried out in
a workmanlike fashion, following the
manufacturer’s instructions, at a
specialised centre.
IMPORTANT Traffic police may not
allow the car on the road if devices
have been installed which modify the
features of the car. This may also cause
invalidation of warranty in relation to
faults caused by the change either
directly or indirectly related to it.Fiat Group Automobiles S.p.A. shall not
be liable for damage caused by the
installation of accessories either not
supplied or recommended by Fiat
Group Automobiles S.p.A. and/or not
installed in compliance with the
provided instructions.
RADIO TRANSMITTERS
AND MOBILE PHONES
Radio transmitter equipment (vehicle
mobile phones, CB radios, amateur
radio, etc.) cannot be used inside the
car unless a separate aerial is mounted
on the roof.
IMPORTANT The use of these devices
inside the passenger compartment
(without a separate aerial) may cause
the vehicle’s electronic systems to
malfunction. This could compromise
safety in addition to constituting a
potential hazard for passengers' health.
In addition, transmission and reception
of these devices may be affected by the
shielding effect of the car body. As far
as the use of EC-approved mobile
phones is concerned (GSM, GPRS,
UMTS), follow the usage instructions
provided by the mobile phone
manufacturer.
WARNING
56) Take care when fitting additional
spoilers or non-standard alloy
wheels: they could reduce the
ventilation of the brakes and
affect efficiency in sharp,
repeated braking or on long
descents. Make sure that nothing
obstructs the pedal stroke (mats,
etc.).
63DISPOSITIVI-ELETTRONICI
61
Page 74 of 215

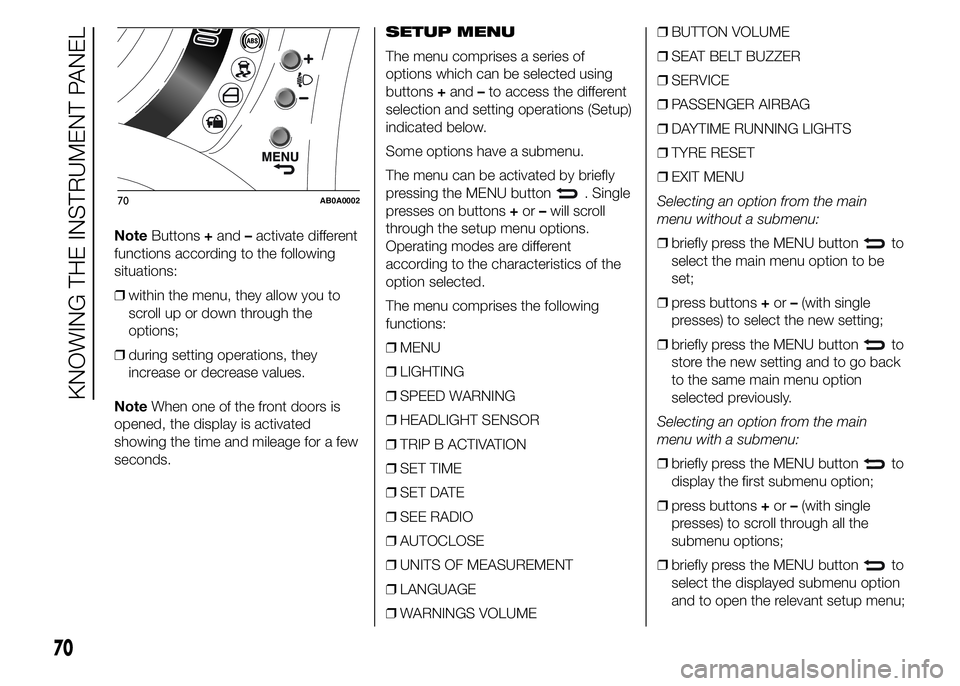
NoteButtons+and–activate different
functions according to the following
situations:
❒within the menu, they allow you to
scroll up or down through the
options;
❒during setting operations, they
increase or decrease values.
NoteWhen one of the front doors is
opened, the display is activated
showing the time and mileage for a few
seconds.SETUP MENU
The menu comprises a series of
options which can be selected using
buttons+and–to access the different
selection and setting operations (Setup)
indicated below.
Some options have a submenu.
The menu can be activated by briefly
pressing the MENU button
. Single
presses on buttons+or–will scroll
through the setup menu options.
Operating modes are different
according to the characteristics of the
option selected.
The menu comprises the following
functions:
❒MENU
❒LIGHTING
❒SPEED WARNING
❒HEADLIGHT SENSOR
❒TRIP B ACTIVATION
❒SET TIME
❒SET DATE
❒SEE RADIO
❒AUTOCLOSE
❒UNITS OF MEASUREMENT
❒LANGUAGE
❒WARNINGS VOLUME❒BUTTON VOLUME
❒SEAT BELT BUZZER
❒SERVICE
❒PASSENGER AIRBAG
❒DAYTIME RUNNING LIGHTS
❒TYRE RESET
❒EXIT MENU
Selecting an option from the main
menu without a submenu:
❒briefly press the MENU button
to
select the main menu option to be
set;
❒press buttons+or–(with single
presses) to select the new setting;
❒briefly press the MENU button
to
store the new setting and to go back
to the same main menu option
selected previously.
Selecting an option from the main
menu with a submenu:
❒briefly press the MENU button
to
display the first submenu option;
❒press buttons+or–(with single
presses) to scroll through all the
submenu options;
❒briefly press the MENU button
to
select the displayed submenu option
and to open the relevant setup menu;
70AB0A0002
70
KNOWING THE INSTRUMENT PANEL
Page 75 of 215

❒press buttons+or–(with single
presses) to select the new setting for
this submenu option;
❒briefly press the MENU button
to
store the new setting and to go back
to the same submenu option
selected previously.
MENU ITEMS
Menu
This option allows you to access the
Setup menu.
Press the+or–button to select the
various Menu items.
Hold down the MENU button
to
return to the standard screen.
Lighting (Car interior
lighting adjustment)
On some versions, the instrument panel
is provided with a light sensor capable
of detecting environmental light
conditions and adjusting the brightness
of the panel accordingly.
The brightness of the instrument panel
may therefore change while travelling
following an event causing a switch
from "day" to "night" conditions (or vice
versa) in the passenger compartment
(e.g. in a tunnel, on avenues in
shadows, under flyovers, etc.). The
lighting can be adjusted in night mode
only with dipped headlights on. If the
headlights are not on, it can be
adjusted in day mode.This function is available, with the
dipped headlights on and in night-time
conditions, to adjust the brightness
of the instrument panel, control
buttons, radio and automatic climate
control displays.
On some versions, during the daytime
and with dipped headlights on, the
instrument panel, control buttons, radio
and automatic climate control displays
are set to maximum brightness.
To adjust the brightness, proceed as
follows:
❒press the MENU button
briefly to
make the display flash the previously
stored level;
❒press button+or–to adjust the
brightness level;
❒press the MENU button
briefly to
return to the menu screen or hold the
button down to return to the
standard screen without storing.
71
Page 78 of 215

See radio (audio
information repetition)
With this function the display shows
information about the radio.
❒Radio: selected radio station
frequency or RDS message,
automatic tuning activation or
AutoSTore;
❒Audio CD, MP3 CDs: track number.
To show the radio information on the
display ("On") or clear it ("Off"), proceed
as follows:
❒press the MENU button
briefly,
the display will flash "On" or "Off"
depending on the previous setting;
❒press button+or–to select;
❒press the MENU button
briefly to
return to the menu screen or hold the
button down to return to the
standard screen without storing.Autoclose (Automatic
central locking with car
running)
(for versions/markets, where provided)
When activated (On), this function locks
the doors automatically when the
vehicle speed exceeds 20 km/h.
Proceed as follows to activate or
deactivate this function:
❒press the MENU button
briefly to
display a submenu;
❒press the MENU button
briefly,
the display will flash "On" or "Off"
depending on the previous setting;
❒press button+or–to select;
❒press the MENU button
briefly to
return to the submenu screen or hold
the button down to return to the
main menu screen without saving;
❒hold the MENU button
down
again to return to the standard
screen or to the main menu
according to where you are in the
menu.Units of measurement
(Setting)
With this function it is possible to set
the units of measurement through two
submenus: "Distance" and
"Consumption".
To set the required unit of measurement
proceed as follows:
❒briefly press the MENU button
:
the display will show the two
submenus;
❒press button+or–to switch
between the two submenus;
❒once you have selected a submenu,
press the MENU button
briefly;
❒when you select "Distances", briefly
pressing the MENU button
makes the display show "km" or
"mi" depending on the previous
setting;
❒press button+or–to select;
❒when you select "Consumption",
briefly pressing the MENU button
makes "km/l", "l/100km" or
"mpg" appear on the display
depending on the previous setting;
If the set distance unit of measurement
is "km", the fuel consumption unit will
be displayed in km/l or l/100 km.
74
KNOWING THE INSTRUMENT PANEL