Page 214 of 360
CYLINDER HEAD
5-19
EAS1SL5215
CYLINDER HEAD
Removing the cylinder head
Order Part name Q’ty Remarks
Seat Refer to “GENERAL CHASSIS” on page 4-1.
Side cover (left/right) Refer to “GENERAL CHASSIS” on page 4-1.
Air scoop (left / right) Refer to “GENERAL CHASSIS” on page 4-1.
Fuel tank Refer to “FUEL TANK” on page 7-1.
Exhaust pipe and silencer Refer to “ENGINE REMOVAL” on page 5-1.
Radiator hose Disconnect.
Coolant temperature sensor coupler Disconnect.
Throttle body Refer to “THROTTLE BODY” on page 7-5.
Camshaft Refer to “CAMSHAFT” on page 5-11.
Upper engine bracket Refer to “ENGINE REMOVAL” on page 5-1.
1 Bolt (cylinder head) 2
2 Bolt (cylinder head) 4
3 Cylinder head 1
4 Cylinder head gasket 1
5 Timing chain guide (intake side) 1
6 Oil check bolt 2
7 66
1st
2nd
Final20 Nm (2.0 m
kgf, 14 ftIbf)T.
R.
30 Nm (3.0 mkgf, 22 ftIbf)
10 Nm (1.0 mkgf, 7.2 ftIbf)T.R.
10 Nm (1.0 mkgf, 7.2 ftIbf)T.R.
15 Nm (1.5 mkgf, 11 ftIbf)T.R.
Page 230 of 360

CYLINDER AND PISTON
5-35
EAS1SL5231CHECKING THE PISTON PIN
1. Check:
• Piston pin
Blue discoloration/grooves Replace the
piston pin and then check the lubrication
system.
2. Measure:
• Piston pin outside diameter “a”
Out of specification Replace the piston
pin.
3. Measure:
• Piston pin bore inside diameter “b”
Out of specification Replace the piston.
EAS1SL5232INSTALLING THE PISTON AND CYLINDER
1. Install:
• Oil ring expander “1”
• Lower oil ring rail “2”
• Upper oil ring rail “3”
• 2nd ring “4”
• Top ring “5”
TIP
Be sure to install the piston rings so that the
manufacturer’s marks or numbers face up.
2. Install:
• Piston “1”
• Piston pin “2”
• Piston pin clip “3”
TIP
• Apply the engine oil to the piston pin.
• Install the piston with the F mark “a” on it
pointing to its intake (front) side.
• Before installing the piston pin clip, cover the
crankcase opening with a cloth to prevent the
clip from falling into the crankcase. Piston ring end gap
Top ring
End gap (installed)
0.20–0.30 mm (0.0079–0.0118 in)
Limit
0.55 mm (0.0217 in)
End gap (installed)
0.35–0.50 mm (0.0138–0.0197 in)
Limit
0.85 mm (0.0335 in)
Oil ring
End gap (installed)
0.20–0.50 mm (0.0079–0.0197 in)
Piston pin outside diameter
17.991–18.000 mm (0.7083–
0.7087 in)
Limit
17.971 mm (0.7075 in)
Piston pin bore inside diameter
18.004–18.015 mm (0.7088–
0.7093 in)
Limit
18.045 mm (0.7104 in)
b
New
Page 232 of 360
CLUTCH
5-37
EAS1SL5233
CLUTCH
Removing the clutch
Order Part name Q’ty Remarks
Engine oilDrain.
Refer to “CHANGING THE ENGINE OIL” on
page 3-15.
Brake pedal Refer to “ENGINE REMOVAL” on page 5-1.
1 Clutch cable 1 Disconnect.
2 Clutch cover 1
3 O-ring 1
4 Clutch spring 6
5 Pressure plate 1
6 Push rod 1 1
7 Circlip 1
8Washers 1
9 Bearing 1
10 Ball 1
11 Push rod 2 1
12 Friction plate 1 5
13 Clutch plate 7
LS
New
New
New
2
3 45
78961011
13
12
12
18
1
14
13
13
17
16
15
T.R.
T.R.
T.R.
T.R.
LT
Page 234 of 360
CLUTCH
5-39
Removing the right crankcase cover
Order Part name Q’ty Remarks
Right engine guard Refer to “ENGINE REMOVAL” on page 5-1.
Engine oilDrain.
Refer to “CHANGING THE ENGINE OIL” on
page 3-15.
CoolantDrain.
Refer to “CHANGING THE COOLANT” on
page 3-8.
Brake pedal Refer to “ENGINE REMOVAL” on page 5-1.
Clutch cover Refer to “CLUTCH” on page 5-37.
1 Oil filter element cover 1
2 Oil filter element 1
3 Radiator pipe 2 1
4 Kickstarter lever 1
5 Right crankcase cover 1
6 Gaskets 1
7 Dowel pin 2
8Collar 1
For installation, reverse the removal proce-
dure.
T.R.
LS
New
New
67
2
5
4
1
7 8
New
3
LS
New
New
LS
LS
NewNew
LT
LS
Page 237 of 360

CLUTCH
5-42
EAS1SL5244CHECKING THE PRIMARY DRIVEN GEAR
1. Check:
• Primary driven gear
Damage/wear Replace the primary drive
and primary driven gears as a set.
Excessive noise during operation Re-
place the primary drive and primary driven
gears as a set.
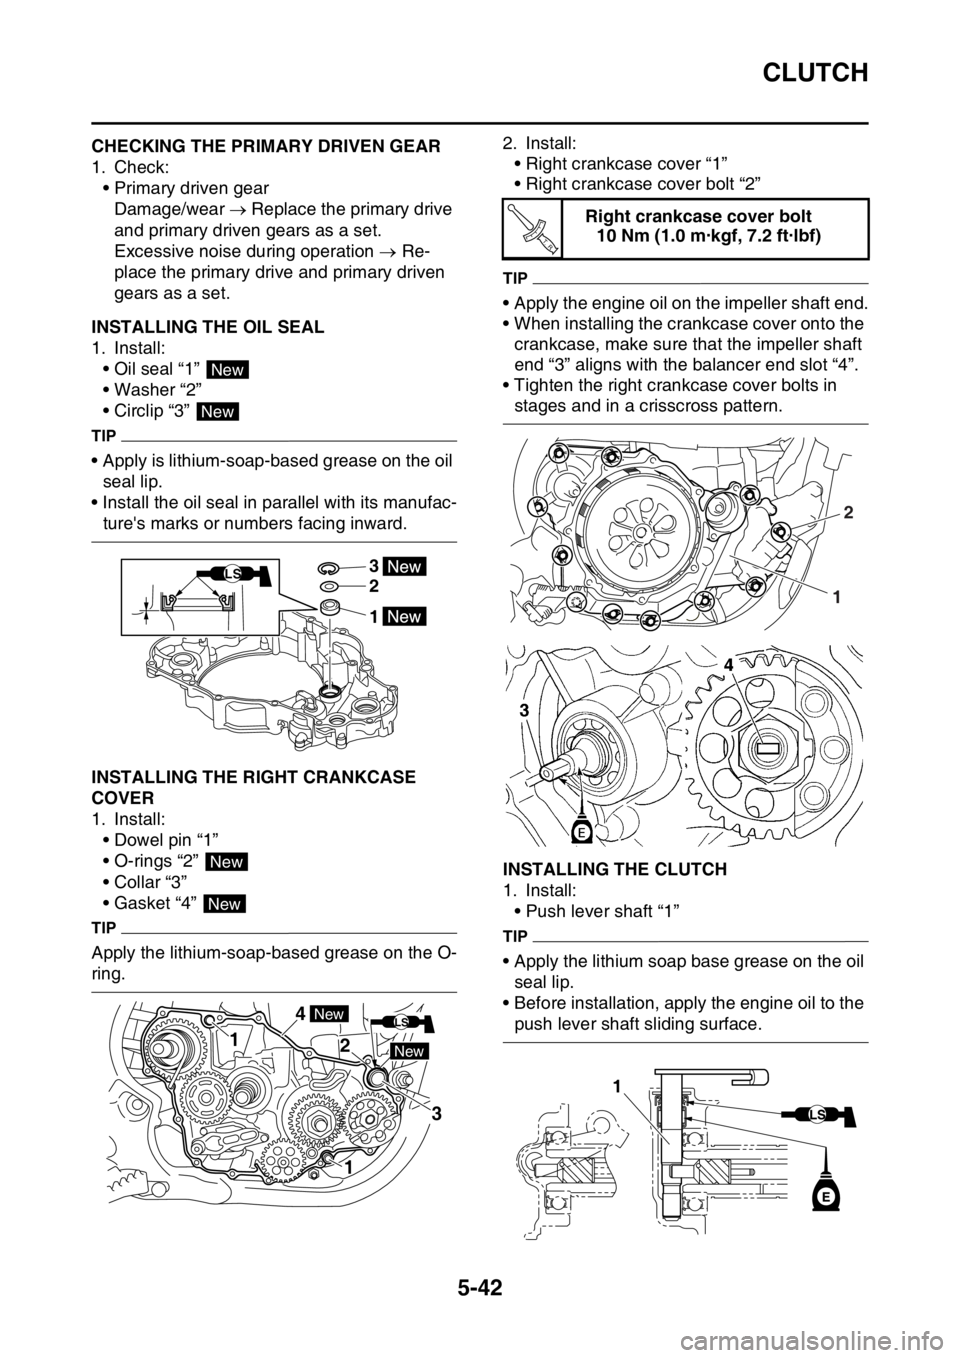
EAS1SL5245INSTALLING THE OIL SEAL
1. Install:
• Oil seal “1”
• Washer “2”
• Circlip “3”
TIP
• Apply is lithium-soap-based grease on the oil
seal lip.
• Install the oil seal in parallel with its manufac-
ture's marks or numbers facing inward.
EAS1SL5246INSTALLING THE RIGHT CRANKCASE
COVER
1. Install:
• Dowel pin “1”
• O-rings “2”
• Collar “3”
• Gasket “4”
TIP
Apply the lithium-soap-based grease on the O-
ring.2. Install:
• Right crankcase cover “1”
• Right crankcase cover bolt “2”
TIP
• Apply the engine oil on the impeller shaft end.
• When installing the crankcase cover onto the
crankcase, make sure that the impeller shaft
end “3” aligns with the balancer end slot “4”.
• Tighten the right crankcase cover bolts in
stages and in a crisscross pattern.
EAS1SL5247INSTALLING THE CLUTCH
1. Install:
• Push lever shaft “1”
TIP
• Apply the lithium soap base grease on the oil
seal lip.
• Before installation, apply the engine oil to the
push lever shaft sliding surface.
New
New
3
2
1
LS
New
New
1
1 4
2
New
New
3
LS
Right crankcase cover bolt
10 Nm (1.0 m·kgf, 7.2 ft·lbf)
T R..
12
1
Page 238 of 360

CLUTCH
5-43
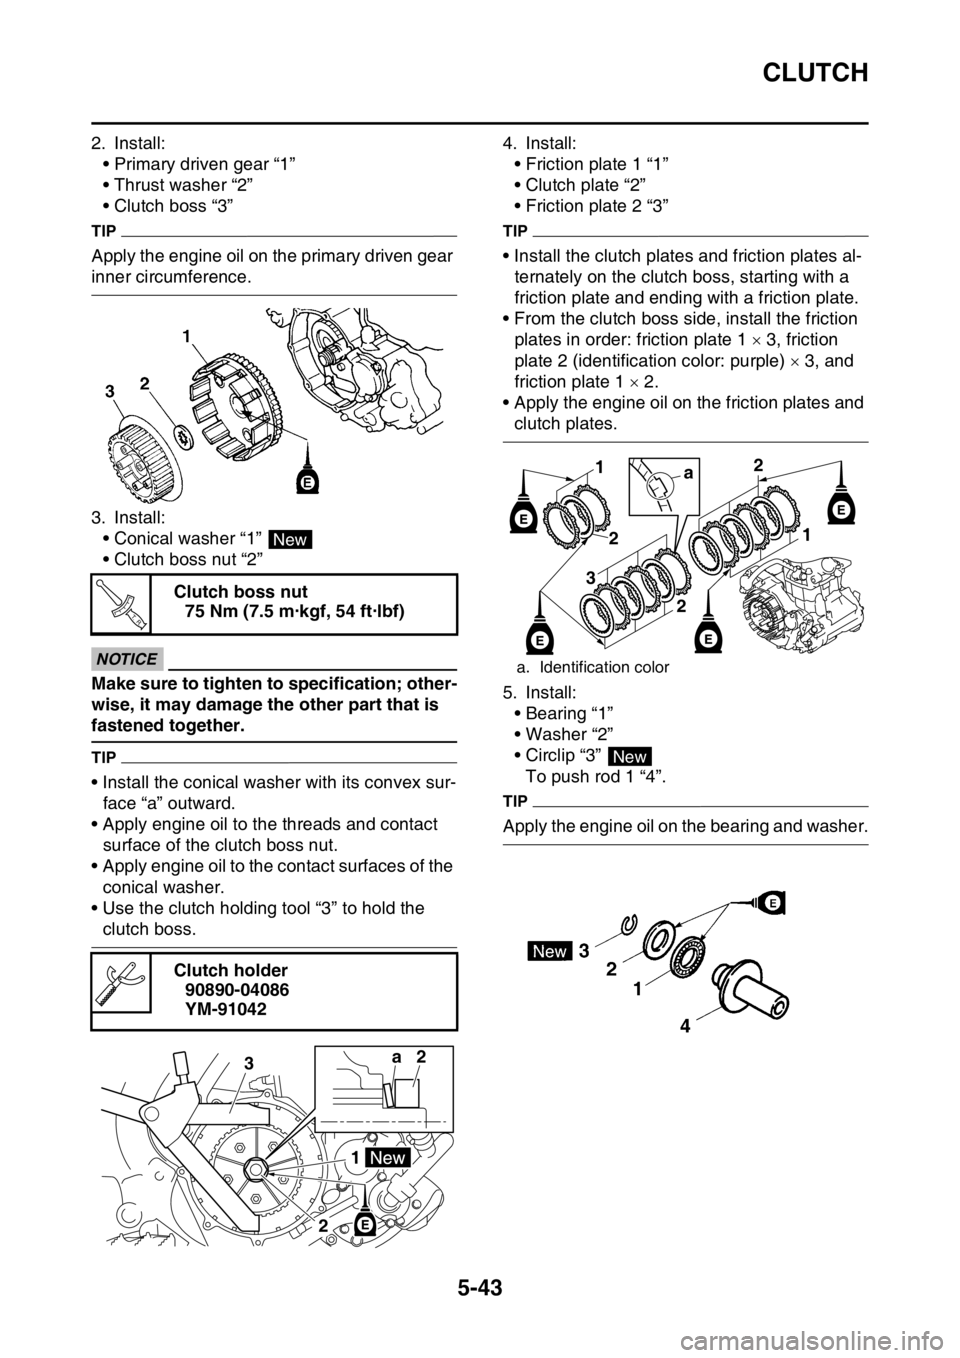
2. Install:
• Primary driven gear “1”
• Thrust washer “2”
• Clutch boss “3”
TIP
Apply the engine oil on the primary driven gear
inner circumference.
3. Install:
• Conical washer “1”
• Clutch boss nut “2”
ECA1DX1020
NOTICE
Make sure to tighten to specification; other-
wise, it may damage the other part that is
fastened together.
TIP
• Install the conical washer with its convex sur-
face “a” outward.
• Apply engine oil to the threads and contact
surface of the clutch boss nut.
• Apply engine oil to the contact surfaces of the
conical washer.
• Use the clutch holding tool “3” to hold the
clutch boss.4. Install:
• Friction plate 1 “1”
• Clutch plate “2”
• Friction plate 2 “3”
TIP
• Install the clutch plates and friction plates al-
ternately on the clutch boss, starting with a
friction plate and ending with a friction plate.
• From the clutch boss side, install the friction
plates in order: friction plate 1 3, friction
plate 2 (identification color: purple) 3, and
friction plate 1 2.
• Apply the engine oil on the friction plates and
clutch plates.
5. Install:
• Bearing “1”
• Washer “2”
• Circlip “3”
To push rod 1 “4”.
TIP
Apply the engine oil on the bearing and washer. Clutch boss nut
75 Nm (7.5 m·kgf, 54 ft·lbf)
Clutch holder
90890-04086
YM-91042
New
T R..
a2
3
21
a. Identification color
1
2a
3
2
2
1
New
Page 239 of 360
CLUTCH
5-44
6. Install:
• Push rod 2 “1”
•Ball “2”
• Push rod 1 “3”
TIP
Apply the engine oil on the push rod 1, 2 and
ball.
7. Install:
• Pressure plate “1”
8. Install:
• Clutch spring
• Clutch spring bolt
TIP
Tighten the bolts in stages and in a crisscross
pattern.9. Install:
• O-ring “1”
TIP
Apply the lithium-soap-based grease to the O-
ring.
10.Install:
• Clutch cover “1”
• Clutch cover bolt
TIP
Tighten the bolts in stages and in a crisscross
pattern.
Clutch spring bolt
10 Nm (1.0 m·kgf, 7.2 ft·lbf)
T R..
Clutch cover bolt
10 Nm (1.0 m·kgf, 7.2 ft·lbf)
New
T R..
1
Page 243 of 360
KICKSTATER
5-48
3. Install:
• Spring guide “1”
TIP
Slide the spring guide into the kick shaft, make
sure the groove “a” in the spring guide fits on
the stopper of the torsion spring.
4. Install:
• Kick shaft assembly “1”
TIP
• Before installation, apply molybdenum disul-
fide grease to the contacting surfaces of the
kick shaft ratchet wheel guide “2” and the kick
shaft stopper “a”.
• Apply the engine oil on the kick shaft.
• Slide the kick shaft assembly into the crank-
case and make sure the kick shaft stopper “a”
fits into the kick shaft ratchet wheel guide.5. Install:
• Torsion spring “1”
TIP
Turn the torsion spring clockwise and hook into
the proper hole “a” in the crankcase.
EAS1SL5254INSTALLING THE KICK IDLE GEAR
1. Install:
• Kick idle gear “1”
• Washer “2”
• Circlip “3”
TIP
• Apply the engine oil on the kick idle gear inner
circumference.
• Install the kick idle gear with its depressed
side “a” toward you.
1 2a b
New