Page 55 of 211

Do not leave any toys or other objects loose in the child seat or on the seat while the
vehicle is in motion.
Country-specific standards for child seats (selectionyf
The child seats must correspond to the standard ECE-R 44. Further information is available from
Volkswagen dealerships or on the Internet at www.volkswagen.com.
Group classification for child seats according to ECE-R 44
Weight classChild's weightAge
Group 0up to 10 kgup to approximately 9 months
Group 0+up to 13 kgup to approximately 18 months
Group 19 to 18 kgapproximately 8 months to 3/ years
Group 215 to 25 kgapproximately 3 to 7 years
Group 322 to 36 kgapproximately 6 to 12 years
Not every child will fit in the seat specified for their weight group. Likewise, not every seat will fit in
every vehicle. Therefore, always check whether the child fits correctly in the child seat and whether
the seat is securely attached in the vehicle.
Child seats that have been tested and approved in accordance with the ECE R 44 standard bear
the test mark on the seat: a large letter E in a circle with the test number below it.
ECE R: Economic Commission for Europe Regulation.
Various securing systems
Fig. 58 On the rear seats: figures Ⓐ and Ⓑ illustrate the main securing points for the child restraint
system on the lower retaining rings and top tether. Figure Ⓒ shows how to secure the child restraint
system using the vehicle seat belt
First read and observe the introductoryinformation and safety warnings⇒
Introduction
Always secure child seats properly, safely and in accordance with the instructions from the child
seat manufacturer.
The fitted child seat must sit close to the vehicle seat and must not be able to move or tip more than
2.5 cm.
Child seats that are intended to be secured using the top tether must be secured in the vehicle
using the top tether ⇒ Securing child seats with the top tether. Attach the top tether only to the
retaining rings fitted for this purpose. Always pull the top tether tightly so that the child seat is
secure and fits closely to the seat.
Country-specific securing systems
Variants of the attachment system⇒ Fig. 58:
ISOFIX retaining rings and top tether, including in Europe⇒ Securing child seats using
lower anchoring points (ISOFIX, LATCHyf and ⇒ Securing child seats with the top tether.
1yf
1
2
Ignoring any of the items on this important safety checklist can lead to accidents and injuries.
\f
Page 56 of 211

LATCH/UCRA universal anchorage attachment points and top tether, including in North
America⇒ Securing child seats using lower anchoring points (ISOFIX, LATCHyf.
Three-point automatic seat belt and top tether⇒ Securing child seats with a seat belt.
The systems consist of attachments for child restraint systems with a top tether and lower
anchoring points in the seat.
Using a child seat on the front passenger seat
First read and observe the introductoryinformation and safety warnings⇒
Introduction
Not all countries allow you to transport children on the front passenger seat. Not every child seat is
suitable for use on the front passenger seat. Volkswagen dealerships keep an up-to-date list of all
authorised child seats. Only use child seats that have been authorised for your vehicle.
The active front airbag on the front passenger side presents a major danger to a child. Transporting
a child in a rear-facing child seat on the front passenger seat can pose a danger to the child's life.
If a rear-facing child seat is secured to the front passenger seat, an inflating front passenger front
airbag can strike it with such force that critical or fatal injuries may occur ⇒. Therefore, never
use a rear-facing child seat on the front passenger seat when the front passenger front airbag is
activated.
Only use a rear-facing child seat on the front passenger seat when you have ascertained that the
front passenger front airbag has been switched off. This is confirmed when the yellow indicator
lamp in the dash panel PASSENGER AIR BAG lights up ⇒ Airbag system. If the front
passenger front airbag cannot be switched off and stays active, do not transport any children on
the front passenger seat⇒.
What to be aware of when using a child seat on the front passenger seat:
\f
Page 61 of 211

Fig. 61 Turn signal and main beam lever in the basic position
First read and observe the introductoryinformation and safety warnings⇒
Introduction
Move the lever into the required position:
Right turn signal ⇒.
Left turn signal ⇒.
Switch on the main beam ⇒. When the main beam is switched on, an indicator lamp
in the instrument cluster lights up.
Operate the headlight flasher or switch off the main beam. The headlight flasher comes on
for as long as the lever is pulled. The indicator lamp lights up.
Return the lever to the basic position to switch off the current function.
Lane change flash
To operate the lane change flash, push the lever up or down to the point where you incur resistance
and then release the lever. The turn signal flashes three times.
This lane change flash function can be deactivated at a qualified workshop.
The turn signal will only work when the ignition is switched on. The hazard warning lights
also work when the ignition is switched off ⇒ In an emergency.
If one turn signal fails, the indicator lamp will start flashing twice as fast.
The main beam headlights can only be switched on if the dipped beam headlights are
already on.
Switching lights on and off
Fig. 62 Next to the steering wheel: examples of the various light switches
First read and observe the introductoryinformation and safety warnings⇒
Introduction
Observe any country-specific regulations when using vehicle lighting.
Incorrect use of turn signals, a failure to use turn signals, or forgetting to switch off a turn
signal can confuse other road users. This can lead to accidents and serious injuries.
\f
Page 63 of 211

If you have to drive a right-hand drive vehicle in a left-hand drive country, or vice versa, the
asymmetric dipped beam headlights may dazzle oncoming traffic.
Therefore you may have to apply stickers to certain parts of the headlight lenses if you are driving
abroad. A qualified workshop can provide you with further information. Volkswagen recommends
using a Volkswagen dealership for this purpose.
Stickers may only be used on the headlights for a limited period. Please contact a qualified
workshop for a permanent alteration. Volkswagen recommends using a Volkswagen dealership for
this purpose.
Headlight range control, instrument and switch lighting
Fig. 63 Next to steering wheel: headlight range control
First read and observe the introductoryinformation and safety warnings⇒
Introduction
Headlight range control
Depending on what level it is set to, the headlight range control ⇒ Fig. 63 adjusts the position of the
light cones in the headlights according to the load level of the vehicle. This gives the driver the best
visibility possible and means that oncoming traffic will not be dazzled ⇒.
The headlights can only be adjusted when the dipped beam headlights are switched on.
To adjust, turn the control ⇒ Fig. 63:
SettingVehicle load level
\f
Page 64 of 211
Protection from the sun
Introduction
This chapter contains information on the followingsubjects:
⇒ Sun visors
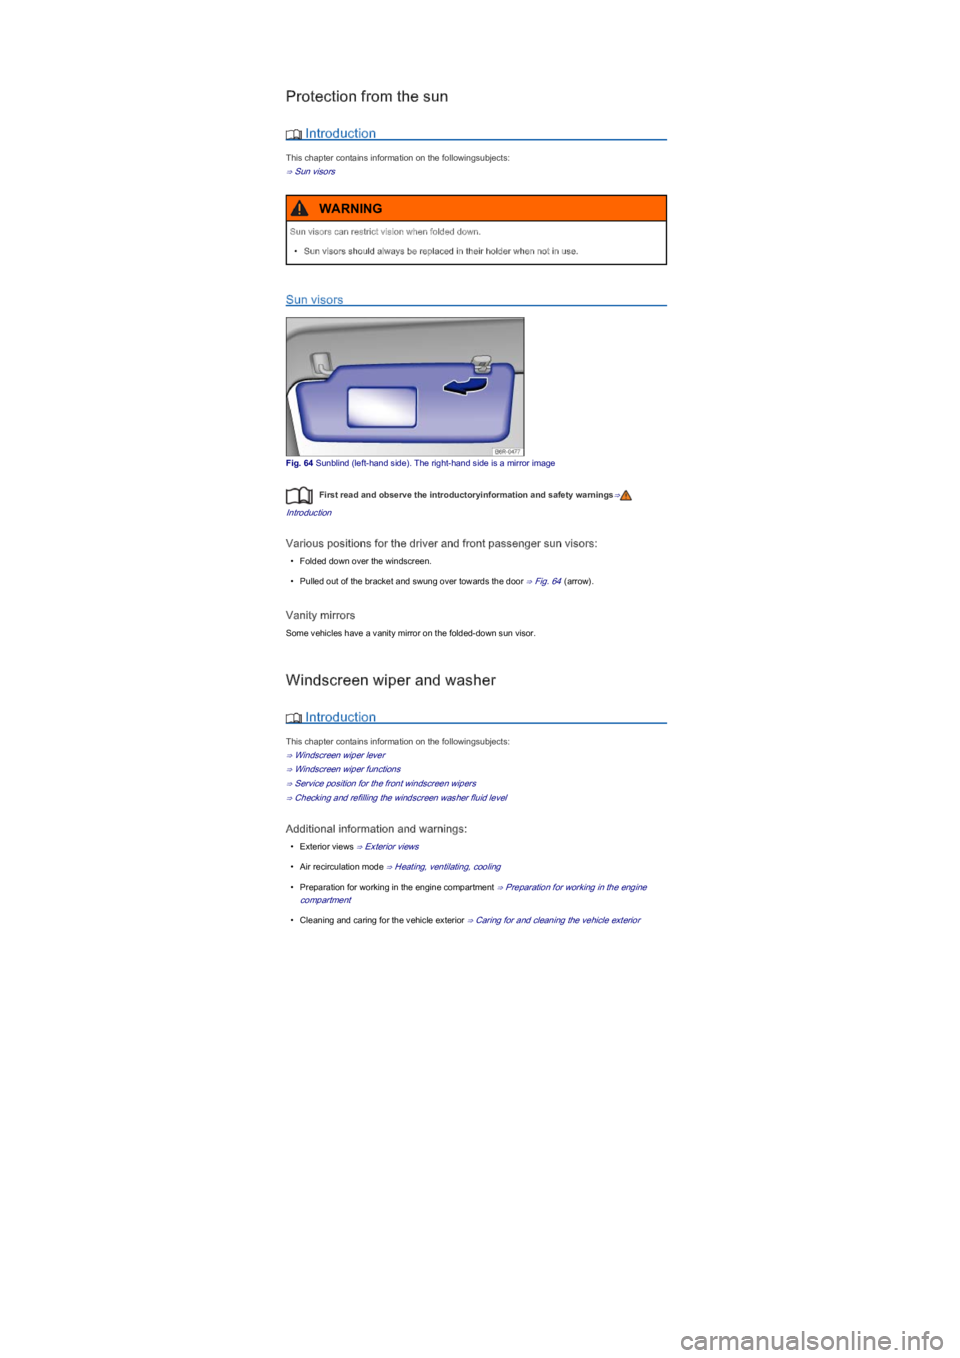
Sun visors
Fig. 64 Sunblind (left-hand sideyf�����7�K�H���U�L�J�K�W���K�D�Q�G���V�L�G�H���L�V���D���P�L�U�U�R�U���L�P�D�J�e
First read and observe the introductoryinformation and safety warnings⇒
Introduction
Various positions for the driver and front passenger sun visors:
\f
Page 65 of 211
Windscreen wiper lever
Fig. 65 Operating the front windscreen wiper
Fig. 66 Operating the rear window wiper
First read and observe the introductoryinformation and safety warnings⇒
Introduction
Move the lever into the required position ⇒:
⓪Switches off the windscreen wiper.
①Interval wipe for the windscreen.
②Slow wipe.
③Fast wipe.
④Flick wipe \f
Page 66 of 211

The windscreen wipers will only function when the ignition is switched on.
The interval wipe for the windscreen depends on the speed of the vehicle. The wipers will
wipe more frequently as the vehicle moves faster.
The rear window wiper is switched on automatically if the front windscreen wipers are
switched on and reverse gear is engaged.
Windscreen wiper functions
First read and observe the introductoryinformation and safety warnings⇒
Introduction
Windscreen wiper response in various situations:
When the vehicle is
stationary:
When switched on, the wipers will temporarily be switched to the next
setting down.
When the interval wipe is
switched on:
The wiper intervals are adjusted depending on the vehicle speed.
The faster the vehicle is travelling, the shorter the interval.
The wiper will try to wipe away any obstacles that are on the windscreen. The wiper will stop
moving if the obstacle blocks its path. Remove the obstacle and switch the wiper back on again.
Service position for the front windscreen wipers
Fig. 67 Wiper blades in service position
First read and observe the introductoryinformation and safety warnings⇒
Introduction
The windscreen wiper arms can be lifted off the windscreen when in the service position ⇒ Fig. 67.
Carry out the following steps to move the windscreen wipers to the service position:
\f
Page 67 of 211
Checking and refilling the windscreen washer fluid level
Fig. 68 In the engine compartment: cap of washer fluid reservoir
First read and observe the introductoryinformation and safety warnings⇒
Introduction
The windscreen washer fluid level should be checked regularly and topped up as necessary.
\f