Page 45 of 394
�x Using the wrong battery can damage the remote control vehicle key. Replace a dead battery with a new one that has the same voltage, size, and specifications.
�x Make sure the plus and minus poles of the battery are correctly positioned.
Dispose of old batteries in an environmentally responsible manner and keep them out of the reach of children.
Batteries of the type used in your remote control vehicle key may contain Perchlorate Material. Special handling may apply – see http://www.dtsc.ca.gov/hazardouswaste/perchlorate. Obey all legal requirements regarding handling and disposal of these batteries. Authorized Volkswagen dealers and authorized Volkswagen Service Facilities are familiar with the requirements, and we recommend that you have them perform this service for you.
Synchronizing the remote control vehicle key
�
Page 53 of 394
A driver message appears in the instrument cluster display if there is no remote control vehicle key inside the vehicle or if the system does not recognize the remote control vehicle key. The key may not be recognized, for example, if it is covered by something that interferes with the signal (such as a briefcase), or if the remote control vehicle key battery is weak. Electronic devices such as mobile phones can also interfere with the signal.
Dirt on the door handles that contains a lot of salt (especially in winter) can affect the way the
door handle sensors work. Cleaning the door handles can help with this problem ⇒ page 334, Exterior care and cleaning.
If the automatic transmission is not in Park (P) position, the electronic steering column lock will not lock and the vehicle will not lock via sensors in the front door handles or the remote control vehicle key.
Anti-theft alarm system
�
Page 63 of 394
Switches in the driver door
Key to ⇒ fig. 30:
(1) For the windows in the front doors.
(2) For the windows in the rear doors.
(3) Safety switch.
Opening or closing windows
Function Action
Opening Press the � switch.
Closing Pull the � switch.
Stopping
automatic
movement
Press/pull the respective switch again.
�_ The safety switch (3) deactivates the
power windows in the rear doors. The
yellow indicator light in the switch lights
up (4-door models only).
The power windows function only when the ignition is switched on.
You can still use the power windows for several minutes after the ignition is switched off as long as the driver or front passenger door has not been opened. When the vehicle key has been removed from the ignition and the driver door has been opened, the power windows cannot be opened or closed.
A separate button for controlling the passenger side window is located in the front passenger door.
Power windows – features
�
Page 64 of 394

�x Switch on the ignition.
�x Close all windows and doors.
�x Pull the switch for the respective window up and hold it for at least 2 seconds in this position.
�x Release the switch, pull up and hold again. The one-touch feature is now reactivated.
The one-touch feature can be reactivated for one or more windows at the same time.
Convenience closing
The convenience closing feature lets you close the windows and the power sunroof as follows:
�x From inside the vehicle: When the driver door is open, pull up and hold the switch for the driver window until all windows and the sunroof close.
�x Manual locking from outside the vehicle: Lock the vehicle with the vehicle key bit in the driver door
and keep the key turned in the locking position to close all windows and the power sunroof ⇒ Manual-ly unlocking and locking the driver door.
�x Vehicles with Keyless Access: Hold your finger on the lock sensor surface on the outside of the
door handle for a few seconds until the windows and power sunroof close ⇒ Unlocking or locking the vehicle with Keyless Access.
On appropriately equipped vehicles, a variety of settings related to window operation can be made and adjusted in the Infotainment system by pressing the �#�!�2 button followed by the �
Page 73 of 394
WARNING
Contact with parts of the vehicle interior can cause serious personal injury in a crash.
�x Always make sure that all vehicle occupants stay in a proper seating position and are properly restrained whenever the vehicle is moving.
�x Improper seating positions increase the risk of serious and fatal injury, especially when an airbag deploys and strikes a passenger in an improper seating position.
Proper seating position
Fig. 32 The driver should never sit closer than 10 inches (25 cm) of the steering wheel.
Fig. 33 Proper safety belt positioning and head restraint adjustment.
�
Page 77 of 394

If your vehicle is equipped with electrical controls for the front seats, the controls on the front passen-ger seat either mirror those on the driver seat or there may be different combinations of electrical and manual controls.
There may be manual and electrical controls on the same seat.
Press the switch in the direction of the arrow ⇒ fig. 35:
(1) (A) Slide the seat forward or back.
(B) Adjust the seat cushion angle.
(C) Raise or lower the seat cushion.
(2) (D) Adjust the backrest angle.
Press the switch in the corresponding area ⇒ fig. 36:
(1) or (2) Adjust the curve of the lumbar support.
(3) or (4) Adjust the height of the lumbar support.
WARNING
Improper use of electrical seat controls can cause serious personal injuries.
�x The front seats in your vehicle can be electrically adjusted even when the vehicle key has been removed from the ignition or, on a vehicle with Keyless Access, even if there is no key in the vehicle.
�x Never leave children and persons who need help in the vehicle alone because the unsu-pervised use of the electric seat adjustments can result in serious personal injury.
�x Always make sure that no one is in the way while the front seats are being adjusted, or while calling up the stored memory settings for the front seats. In an emergency, stop auto-matic seat adjustment by pressing a seat adjustment switch.
NOTICE
To help prevent damage to electrical parts in the seat, do not kneel on the front seats or apply concentrated pressure to a small area of the seat or backrest.
If the vehicle battery is too weak, the electrical seat adjustment controls may not work.
Starting the electric motor may stop seat adjustment.
Page 80 of 394

�x Slide a flat object, such as a plastic credit card, underneath the right side of the cap (left side if
sitting behind the head restraint) on the right-hand seat guide rod ⇒ fig. 39 (1) to unlock the head restraint.
�x Push the flat object (plastic card) in against the guide rod to depress a release button located under the cap (not visible).
�x Use one hand to hold the release button in with the flat object. With your other hand, lift the same guide rod slightly to expose a notch in the rod at the bottom (can be seen and felt with fingers). The right-hand guide rod is now released.
�x To release the left-hand guide rod, press the flat object in (towards guide rod) and hold.
�x Pull the head restraint out completely.
Installing the front head restraints
�x Position head restraint properly over the head restraint guides of the respective seat backrest and insert the head restraint into the guides.
�x Push the head restraint down ⇒ fig. 39.
�x Adjust the head restraint according to the occupant's size ⇒ Adjusting the front and rear head restraints.
WARNING
Driving without head restraints or with improperly adjusted head restraints increases the risk of serious injuries in a collision.
�x Always drive with the head restraints in place and properly adjusted to help minimize the risk of neck injury in a crash.
�x Always reinstall head restraints as soon as possible so that vehicle occupants are proper-ly protected.
NOTICE
When removing or reinstalling the head restraint, take care that the head restraint does not strike the headliner or other parts of the vehicle. The headliner or other parts of the vehicle could otherwise be damaged.
Page 82 of 394

�x If necessary, press the flat blade of the screwdriver from the vehicle tool kit into the slit of the trim
cap ⇒ fig. 41 (2) in the direction of the arrow and hold it in this position.
�x At the same time press button (2) while a second person pulls out the head restraint completely.
�x Fold the backrest of the rear seat bench back so that it locks securely.
Reinstalling the rear head restraint (both versions)
�x Unlock the backrest of the rear seat bench and fold it forward ⇒ Luggage compartment.
�x Position head restraint properly over the head restraint guides of the respective seat backrest and insert the head restraint into the guides.
�x Push the head restraint down while pressing button ⇒ fig. 40 (2) or ⇒ fig. 41 (2).
�x Fold the backrest of the rear seat bench back so that it locks securely.
�x Adjust the head restraint according to the occupant's size ⇒ Adjusting the front and rear head restraints.
WARNING
Driving without head restraints or with improperly adjusted head restraints increases the risk of serious injuries in a collision.
�x Always drive with the head restraints in place and properly adjusted to help minimize the risk of neck injury in a crash.
�x Always reinstall head restraints as soon as possible so that vehicle occupants are proper-ly protected.
NOTICE
When removing or reinstalling the head restraint, take care that the head restraint does not strike the headliner or other parts of the vehicle. The headliner or other parts of the vehicle could otherwise be damaged.
Adjusting the steering wheel position
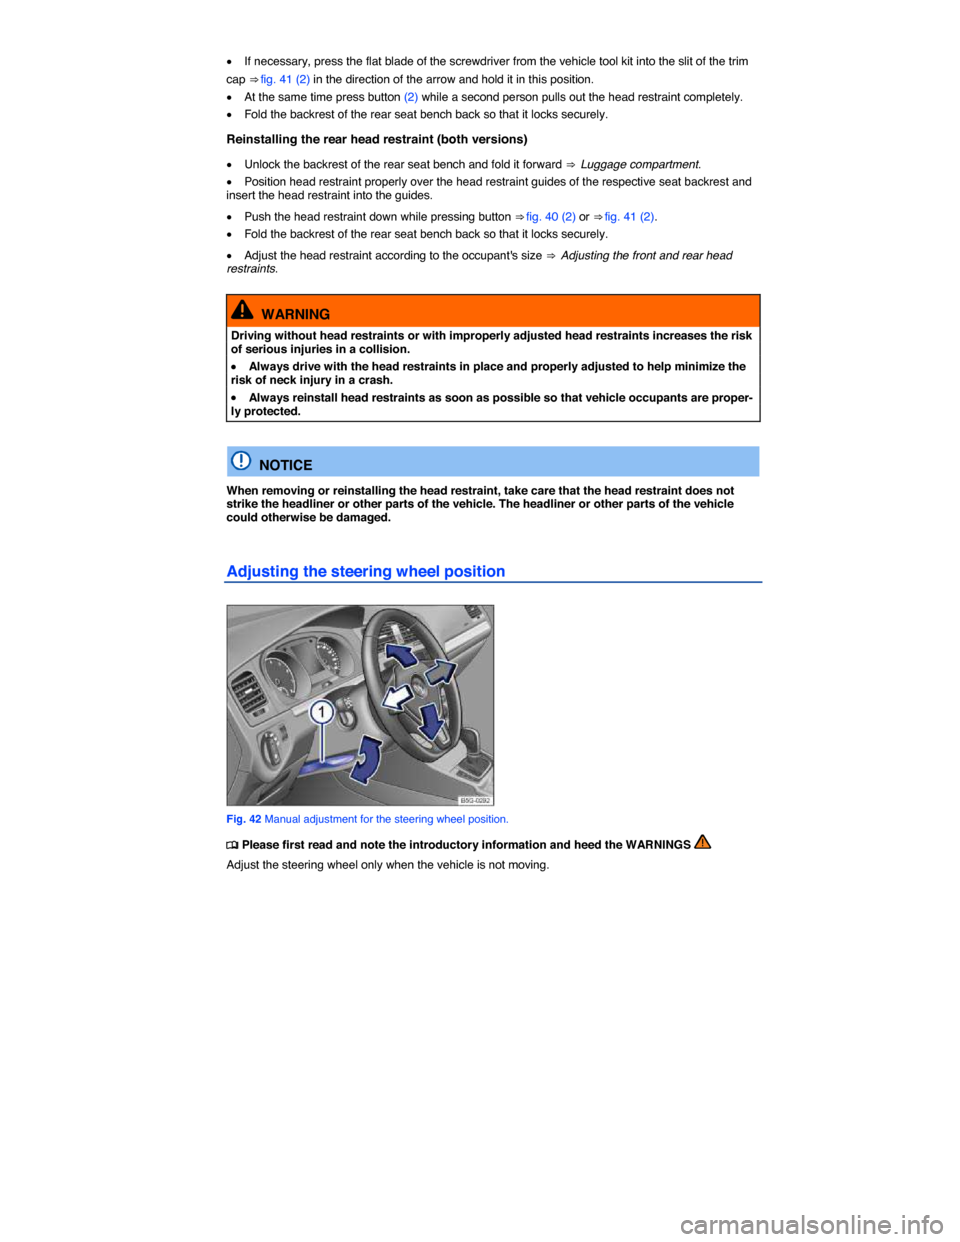
Fig. 42 Manual adjustment for the steering wheel position.
�