Page 61 of 728
61
1-3. Adjustable components (s
eats, mirrors, steering wheel)
1
Before driving
LC200_OM_OM60L83U_(U)
Tumbling the second seats and third seat entry
For easy access to the third seat, perform in “Tumbling the
second seats”. ( P. 6 2 )
■ Before tumbling the second seats
Stow the seat belt buckles and
lower the head restraints to the
lowest position.
Pass the outer seat belts through
the seat belt hangers and secure
the seat belt plates.
This prevents the shoulder belt
from being damage.
Make sure that the seat belts are
removed from the hangers before
using them.
STEP1
STEP1
ITY13C013a
STEP2
Page 64 of 728
64 1-3. Adjustable components (seats, mirrors, steering wheel)
LC200_OM_OM60L83U_(U)
Folding up the third seats
■ Before folding up the third seats
Stow the seat belts buckles.
Stow the center head restraint in the seatback. ( P. 76)
Pass the outer seat belts through
the seat belt hangers and secure
the seat belt plates.
This prevents the shoulder belt
from being damage.
Make sure that the seat belts are
removed from the hangers before
using them.
Stow the center seat belt tabs in the cover set in the roof.
( P. 7 9 )
ITY13C018
STEP1
STEP2
ITY13C021a
STEP3
STEP4
Page 66 of 728
66 1-3. Adjustable components (seats, mirrors, steering wheel)
LC200_OM_OM60L83U_(U) Secure the seats by the strikers.
Remove the seat hook covers
from the back of the seat cush-
ion, and install them on the seat
hooks.
■ Returning the third seats
Remove the seat hook covers
from the floor and install them
into the back of the seat cushion.
Unlock the seats by pulling the
stowed seat lock release levers
and lower the seats to its original
position.
STEP4
ITY13C030
STEP5
STEP1
STEP2
Page 76 of 728

76 1-3. Adjustable components (seats, mirrors, steering wheel)
LC200_OM_OM60L83U_(U)
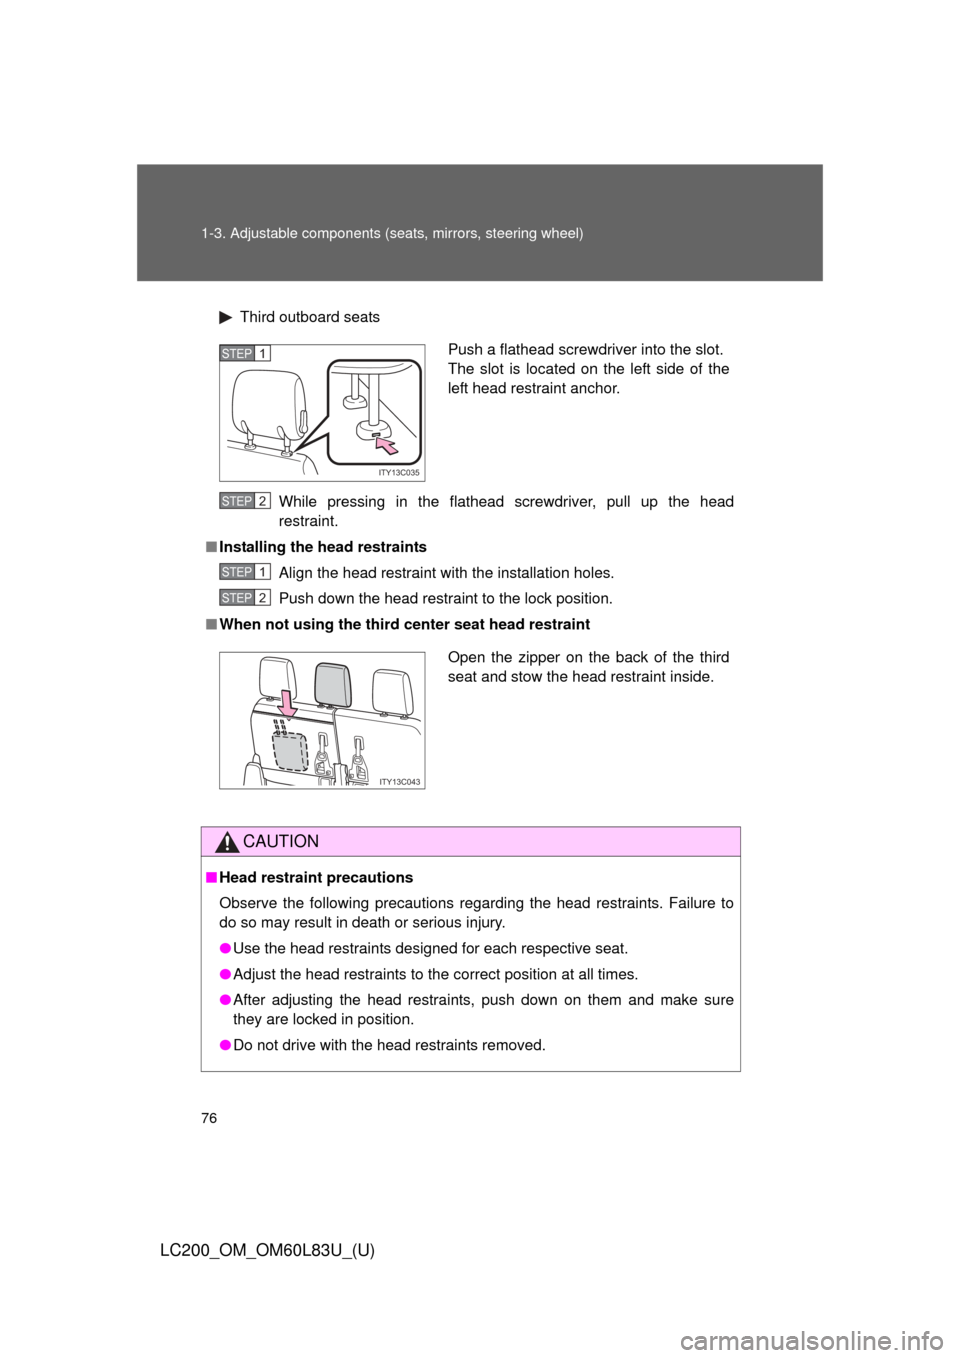
Third outboard seats
While pressing in the flathead screwdriver, pull up the head
restraint.
■ Installing the head restraints
Align the head restraint with the installation holes.
Push down the head restraint to the lock position.
■ When not using the third center seat head restraint
CAUTION
■Head restraint precautions
Observe the following precautions regarding the head restraints. Failure to
do so may result in death or serious injury.
●Use the head restraints designed for each respective seat.
● Adjust the head restraints to the correct position at all times.
● After adjusting the head restraints, push down on them and make sure
they are locked in position.
● Do not drive with the head restraints removed.
Push a flathead screwdriver into the slot.
The slot is located on the left side of the
left head restraint anchor.
ITY13C035
STEP1
STEP2
STEP1
STEP2
Open the zipper on the back of the third
seat and stow the head restraint inside.
ITY13C043
Page 521 of 728

521
4-1. Maintenance and care
4
Maintenance and care
LC200_OM_OM60L83U_(U)
NOTICE
■
Cleaning detergents
●Do not use the following types of detergent, as they may discolor the vehi-
cle interior or cause streaks or damage to painted surfaces.
• Non-seat portions: Organic substances such as benzene or gasoline,
alkaline or acidic solutions, dye, or bleach.
• Seats: Acidic solutions, such as thinner, benzene, or alcohol.
● Do not use polish wax or polish cleaner. The instrument panel’s or other
interior part’s painted surface may be damaged.
■ Preventing damage to leather surfaces
Observe the following precautions to avoid damage to and deterioration o\
f
leather surfaces.
●Remove any dust or dirt on leather surfaces immediately.
● Do not expose the vehicle to direct sunlight for extended periods of time.
Park the vehicle in the shade, especially during summer.
● Do not place items made of vinyl, plastic, or that contain wax on the uphol-
stery, as they may stick to the leather surface if the vehicle interior heats
up significantly.
■ Water on the floor
Do not wash the vehicle floor with water.
Vehicle systems such as the audio system may be damaged if water comes
into contact with electrical components under the floor of the vehicle, and
may also cause the body to rust.
■ Cleaning the inside of the rear window
●Do not use glass cleaner to clean the rear quarter windows and rear win-
dow, as this may cause damage to the antenna or rear window defogger
heater wires. Use a cloth dampened with lukewarm water to gently wipe
the window clean. Wipe the window in strokes running parallel to the
heater wires or antenna.
● Be careful not to scratch or damage the heater wires or antenna.