Page 543 of 728
543
4-3. Do-it-yourself maintenance
4
Maintenance and care
LC200_OM_OM60L83U_(U)
Power steering fluid
■ Fluid level
The fluid level should be within the appropriate range.
Full (when hot)
Add fluid (when hot)
Full (when cold)
Add fluid (when cold)
Hot: Vehicle has been driven around 50 mph (80 km/h) for 20 min- utes, or slightly longer in frig id temperatures. (Fluid tempera-
ture, 140°F - 175°F [60°C - 80°C]).
Cold: Engine has not been run for about five hours. (Room tem- perature, 50°F - 85°F [10°C - 30°C]).
■ Checking the fluid level
Make sure to check the fluid type and prepare the necessary items.
Clean all dirt off the reservoir.
Remove the cap by turning it counterclockwise.
Wipe the dipstick clean.
Reinstall and remove the reservoir cap again.
Check the fluid level.
1
23
4
ITY43C070
Fluid typeAutomatic transmission fluid DEXRON® II or III
ItemsRag or paper, Clean funnel (only for adding fluid)
STEP1
STEP2
STEP3
STEP4
STEP5
Page 544 of 728
544 4-3. Do-it-yourself maintenance
LC200_OM_OM60L83U_(U)
BatteryCheck the battery as follows:
■ Exterior
Make sure that the battery terminals are not corroded and that there
are no loose connections, cracks, or loose clamps.
Te r m i n a l s
Hold-down clamp
CAUTION
■When checking the reservoir
Take care, as the reservoir may be hot.
NOTICE
■When adding fluid
Avoid overfilling, or the power steering may be damaged.
■ After replacing the reservoir cap
Check the steering box case, vane pump and hose connections for leaks or
damage.
1
1
2
ITY43C020
Page 580 of 728

580 4-3. Do-it-yourself maintenance
LC200_OM_OM60L83U_(U)
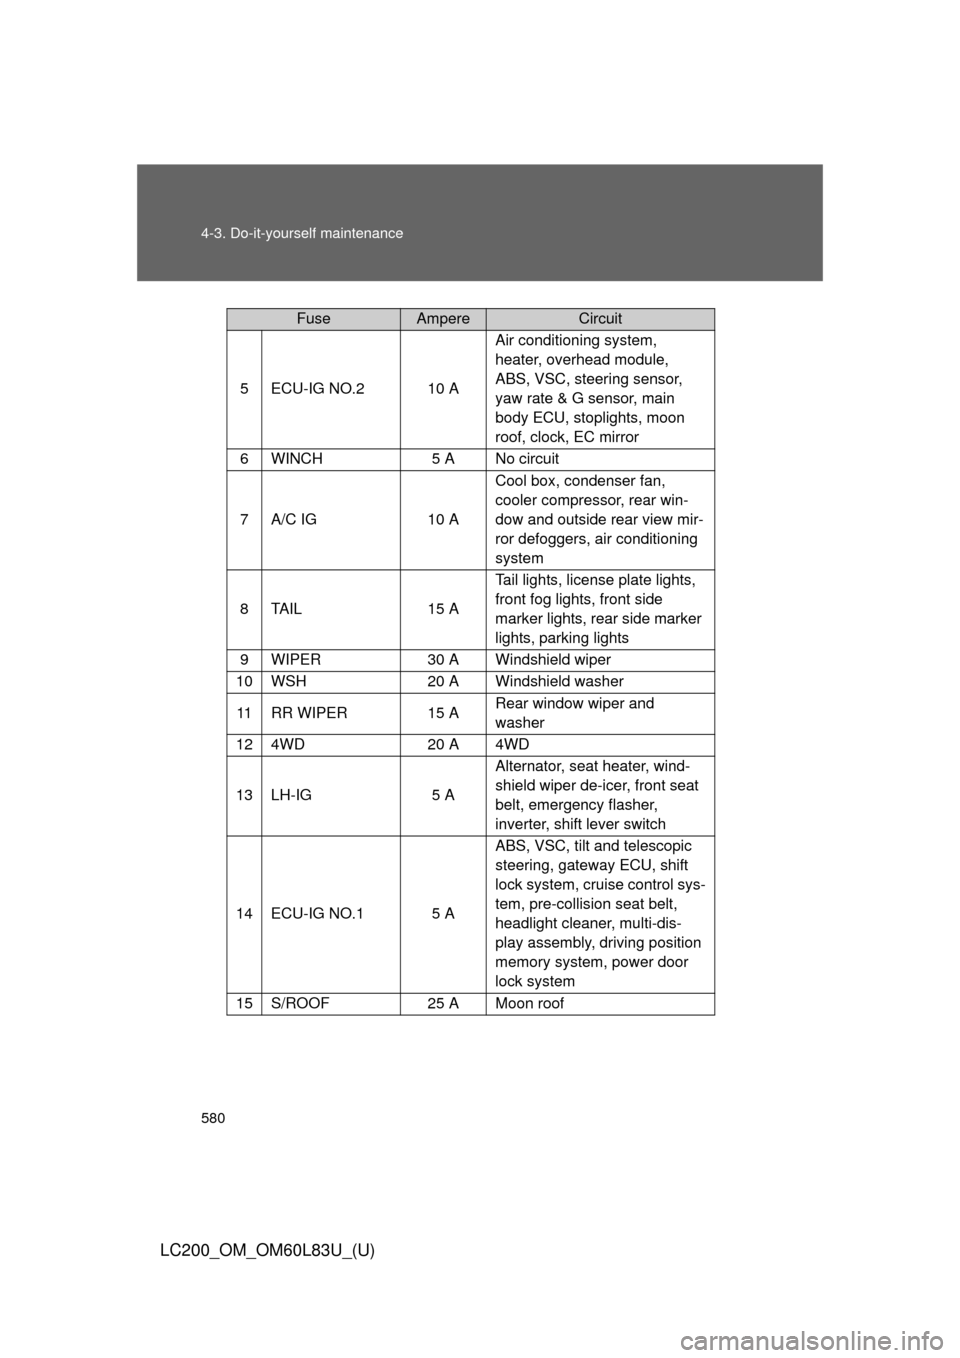
5ECU-IG NO.210 AAir conditioning system,
heater, overhead module,
ABS, VSC, steering sensor,
yaw rate & G sensor, main
body ECU, stoplights, moon
roof, clock, EC mirror
6WINCH5 A No circuit
7A/C IG10 A
Cool box, condenser fan,
cooler compressor, rear win-
dow and outside rear view mir-
ror defoggers, air conditioning
system
8TA I L15 A
Tail lights, license plate lights,
front fog lights, front side
marker lights, rear side marker
lights, parking lights
9WIPER30 A Windshield wiper
10WSH20 A Windshield washer
11RR WIPER15 A
Rear window wiper and
washer
124WD20 A 4WD
13LH-IG5 AAlternator, seat heater, wind-
shield wiper de-icer, front seat
belt, emergency flasher,
inverter, shift lever switch
14ECU-IG NO.15 AABS, VSC, tilt and telescopic
steering, gateway ECU, shift
lock system, cruise control sys-
tem, pre-collision seat belt,
headlight cleaner, multi-dis-
play assembly, driving position
memory system, power door
lock system
15S/ROOF25 A Moon roof
FuseAmpereCircuit
Page 581 of 728
581
4-3. Do-it-yourself maintenance
4
Maintenance and care
LC200_OM_OM60L83U_(U)
16RR DOOR RH20 A Power windows
17MIR15 A
Mirror ECU, outside rear view
mirror defoggers
18RR DOOR LH20 A Power windows
19FR DOOR LH20 A Power windows
20FR DOOR RH20 A Power windows
21RR FOG7.5 A No circuit
22A/C7.5 A Air conditioning system
23AM15 A No circuit
24TI & TE15 A Tilt and telescopic steering
25FR P/SEAT RH30 A Power seat
26PWR OUTLET15 A Power outlet
27OBD7.5 A On-Board diagnosis
28PSB30 A Pre-collision seat belt
29DR/LCK25 A Main body ECU
30FR P/SEAT LH30 A Power seat
31INVERTER15 A Inverter
FuseAmpereCircuit
Page 609 of 728
5
When trouble arises
609
5-1. Essential information
LC200_OM_OM60L83U_(U)
Emergency towing procedure
Securely attach a cable or chain to the towing hook.
Take care not to damage the vehicle body.
Enter the vehicle being towed and start the engine.
If the engine does not start, turn the “ENGINE START STOP”
switch to IGNITION ON mode.
Put the four-wheel drive control switch in “H4”. (The center dif-
ferential is unlocked.)
Shift the shift lever to N and release the parking brake.
When the shift lever cannot be shifted: P. 657
■While towing
If the engine is not running, the power assist for the brakes and steering will
not function, making steering and braking more difficult.
■ Wheel nut wrench
Wheel nut wrench is installed in the tool box. ( P. 641)
STEP1
STEP2
STEP3
STEP4
Page 671 of 728
5
When trouble arises
671
5-2. Steps to take in an emergency
LC200_OM_OM60L83U_(U)
CAUTION
■
If the engine has to be turned off while driving
Power assist for the brakes and steering wheel will be lost, making the brake
pedal harder to depress and the steering wheel heavier to turn. Decelerate
as much as possible before turning off the engine.
Page 682 of 728
682 6-1. Specifications
LC200_OM_OM60L83U_(U)
Steering
Tires and wheels
Free playLess than 1.18 in. (30 mm)
Power steering fluid typeAutomatic transmission fluid DEXRON® II
or III
Tire sizeP285/60R18 114V
Tire inflation pressure
(Recommended cold tire
inflation pressure)
Front tires:
33 psi (230 kPa, 2.3 kgf/cm2 or bar)
Rear tires:
33 psi (230 kPa, 2.3 kgf/cm
2 or bar)
Spare tire:
33 psi (230 kPa, 2.3 kgf/cm
2 or bar)
Wheel size18 8 J
Wheel nut torque97 ft•lbf (131 N•m, 13.4 kgf•m)
Page 693 of 728

693
6-1. Specifications
6
Vehicle specifications
LC200_OM_OM60L83U_(U)
Warning: The temperature grades of a tire assume that it is properly
inflated and not overloaded.
Excessive speed, underinflation, or
excessive loading, either sepa-
rately or in combination, can caus e heat buildup and possible tire fail-
ure.
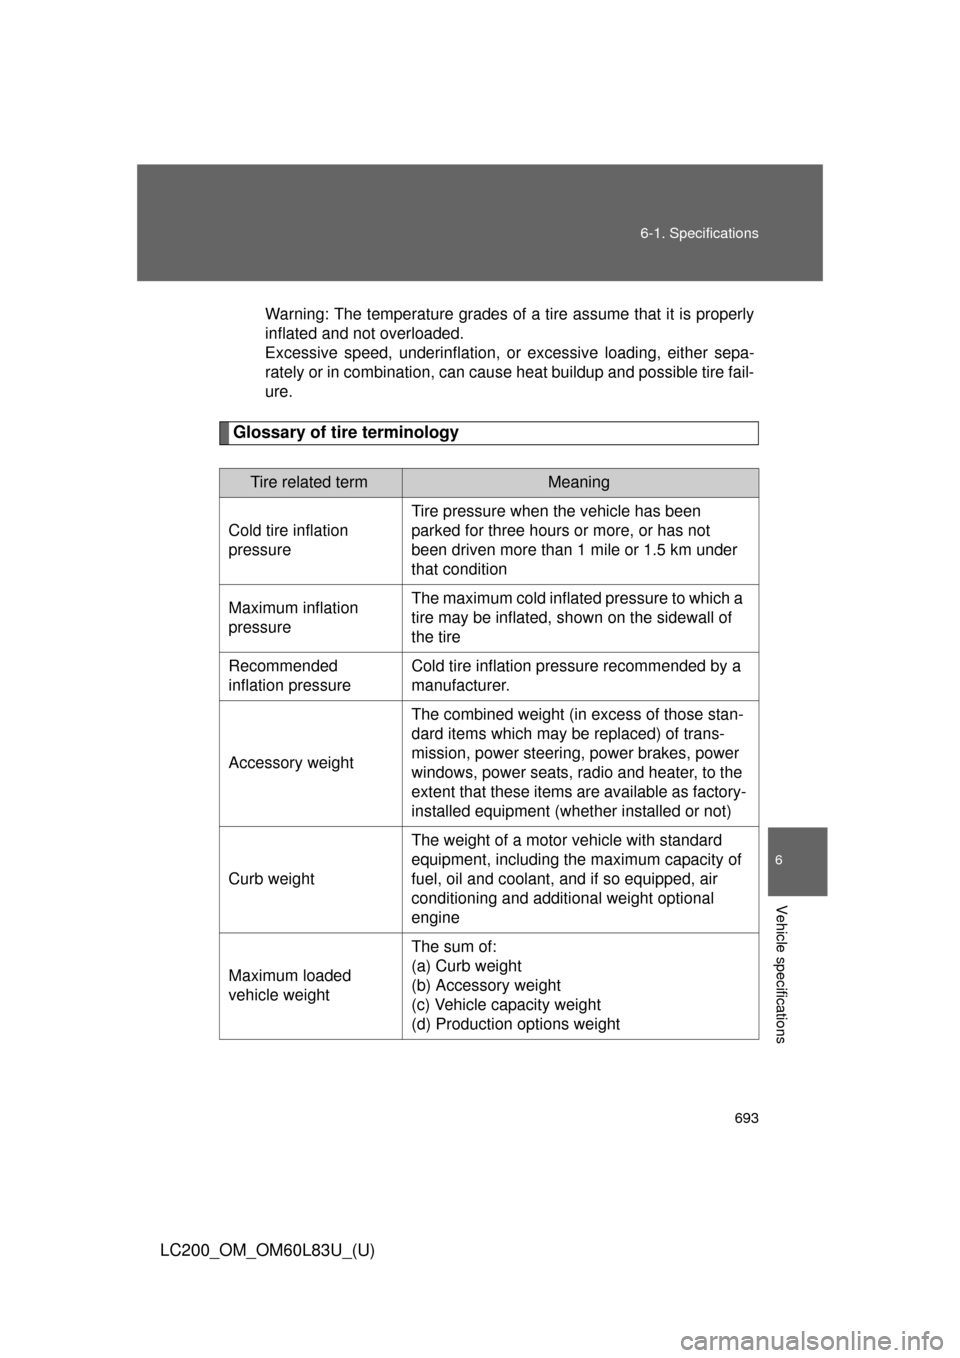
Glossary of tire terminology
Tire related termMeaning
Cold tire inflation
pressure Tire pressure when the vehicle has been
parked for three hours or more, or has not
been driven more than 1 mile or 1.5 km under
that condition
Maximum inflation
pressure The maximum cold inflated
pressure to which a
tire may be inflated, s hown on the sidewall of
the tire
Recommended
inflation pressure Cold tire inflation pressure recommended by a
manufacturer.
Accessory weight The combined weight (in excess of those stan-
dard items which may be replaced) of trans-
mission, power steering, power brakes, power
windows, power seats, radio and heater, to the
extent that these items
are available as factory-
installed equipment (whether installed or not)
Curb weight The weight of a motor vehicle with standard
equipment, including the maximum capacity of
fuel, oil and coolant, and if so equipped, air
conditioning and additional weight optional
engine
Maximum loaded
vehicle weight The sum of:
(a) Curb weight
(b) Accessory weight
(c) Vehicle capacity weight
(d) Production options weight