Page 36 of 356

36
1. BASIC INFORMATION BEFORE OPERATION
4. TOUCH SCREEN OPERATION
This system is operated mainly by the
buttons on the screen. (Referred to as
screen buttons in this manual.)
When a screen button is touched, a
beep sounds. (To set the beep sound,
see page 57.)
NOTICE
●To prevent damaging the screen, lightly
touch the screen buttons with your fin-
ger.
● Do not use objects other than your finger
to touch the screen.
● Wipe off fingerprints using a glass clean-
ing cloth. Do not use chemical cleaners
to clean the screen, as they may dam-
age the touch screen.
INFORMATION
●If the system does not respond to touch-
ing a screen button, move your finger
away from the screen and then touch it
again.
● Dimmed screen buttons cannot be oper-
ated.
● The displayed image may become
darker and moving images may be
slightly distorted when the screen is
cold.
● In extremely cold conditions, the map
may not be displayed and the data input
by a user may be deleted. Also, the
screen buttons may be harder than
usual to depress.
● When you look at the screen through
polarized material such as polarized
sunglasses, the screen may be dark and
hard to see. If so, look at the screen
from different angles, adjust the screen
settings on the “Display Settings” screen
or take off your sunglasses.
Page 39 of 356
39
1. BASIC INFORMATION BEFORE OPERATION
2
BASIC FUNCTION
■SELECTING ALL ITEMS
1Select “Select All”.
“Unselect All” : Unselect all items in the
list.
Some lists contain “Select All”. If “Se-
lect All” is selected, it is possible to
select all items.
LIST SCREEN OPERATION
When a list is displayed, use the appro-
priate screen button to scroll through
the list.
IconFunction
Select to skip to the next or previ-
ous page.
Select and hold or to
scroll through the displayed list.
This indicates the displayed
screen’s position.
If appears to the right of an
item name, the complete name is
too long to display.
Select to scroll to the end of
the name.
Select to move to the begin-
ning of the name.
Page 41 of 356

41
1. BASIC INFORMATION BEFORE OPERATION
2
BASIC FUNCTION
7. SCREEN ADJUSTMENT
1Press the “APPS” button.
2Select “Setup” .
3Select “Display” .
4Select the items to be set.
1Select “Day Mode” .
The contrast and brightness of the
screen display and the image of the
camera display can be adjusted. The
screen can also be changed to either
day or night mode.
For information regarding audio/visual
screen adjustment: P.78
No.FunctionPage
Select to adjust the screen
display.
42Select to adjust the camera
display.
Select to adjust the video
display.78
Select to turn day mode on/
off.41
INFORMATION
●When the screen is viewed through
polarized sunglasses, a rainbow pattern
may appear on the screen due to optical
characteristics of the screen. If this is
disturbing, please operate the screen
without polarized sunglasses.
CHANGING BETWEEN DAY
AND NIGHT MODE
Depending on the position of the head-
light switch, the screen changes to day
or night mode. This feature is available
when the headlight is switched on.
INFORMATION
● If the screen is set to day mode with the
headlight switch turned on, this condition
is memorized even with the engine
turned off.
Page 49 of 356
49
2. Bluetooth® SETTINGS
2
BASIC FUNCTION
2. SETTING Bluetooth® DETAILS
1Press the “APPS” button.
2Select “Setup” .
3Select “Bluetooth*” .
4Select the desired item to be set.
*: Bluetooth is a registered trademark of
Bluetooth SIG, Inc.
“Bluetooth* Setup” SCREEN
FunctionPage
Registering a Bluetooth® device50
Deleting a Bluetooth® device51
Connecting a Bluetooth® device52
Editing the Bluetooth® device infor-
mation54
Bluetooth® system settings55
Page 56 of 356

56
2. Bluetooth® SETTINGS
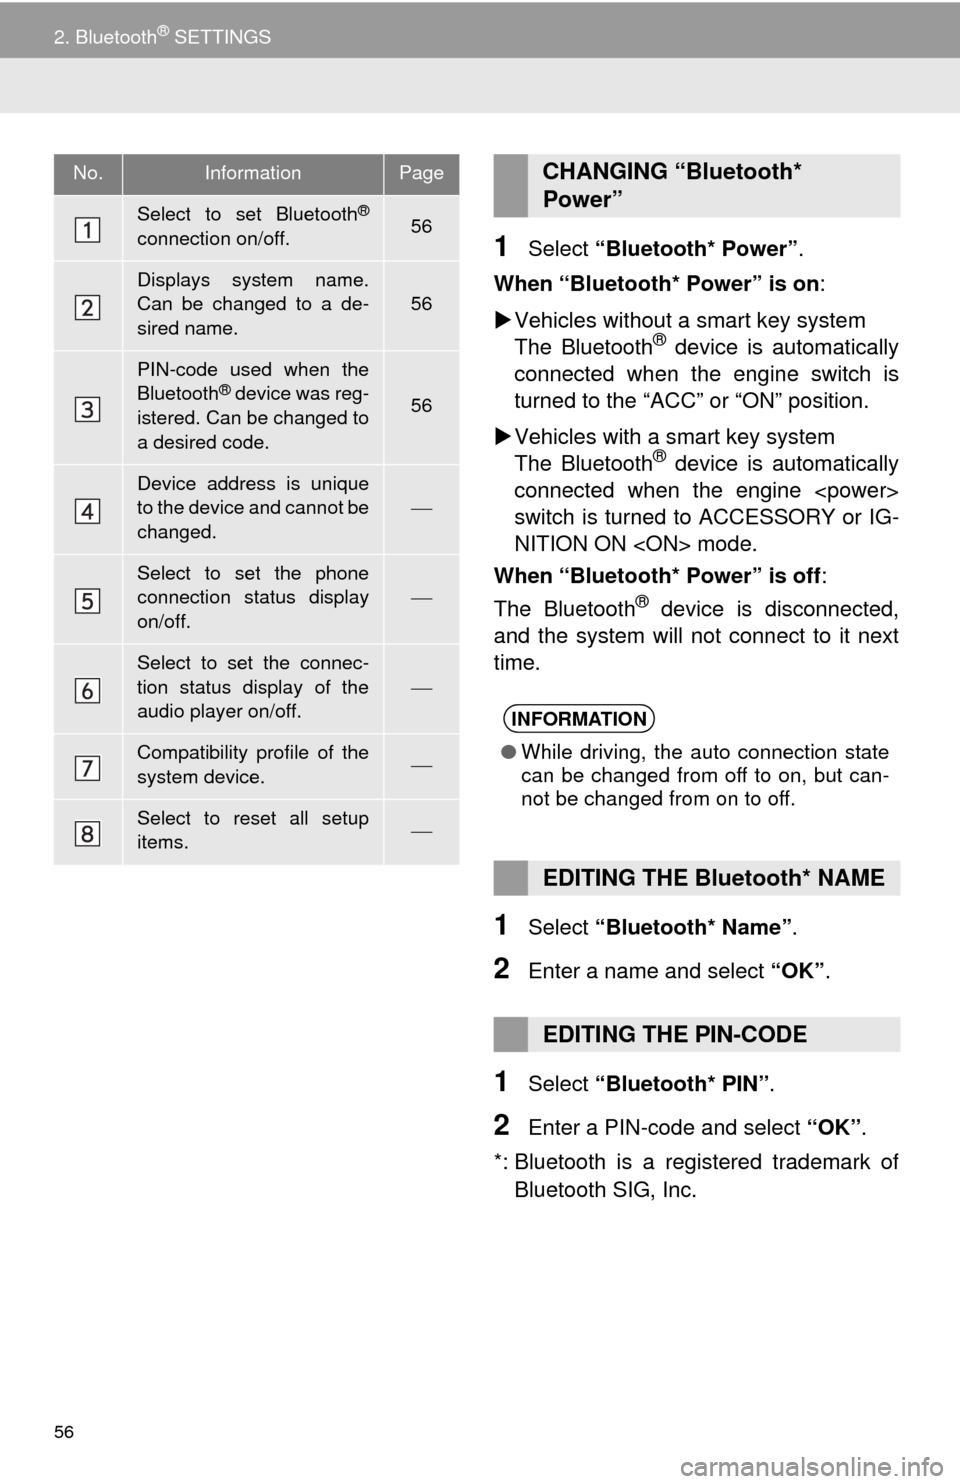
1Select “Bluetooth* Power” .
When “Bluetooth* Power” is on :
Vehicles without a smart key system
The Bluetooth
® device is automatically
connected when the engine switch is
turned to the “ACC” or “ON” position.
Vehicles with a smart key system
The Bluetooth
® device is automatically
connected when the engine
switch is turned to ACCESSORY or IG-
NITION ON mode.
When “Bluetooth* Power” is off :
The Bluetooth
® device is disconnected,
and the system will not connect to it next
time.
1Select “Bluetooth* Name” .
2Enter a name and select “OK”.
1Select “Bluetooth* PIN” .
2Enter a PIN-code and select “OK”.
*: Bluetooth is a registered trademark of Bluetooth SIG, Inc.
No.InformationPage
Select to set Bluetooth®
connection on/off.56
Displays system name.
Can be changed to a de-
sired name.
56
PIN-code used when the
Bluetooth® device was reg-
istered. Can be changed to
a desired code.56
Device address is unique
to the device and cannot be
changed.
Select to set the phone
connection status display
on/off.
Select to set the connec-
tion status display of the
audio player on/off.
Compatibility profile of the
system device.
Select to reset all setup
items.
CHANGING “Bluetooth*
Power”
INFORMATION
● While driving, the auto connection state
can be changed from off to on, but can-
not be changed from on to off.
EDITING THE Bluetooth* NAME
EDITING THE PIN-CODE
Page 67 of 356
67
3. OTHER SETTINGS
2
BASIC FUNCTION
3Select the items to be edited.■EDITING DEALER OR CONTACT
NAME
1Select “Edit” next to “Dealer” or “Con-
tact”.
2Enter the name and select “OK”.
■EDITING THE LOCATION
1Select “Edit” next to “Location”.
2Scroll the map to the desired point
(P.268) and select “OK”.
■EDITING PHONE NUMBER
1Select “Edit” next to “Phone #”.
2 Enter the phone number and select
“OK”.
No.FunctionPage
Select to enter the name of
a dealer.67
Select to enter the name of
a dealer member.67
Select to set the location.67
Select to enter the phone
number.67
Select to delete the dealer
information displayed on
the screen.
Select to set the displayed
dealer as a destination.288
Page 73 of 356
73
1. BASIC OPERATION
3
AUDIO/VISUAL SYSTEM
FunctionPage
Using the radio81, 91, 97
Playing an audio CD or MP3/WMA/AAC disc98
Playing a USB memory101
Playing an iPod®105
Playing a Bluetooth® device109
Using the AUX port11 4
Playing the VTR11 6
Using the steering wheel audio switches11 8
Audio system settings121
Rear seat entertainment system132
INFORMATION
●The display and button positions will differ depending on the type of the system.
Page 75 of 356
75
1. BASIC OPERATION
3
AUDIO/VISUAL SYSTEM
1Press the “AUDIO” button.
2Select “Source” on the audio screen
or press “AUDIO” button again.
3Select the desired source.
1Display the “Select Audio Source”
screen. (P.75)
2Select “Reorder” .
3Select the desired audio source then
or to reorder.
4Select “OK”.
SELECTING AN AUDIO
SOURCE
INFORMATION
●Dimmed screen buttons cannot be oper-
ated.
● When there are two pages, select
or to change the page.
REORDERING THE AUDIO
SOURCE