Page 240 of 356

240
2. SETUP
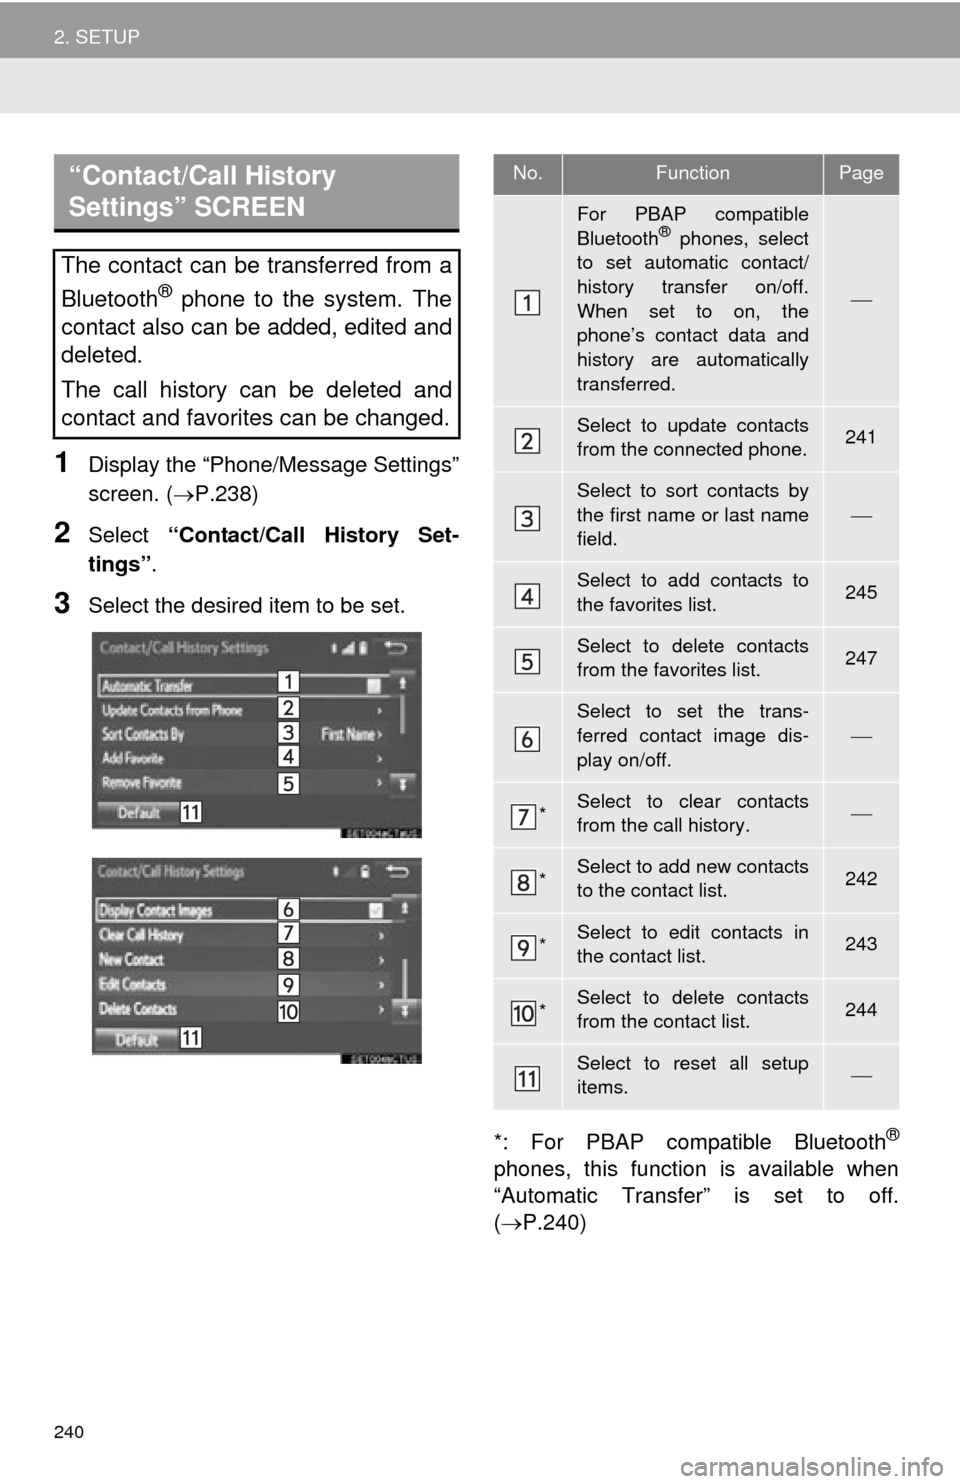
1Display the “Phone/Message Settings”
screen. (P.238)
2Select “Contact/Call History Set-
tings” .
3Select the desired item to be set.
*: For PBAP compatible Bluetooth
®
phones, this function is available when
“Automatic Transfer” is set to off.
(P.240)
“Contact/Call History
Settings” SCREEN
The contact can be transferred from a
Bluetooth
® phone to the system. The
contact also can be added, edited and
deleted.
The call history can be deleted and
contact and favorites can be changed.
No.FunctionPage
For PBAP compatible
Bluetooth® phones, select
to set automatic contact/
history transfer on/off.
When set to on, the
phone’s contact data and
history are automatically
transferred.
Select to update contacts
from the connected phone.241
Select to sort contacts by
the first name or last name
field.
Select to add contacts to
the favorites list. 245
Select to delete contacts
from the favorites list. 247
Select to set the trans-
ferred contact image dis-
play on/off.
*Select to clear contacts
from the call history.
*Select to add new contacts
to the contact list.242
*Select to edit contacts in
the contact list.243
*Select to delete contacts
from the contact list.244
Select to reset all setup
items.
Page 241 of 356

241
2. SETUP
7
PHONE
■FOR PBAP COMPATIBLE
Bluetooth
® PHONES
1Select “Update Contacts from
Phone” .
Contacts are transferred automatically.
2Check that a confirmation screen is
displayed when the operation is com-
plete.
This operation may be unnecessary
depending on the type of cellular phone.
Depending on the type of cellular phone,
OBEX authentication may be required
when transferring contact data. Enter
“1234” into the Bluetooth
® phone.
If another Bluetooth
® device is connected
when transferring contact data, depending
on the phone, the connected Bluetooth
®
device may need to be disconnected.
Depending on the type of Bluetooth
®
phone being connected, it may be neces-
sary to perform additional steps on the
phone.
■FOR PBAP INCOMPATIBLE BUT
OPP COMPATIBLE Bluetooth
®
PHONES
1Select “Update Contacts from
Phone” .
2Transfer the contact data to the system
using a Bluetooth
® phone.
This operation may be unnecessary
depending on the type of cellular phone.
Depending on the type of cellular phone,
OBEX authentication may be required
when transferring contact data. Enter
“1234” into the Bluetooth
® phone.
To cancel this function, select “Cancel”.
3Check that a confirmation screen is
displayed when the operation is com-
plete.
INFORMATION
●Depending on the type of phone, certain
functions may not be available.
● Contact data is managed independently
for every registered phone. When one
phone is connected, another phone’s
registered data cannot be read.
UPDATE CONTACTS FROM
PHONE
Operation methods differ between
PBAP compatible and PBAP incom-
patible but OPP compatible Bluetooth
®
phones.
If your cellular phone is neither PBAP
nor OPP compatible, the contacts can-
not be transferred.
This operation cannot be performed
while driving.
Page 242 of 356
242
2. SETUP
■UPDATING THE CONTACTS IN A
DIFFERENT WAY (FROM THE “Call
History” SCREEN)
1Display the phone top screen.
(P.224)
2Select the “Call History” tab and se-
lect a contact not yet registered in the
contact list.
3Select “Update Contact” .
4Select the desired contact.
5Select a phone type for the phone
number.
1Select “New Contact” .
2Enter the name and select “OK”.
3Enter the phone number and select
“OK”.
4Select the phone type for the phone
number.
5To add another number to this contact,
select “Yes”.
For PBAP compatible Bluetooth®
phones, this function is available when
“Automatic Transfer” is set to off.
( P.240)
REGISTERING A NEW
CONTACT TO THE CONTACT
LIST
New contact data can be registered.
Up to 4 numbers per person can be
registered. For PBAP compatible
Bluetooth
® phones, this function is
available when “Automatic Transfer” is
set to off. ( P.240)
Page 243 of 356
243
2. SETUP
7
PHONE
■REGISTERING A NEW CONTACT IN
A DIFFERENT WAY (FROM THE
“Call History” SCREEN)
1Display the phone top screen.
(P.224)
2Select the “Call History” tab and se-
lect a contact not ye t registered in the
contact list.
3Select “Add to Contacts” .
4Follow the steps in “REGISTERING A
NEW CONTACT TO THE CONTACT
LIST” from “STEP 2”. ( P.242)
1Select “Edit Contacts” .
2Select the desired contact.
3Select corresponding to the de-
sired name or number.
For editing the name
4Follow the steps in “REGISTERING A
NEW CONTACT TO THE CONTACT
LIST” from “STEP 2”. ( P.242)
For editing the number
4Follow the steps in “REGISTERING A
NEW CONTACT TO THE CONTACT
LIST” from “STEP 3”. ( P.242)
EDITING THE CONTACT DATA
For PBAP compatible Bluetooth
®
phones, this function is available when
“Automatic Transfer” is set to off.
( P.240)
Page 244 of 356
244
2. SETUP
■EDITING THE CONTACT IN A DIF-
FERENT WAY (FROM THE “Contact
Details” SCREEN)
1Display the phone top screen.
(P.224)
2Select the “Contacts” , “Call History”
tab or the “Favorites” tab and select
the desired contact.
3Select “Edit Contact” .
“E-mail Addresses” : Select to display all
registered e-mail addresses for the con-
tact.
4Follow the steps in “EDITING THE
CONTACT DATA” from “STEP 4”.
(P.243)
1Select “Delete Contacts” .
2Select the desired contact and select
“Delete”.
3Select “Yes” when the confirmation
screen appears.
DELETING THE CONTACT
DATA
For PBAP compatible Bluetooth
®
phones, this function is available when
“Automatic Transfer” is set to off.
( P.240)
INFORMATION
● Multiple data can be selected and
deleted at the same time.
Page 245 of 356
245
2. SETUP
7
PHONE
■DELETING THE CONTACT IN A DIF-
FERENT WAY (FROM THE “Contact
Details” SCREEN)
1Display the phone top screen.
(P.224)
2Select the “Contacts” , “Call History”
tab or the “Favorites” tab and select
the desired contact.
3Select “Delete Contact” .
4Select “Yes” when the confirmation
screen appears.
■REGISTERING THE CONTACTS IN
THE FAVORITES LIST
1Select “Add Favorite” .
2Select the desired contact to add to the
favorites list.
Dimmed contacts are already stored as a
favorite.
3Check that a confirmation screen is
displayed when the operation is com-
plete.
INFORMATION
● When a Bluetooth® phone is deleted,
the contact data will be deleted at the
same time.
FAVORITES LIST SETTING
Up to 15 contacts (maximum of 4 num-
bers per contact) can be registered in
the favorites list.
Page 246 of 356

246
2. SETUP
When 15 contacts have already been
registered to the favorites list
1When 15 contacts have already been
registered to the favorites list, a regis-
tered contact needs to be replaced.
Select “Yes” when the confirmation
screen appears to replace a contact.
2Select the contact to be replaced.
3Check that a confirmation screen is
displayed when the operation is com-
plete.
Registering contacts in the favorites list
in a different way (from the “Contacts”
screen)
1Display the phone top screen.
( P.224)
2Select the “Contacts” tab.
3Select at the beginning of the de-
sired contact list name to be registered
in the favorites list.
When selected, is changed to , and
the contact is registered in the favorites
list.
Registering contacts in the favorites list
in a different way (from the “Contact De-
tails” screen)
1Display the phone top screen.
( P.224)
2Select the “Contacts” tab or the “Call
History” tab and select the desired
contact.
3Select “Add Favorite” .
4Check that a confirmation screen is
displayed when the operation is com-
plete.
Page 247 of 356

247
2. SETUP
7
PHONE
■DELETING THE CONTACTS IN THE
FAVORITES LIST
1Select “Remove Favorite” .
2Select the desired contacts and select
“Remove”.
3Select “Yes” when the confirmation
screen appears.
4Check that a confirmation screen is
displayed when the operation is com-
plete.
Deleting contacts in the favorites list in a
different way (from the “Contacts”
screen)
1Display the phone top screen.
(P.224)
2Select the “Contacts” tab.
3Select at the beginning of the con-
tact list name to be deleted from the fa-
vorites list.
When selected, is changed to , and
the data is deleted from the list.
Deleting contacts in the favorites list in a
different way (from the “Contact Details”
screen)
1Display the phone top screen.
(P.224)
2Select the “Contacts” , “Call History”
tab or the “Favorites” tab and select
the desired contact to delete.
3Select “Remove Favorite” .
4Select “Yes” when the confirmation
screen appears.
5Check that a confirmation screen is
displayed when the operation is com-
plete.