Page 9 of 25

OVERVIEW
FEATURES/OPERATIONS
SAFETY AND EMERGENCY FEATURES
1415
FEATURES/OPERATIONS
Hold wheel, push lever down, set angle and length, and return lever.
Angle
Length
Lock release lever
NOTE: Do not attempt to adjust while the vehicle is in motion.
Tilt and telescopic steering wheel
Moonroof
Sliding operationTilting operation
Tilt
Close
Door-Power back (liftgate)
Push
Push and hold
Instrument panel Back door (liftgate) (open and close)
Open: Push and hold
Close: Push and hold again
NOTE: If battery is disconnected, the power back door needs to be reinitialized.
Refer to the Owner’s Manual for more details.
Recommended open position to
minimize wind noise.
Push once to open partway;
again to open completely.
Panoramic Moonroof (if equipped)
Shade operationTilting operation
If the moon roof is open, pressing the
switch closes it up to the tilt-up position.
If the shade is closed past the half-open
position when the switch is pressed, it will
open up to the half-open position.
To stop operation partway, quickly slide
and release the switch again.
Close
Open
Sliding operation
The moon roof stops slightly before the fully open position to reduce wind noise and the
shade opens fully. Slide the switch again to fully open or close the moon roof.
Back door (liftgate) (open only)Remote
control
Page 10 of 25

OVERVIEW
FEATURES/OPERATIONS
SAFETY AND EMERGENCY FEATURES
16
FEATURES/OPERATIONS
Seats-Head restraints
Lock release button
Lock release button
Lock release button
Pull
Height
Seats -Stowing third row seats
Refer to the Owner’s Manual for more details.
Seats -Returning third row seats
(1) Pull
Seat adjustments-Rear
Seat position (forward/backward)
Seatback angle
Seatback angle adjustment straps
Refer to the Owner’s Manual for more details.
Seat adjustments-Front
Seat cushion length adjustment*
Seat position adjustment switch
Seatback angle adjustment
Lumber support adjustment switch*
Memory position 1
Memory position 2
Set memory position switch
* These features are only available on the driver’s seat.
Power seatDriving position memory
Second row
(2) RaiseLock release button
Lock release button
Lock release button
Front and second rowThird row
Height
17
Third row seatProgrammable power liftgate
1. When the liftgate reaches the desired height, push the rear liftgate close- button (on the door jam of the liftgate) once. Press and hold the button until
it beeps 4 times.
2. To reset the height, with the liftgate open and not moving, press and hold the rear liftgate close-button until it beeps 4 times, and continue to hold until it
beeps again -then let go. Push the same button to close the liftgate. When you
next open the liftgate it will open to the maximum height.
3. The height can also be set through the “Setup” screen on the audio display. Setup > Vehicle Customization > Other Vehicle Settings > Power Back Door
Opening Adjust. Through this screen, there are 5 height options to choose
from.
NOTE: If the liftgate has stopped operating, check inside the glove box, on the left side, to ensure the PWR DOOR OFF button has not been pushed.
** For detailed instructions, see Owner’s Maual.
1
2
3
4
5
6
1
23
7
4
5
6
7
1
2
3
11
2
3
Page 11 of 25

Windshield wipers & washers
FrontRear
* Intermittent windshield wiper frequency adjustment
Rotate to increase/decrease wipe frequency.
Interval wipe
Single wipe
Slow
Fast
Pull to wash and wipe Adjust frequency*
OVERVIEW
FEATURES/OPERATIONS
SAFETY AND EMERGENCY FEATURES
18
19
Lights & turn signals
Front fog lights
Front fog lights come on only when the headlights are on low beam.
Power outlets-12V DC
Rear of center console compartment
Instrument panel
The “POWER” switch must be in the “ACCESSORY” or “ON” mode.
Power outlet-120V AC
Rear center console
compartment
Center console
The “POWER” switch must be in the ON mode.
FEATURES/OPERATIONS
Headlights
-Daytime Running Light system (DRL) (if equipped)
Automatically turns on the
headlights at a reduced intensity.
-Automatic light cut off system Lights automatically turn off after a delay of 30 seconds, or when lock switch on remote is pushed after all doors are locked.
High beam flasher
Low beam
High beam
Headlights
Parking lights Auto
DRL OFF
With DRL OFF switch
Turn
Turn signals
Right turn
Lane change
Lane change Left turn
WipeInterval wipe
Push to wash and wipe
Page 12 of 25

OVERVIEW
FEATURES/OPERATIONS
SAFETY AND EMERGENCY FEATURES
21
20
FEATURES/OPERATIONS
Multi-Information Display
Windows-Power
Up
Down
Driver sideWindow lock switch
Automatic operation front row or all-position (if equipped) Push the switch
completely down or pull it completely up and release to fully open or close. To
stop the window partway, operate the switch in the opposite direction.
Window lock switch Deactivates all passenger windows. Driver’s window
remains operable.
MicrophoneSteering wheel telephone controls
Volume control
“ < > ” switch
Use to search within the selected audio medium (radio, CD, iPod
®, etc.).
Start call
End call
vv
Push “meter control switches” to change information in the following:
(1) Drive information
(2) Navigation system linked display
(3) Audio system linked display
(4) Dynamic radar cruise control
1
(5) LDA (Lane Departure Alert) status1
(6) Warning messages
(7) Settings display
1 If equipped
Steering wheel switches
and Telephone controls (Bluetooth®)*
Bluetooth® technology allows dialing or receipt of calls without taking hands from
the steering wheel or using a cable to connect the compatible telephone and the
system. Refer to “Bluetooth
® audio/phone,” in the Owner’s Manual, for more
information about phone connections and compatibility.
* Position of buttons may vary on some vehicles, for more details please refer to the Owner’s Manual
1
2
3
4
1223
45
5
Page 13 of 25

22
FEATURES/OPERATIONS
1. Press the “APPS” button followed by the “Setup” button on the display screen.
2. Touch “Bluetooth” on the display screen
3. Touch “Add” on the display screen
4. Go to your phone and access Bluetooth settings
5. On your phone, touch the device to be paired.
6. Confirm the PIN. Touch “OK” or “Pair”
Once you have connected the Bluetooth device, it is automatically connected
whenever the “POWER” switch is in the ACCESSORY or ON mode.
** For detailed pairing instructions, see your audio system owner’s manual.
Refer to Section 3-7 of the Navigation System Owner’s Manual for more
information.
Audio System
Rear seat entertainment system (DVD player)
Remote control
AV input port
Rear seat entertainment system
(if equipped)
By inserting a mini plug into the USB/AUX port, you can listen to music from a
portable audio device through the vehicle’s speaker system while in USB/AUX mode.
USB/AUX port
OVERVIEW FEATURES/OPERATIONS
SAFETY AND EMERGENCY FEATURES
23
Audio
HOME
APPS
AUDIO
NAV
1 Refer to the “NAVIGATION AND MULTIMEDIA SYSTEM OWNER’S MANUAL”.
Map card
insert1
AUDIO Button
Access to audio functions.
HOME Button
Access to Home screen.
APPS Button
Access to traffic and weather1HOME SCREEN - the home screen offers a two
panel and a three panel layout. Information and
layout will vary depending on selected set up.
1
23
3
Entune Premium JBL Audio* with Navigation and App Suite
2
OVERVIEW
FEATURES/OPERATIONS
*
The Entune App Suite may not be pre-installed in your vehicle. In order to activate the Entune App Suite, download
and launch the Entune app on your smartphone, connect the phone to the vehicle via Bluetooth®, and open the
Entune™ App on the phone and sign in. Press the “Apps” button on the audio unit and accept the prompt to update
the Apps. The download process will take up to 15 minutes, and when it is complete, follow the on-screen prompts to
complete installation. Once the update is complete, the available Apps will be listed on the Apps menu screen.
1
2
3
4
1
2
3
4
Pairing a Bluetooth Device
Seek station/
CD track select
Turn to tune radio
stations manually or
select tracks or files
Push to display
telephone option
screen
Eject CD
Push to turn
ON/OFF
Page 14 of 25

OVERVIEW
FEATURES/OPERATIONS
SAFETY AND EMERGENCY FEATURES
25
24
Air Conditioning/Heating
Front automatic Air Conditioning
Automatic climate control ON
Adjusting the temperature setting will cause the airflow vents, air intake and
fan to adjust automatically.
Front windshield airflow/defogger
Rear windshield airflow/defogger and side mirror defogger
Temperature selector dial
Recirculate cabin air (fresh air when OFF)
Fan speed
Airflow mode selector
Temperature selector (rear)
Rear Air Conditioning ON/OFF
“SYNC” button
Indicator ON: Synchronize temperature settings for driver and all passengers.
Indicator OFF: Separate temperature settings for driver, front passenger and
rear passengers.
Air Conditioning ON/OFF
Air Conditioning/Heating
Front automatic Air Conditioning
FEATURES/OPERATIONS
Driver Easy Speak
This feature utilizes the vehicle’s built-in microphone to amplify the driver’s
voice through the rear speakers. To activate this feature, select “Driver Easy
Speak” from the Apps screen on the audio unit. The feature must be turned on
every time you enter the vehicle, and automatically turns off when any d\
oor
(including the liftgate) is opened. There are 7 volume settings.
1
2
3
4
5
6
7
8
9
10
11
1
2
3
456789
10
11
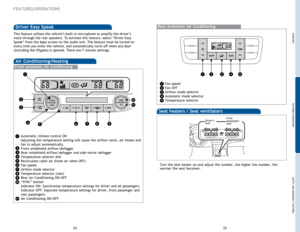
Rear automatic Air Conditioning (if equipped)
Fan speed
Fan OFF
Airflow mode selector
Automatic mode selector
Temperature selector
Rear Automatic Air Conditioning
1
2
3
4
5
12345
Seat heaters / Seat ventilators
Turn the seat heater on and adjust the number, the higher the number, the
warmer the seat becomes.
Driver’s
seatFront
passengers
seat’
Page 15 of 25

OVERVIEW
FEATURES/OPERATIONS
SAFETY AND EMERGENCY FEATURES
27
26
FEATURES/OPERATIONS
Hi temperature
OFF switch
Low temperature
Clock
Press “H” for Hours and “M” for minutes to set or change the time.
Second row seat heaters (if equipped)
Hi temperature
OFF switch
Low temperature
Hour
Minute
Cruise control
Turning system ON/OFF
System ON/OFF
Garage door opener (HomeLink®)*
(if equipped)
Garage door openers manufactured under license from HomeLink®* can be
programmed to operate garage doors, estate gates, security lighting, etc\
.
Refer to “Garage door opener,” Section 5-4 in the Owner’s Manual for more
details.
For programming assistance, contact HomeLink
® at 1-800-355-3515, or visit
http://www.homelink.com.
* HomeLink ®
is a registered trademark of Johnson Controls, Inc.
1 The set speed may also be cancelled by depressing the brake pedal.2 The set speed may be resumed once vehicle speed exceeds 25 mph.
Functions
Increase speed
Decrease speed
Cancel1
Resume2
Set
12HomeLink ®
indicator light
Garage door operation
indicator1
2
Page 16 of 25

OVERVIEW
FEATURES/OPERATIONS
SAFETY AND EMERGENCY FEATURES
29
28
SAFETY AND EMERGENCY FEATURES
If belt is fully extended, then retracted even slightly, it cannot be re-extended
beyond that point, unless fully retracted again. This feature is used to help hold
child restraint systems securely.
To find more information about seat belts, and how to install a child restraint
system, refer to the
Owner’s Manual.
Keep as low on
hips as possible
Take up slack
Too high
Seat belts
System reset initialization
1. Push and hold “
SET” button until
the indicator blinks three times.
2. Wait a few minutes to allow initialization to complete.
Tire Pressure Monitoring (warning)
System
After adjusting tire pressures, or after tires have been rotated or replaced, turn
the ignition switch to “ON” and press and hold the “
SET” button until indicator
blinks three times. Let the vehicle sit for a few minutes to allow initialization to
complete.
Refer to the load label on the door jamb or the Owner’s Manual for tire inflation
specifications.
If the
tire pressure indicator flashes for more than 60 seconds and then remains on,
take the vehicle to your local Toyota dealer.
NOTE:
The
warning light may come on due to temperature changes or changes in
tire pressure from natural air leakage. If the system has not been initialized
recently, setting the tire pressures to factory specifications should turn off the light.
Moving the lever downward will allow the door to be opened only from the outside.
Rear door
Doors-Child safety locks
Push up, or squeeze
lock release to lower
Seat belts-Shoulder belt anchor
Unlock
Lock
Third row center seat
Plate “A ”
Buckle “A ”
Plate “B”
Buckl e “B”
Plate “A ”
Buckle “A ”
Plate “B”
Buckl e “B”
(1) Take the plate out of
the holder, and then pull
down the seat belt
Plate “A ”
Buckle “A ”
Plate “B”
Buckl e “B”
(2) Push plate “A” into
buckle “A” until a click
sound is heard.(3) Push plate “B” into
buckle “B” until a click
sound is heard.