Page 362 of 464
362
5-1. Essential information
Emergency flashers
Emergency flashers
If the emergency flashers are used for a long time while the engine is not
operating, the battery may discharge.
The emergency flashers are used to warn other drivers when the
vehicle has to be stopped in the road due to a breakdown, etc.
Press the switch.
All the turn signal lights will
flash. To turn them off, press
the switch once again.
Page 372 of 464

372
5-2. Steps to take in an emergency
If a war ning light tur ns on or a warning buzzer sounds...
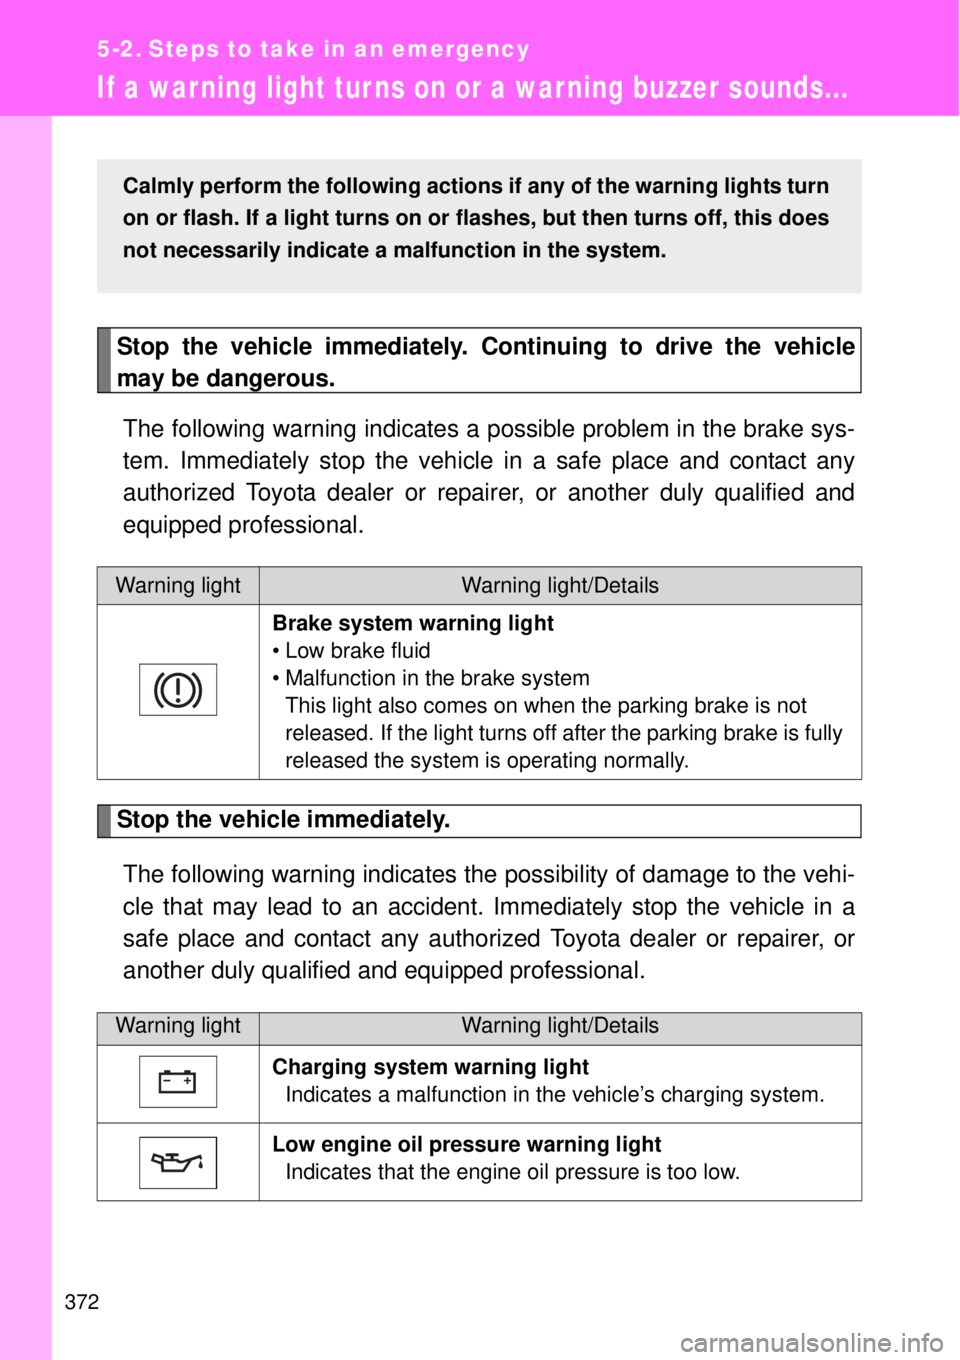
Stop the vehicle immediately. Continuing to drive the vehicle
may be dangerous.
The following warning indicates a possible problem in the brake sys-
tem. Immediately stop the vehicle in a safe place and contact any
authorized Toyota dealer or repairer, or another duly qualified and
equipped professional.
Stop the vehicle immediately.
The following warning indicates the possibility of damage to the vehi-
cle that may lead to an accident. Immediately stop the vehicle in a
safe place and contact any authorized Toyota dealer or repairer, or
another duly qualified and equipped professional.
Warning lightWarning light/Details
Brake system warning light
• Low brake fluid
• Malfunction in the brake system
This light also comes on when the parking brake is not
released. If the light turns off after the parking brake is fully
released the system is operating normally.
Warning lightWarning light/Details
Charging system warning light
Indicates a malfunction in the vehicle’s charging system.
Low engine oil pressure warning light
Indicates that the engine oil pressure is too low.
Calmly perform the following actions if any of the warning lights turn
on or flash. If a light turns on or flashes, but then turns off, this does
not necessarily indicate a malfunction in the system.
Page 409 of 464

5
409
5-2. Steps to take in an emergency
When trouble arises
If the engine will not start
If the engine will not start even though correct starting procedures
are being followed (P. 169, 178), consider each of the following
points.
The engine will not start even when the starter motor oper-
ates normally.
One of the following may be the cause of the problem.
There may not be sufficient fuel in the vehicle’s tank.
Refuel the vehicle.
The engine may be flooded.
Try to restart the engine once more following correct starting
procedures. (P. 169, 178)
There may be a malfunction in the engine immobilizer system.
(P. 9 1 )
The starter motor turns over slowly, the interior lights and
headlights are dim, or the horn does not sound or sounds at
a low volume.
One of the following may be the cause of the problem.
The battery may be discharged. (P. 418)
The battery terminal connections may be loose or corroded.
The starter motor does not turn over. (vehicles with a smart
entry & start system)
The engine starting system may be malfunctioning due to an
electrical problem such as an open circuit or a blown fuse. How-
ever, an interim measure is available to start the engine.
(P. 410)
Page 410 of 464

410 5-2. Steps to take in an emergency
Emergency start function (vehicles with a smart entry & start system)
When the engine does not start, the following steps can be used as
an interim measure to start the engine if the “ENGINE START STOP”
switch is functioning normally:
Vehicles with an automatic transmission
Set the parking brake.
Put the shift lever in P.
Set the “ENGINE START STOP” switch to ACCESSORY
mode.
Press and hold the “ENGINE START STOP” switch about 15
seconds while depressing the brake pedal firmly.
Even if the engine can be started using the above steps, the system
may be malfunctioning. Have the vehicle checked by any authorized
Toyota dealer or repairer, or another duly qualified and equipped pro-
fessional.
The starter motor does not turn over, the interior lights and
headlights do not turn on, or the horn does not sound.
One of the following may be the cause of the problem.
One or both of the battery terminals may be disconnected.
The battery may be discharged. (P. 418)
There may be a malfunction in the steering lock system. (vehi-
cles with a smart entry & start system)
Contact any authorized Toyota dealer or repairer, or another duly
qualified and equipped professional if the problem cannot be
repaired, or if repair procedures are unknown.
STEP 1
STEP 2
STEP 3
STEP 4
Page 420 of 464

420 5-2. Steps to take in an emergency
Starting the engine when the battery is discharged
The engine cannot be started by push-starting.
Avoiding a discharged battery
Turn off the headlights and the air conditioning system while the engine is
off.
Turn off any unnecessary electrical components when the vehicle is run-
ning at a low speed for an extended period, such as in heavy traffic, etc.
Charging the battery
The electricity stored in the battery will discharge gradually even when the
vehicle is not in use, due to natural discharge and the draining effects of cer-
tain electrical appliances. If the vehicle is left for a long time, the battery may
discharge, and the engine may be unable to start. (The battery recharges
automatically during driving.)
Precautions when the battery is discharged (vehicles with a smart
entry & start system)
In some cases, it may not be possible to unlock the doors using the smart
entry & start system when the battery is discharged. Use the wireless
remote control or the mechanical key to lock or unlock the doors.
The engine may not start on the first attempt after the battery has
recharged but will start normally after the second attempt. This is not a
malfunction.
Once the vehicle’s engine has started, remove the jumper
cables in the exact reverse order in which they were con-
nected.
Once the engine starts, have the vehicle checked at any autho-
rized Toyota dealer or repairer, or another duly qualified and
equipped professional as soon as possible.STEP 5
Page 444 of 464
444 6-1. Specifications
Light bulbs
A: D4S discharge bulbs B: H11 halogen bulbs
C: Wedge base bulbs (amber) D: HB3 halogen bulbs
E: Wedge base bulbs (clear) F: Double end bulbs
G: H8 halogen bulbs
Light BulbsWTy p e
ExteriorHeadlights
High beam (halogen bulbs)
Low/high beam (discharge bulbs)
Low beam (halogen bulbs)60
35
55D
A
B
Front turn signal lights 21 C
Front position lights (vehicles with halogen
headlights)5E
Daytime running lights 13
Front fog lights (vehicles with discharge head-
lights)24
Front fog lights (vehicles with halogen head-
lights) (if equipped)35 G
Rear turn signal lights 21 C
Back-up lights 16 E
Rear fog lights 21 E
License plate lights 5 E
Side turn signal lights 5 C
InteriorVanity lights (if equipped) 2 F
Interior light 10 F
Door courtesy lights (if equipped) 5 C
Trunk light (if equipped) 5 C
Page 448 of 464
448 6-2. Customization
Wireless
remote con-
trol
(
P. 51)Trunk unlocking opera-
tionPush and hold
(short)Push and hold
(long)
One short push
Two short
pushes
Automatic
light control
system
(P. 208)Light sensor sensitivity ±0% -40% to +40%
Lights
(
P. 208)Time that the low beam
headlights are on when
the vehicle is parked30 seconds60 seconds
90 seconds
120 seconds
Rear window
defogger
(
P. 256)Time elapsed before
the rear window defog-
ger turn off (vehicles
with an automatic air
conditioning system)15 minutes Continue
Illumination
(
P. 259)Time elapsed before
lights turn off15 seconds7.5 seconds
30 seconds
Operation when the
doors are unlockedOn Off
Operation after the
engine switch is turned
offOn Off
Interior light illumination
upon approach (vehi-
cles with a smart entry
& start system)On Off
Interior light illumination On Off
ItemFunctionDefault settingCustomized
setting
Page 452 of 464

452 Alphabetical index
Back-up lights
Replacing light bulbs ............. 343
Wattage................................. 444
Battery
Checking ............................... 308
If the vehicle has a
discharged battery .............. 418
Preparing and checking
before winter ....................... 233
Bottle holders........................... 263
Brake
Parking brake ........................ 192
Brake assist.............................. 225
Break-in tips ............................. 159
Brightness control
Instrument panel light
control ................................. 196Care
Alcantara®............................ 289
Exterior ................................. 282
Interior................................... 285
Seat belts .............................. 286
Chains....................................... 233
Child restraint system
Baby seats, definition............ 133
Baby seats, installation ......... 141
Child seats, definition............ 133
Child seats, installation ......... 141
Installing CRS with ISOFIX
rigid anchor......................... 145
Installing CRS with
seat belts ............................ 142
Installing CRS with
top straps............................ 146
Junior seats, definition .......... 133
Junior seats, installation ....... 141
BC