Page 9 of 23

OVERVIEW
FEATURES/OPERATIONS
SAFETY AND EMERGENCY FEATURES
1415
Power outlets-12V DC
Front console
The “ENGINE START STOP” switch must be in the ACCESSORY or IGNITION ON
mode for use.
Center console
Lights & turn signals
Turn signals
Headlights
High beam
Front fog lights (if equipped)
Headlights
-Daytime Running Light system (DRL) Automatically turns on the headlights to make vehicle more visible to other drivers. Not for use at night.
-Automatic light cut off system When the headlights are on: Automatically turns lights off after 30-second delay, or lock switch on remote may be pushed after locking.
When the tail lights are on: Automatically turns lights off when driver’s door is opened. Parking lights
Right turn
Lane change
1
Lane change2
Left turn High beam
flasher
Auto
DRL OFF
Turn
Windshield wipers & washers
Adjust sensor sensitivity2
Pull to wash and wipe
Single wipe
Auto wipe
Slow
Fast
Front fog lights come on only when the headlights are on low beam.
FEATURES/OPERATIONS
1 Intermittent windshield wiper frequency adjustment Rotate to increase/decrease wipe frequency.
2 Rain-sensing windshield wiper Rotate to increase/decrease sensor sensitivity.
With intermittent wiper
With AUTO rain-sensing wiper (if equipped)
Pull to wash and wipe
Single wipe
Interval wipe
Slow
Fast
Low beam
Automatic high beam (if equipped)
* Refer to the Owner’s Manual for details on activating the automatic high beams.
Adjust frequency1
DeactivateActivate*
1 The right hand signals will flash three times.2 The left hand signals will flash three times.
Page 10 of 23

OVERVIEW
FEATURES/OPERATIONS
SAFETY AND EMERGENCY FEATURES
1617
FEATURES/OPERATIONS
Cruise control
1 The set speed may also be cancelled by depressing the brake pedal.2 The set speed may be resumed once vehicle speed exceeds 25 mph.
Turning system ON/OFF
Functions
System ON/OFF
Increase speed
Decrease speed
Cancel1
Resume2
Garage door opener (HomeLink®)*
(if equipped)
Garage door openers manufactured under license from HomeLink®* can be
programmed to operate garage doors, estate gates, security lighting, etc\
.
Refer to “Garage door opener,” Section 5-5 in the Owner’s Manual for more
details.
For programming assistance, contact HomeLink
® at 1-800-355-3515, or visit
http://www.homelink.com.
* HomeLink® is a registered trademark of Gentex Corporation.
Set
To set, cancel and resume a speed Refer to “Functions” in the Cruise Control
section, and to the Owner’s Manual for more details.
Fixed speed mode
(1) Push
System ON/OFF
(2) Push and hold to change mode
Refer to the Owner’s Manual for more details and complete safety precautions
before attempting to use “Dynamic radar cruise control.”
Dynamic radar cruise control
(if equipped)
Distance control mode
To set, cancel and resume a speed Refer to “Functions” in the Cruise Control
section, and your Owner’s Manual for more details.
NOTE:
Once
vehicle speed is set, pushing lever up toward “+ RES” will increase
speed by 1 mph, or in 5 mph increments if held. Pushing lever down toward
“- SET” will reduce speed in the same way.
The distance control mode will cruise at a set speed, decelerate to maintain a
selected distance from a slower vehicle traveling in front of you, and accelerate
back up to the selected speed if the vehicle in front changes lanes or speeds up.
Push
Push
System ON/OFF
LONG MIDDLE SHORT
To change the vehicle-to-vehicle distance
Push the distance button to cycle through the settings, which will change
progressively from LONG to MIDDLE to SHORT.
Page 11 of 23

Windshield airflow/defogger
Outside rearview mirror/Rear defogger
Temperature se")
OVERVIEW
FEATURES/OPERATIONS
SAFETY AND EMERGENCY FEATURES
19
18
Front control panel
Temperature selector (driver side)
Windshield airflow/defogger
Outside rearview mirror/Rear defogger
Temperature selector (passenger side)
Recirculate cabin air (fresh air when OFF)
“SYNC” button
Indicator ON: Synchronized temperature settings for driver, passengers and
rear seat (if equipped).
Indicator OFF: Separate temperature settings for driver and passengers.
Air Conditioning ON/OFF
Fan speed
Climate control OFF
Automatic climate control ON
Adjusting the temperature setting will cause the airflow vents, air intake and
fan to adjust automatically.
Airflow vent
In “
/” mode, use fresh air (“” indicator ON) to reduce
window
fogging.
FEATURES/OPERATIONS
Air Conditioning/HeatingRear control panel (if equipped)
Rear control switch
Rear passenger’s temperature control
Seat ventilators/Heaters (if equipped)
Push knob to pop the controller out.
Turn clockwise for heater, counter-clockwise for ventilator.
Push Turn
With ventilator
Heater only
Push
TurnHeater
OFFVentilator
Type A
Type B
Page 12 of 23
, or to
perform certain")
OVERVIEW
FEATURES/OPERATIONS
SAFETY AND EMERGENCY FEATURES
21
20
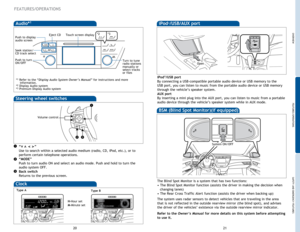
Steering wheel switches
“ ”
Use to search within a selected audio medium (radio, CD, iPod, etc.), or to
perform certain telephone operations.
“MODE”
Push to turn audio ON and select an audio mode. Push and hold to turn the
audio system OFF.
Back switch
Returns to the previous screen.vvvv
Volume control
iPod®/USB port
By connecting a USB-compatible portable audio device or USB memory to the
USB port, you can listen to music from the portable audio device or USB memory
through the vehicle’s speaker system.
AUX port
By inserting a mini plug into the AUX port, you can listen to music from a portable
audio device through the vehicle’s speaker system while in AUX mode.
FEATURES/OPERATIONS
Audio*1
Touch screen displayPush to display
audio screen
Push to turn
ON/OFFEject CD
Turn to tune
radio stations
manually or
select tracks
or files
Seek station/
CD track select*2*3
*
1 Refer to the “Display Audio System Owner’s Manual ” for instructions and more
information.
*
2 Display Audio system
*3 Premium Display Audio system
iPod®/USB/AUX port
Open
Clock
H-Hour set
M-Minute set
Type A Type B
BSM (Blind Spot Monitor)(if equipped)
The Blind Spot Monitor is a system that has two functions:
• The Blind Spot Monitor function (assists the driver in making the decision when
changing lanes)
• The Rear Cross Traffic Alert function (assists the driver when backing up)
The system uses radar sensors to detect vehicles that are traveling in the area
that is not reflected in the outside rearview mirror (the blind spot), and advises
the driver of the vehicles’ existence via the outside rearview mirror indicator.
Refer to the Owner‘s Manual for more details on this system before attempting
to use it.
System ON/OFF
Page 13 of 23

OVERVIEW
FEATURES/OPERATIONS
SAFETY AND EMERGENCY FEATURES
23
22
Rear
FEATURES/OPERATIONS
Cup holders
Front
Door locks
Lock
Unlock
SAFETY AND EMERGENCY FEATURES
Moving the lever to the lock position will allow the door to be opened only from
the outside.
Rear door
Type AType B
Doors-Child safety locks
If belt is fully extended, then retracted even slightly, it cannot be re-extended
beyond that point, unless fully retracted again. This feature is used to help hold
child restraint systems securely.
To find more information about seat belts, and how to install a child restraint
system, refer to the Owner’s Manual.
Keep as low on
hips as possible
Take up slack
Too high
Seat belts
Lock
Unlock
Wireless charger (if equipped)
A mobile device with the “” logo can be charged wirelessly. Charging can only
be performed with the “ENGINE START STOP” switch in ACCESSORY or IGNITION ON
mode. Place a mobile device on the tray. One LED indicator is illuminated while
charging and two LED indicators are illuminated when the charging is complete.
Close
OpenSystem ON/OFF
Page 14 of 23

OVERVIEW
FEATURES/OPERATIONS
SAFETY AND EMERGENCY FEATURES
25
24
SAFETY AND EMERGENCY FEATURES
Push up, or squeeze
lock release to lower
System reset initialization
1. Push and hold “
SET” button until
the indicator blinks three times.
2. Wait a few minutes to allow initialization to complete.
Seat belts-Shoulder belt anchorSpare tire & tools
Tool location
Luggage floor cover
Jack
Jack handle
Spare tire
Tool tray
Wheel nut wrench
Removing the spare tire
Trunk-Internal release
Pull up
Tire Pressure Monitoring (warning)
System
After adjusting tire pressures, or after tires have been rotated or replaced, turn
the “ENGINE START STOP” switch to IGNITION ON mode and press and hold the
“
SET” button until indicator blinks three times. Let the vehicle sit for a few
minutes to allow initialization to complete.
Refer to the load label on the door jamb or the Owner’s Manual for tire inflation
specifications.
If the
tire pressure indicator flashes for more than 60 seconds and then remains
on, take the vehicle to your local Toyota dealer.
NOTE:
The
warning light may come on due to temperature changes or changes
in tire pressure from natural air leakage. If the system has not been initialized
recently, setting the tire pressures to factory specifications should tu\
rn off the light.
Refer to the Owner’s Manual for tire changing and jack positioning procedures.
(1)
(2)
(2) Loosen the center fastener that secures the spare tire.
(1) Remove the tool tray.
Page 15 of 23

OVERVIEW
FEATURES/OPERATIONS
SAFETY AND EMERGENCY FEATURES
27
26
Star Safety SystemTM
VSC helps prevent loss of traction during cornering by reducing engine power and
applying brake force to selected wheels.
Toyota’s VSC monitors steering angle and the direction your vehicle is traveling.
When it senses that the front or rear wheels begin to lose traction, VSC reduces
engine power and applies braking to selected wheels. This helps restore traction
and vehicle control.
Vehicle Stability Control (VSC)
Anti-Lock Brake System (ABS)
ABS helps prevent brakes from locking up by “pulsing” brake pressure to each
wheel. This limits brake lockup and helps provide directional control for the
current road conditions.
Toyota’s ABS sensors detect which wheels are locking up and limits wheel lockup
by “pulsing” each wheel’s brakes independently. Pulsing releases brake pressure
repeatedly for fractions of a second. This helps the tires attain the traction that
current road conditions will allow, helping you to stay in directional control.
Brake Assist (BA)
Brake Assist is designed to detect sudden or “panic” braking, and then add braking
pressure to help decrease the vehicle’s stopping distance. When there’s only a
split second to react, Brake Assist can add additional brake pressure more quickly
than just the driver alone can. VSC helps prevent loss of traction during cornering by reducing engine power, and
Traction Control helps maintain traction on loose gravel and wet, icy, or uneven
surfaces by applying brake force to the spinning wheel(s).
Toyota’s TRAC sensors are activated when one of the drive wheels starts to slip.
TRAC limits engine output and applies the brakes to the spinning wheel. This
transfers power to the wheels that still have traction to help keep you on track.
Traction Control (TRAC)
Electronic Brake Force Distribution (EBD)
Toyota’s ABS technology has Electronic Brake-force Distribution (EBD) to help
maintain control and balance when braking. Abrupt stops can cause a vehicle
to tilt forward, reducing the braking power of the rear wheels. EBD responds to
sudden stops by redistributing brake force to enhance the braking effectiveness of
all four wheels.
SAFETY AND EMERGENCY FEATURES
All new Toyota vehicles come standard with the Star Safety SystemTM, which
combines Vehicle Stability Control (VSC), Traction Control (TRAC), Anti-lock
Braking System (ABS), Electronic Brake-force Distribution (EBD), Brake Assist (BA)
and Smart Stop Technology (SST).
There are two types of Toyota floor mats: carpeted and all-weather. Each vehicle
has model-specific floor mats. Installation is easy.
To keep your floor mat properly positioned, follow these steps:
•
Only
use floor mats designed for your specific model.
•
Use
only one floor mat at a time, using the retaining hooks to keep the mat in
place.
•
Install
floor mats right side up.
Floor mat installation
Smart Stop Technology automatically reduces driving torque when the accelerator
and brake pedals are pressed simultaneously under certain conditions.
SST engages when the accelerator is depressed first and the brakes are applied
firmly for longer than one-half second at speeds greater than five miles per hour.
SST doesn’t engage if the brake pedal is depressed before the accelerator pedal,
allowing vehicles to start on a steep hill and safely accelerate without rolling
backward.
Smart Stop Technology (SST)
Always align the Δ marks.
Page 16 of 23
29
28 29
28
BLUETOOTH® DEVICE PAIRING
SECTION