Page 140 of 492
140
1-7. Safety information
Installing child restraints using a seatbelt (child restraint lock
function belt)
■Rear facing Infant seat/convertible seat
Place the child restraint system
on the rear seat facing the rear
of the vehicle.
Run the seatbelt through the
child restraint system and insert
the plate into the buckle. Make
sure that the belt is not twisted.
Fully extend the shoulder belt
and allow it to retract to put it in
lock mode. In lock mode, the belt
cannot be extended.
STEP 1
STEP 2
STEP 3
Page 141 of 492
141
1-7. Safety information
1
Before driving
While pushing the child restraint
system down into the rear seat,
allow the shoulder belt to retract
until the child restraint system is
securely in place.After the shoulder belt has
retracted to a point where there is
no slack in the belt, pull the belt to
check that it cannot be extended.
■Forward facing Convertible seat
Place the child restraint system
on the seat facing the front of the
vehicle.
Run the seatbelt through the
child restraint system and insert
the plate into the buckle. Make
sure that the belt is not twisted.
Fully extend the shoulder belt
and allow it to retract to put it in
lock mode. In lock mode, the belt
cannot be extended.
STEP 4
STEP 1
STEP 2
STEP 3
Page 144 of 492

144
1-7. Safety information
■When installing a child restraint system with LA TCH anchors and a top
tether strap
Depending on the child restraint system's size and shape, if the child
restraint system is installed to the LATCH anchors first, it may not be possi-
ble to attach the top tether strap to the anchor bracket.
In that case, first temporarily attach the top tether strap to the anchor
bracket, install the child restraint system using the lower anchors and then
tighten the top tether strap.
■Laws and regulations pertaining to anchorages
The LATCH system conforms to FMVSS225 or CMVSS210.2.
Child restraint systems conforming to FMVSS213 or CMVSS213 specifica-
tions can be used.
This vehicle is designed to conform to the SAE J1819.
WARNING
■When installing a booster seat
To prevent the belt from going into ALR lock mode, do not fully extend the
shoulder belt. ALR mode causes the belt to tighten only. This could cause
injury or discomfort to the child. ( →P. 60)
■When installing a child restraint system
Follow the directions given in the child restraint system installation manual
and fix the child restraint system securely in place.
If the child restraint system is not correctly fixed in place, the child or other
passengers may be injured or even killed in the event of sudden braking,
sudden swerving or an accident.
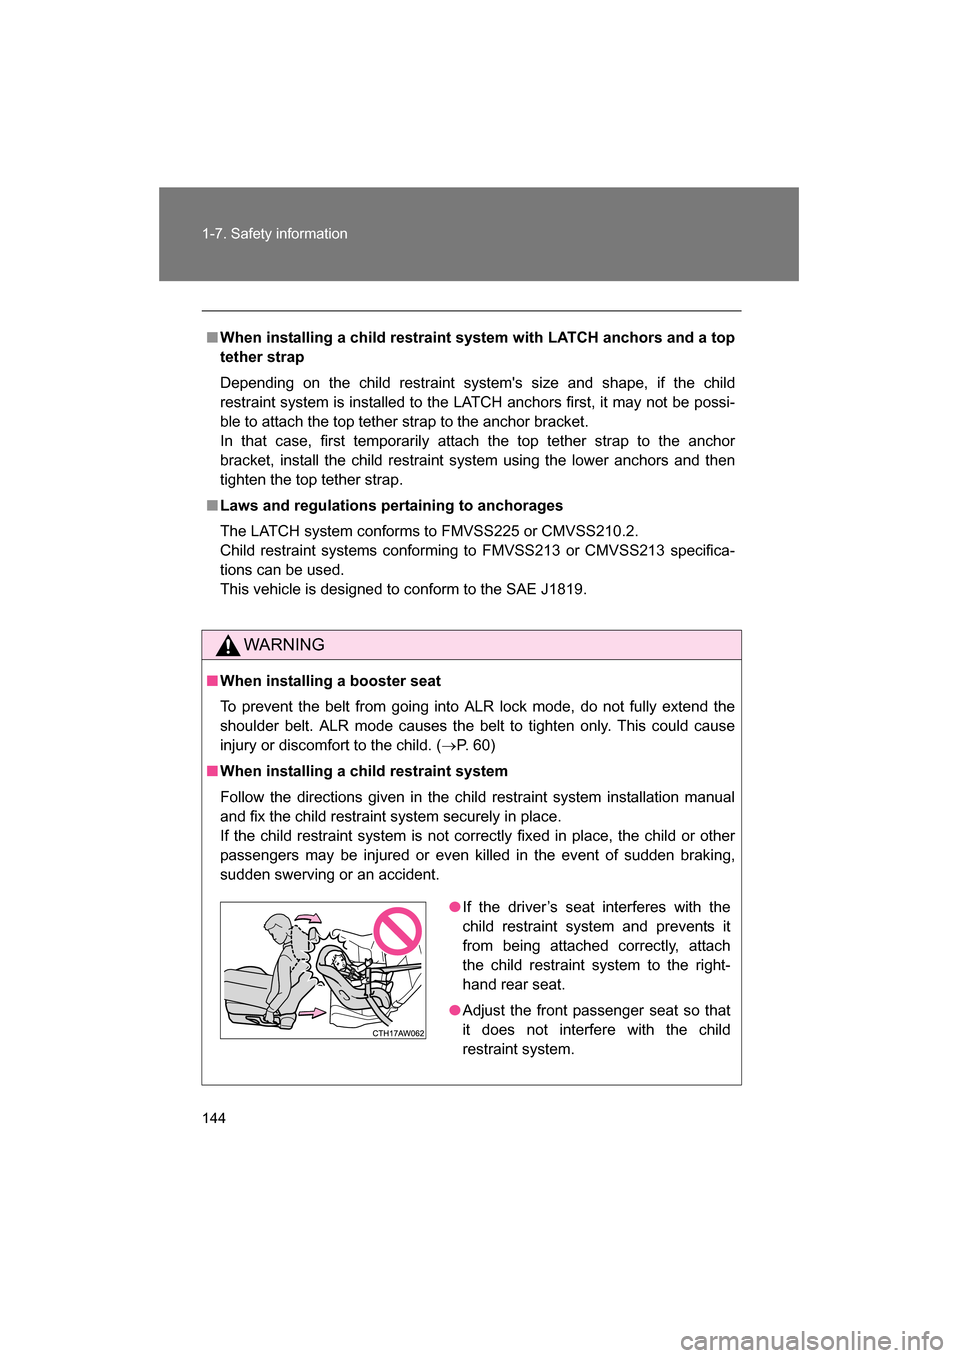
●If the driver’s seat interferes with the
child restraint system and prevents it
from being attached correctly, attach
the child restraint system to the right-
hand rear seat.
●Adjust the front passenger seat so that
it does not interfere with the child
restraint system.
Page 145 of 492
145
1-7. Safety information
1
Before driving
WARNING
■When installing a child restraint system
●Ensure that the belt and plate are securely locked and the seatbelt is not
twisted.
●Shake the child restraint system left and right, and forward and backward
to ensure that it has been securely installed.
●When adjusting the front passenger seat position after installing a child
restraint system, do so slowly.
●Follow all installation instructions provided by the child restraint system
manufacturer.
■To correctly attach a child restraint system to the anchors
When using the LATCH anchors, be sure that there are no foreign objects
around the anchors and that the seatbelt is not caught behind the child
restraint. Make sure the child restraint system is securely attached, or it may
cause death or serious injury to the child or other passengers in the event of
sudden braking, sudden swerve or an accident.
Page 149 of 492

149
2-1. Driving procedures
2
When driving
■Parking the vehicle
Vehicles with an automatic transmission With the select lever in D, depress the brake pedal.
Shift the select lever to P. ( →P. 174)
Set the parking brake. ( →P. 185)
Vehicles without a keyless access with push button start
system:
Turn the engine switch to the “LOCK” position to stop the
engine.
Vehicles with a keyless access with push button start sys-
tem:
Press the push-button ignition switch to stop the engine.
Lock the door, making sure that you have the key on your
person.
If parking on a hill, block the wheels as needed.
Vehicles with a manual transmission While depressing the clutch pedal, depress the brake
pedal.
Shift the shift lever to neutral. ( →P. 181)
Set the parking brake. ( →P. 185)
Vehicles without a keyless access with push button start
system:
Turn the engine switch to the “LOCK” position to stop the
engine.
Vehicles with a keyless access with push button start sys-
tem:
Press the push-button ignition switch to stop the engine.
Lock the door, making sure that you have the key on your
person.
If parking on a hill, shift the shift lever to 1 or R and block the
wheels as needed.
STEP 1
STEP 2
STEP 3
STEP 4
STEP 5
STEP 1
STEP 2
STEP 3
STEP 4
STEP 5
Page 161 of 492

161
2-1. Driving procedures
2
When driving
CAUTION
■Replacement of brake pad and lining
If you continue to drive despite the scraping noise from the audible brake
pad wear indicator, it will result in the need for costly brake rotor repair or
replacement.
■Breaking-in of new brake pads and linings
Pulling the parking brake lever too forcefully may cause the rear wheels to
lock. To avoid this, be certain to pull the lever up slowly and gently.
■If you get a flat tire while driving
A flat or damaged tire may cause the following situations. Hold the steering
wheel firmly and gradually depress the brake pedal to slow down the vehicle.
●It may be difficult to control your vehicle.
●The vehicle will make abnormal sounds or vibrations.
●The vehicle will lean abnormally.
Information on what to do in case of a flat tire ( →P. 384)
■When encountering flooded roads
Do not drive on a road that has flooded after heavy rain etc. Doing so may
cause the following serious damage to the vehicle:
●Engine stalling
●Short in electrical components
●Engine damage caused by water immersion
In the event that you drive on a flooded road and the vehicle is flooded, be
sure to have your SUBARU dealer check the following:
●Brake function
●Changes in quantity and quality of oil and fluid used for the engine, trans-
mission, differential, etc.
●Lubricant condition for the propeller shaft, bearings and suspension joints
(where possible) and the function of all joints, bearings, etc.
Page 167 of 492

167
2-1. Driving procedures
2
When driving
■Operation of the push-button ignition switch
When operating the push-button ignition switch, one short, firm press is
enough. If the switch is pressed improperly, the engine may not start or the
push-button ignition switch mode may not change. It is not necessary to
press and hold the switch.
■Access key battery depletion
→ P. 3 4
■Conditions affecting operation
→P. 3 0
■Note for the “keyless access” entry function
→P. 3 1
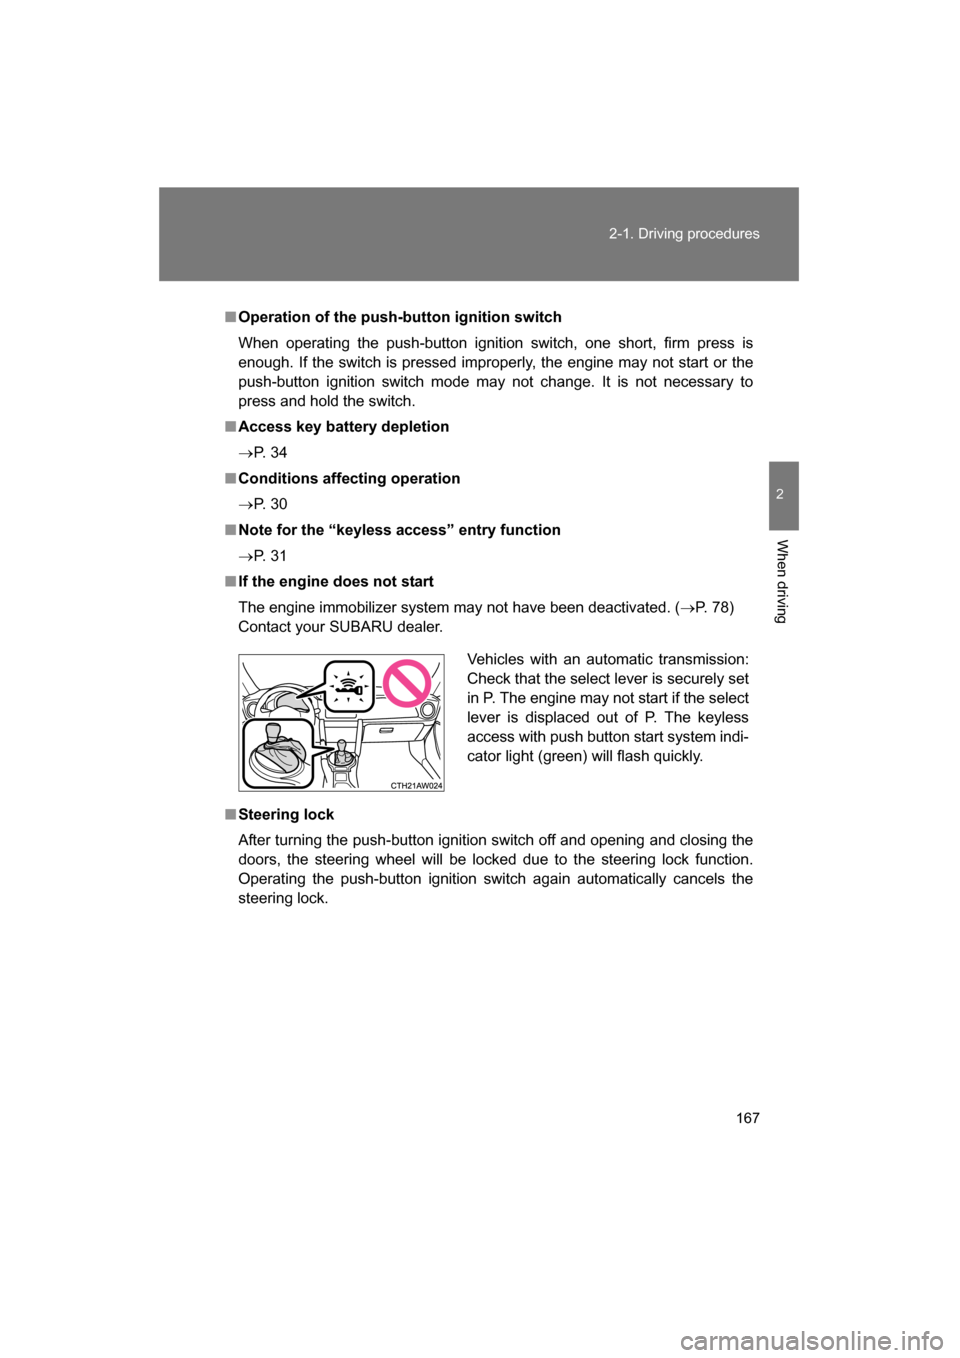
■If the engine does not start
The engine immobilizer system may not have been deactivated. ( →P. 78)
Contact your SUBARU dealer.
■Steering lock
After turning the push-button ignition switch off and opening and closing the
doors, the steering wheel will be locked due to the steering lock function.
Operating the push-button ignition switch again automatically cancels the
steering lock. Vehicles with an automatic transmission:
Check that the select lever is securely set
in P. The engine may not start if the select
lever is displaced out of P. The keyless
access with push button start system indi-
cator light (green) will flash quickly.
Page 168 of 492

168
2-1. Driving procedures
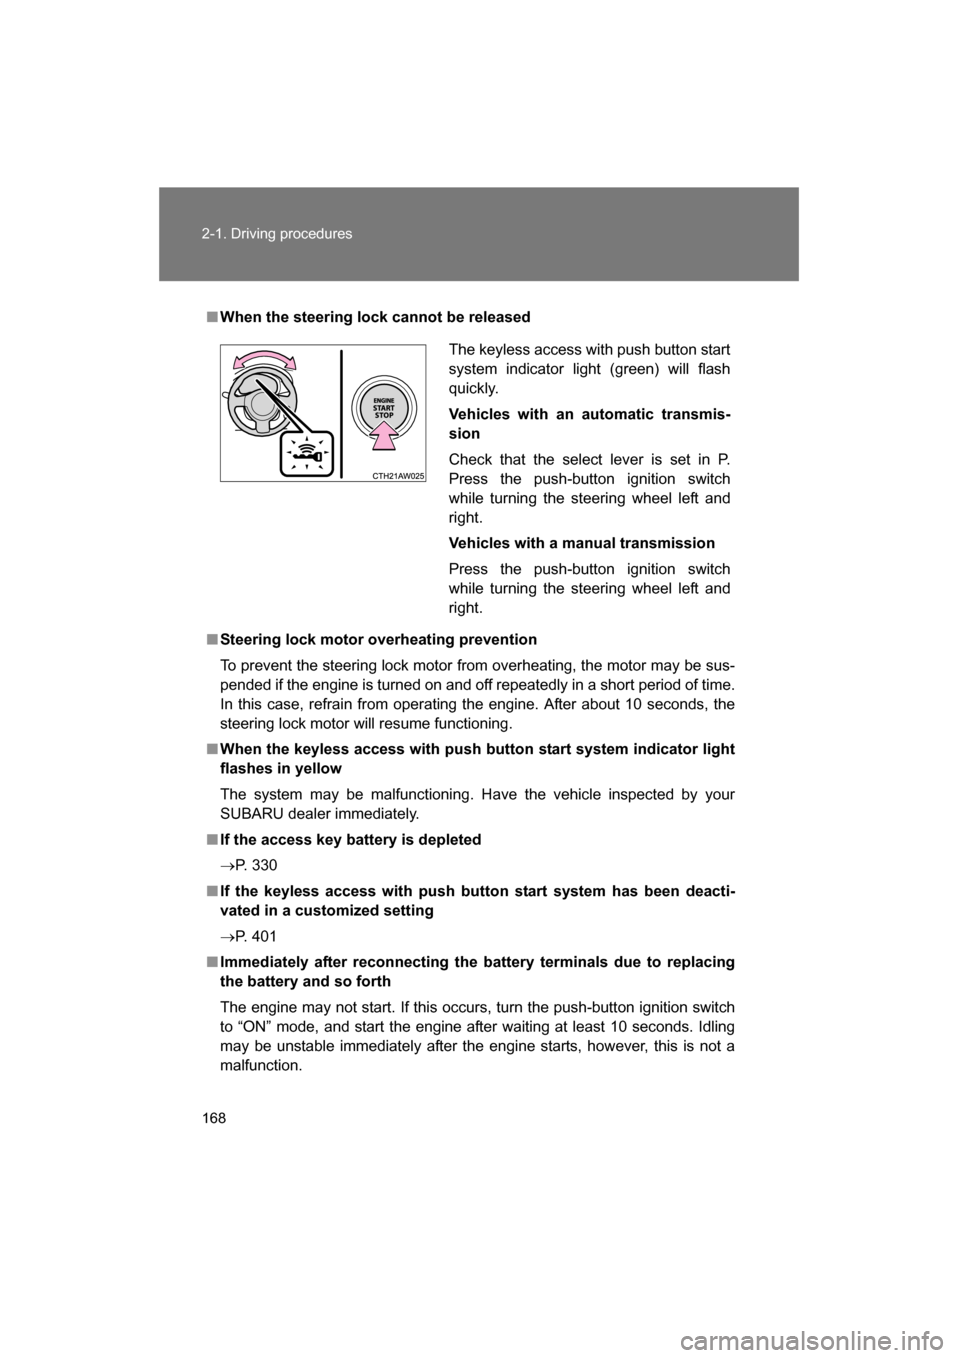
■When the steering lock cannot be released
■Steering lock motor overheating prevention
To prevent the steering lock motor from overheating, the motor may be sus-
pended if the engine is turned on and off repeatedly in a short period of time.
In this case, refrain from operating the engine. After about 10 seconds, the
steering lock motor will resume functioning.
■When the keyless access with push button start system indicator light
flashes in yellow
The system may be malfunctioning. Have the vehicle inspected by your
SUBARU dealer immediately.
■If the access key battery is depleted
→P. 330
■If the keyless access with push button start system has been deacti-
vated in a customized setting
→ P. 401
■Immediately after reconnecting the battery terminals due to replacing
the battery and so forth
The engine may not start. If this occurs, turn the push-button ignition switch
to “ON” mode, and start the engine after waiting at least 10 seconds. Idling
may be unstable immediately after the engine starts, however, this is not a
malfunction. The keyless access with push button start
system indicator light (green) will flash
quickly.
Vehicles with an automatic transmis- sion
Check that the select lever is set in P.
Press the push-button ignition switch
while turning the steering wheel left andright.
Vehicles with a manual transmission
Press the push-button ignition switch
while turning the steering wheel left andright.