2015 SKODA SUPERB warning triangle
[x] Cancel search: warning trianglePage 34 of 276

Engine electronics check (petrol engine)35 Safety systems35
Tyre pressure
35
Brake linings
36
Fuel reserve
36
Lane departure warning (Lane Assist)
36
Turn signal system
36
Trailer turn signal lights
36
Fog lights
36
Speed regulating system / Speed limiter
37
Brake pedal (automatic transmission)
37
Parking brake - Auto Hold function
37
Main beam
37
Automatic transmission
37
Rear seat belt warning light
37
Alternator
37
Coolant
38
Engine oil pressure too low
38
Engine oil level
38
AdBlue ®
39
Lamp failure
39
Diesel particulate filter (diesel engine)
39
Windscreen washer fluid level
40
Headlamp assistant
40
START-STOP system
40
Low temperature displayed
40
Water in the fuel filter (diesel engine)
40
Automatic Distance Control (ACC)
40
Distance warning (Front Assist)
40
Advance warning / emergency braking (Front Assist)
41
Economy mode
41
Adaptive chassis control (DCC) fault
41
Service
41
The warning lights in the instrument cluster indicate certain functions or
faults.
Some warning lights can be accompanied by acoustic signals and messages in
the display of the instrument cluster.
After switching on the ignition, some warning lights light up briefly as a func-
tion test.
If the tested systems are OK, the corresponding warning lights go out a few
seconds after switching on the ignition or after starting the engine.
Warning lights in the display
Depending on the importance the warning light
(danger) or
(warning) illu-
minate along with some of the warning lights in the list with the warning
lights.
Depending on vehicle specification, some warning lights may be displayed in
colour on the display. For example. the coolant warning lamp may be represen-
ted as follows.
▶ - Segment Display / monochromatic (“black and white”) MAXI DOT display
▶ - colour MAXI DOT displayWARNING■
Ignoring illuminated warning lights and related messages or instructions
in the display of the instrument cluster may lead to serious personal injury
or damage to the vehicle.■
If you have to stop for technical reasons, then park the vehicle at a safe
distance from the traffic, switch off the engine and switch on the hazard
warning lights » page 71. Place the warning triangle at the prescribed dis-
tance.
■
The engine compartment of your car is a hazardous area. The following
warning instructions must be followed at all times when working in the en-
gine compartment » page 206, Engine compartment .
Parking brake
Read and observe
on page 32 first.
illuminates - the hand brake light is switched on.
Parking brake error
illumi-
nates
Fault: electric parking brakePARKING BRAKE FAULT
Seek help from a specialist garage.
Parking on a slope that is too steep
illumi-
nates
Parking brake: grad. too steep. Owner's manual!GRADIENT TOO STEEP
32Using the system
Page 224 of 276

Do-it-yourself
Emergency equipment and self-help
Emergency equipment
Introduction
This chapter contains information on the following subjects:
First aid kit and warning triangle
222
reflective vest
223
Fire extinguisher
223
Vehicle tool kit
223
First aid kit and warning triangle
Fig. 237
Placing the first aid kit and the warning triangle - version 1 / re-
lease the retaining clip
Fig. 238
Placement of the first aid kit and
warning triangle - version 2
The following information applies for the first aid kit and warning triangle from
the ŠKODA Original Accessories.
The storage compartments may be too small for other first aid kits and warn-
ing triangles.
First-aid box
The first-aid box can be attached by a strap to the right-hand side of the boot
» Fig. 237 .
With some equipment types this is located in the storage compartment.
Warning triangle – version 1
The warning triangle can be inserted into the cladding of the rear wall and se-
cured with the fastener tape » Fig. 237.
Warning triangle – version 2
The warning triangle can be stored in the rear wall trim panel » Fig. 238. When
removing the warning triangle first lift the flooring in the luggage compart-
ment.
Undo / secure fastening strap›
Press the latch on the connector in the direction of arrow
1
» Fig. 237 .
›
Release strap
A
in the direction of arrow
2
.
›
Pull strap
A
against arrow direction
2
until it locks into place.
Pay attention to the expiration date of the first-aid kit.
WARNINGThe first-aid kit and warning triangle must always be secured safely so that
they do not come loose when making an emergency braking or in a vehicle
collision which could cause injuries to occupants.
Note
We recommend using a first-aid kit from ŠKODA Original Accessories, which
are available from a ŠKODA Partner.222Do-it-yourself
Page 226 of 276
WARNINGThe factory-supplied lifting jack is only intended for your model of vehicle.
Under no circumstances attempt to lift heavier vehicles or other loads.
CAUTION
■ Screw the jack back into the starting position before storing in the box with
the tool kit.■
Ensure that the vehicle tool kit is safely secured in the boot.
■
Ensure that the box is always secured with the strap.
Note
The declaration of conformity is included with the jack or the log folder.
Changing a wheel
Introduction
This chapter contains information on the following subjects:
Preparation
224
Removing/stowing the wheel
224
Full wheel trim
225
Wheel bolts
225
Anti-theft wheel bolts
225
Loosening/tightening wheel bolts
226
Raising the vehicle
226
Remove the wheel / fix
227
Follow-up tasks
227
For your own safety and the safety of the passengers, the following instruc-
tions must be observed before changing a wheel on the road.
Switch on the hazard warning lights system.
Place the warning triangle at the prescribed distance.
Park the vehicle as far away as possible from the flowing traffic.
Choose a location with a flat, solid surface.
Have all the occupants get out. The passengers should not stand on the
road (instead they should remain behind a crash barrier, for instance) while
the wheel is being changed.
Tyres with increased puncture resistance
Some vehicles may be fitted with tyres at the factory that have increased
puncture resistance (so-called “SEAL” tyres).
These vehicles are delivered without a puncture repair kit, spare wheel and
appropriate hand tools.
If the tyres with increased puncture resistance are replaced with tyres that
have no increased puncture resistance then the vehicle should be equipped
with a puncture repair kit, spare wheel and appropriate hand tools.
Preparation
Before changing the wheel, the following work must be carried out.
›
Switch off the engine.
›
For vehicles with manual transmission engage 1st gear.
›
On vehicles with
automatic transmission place the selector lever in the P po-
sition.
›
The parking brake switch.
›
Uncouple any trailers.
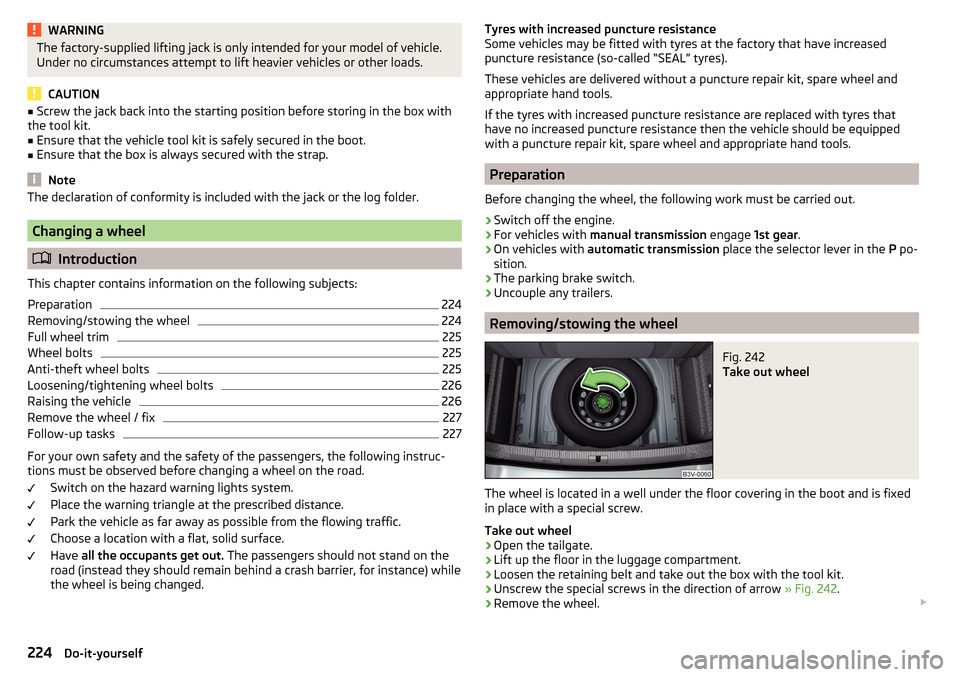
Removing/stowing the wheel
Fig. 242
Take out wheel
The wheel is located in a well under the floor covering in the boot and is fixed
in place with a special screw.
Take out wheel
›
Open the tailgate.
›
Lift up the floor in the luggage compartment.
›
Loosen the retaining belt and take out the box with the tool kit.
›
Unscrew the special screws in the direction of arrow » Fig. 242.
›
Remove the wheel.
224Do-it-yourself
Page 231 of 276

General informationRead and observe
on page 228 first.
For your own safety and the safety of your passengers, the following instruc-
tions must be observed before carrying out a wheel repair on the road.
Switch on the hazard warning lights system.
Place the warning triangle at the prescribed distance.
Park the vehicle as far away as possible from the flowing traffic.
Choose a location with a flat, solid surface.
Have all the occupants get out. The passengers should not stand on the
road (instead they should remain behind a crash barrier, for instance) while
the wheel is being changed.
The breakdown kit must not be used under the following circumstances. ▶ The rim is damaged.
▶ The outside temperature is below -20 ° C.
▶ The cut or puncture is larger than 4 mm.
▶ The tyre wall is damaged.
▶ After the expiration date (see inflation bottle).
Preparations for using the breakdown kit
Read and observe
on page 228 first.
The following preparatory work must be carried out before using the puncturerepair kit.
›
Switch off the engine.
›
For vehicles with manual transmission engage 1st gear.
›
On vehicles with
automatic transmission place the selector lever in the P po-
sition.
›
The parking brake switch.
›
Check that you can carry out the repairs with the breakdown kit » page 228.
›
Uncouple any trailers.
›
Remove the breakdown kit from the boot.
›
Stick the sticker
1
» Fig. 248 on page 228 on the dashboard in the driver's
field of view.
›
Unscrew the valve cap.
›
Use the valve remover
2
to unscrew the valve core and place it on a clean
surface (rag, paper, etc.).
Sealing and inflating the tyre
Read and observe
on page 228 first.
Sealing
›
Forcefully shake the tyre inflation bottle
10
» Fig. 248 on page 228 back and
forth several times.
›
Firmly screw the inflation hose
3
onto the tyre inflater bottle
10
. The film on
the cap is pierced automatically.
›
Remove the plug from the inflation hose
3
and plug the open end fully onto
the tyre valve.
›
Hold the bottle
10
with the bottom facing upwards and fill all of the sealing
agent from the tyre inflator bottle into the tyre.
›
Remove the filler plug from the tyre valve.
›
Screw the valve core back into the tyre valve using the valve remover
2
.
Inflating
›
Screw the air compressor tyre inflation hose
7
» Fig. 248 on page 228 firmly
onto the tyre valve.
›
For vehicles with manual transmission the lever into the neutral position.
›
On vehicles with automatic transmission place the selector lever in the P po-
sition.
›
Start the engine and run it in idle.
›
Plug the connector
6
into 12 volt socket » page 100.
›
Switch on the air compressor with the ON and OFF switch
9
.
›
Allow the air compressor to run until a pressure of 2.0 - 2.5 bar is achieved.
Maximum run time of 8 minutes » .
›
Switch off the air compressor.
›
If you cannot reach an air pressure of 2.0 - 2.5 bar, unscrew the tyre inflation
hose
7
from the tyre valve.
›
Drive the vehicle 10 metres forwards or backwards to allow the sealing agent
to “distribute” in the tyre.
›
Firmly screw the tyre inflation hose
7
back onto the tyre valve and repeat
the inflation process.
›
Switch off the air compressor.
›
Remove the tyre inflation hose
7
from the tyre valve.
Once a tyre inflation pressure of 2.0 - 2.5 bar is achieved, you can continue the journey.
229Emergency equipment and self-help
Page 261 of 276

Fuel supply30
Gear changes42
Service interval49
Disposal Acceptance and recycling of used vehicles
193
Distance driven31
Distance warning Warning light
40
Door Child safety lock
57
Closing56
Emergency locking236
Emergency locking the driver's door236
Opening56
Door warning41
Drive Driving through water
141
DriveGreen140
Driver Steering Recommendation (DSR)145
Driving Emissions
248
Fuel consumption248
through water141
driving data operation
43
Driving mode171
driving mode select Normal mode
172
Driving Mode Selection171
DSR145
Dynamic Light Assist72
E
ECO-TIP
49
Eco-tips49
Economical driving Tips
139
Economy mode Warning light
41
EDL145
Electrical boot lid set the top position of the lid
60
Electrical power windows Buttons in the driver's door
62
Electric boot lid Force limit
59
Manual operation59
Electric luggage compartment lid Malfunctions
61
Operating60
Electric parking brake133
Electric window lifter61, 63
Button in the passenger door63
Button in the rear doors63
Window operation malfunctions64
Electronic differential lock (EDL, XDS)145
Electronic immobilizer126
emergency replace battery in the remote control
235
Emergency Changing a wheel
224
Hazard warning light system71
Jump-starting230
Locking the door without a locking cylinder236
Locking the driver's door236
Selector lever-unlocking237
Switch off the engine by pressing a button129
Towing the using the tow hitch233
Towing the vehicle231
Tyre repair228
Unlocking the driver's door236
emergency equipment reflective vest
223
Emergency equipment Fire extinguisher
223
First aid kit222
Jack223
Vehicle tool kit223
Warning triangle222
Emissions248
Engine Information messages
38
Running-in139
Engine compartment206
Brake fluid212
Overview208
Vehicle battery213
Engine number246
engine oil specification
209
Engine oil209
Checking210
Replenishing210
Warning light38
EPC Warning light
35
ESC Operation
144
Warning light34
ESC Sport144
Exhaust emissions control system Warning light
34
F
Fastening elements
106
Fatigue detection182
Function182
Information messages182
Films195
Fire extinguisher223
First aid kit222
Floor covering Fixing
108
in the luggage compartment108
Fog lights Warning light
36
Fog Lights70
Fold in passenger's mirror80
259Index
Page 269 of 276

Materials199
Natural leather199
Plastic parts196
Polishing vehicle paint work195
Rubber seals196
Safety belt200
Seat covers200
Under-body protections198
washing193
Vehicle condition see Auto-check control
41
Vehicle data sticker246
Vehicle data sticker and nameplate Vehicle data sticker and nameplate
246
Vehicle dimensions249, 250
Vehicle height249, 250
Vehicle Identification Number (VIN)246
Vehicle length249, 250
Vehicle tool kit223
Vehicle width249, 250
Ventilation Front seats
89
Seats88
vest holder for reflective vest
223
VIN Vehicle Identification Number
246
Virtual pedal61
Visibility75
Visors see front sun visors
76
see Sun screen76
W
Warning lights
31
Warning symbols see Warning lights
31
Warning triangle222
warning when speeding44
Washing Automatic car wash system194
by hand193
High-pressure cleaner194
Washing vehicles193
Waste container93
Water in the fuel filter Warning light
40
Warning messages40
Weather conditions190
Wheel bolts Anti-theft wheel bolts
225
Caps225
Loosening and tightening226
Wheel rims217
Wheels Age of wheels
217
Changing224
Driving style218
Full trim225
General information217
Load index220
Snow chains221
Speed symbol220
Storage of wheels217
Tyre damage219
Tyre pressure217
Tyre size220
Tyre wear218
Tyre wear indicator219
unidirectional tyres219
Wheel balance218
Wheel replacement219
Winter tyres221
Wi-Fi Connection
50
Password50
Password change51
Setting51
Wi-Fi Direct Connection51
Password change51
Setting51
Window operation61
Button in the passenger door63
Button in the rear doors63
Buttons in the driver's door62
Comfort operation63
Malfunctions64
Window wiper Replacing the rear window wiper blade
238
Windscreen Heater
75
Windscreen washer fluid Checking
208
Replenishing208
Warning light40
Winter208
Windscreen washers Windscreen washers
78
Windscreen washer system208
Windscreen wipers automatic rear window wipers
78
operation78
Replacing the windscreen wipers237
Windscreen washer fluid208
Windscreen wipers and washers77
Winter operation220
De-icing windows196
Snow chains221
Winter tyres221
Winter tyres See Wheels
221
Wiper blades198
Service position of the windscreen wiper arms 237
Wiper interval
78
Wipers Maintaining wiper blades
198
267Index