Page 57 of 84
 Amundsen Bolero Infotainment System Manual If the menu for setting the alternative routes is turned on, the guidance for
this route type (most economic/fastest/shortest) must be selected before
starting.
If the destination entry occurs during")
If the menu for setting the alternative routes is turned on, the guidance for
this route type (most economic/fastest/shortest) must be selected before
starting.
If the destination entry occurs during route guidance, the destination change
must be confirmed by pressing the function key Start in addition to confirming
in the following menu that appears.
Delete›
Press in the Navigation menu the function key
→ Manage memory → De-
lete my POIs → Delete .
Map
Introduction
This chapter contains information on the following subjects:
Map description
54
Options for map display
54
POI in the map
55
Road sign
55
Map Orientation
55
Map scale
55
Map alignment
56
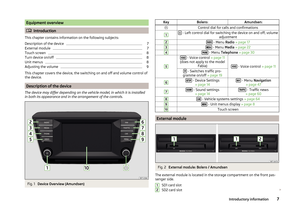
Map description
Fig. 41
Map
The following information and function keys can be displayed in the map. Vehicle position
Destination position
Route
ABCFunction keys for map operation
Function key for the POI
Information on the maximum permitted speed
Information in the status line Street name / street number of the current vehicle position
Distance to destination
Estimated time of arrival at destination / stopover
Estimated remaining travel time to destination / from the stopover
Options for map display
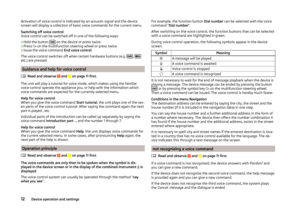
Fig. 42
Map options
›
Press in the Navigation menu the function key
.
The following function keys are displayed » Fig. 42.
2D - Two-dimensional map display
3D - Three-dimensional map display
Map display with the route from the current vehicle location to the desti-
nation
Representation of the target or the next stopover destination in the map
(depending on the display setting » page 63, Advanced settings )
Automatic map display in day or night mode (depending on the currently
active vehicle lighting)
Daytime map display
Night-time map display
On / off of the split screen display
On / off of the selected POI categories display
DEFABCDE54Navigation (Amundsen)
Page 58 of 84
 Amundsen Bolero Infotainment System Manual If the map scale of the 2D Map or 3D Map is greater than 10 km (5 miles), then
the map is automatically displayed as 2D and aligned in the direction of north.
If the scale is increased beyond this val")
If the map scale of the 2D Map or 3D Map is greater than 10 km (5 miles), then
the map is automatically displayed as 2D and aligned in the direction of north.
If the scale is increased beyond this value, then the map is switched back to
the original representation.
POI in the map
The device offers the possibility of up to 10 POI categories to be display on the
map.
Switch display on/off
›
Press in the Navigation menu the function key
→ POIs .
Select the displayed category
›
Switch on show POIs.
›
Press in the Navigation menu the function key
→ Map → Select catego-
ries for POIs .
›
Select the desired POI category.
Guidance to the POI
›
Press the function key with the symbol of a POI in the map.
The following POI details are displayed.
If the function key includes several POIs, then they will be listed. Select the de-
sired destination from the list, then POI details will be shown.
›
Press the function key Start.
Then a route to the destination is calculated and the route guidance starts.
If the navigation menu for setting the alternative routes is turned on, the guid-
ance for this route type (economic / fast / short) must be selected before start-
ing.
If the destination entry occurs during route guidance, the destination change
must be confirmed by pressing the function key Start in addition to confirming
in the following menu that appears.
Road sign
The device offers the possibility of displaying the traffic signs stored in the
navigation data or detected by the front camera in the device screen
F
» Fig. 41 on page 54 .
Turn on / off the display traffic signs » page 63.
For some vehicles it is possible to set an alert when crossing the permitted
speed limited set by a road sign - Traffic Sign recognition → Warning .
For trailer towing, we recommend switching on the assistance systems option
Traffic Sign recognition → Trailer recognition (show road signs) .
Map Orientation
The map in the 3D display is aligned only with respect to the direction of travel.
The map in the 2D display can be oriented to the north or in relation to the di-
rection of travel.
A change of map orientation is only possible when the map is centred on the
vehicle position (the function key or
is not displayed).
Change the map orientation
›
Press in the Navigation menu the function key
in the area
D
» Fig. 41 on
page 54 .
The map is oriented to the north or in relation to the direction of travel.
The arrow in symbol always points to the north.
The map is oriented to the north
The map does not rotate, the vehicle position symbol rotates.
Map oriented to the direction of travel
The map rotates, the vehicle position symbol does not rotate.
Map scale
It is possible to change the map scale manually or to turn on the automatic
change of scale.
Symbols of the scale function keys
In the map area
D
» Fig. 41 on page 54 the following context-dependent func-
tion keys and information is displayed.
Manually set scaleAutomatically adjusted scale
Turn on / off the automatic change of scale
Map view in reduced scale
Current elevation
Manual change of scale
Map scale can be change in the following ways.
55Navigation (Amundsen)
Page 59 of 84
 Amundsen Bolero Infotainment System Manual ›Turning the control knob
.
› Touching the screen with two fingers and pulling them apart or closing them
together.
Enabling automatic scaling
› Press in the
Navigation menu the function k")
›Turning the control knob
.
› Touching the screen with two fingers and pulling them apart or closing them
together.
Enabling automatic scaling
› Press in the
Navigation menu the function key
→
.
Press the function key
is highlighted in green. The manual scaling switches
to automatic scaling.
The automatic scale is only active as long as the map is centred on the vehicle
position (the function key
or is not displayed).
If the automatic scale is active, the map scale will change automatically de-
pending on the type of roads travelled (motorway - smaller map scale / town
larger map scale) and from the manoeuvre to be carried out.
Turn off the automatic change of scale
› Press in the
Navigation menu the function key
→
.
Press the function key is highlighted in white. The automatic scaling
changes to manual change of scale.
The turning off occurs likewise when the map is moved or the map scale is
changed manually.
Map view in reduced scale
› Press in the
Navigation menu the function key
→
or
→
.
The map scale is reduced for a few seconds and then restored.
Map alignment
The moved map can be centred/aligned to the vehicle, destination or route po-
sition.
In the map area
D
» Fig. 41 on page 54 the following function keys are dis-
played depending on the map display.
Aligning to the vehicle position (in the 2D map display - or 3D map dis-
play - )
Alignment to the destination position (in the destination position display -
)
Route alignment (in the route display - )
Route guidance
Introduction
This chapter contains information on the following subjects:
Destination management
57
Route calculation
57
Most common routes
58
graphical driving recommendations
58
Nav. announcements
58
Route information
58
Finish route guidance
59
Abort route guidance
59
The route guidance is as follows.
› Through graphical driving instructions in the device display screen and in the
display of the instrument cluster.
› With navigation announcements.
The unit tries to allow for continued guidance even if the navigation data is in-
complete or there is no data at all for the given area.
The route is recalculated each time if you ignore driving recommendations or
change the route.
Route guidance in demo mode
The Demo mode provides a travel simulation to the entered destination. The
function offers the chance to travel through the calculated route “virtually”.
When the Demo mode is turned on, a menu for route guidance in the Demo
mode or in normal operation is displayed before the start of route guidance.
Activation / deactivation of the Demo mode » page 63, Advanced settings .
WARNINGThe navigation announcements provided may vary from the actual situa-
tions, e.g. due to out-of-date navigation data.56Navigation (Amundsen)
Page 60 of 84
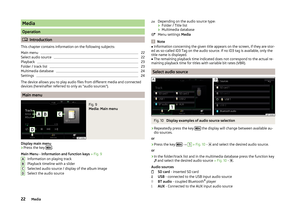
 Amundsen Bolero Infotainment System Manual Destination managementFig. 43
Destination details
Read and observe on page 56 first.
After you enter a new destination or after pressing the function key in the
list of registered destinations a")
Destination managementFig. 43
Destination details
Read and observe on page 56 first.
After you enter a new destination or after pressing the function key in the
list of registered destinations a menu for the destination and route manage-
ment appears » Fig. 43.
Area with function keys
Detailed destination information
Destination position in the map
Magnification of the window with destination information
Reduction of the window with destination information
Function keys in range
A
› Start
- Depending on the setting of the start of the route calculation or route
type selection
› Finish
- Stop the route guidance
› Route options
- Display a menu for setting the route options
› Store
- Store the destination in the destination memory
› Edit
- Edit the address of the destination entered through the map point
› Dial number
- Start a telephone conversation with the contact number of the
POI
Store destination
› Press the function key
Store.
› Name destination and confirm store.
Edit destination
By pressing the function key Edit the following menu is displayed for the desti-
nation processing.
ABC› Delete
- Delete the destination
› Store as
- Edit the name and then store the destination
› Favourite
- Add or remove the destinations as favourites
Route calculation
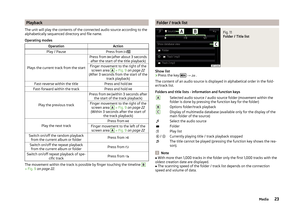
Fig. 44
Alternative routes
Read and observe on page 56 first.
Route calculation is done on the basis of the set route options. These route
options can be set » page 62, Route options .
Alternative routes
With selection of alternative routes turned on, the following menu is displayed
after the route calculation » Fig. 44.
Calculate the most economical route with shortest travelling time and
distance travelled – the route is highlighted green
Calculate the fastest route to the destination, even if a detour is neces-
sary - the route is highlighted in red
Calculate the shortest route to the destination, even if a longer travel-
ling time is required - the route is highlighted in orange
In the Alternative Routes function keys, information about the route length
and the estimated travel time are displayed.
It is possible to select an already calculated alternative route before the calcu- lation of the remaining routes is completed.
Selecting the type of route will start the route guidance.
If no route selection is made within 30 s after the calculation of all routes, the
route guidance is automatically started according to the set route type
» page 62 , Route options .
ABC57Navigation (Amundsen)
Page 61 of 84
 Amundsen Bolero Infotainment System Manual Most common routesRead and observe
on page 56 first.
The unit automatically displays up to three of the most frequently travelledroutes for the current time and geographical position.
A route guidan")
Most common routesRead and observe
on page 56 first.
The unit automatically displays up to three of the most frequently travelledroutes for the current time and geographical position.
A route guidance to one of the routes can be started as long as no route guid-
ance takes place.
Route selection
›
In the split screen press the key Routes → Show on map .
›
Select the desired route by pressing the function key with the route name,
the distance and the journey time to the destination.
Then a selected rout is calculated and the route guidance starts.
The most common routes stored can be deleted » page 63, Manage memory .
graphical driving recommendations
Fig. 45
Driving recommendations / travel recommendation detail
Read and observe
on page 56 first.
The display of the graphical driving recommendations is in the extra window
Manoeuvre as well as the display of the instrument cluster.
In the extra window Manoeuvre the following driving recommendations are
shown » Fig. 45 .
Street name and street number of the current vehicle position
Up to the three next driving recommendations with street names and road
numbers, with the distance and travel time to the recommended destina-
tion
ABDetail of driving recommendation that appears near the manoeuvre
Lane recommendation
In the split screen Manoeuvre the device announces TMC traffic obstructions
and on motorways, car parks, petrol stations or restaurants.
With activated function
→ Advanced settings → Note: national border
crossed display the country-specific speed limits when crossing international
borders. These speed limits can be displayed in the menu Navigation by press-
ing the function key
→ Top speed .
Nav. announcements
Read and observe
on page 56 first.
The device gives out navigation announcements.
The navigation announcements are generated by the device. The flawless
clarity of the message (e.g., road or city name) cannot always be guaranteed.
The last navigation announcement is repeated by pressing the control switch
.
The timing of the navigation message is dependent on the type of road and on
the driving speed. For example, on motorways, the first announcement is
heard about 2000 m (6000 ft) before the motorway exit.
Setting the navigation announcements » page 63, Navigation announce-
ments .
Route information
Read and observe
on page 56 first.
During route guidance, detailed route information can be displayed.
›
Press in the Navigation menu the function key
→ Route information .
Depending on the context, some of the following information is displayed.
› Information to the final destination
›
- Distance to the destination
CD58Navigation (Amundsen)
Page 62 of 84
 Amundsen Bolero Infotainment System Manual ›
- Arrival time at destination 1)
›
- Remaining travel time to the destination 1)
› Route type (economic, fastest, shortest)
› Current vehicle position (coordinates)
Finish route gui")
›
- Arrival time at destination 1)
›
- Remaining travel time to the destination 1)
› Route type (economic, fastest, shortest)
› Current vehicle position (coordinates)
Finish route guidance
Read and observe
on page 56 first.
The route guidance can be finished in one of the following ways.
›
The final destination is reached.
›
Press in the Navigation menu the function key
→ Stop route guidance .
›
If a route guidance is in progress, then a new tour is to be entered and finish-
ing the guidance by pressing the function key Finish.
›
The ignition is off for longer than 120 min.
Abort route guidance
Read and observe
on page 56 first.
If the ignition is switched off and on again, then the route guidance is contin-ued depending on the stop time in one of the following ways.
› Within 15 min. - route guidance is continued taking into account the calcula-
ted route.
› Between 15 min and 120 min - the screen displays the message
Continue
route guidance? , after you confirm the message, the route guidance contin-
ues using the calculated route.
› After 120 min - the route guidance is cancelled.
Tour
Introduction
This chapter contains information on the following subjects:
Tour setting
59
Edit tour
60
Tour memory management
60Tour settingFig. 46
Entering a new tour
Tour creation (occurs no guidance)
›
Press in the Navigation menu the function key
→ New tour .
Insert a destination in one of the following ways.
›
Press the function key
A
» Fig. 46 and enter a new destination.
or
›
Press the function key
B
and select a destination from the list of registered
destinations » page 50.
The created tour can be stored by pressing the function key
C
or the route
guidance can be started by pressing the function key
D
.
Tour creation (starts a route guidance)
›
Press in the Navigation menu the function key
→ New dest./stopover .
›
Enter destination.
›
Press the function key Start→ Stopover .
The created tour can be stored by pressing the function key
C
or the route
guidance can be started by pressing the function key
D
.
1)
If the time of arrival to the final destination or remaining travelling time greater than 24 hours, is dis-
played inside the symbol.
59Navigation (Amundsen)
Page 63 of 84
 Amundsen Bolero Infotainment System Manual Edit tourFig. 47
Edit tour
Open edit tour (starts a route guidance)
›
Press in the Navigation menu the function key
→ Edit tour .
Insert destination in the tour
›
Press the function key")
Edit tourFig. 47
Edit tour
Open edit tour (starts a route guidance)
›
Press in the Navigation menu the function key
→ Edit tour .
Insert destination in the tour
›
Press the function key
A
» Fig. 47 and enter a new destination.
or
›
Press the function key
B
and select a destination from the list of registered
destinations.
Each additional destination is added to the list as the final destination.
Change positions of destinations with each other
›
Hold the function key and move the destination to the desired position.
With destinations on the tour already reached the note Destination reached is
displayed below the destination name. It is not possible to change the position
of these destinations with each other.
Information on the sequence of destinations as well as the tour
Depending on the destinations the following information is displayed » Fig. 47.
Stopover (with sequential number)
Final destination
Estimated arrival time at destination
Distance to destination
Destination management
› Press the function key for the desired destination, the following menu is dis-
played.
Delete the destination
Route guidance to this destination is continued and then to the next tour
destination (previous stopovers are skipped).
Display the destination details
Tour memory
› Press the function key C
» Fig. 47 .
The following menu is displayed. Store edited tour with a new name
Store edited tour under the original name
Start of route guidance › Press the function key
D
» Fig. 47 .
A tour calculation and route guidance starts.
Tour memory management
›
Press in the Navigation menu the function key
→ Tour memory .
A list of stored tours is displayed.
›
Select the desired tour, the following function keys appear.
Delete the tour
Edit tour Tour calculation and start route guidance
Traffic reports
Introduction
This chapter contains information on the following subjects:
List of the traffic reports
61
Detail of the traffic report
61
Dynamic route
62
Enter / remove traffic conditions on your route manually
62New tourReplaceDeleteEditStart60Navigation (Amundsen)
Page 64 of 84
 Amundsen Bolero Infotainment System Manual List of the traffic reportsFig. 48
List of traffic reports
The device allows you to receive TMC traffic reports (Traffic Message Channel),
which contain information regarding traffic obstructions.
Du")
List of the traffic reportsFig. 48
List of traffic reports
The device allows you to receive TMC traffic reports (Traffic Message Channel),
which contain information regarding traffic obstructions.
During route guidance information messages are then issued with respect to
traffic congestion from the device.
Show list
›
Press the key .
A list of traffic reports is shown » Fig. 48.
The list of traffic reports is arranged according to the type of road and the road
number (motorway, express way, country road, etc.).
A traffic report may contain some of the following information.
›
Number of road affected
›
Name of the location in question
›
Description of the traffic obstruction
›
Symbol of the traffic obstruction
A traffic report with a number contains multiple reports.
If the icon in the list of traffic reports is crossed out, then the device is out-
side the range of the traffic report provider.
Display options
With ongoing route guidance and after pressing the function key
A
» Fig. 48
selected can be from the following menu.
›
All - View all traffic reports
›
Route - Display the traffic reports on the route
NoteThe traffic reports are updated by the device constantly in the background.
The reception of traffic reports is always switched on and cannot be turned
off.
Detail of the traffic report
Fig. 49
Detail of the traffic report
Show details of the traffic report
The details of the traffic report can be shown in one of the following ways.
›
Select the required traffic report in the list of traffic reports.
or
›
Tap on the symbol for the traffic obstruction in the map.
The display then shows the following information and function keys » Fig. 49.
Map of the affected location
Details of the traffic obstruction
Reception time as well as information regarding the traffic report provider
Symbol of the traffic obstruction
Length of the traffic obstruction Display previous / subsequent traffic report
Magnification of the window with information on the traffic obstruction
Reduction of the window with information on the traffic obstruction
Colour coding of the importance of the traffic obstruction
The symbol for the traffic obstruction (e.g.
,
,
or similar) precedes the ob-
struction and the length of obstruction is shown in the map on the right along
the route.
Depending on the context, the symbol for the obstruction is displayed in one
of the following ways.
ABCDE61Navigation (Amundsen)