2015 SKODA OCTAVIA sd card
[x] Cancel search: sd cardPage 5 of 100

Table of Contents
Important information about this manual3
Notes
4
Abbreviations
Introductory information
Important notes
6
Equipment overview
6
Device operation and settings
Device operation
9
Voice control
10
Device Settings
14
Radio
Operation
17
Settings
20
Media
Operation
22
Audio sources
24
Images
Image viewer
30
DVD video
Video player
32
TV tuner
TV function
34Telephone
Introductory information37
Pairing and connecting
40
Connection using the SIM card in the external
module
44
Telephone functions
45
Text messages (SMS)
49
WLAN connectivity and data connection
WLAN
51
Data connection
52
SmartLink
Introductory information
53
Android Auto ™
54
Apple CarPlay
56
MirrorLink™
57
Navigation
Navigation description
60
New destination
61
My Destinations
63
POI
64
Import custom destinations
65
Map
66
Route guidance
69
Tour
73
Waypoint mode
74Traffic reports76
Settings
78
Vehicle systems
CAR - Vehicle settings
80
Adjustment of the heating and cooling system
85
Index
2Table of Contents
Page 10 of 100
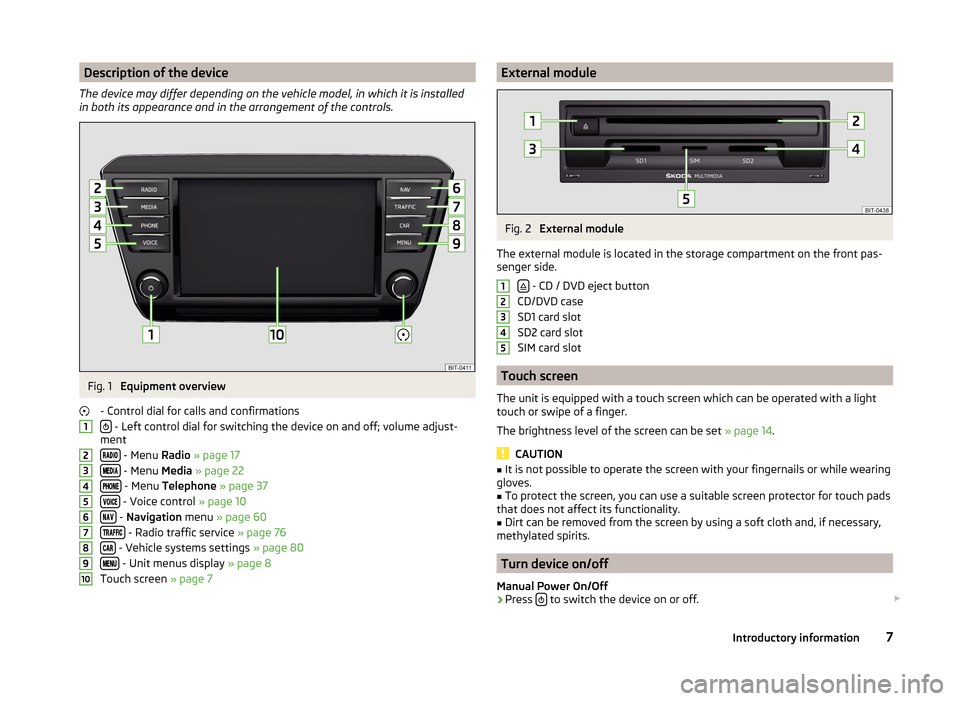
Description of the device
The device may differ depending on the vehicle model, in which it is installed
in both its appearance and in the arrangement of the controls.Fig. 1
Equipment overview
- Control dial for calls and confirmations
- Left control dial for switching the device on and off; volume adjust-
ment
- Menu Radio » page 17
- Menu Media » page 22
- Menu Telephone » page 37
- Voice control » page 10
- Navigation menu » page 60
- Radio traffic service » page 76
- Vehicle systems settings » page 80
- Unit menus display » page 8
Touch screen » page 7
12345678910External moduleFig. 2
External module
The external module is located in the storage compartment on the front pas-
senger side.
- CD / DVD eject button
CD/DVD case
SD1 card slot
SD2 card slot
SIM card slot
Touch screen
The unit is equipped with a touch screen which can be operated with a light
touch or swipe of a finger.
The brightness level of the screen can be set » page 14.
CAUTION
■
It is not possible to operate the screen with your fingernails or while wearing
gloves.■
To protect the screen, you can use a suitable screen protector for touch pads
that does not affect its functionality.
■
Dirt can be removed from the screen by using a soft cloth and, if necessary,
methylated spirits.
Turn device on/off
Manual Power On/Off
›
Press to switch the device on or off.
123457Introductory information
Page 22 of 100
Store preferred stationRead and observe
on page 17 first.
For each broadcasting range there are 18 preset buttons to store the preferred
stations. These preset buttons are divided into three memory groups.
A station can be stored in the device memory in one of the following ways.
Store station from the Radio menu
›
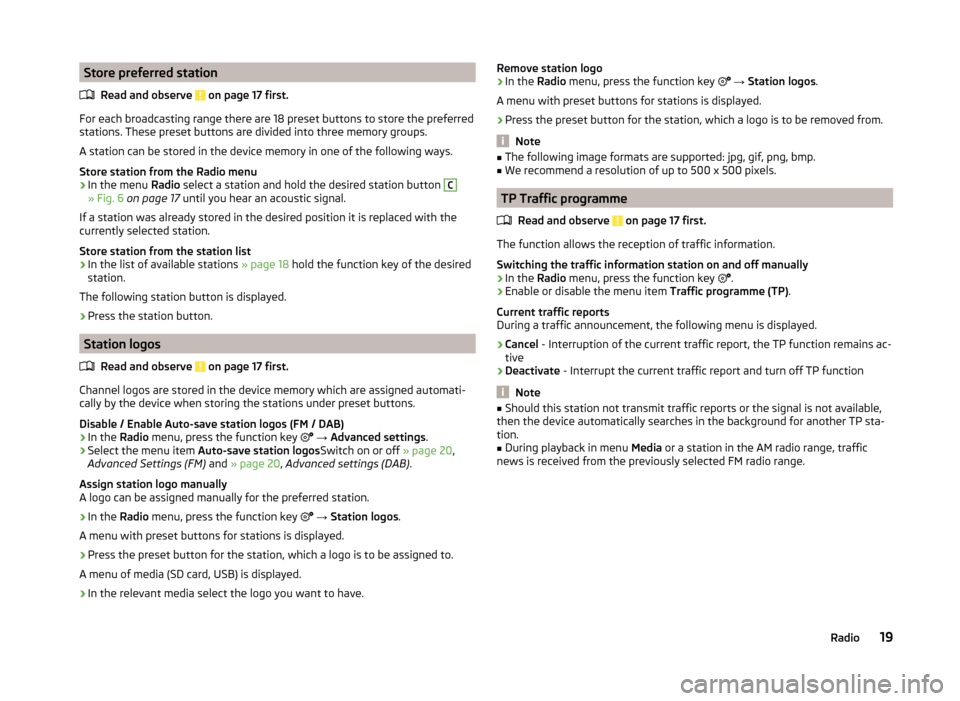
In the menu Radio select a station and hold the desired station button
C
» Fig. 6 on page 17 until you hear an acoustic signal.
If a station was already stored in the desired position it is replaced with the
currently selected station.
Store station from the station list
›
In the list of available stations » page 18 hold the function key of the desired
station.
The following station button is displayed.
›
Press the station button.
Station logos
Read and observe
on page 17 first.
Channel logos are stored in the device memory which are assigned automati-
cally by the device when storing the stations under preset buttons.
Disable / Enable Auto-save station logos (FM / DAB)
›
In the Radio menu, press the function key
→ Advanced settings .
›
Select the menu item
Auto-save station logos Switch on or off » page 20,
Advanced Settings (FM) and » page 20 , Advanced settings (DAB) .
Assign station logo manually
A logo can be assigned manually for the preferred station.
›
In the Radio menu, press the function key
→ Station logos .
A menu with preset buttons for stations is displayed.
›
Press the preset button for the station, which a logo is to be assigned to.
A menu of media (SD card, USB) is displayed.
›
In the relevant media select the logo you want to have.
Remove station logo›In the Radio menu, press the function key → Station logos .
A menu with preset buttons for stations is displayed.›
Press the preset button for the station, which a logo is to be removed from.
Note
■ The following image formats are supported: jpg, gif, png, bmp.■We recommend a resolution of up to 500 x 500 pixels.
TP Traffic programme
Read and observe
on page 17 first.
The function allows the reception of traffic information.
Switching the traffic information station on and off manually
›
In the Radio menu, press the function key
.
›
Enable or disable the menu item
Traffic programme (TP).
Current traffic reports
During a traffic announcement, the following menu is displayed.
›
Cancel - Interruption of the current traffic report, the TP function remains ac-
tive
›
Deactivate - Interrupt the current traffic report and turn off TP function
Note
■
Should this station not transmit traffic reports or the signal is not available,
then the device automatically searches in the background for another TP sta-
tion.■
During playback in menu Media or a station in the AM radio range, traffic
news is received from the previously selected FM radio range.
19Radio
Page 26 of 100
Audio sourcesJukebox - Internal device memory
CD/DVD - Inserted CD / DVD
SD card - inserted SD card
USB - connected to the USB input audio source
BT audio - coupled Bluetooth ®
player
WLAN - Connected to the WLAN audio source
AUX - Connected to the AUX input audio source
Playback
The unit will play the contents of the connected audio source according to the
alphabetically sequenced directory and file name.
Operating modes
OperationActionPlay / PausePress from
Plays the current track from the start
Press from (after about 3 seconds
after the start of the track playback)Finger movement to the right of the screen area A
» Fig. 9 on page 22
(After 3 seconds from the start of the track playback)Fast-reverse within the titlePress and hold Fast-forward within the trackPress and hold
Play the previous track
Press from (within 3 seconds after
the start of the track playback)Finger movement to the right of the screen area A
» Fig. 9 on page 22
(Within 3 seconds after the start of the track playback)Play the next track
Press from Finger movement to the left of the
screen area A
» Fig. 9 on page 22Switch on/off the random playback
from the current album or folderPress from Switch on/off the repeat playback
from the current album or folderPress from OperationActionSwitch on/off repeat playback of spe-
cific trackPress from Search (applies to sources with a dis-
played multimedia database)Press from Turn on / off the preferred playback
(most played / best rated) trackPress from
The movement within the track is possible by finger touching the timeline
B
» Fig. 9 on page 22 .
Folder / track list
Fig. 11
Folder / Title list
Show list
›
Press the key
→
.
The content of an audio source is displayed in alphabetical order in the fold-
er/track list.
Folders and title lists - information and function keys
ASelected audio source / audio source folder (movement within the
folder is done by pressing the function key for the folder)BOptions folder/track playbackCDisplay of multimedia database (available only for the display of the
main folder of the source)Select the audio sourceFolderPlay list 23Media
Page 27 of 100
/ Currently playing title / track playback stoppedThe title cannot be played (pressing the function key shows the
cause).
Note
■ With more than 1,000 tracks in the folder only the first 1,000 tracks with the
oldest creation date are displayed.■
The scanning speed of the folder / track list depends on the connection
speed and volume of data.
Multimedia database
Fig. 12
Multimedia database
In the multimedia database the tracks are sorted according to categories.
Viewing multimedia database
›
Press the key
→
.
or
›
Press the key
→
→
C
» Fig. 11 on page 23 .
Multimedia database - Information and function keys » Fig. 12
Selected audio source / selected category / audio source folder (move- ment within the folder is done by pressing the function key for the folder)
Display of folder / track list (available only for the display of the entire
source content - source folders)
Select the audio source
Sorting according to the track list name
Sorting according to the artist's name
Sorting according to the album name
Sorting according to the track title
Sorting according to the podcast name
ABSorting according to the genre type
Sorting according to the composer's name
Sorting according to audio books name
Sorting according to the video type
For playback the category and then the title is selected.
Settings
›
Press the key
→
.
■ Sound - Sound settings
■ Manage jukebox - Manage (record / delete) supported files (audio / video) in
the internal memory
■ Mix/repeat including subfolders - Switching the title display including sub-
directory
■ Bluetooth - Settings for the Bluetooth ®
function
■ WLAN - WLAN settings
■ Video (DVD) settings - Setting the parameters of the DVD video
■ Remove safely: - safe removal of the audio source
■ Traffic programme (TP) - Switches traffic programme on/off
■ External AUX device - Enables / disables the AUX input
■ Reset codec to system settings - Codec default settings
Audio sources
Introduction
This chapter contains information on the following subjects:
Jukebox
25
CD / DVD
26
SD card
27
USB input
27
Bluetooth ®
player
28
WLAN
28
AUX - input
28
Supported audio sources and file formats
29
The device allows you to play audio files in various formats and to connect dif-
ferent source types » page 29.
24Media
Page 30 of 100
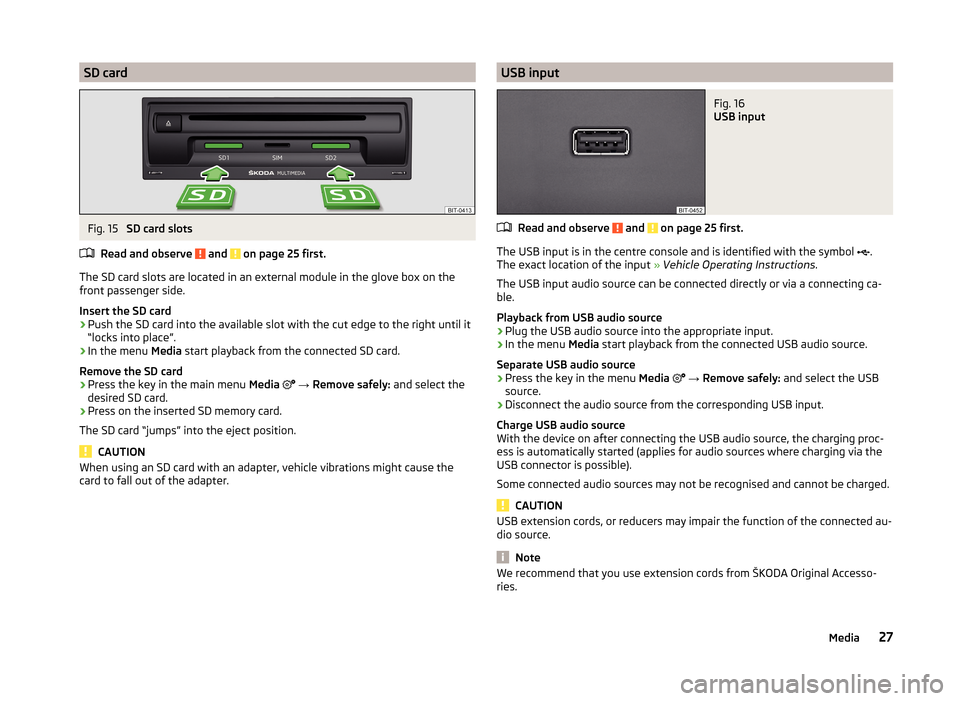
SD cardFig. 15
SD card slots
Read and observe
and on page 25 first.
The SD card slots are located in an external module in the glove box on the
front passenger side.
Insert the SD card
›
Push the SD card into the available slot with the cut edge to the right until it
“locks into place”.
›
In the menu Media start playback from the connected SD card.
Remove the SD card
›
Press the key in the main menu Media
→ Remove safely: and select the
desired SD card.
›
Press on the inserted SD memory card.
The SD card “jumps” into the eject position.
CAUTION
When using an SD card with an adapter, vehicle vibrations might cause the
card to fall out of the adapter.USB inputFig. 16
USB input
Read and observe and on page 25 first.
The USB input is in the centre console and is identified with the symbol .
The exact location of the input » Vehicle Operating Instructions .
The USB input audio source can be connected directly or via a connecting ca-
ble.
Playback from USB audio source
›
Plug the USB audio source into the appropriate input.
›
In the menu Media start playback from the connected USB audio source.
Separate USB audio source
›
Press the key in the menu Media
→ Remove safely: and select the USB
source.
›
Disconnect the audio source from the corresponding USB input.
Charge USB audio source
With the device on after connecting the USB audio source, the charging proc-
ess is automatically started (applies for audio sources where charging via the
USB connector is possible).
Some connected audio sources may not be recognised and cannot be charged.
CAUTION
USB extension cords, or reducers may impair the function of the connected au-
dio source.
Note
We recommend that you use extension cords from ŠKODA Original Accesso-
ries.27Media
Page 32 of 100
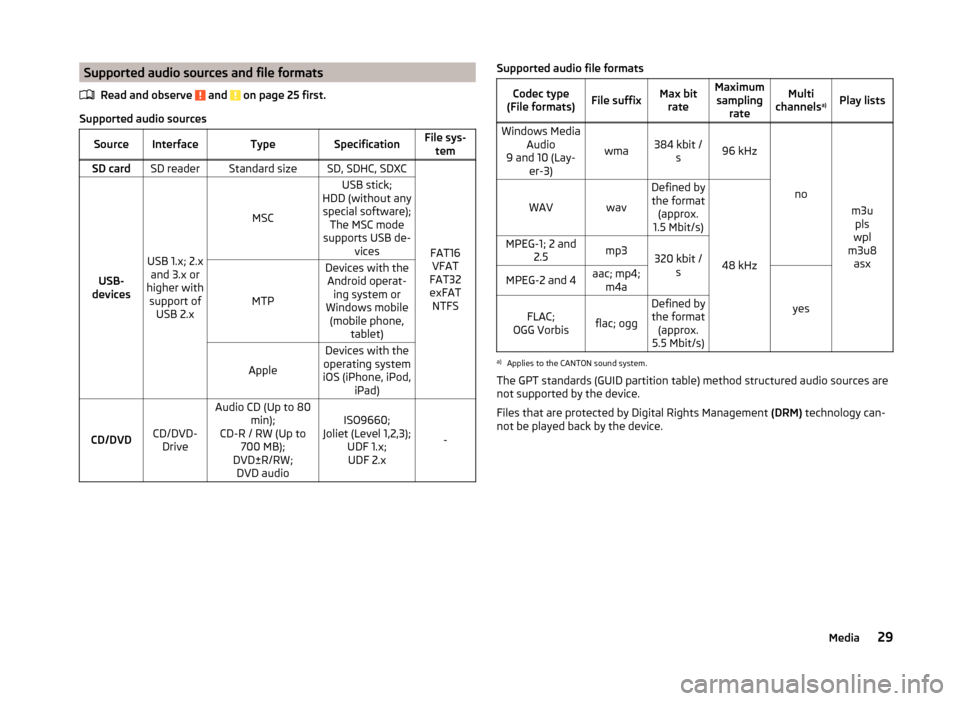
Supported audio sources and file formatsRead and observe
and on page 25 first.
Supported audio sources
SourceInterfaceTypeSpecificationFile sys-temSD cardSD readerStandard sizeSD, SDHC, SDXC
FAT16VFAT
FAT32
exFAT NTFSUSB-
devices
USB 1.x; 2.x and 3.x or
higher with support of USB 2.x
MSC
USB stick;
HDD (without any special software); The MSC mode
supports USB de- vices
MTP
Devices with theAndroid operat- ing system or
Windows mobile (mobile phone, tablet)
Apple
Devices with the
operating system
iOS (iPhone, iPod, iPad)
CD/DVDCD/DVD-Drive
Audio CD (Up to 80 min);
CD-R / RW (Up to 700 MB);
DVD±R/RW; DVD audioISO9660;
Joliet (Level 1,2,3); UDF 1.x;UDF 2.x
-
Supported audio file formatsCodec type
(File formats)File suffixMax bit rateMaximumsampling rateMulti
channels a)Play listsWindows Media
Audio
9 and 10 (Lay- er-3)
wma384 kbit /s96 kHz
no
m3upls
wpl
m3u8 asx
WAVwav
Defined bythe format (approx.
1.5 Mbit/s)
48 kHz
MPEG-1; 2 and 2.5mp3320 kbit /sMPEG-2 and 4aac; mp4;m4a
yes
FLAC;
OGG Vorbisflac; ogg
Defined by the format (approx.
5.5 Mbit/s)a)
Applies to the CANTON sound system.
The GPT standards (GUID partition table) method structured audio sources are
not supported by the device.
Files that are protected by Digital Rights Management (DRM) technology can-
not be played back by the device.
29Media
Page 33 of 100

Images
Image viewer
Introduction
This chapter contains information on the following subjects:
Main menu
30
Select image source
30
Operation
30
Image with GPS coordinates
31
Supported image file formats and sources
31
Settings
31
Note
Viewing images in the device screen is not supported by connected Apple de-
vices.
Main menu
Fig. 18
Images: Main menu
Display main menu
›
Press the key
→
.
Main Menu - Information and function keys Select the image source
Select the images or folder from the list
Display the previous image
Switching on the slideshow
Switching off the slideshow
Display of the next image
AImage settings
Rotate the image 90° anticlockwise
Rotate the image 90° clockwise
Display the output image size while retaining the aspect ratio
Guidance to GPS coordinates (the display only occurs if the image contains
GPS coordinates)
Select image source
›
Press the key
→
→
A
» Fig. 18 on page 30 and select the data
source.
Image sources CD/DVD - Inserted CD / DVD
SD card - inserted SD card
USB - connected to the USB input data source
If the source contains no image with the supported format, the following mes-
sage appears in the screen Please select a source with image files.
Operation
OperationAction
Go to the next image
Finger motion across the screen to the left
(with starting representation)Press from
Go to previous image
Finger motion across the screen to the right
(with starting representation)Press from
Increase the image size
Touch screen using two fingers and pull
apartTurning the knob to the right
Reduce the image size
Touch screen using two fingers and close to-
getherTurning the knob to the leftMoving the image with an en-
larged displayDrag your finger over the screen in the re- quired direction 30Images