2015 SKODA CITIGO steering
[x] Cancel search: steeringPage 91 of 160
WARNING■Always deactivate the cruise control system after use to prevent the sys-
tem being switched on unintentionally.■
Control may only be resumed if the set speed is not too high for the cur-
rent traffic conditions.
Note
During control, speed can be increased by pressing the accelerator pedal. Re-
leasing the accelerator pedal will cause the speed to drop again to the set
speed.
City Safe Drive
Introduction
This chapter contains information on the following subjects:
Operation
89
Disable / Enable
90
City Safe Drive (hereinafter referred to as: the system) monitors the traffic sit-
uation ahead of the vehicle. If the system detects a risk of collision with an ob-
stacle ahead of the vehicle, then automatic braking is applied. The risk of a col-
lision is thus reduced and the consequences of an impact are minimized.
WARNING■ The general information relating to the use of assistance systems must
be observed » page 85, in section Introduction .■
The system does not respond to crossing or oncoming objects.
CAUTION
The system can slow down the vehicle to a standstill. If the vehicle continues
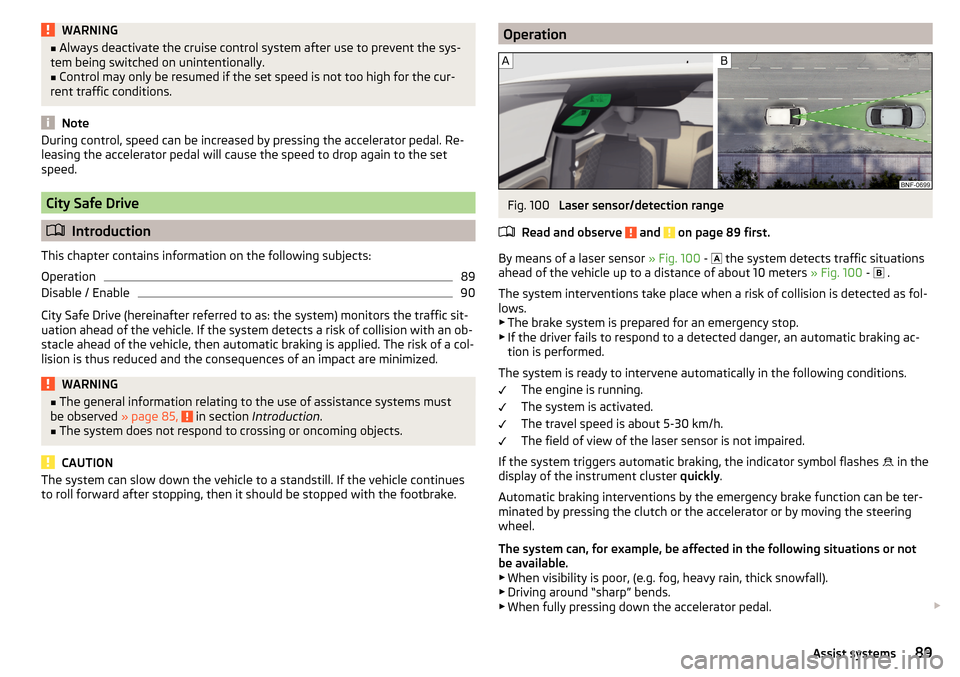
to roll forward after stopping, then it should be stopped with the footbrake.OperationFig. 100
Laser sensor/detection range
Read and observe
and on page 89 first.
By means of a laser sensor » Fig. 100 -
the system detects traffic situations
ahead of the vehicle up to a distance of about 10 meters » Fig. 100 -
.
The system interventions take place when a risk of collision is detected as fol-
lows.
▶ The brake system is prepared for an emergency stop.
▶ If the driver fails to respond to a detected danger, an automatic braking ac-
tion is performed.
The system is ready to intervene automatically in the following conditions. The engine is running.
The system is activated.
The travel speed is about 5-30 km/h.
The field of view of the laser sensor is not impaired.
If the system triggers automatic braking, the indicator symbol flashes in the
display of the instrument cluster quickly.
Automatic braking interventions by the emergency brake function can be ter-
minated by pressing the clutch or the accelerator or by moving the steering
wheel.
The system can, for example, be affected in the following situations or not
be available. ▶ When visibility is poor, (e.g. fog, heavy rain, thick snowfall).
▶ Driving around “sharp” bends.
▶ When fully pressing down the accelerator pedal.
89Assist systems
Page 96 of 160

ŠKODA service partners are liable for any ŠKODA Genuine Part defects for aperiod of 2 years after installation or delivery in accordance with the materials
defect liability, provided that nothing else was agreed in the purchase contract
or in any other agreements. You should keep the approved warranty certificate
and the bill for these components for this period of time, so that commence-
ment of the term may be verified.
In addition, ŠKODA Service Partners also stock a range of suitable car care
products as well as those parts which are subject to natural wear-and-tear,
such as tyres, batteries, bulbs and wiper blades.
Note
The accessories authorized by the company ŠKODA AUTO a.s. will be offered
by the ŠKODA partners in all countries where the company ŠKODA AUTO a.s.
has a sales and service network. This will usually be in the form of a printed
catalogue of Original ŠKODA Accessories, in the form of separate printed bro-
chures or in the form of offers for ŠKODA Genuine Accessories on the ŠKODA
partner web pages.
Spoiler
Read and observe
on page 92 first.
If your new vehicle is fitted with a spoiler on the front bumper in combination
with the spoiler on the luggage compartment lid, the following instructions
must be adhered to. ▶ For safety reasons, the vehicle must only be fitted with a spoiler on the front
bumper in combination with the associated spoiler on the luggage compart-
ment lid.
▶ This kind of spoiler cannot be left on the front bumper either on its own, in
combination with another spoiler not on the luggage compartment lid or in
combination with an unsuitable spoiler on the luggage compartment lid.
▶ We recommend that you consult the ŠKODA service partner for any repairs to
or replacement, addition or removal of spoilers.
WARNING■ If work on your vehicle's spoilers is not carried out properly, this can lead
to operational faults - risk of accident and serious injuries.■
If a front spoiler, full wheel trim, etc. is mounted retrospectively, it must
be ensured that the air supply to the front wheel brakes is not reduced.
The front brakes may overheat, which can have a negative impact on the
functioning of the braking system – risk of accident!
Airbags
Read and observe
on page 92 first.
WARNING■Modifications, repairs and technical alterations that have been carried out
unprofessionally can cause damage and operational faults, and can also se-
riously impair the effectiveness of the airbag system – risk of accident and
fatal injury!■
A change to the vehicle's wheel suspension, including the use of non-ap-
proved wheels and tire combinations, can alter the functioning of the air-
bag system - risk of accident and fatal injury!
WARNINGInformation on the use of the airbag system■Never install any airbag parts into the vehicle that have been removed
from old cars or have been recycled.■
Never install damaged airbag parts in the vehicle. The airbags may then
not be deployed properly or even at all in the event of an accident.
WARNING■ No modifications of any kind must be made to parts of the airbag system.■Any work on the airbag system including the installation and removal of
system components due to other repair work (e.g. removal of the steering
wheel) must only be carried out by a specialist garage.■
Never make any changes to the front bumper or the bodywork.
■
It is prohibited to manipulate individual parts of the airbag system, as this
might result in the airbag being deployed.
■
The protective function of the airbag system is sufficient for only one ac-
cident. The airbag system must then be replaced if the airbag has been de-
ployed.
94General Maintenance
Page 101 of 160

CAUTION■The headlights are never to be wiped dry - there is a risk of damaging the
protective lacquer and the headlight glass subsequently developing cracks.■
Do not use sharp objects to clean the glasses - there is a risk of damaging
the protective lacquer and the headlight glasses subsequently developing
cracks.
■
Do not use any aggressive cleaning or chemical solvent products to clean the
headlights – risk of damaging the headlight lenses.
Door closing cylinder
Read and observe
and on page 97 first.
Specific products must be used for de-icing door lock cylinders.
CAUTION
Make sure that as little water as possible gets into the locking cylinder when
washing the vehicle - there is a risk of freezing the lock cylinder!
Cavity protection
Read and observe
and on page 97 first.
All the cavities of your vehicle which are at risk from corrosion are protected
for life by a layer of protective wax applied in the factory.
This wax protection does not need to be inspected or re-applied.
If any small amount of wax flow out of the cavities at high temperatures, these
must be removed with a plastic scraper and the stains cleaned using a petrole-
um cleaner.
WARNINGSafety regulations should be observed when using petroleum cleaner to re-
move wax – risk of fire!
Jack
Read and observe
and on page 97 first.
The jack is maintenance-free.
If necessary, the moving parts of the jack should be lubricated with a suitable
lubricant.
Wheels
Read and observe
and on page 97 first.
Wheel rims
Also thoroughly wash the wheel rims when washing the vehicle on a regular
basis.
Regularly remove salt and brake abrasion, otherwise the rim material will be
corroded.
Light alloy wheels
After washing thoroughly and treat the wheel rims with a protective product
for light alloy wheels.
For the treatment of wheel rims do not use products which may cause damage
to the paint on the rims.
CAUTION
■ Damage to the paint layer on the wheel rims must be touched up immediate-
ly.■
Severe layers of dirt on the wheels can also result in wheel imbalance. This
may show itself in the form of a wheel vibration which is transmitted to the
steering wheel which, in certain circumstances, can cause premature wear of
the steering. This means it is necessary to remove the dirt.
Under-body protection
Read and observe
and on page 97 first.
The underside of your vehicle is already permanently protected by the factory
against chemical and mechanical influences.
It is not possible to guarantee that the protective coating will not suffer any
damage as the vehicle is driven.
We recommend having the protective layer underneath the vehicle and the
chassis checked — preferably before the beginning of winter and at the end of
winter.
WARNINGNever use additional underbody protection or anti-corrosion agents for ex-
haust pipes, catalytic converters or heat shields. When the engine reaches
its operating temperature, these substances may ignite - risk of fire!99Care and maintenance
Page 102 of 160

Wiper bladesRead and observe
and on page 97 first.
Clean the wiper blades regularly with a glass cleaner. The wiper blades should
be cleaned with a sponge or cloth if they are heavily soiled by insect residues,
for example.
The wiper blades can become soiled with wax residues after washing in auto-
matic vehicle wash systems for example.
Interior care
Introduction
This chapter contains information on the following subjects:
Natural leather
100
Artificial leather, materials and Alcantara ®
101
Seat covers
101
Safety belts
102
We recommend using vehicle care products from ŠKODA Original Accessories.
These are available from ŠKODA Partners. The usage instructions on the pack-
age must be observed.
WARNING■ Vehicle care products may be harmful to your health if not used according
to the instructions.■
Always keep the vehicle care products safe from people who are not com-
pletely independent, e.g. children - there is a danger of poisoning!
■
Air fresheners and scents can be hazardous to heath when the tempera-
ture inside the vehicle is high.
CAUTION
■ Be sure to check clothing for colour fastness to avoid any damage or visible
stains on the material (leather), panels and textiles.■
Remove fresh stains such as those from ball-point pens, ink, lipstick, shoe
polish, etc., from the material (leather), panels and textiles as quickly as possi-
ble.
■
Do not attach scents or air fresheners to the dash panel – there is a risk of
damage to the dash panel.
■ Do not attach any stickers to the filaments or glass antenna - there is risk of
damage.■
Do not clean the roof panelling with a brush – risk of damage to the surface
of the panelling.
■
Cleaner that contain solvents can damage the material being cleaned.
■
Apply only a small amount of the cleaning and care product.
Note
Due to the special tools and knowledge required, and to avoid any potential
problems with the cleaning and care of the interior of your vehicle, we recom-
mend that cleaning and care of the interior of your vehicle be carried out by a
ŠKODA service partner.
Natural leather
Read and observe
and on page 100 first.
The leather needs, depending on the strain placed on it, regular cleaning andmaintenance.
Dust and dirt in pores and creases cause abrasions on the surface and lead to
premature embrittlement of the leather surface. Therefore, they must be re-
moved regularly at short intervals with a cloth or vacuum cleaner.
Clean soiled leather surfaces with a water-dampened cotton or woollen cloth
and then dry with a clean, dry cloth »
.
Clean severely soiled areas with a cloth soaked in a mild soap solution (2 ta-
blespoons of neutral soap to 1 litre of water).
To remove stains , use a cleaning agent specially designed for this purpose.
Treat the leather periodically with a suitable leather protector and use a skin
care cream with light blocker and impregnation after each cleaning.
CAUTION
■ Ensure that no part of the leather is soaked through during cleaning and that
no water gets into the seams. Otherwise, the leather could become brittle or
cracked.■
Avoid leaving the vehicle for lengthy periods in bright sunlight to avoid the
leather from bleaching. If the vehicle is parked in the open for lengthy periods,
protect the leather from direct sunlight by covering it.
■
The use of an additional mechanical steering wheel lock may damage the
leather surface of the steering wheel.
100General Maintenance
Page 119 of 160

Always store wheels or tyres in a cool, dry place that is as dark as possible.
Tyres which are not fixed to a wheel trim should be stored upright.
Tyre age
Tyres age and lose their original characteristics, even if they are not being
used. The service life of the tyres is 6 years. Therefore, we recommend not us-
ing tyres that are older than 6 years.
Wheel bolts
Wheels and wheel bolts are matched to each other in terms of design. We rec-
ommend that you use wheel rims and wheel bolts from ŠKODA Original Acces-
sories.WARNINGNever use tyres if you do not know anything about the condition and age.
Tyre pressure
Fig. 113
Principle sketch: An example on the position of the sticker / tyre
inflation
Read and observe
on page 116 first.
The specified tyre pressures are shown on label
A
» Fig. 113 .
The sticker can be located at the following locations.
▶ B-pillar on the driver's side.
▶ Inside of the fuel filler flap.
Tyre pressure is always to match the load .
Inflation pressure for cold tyres
Inflation pressure for half load
Inflation pressure for increased driving comfort at half load
As a result of pressure level adaption to this value, the fuel consumption
and pollutant emissions may increase slightly.
Inflation pressure for full load
Tyre pressure value on the front axle
Tyre pressure value on the rear axle
The approved tyre sizes for your vehicle are listed in the vehicle's technical
documentation and in the declaration of conformity (the so-called COC docu-
ment).
Check tyre pressures
Check the tyre pressure, including that of the emergency or spare wheel, at
least once a month and also before setting off on a long journey.
Always check the inflation pressure when the tyres are cold. Do not reduce the
higher pressure on warm tyres.
In vehicles with tyre pressure monitoring, tyre pressure values must be stored
every time the tyre pressure changes » page 91.WARNING■
Having the correct tyre inflation pressure is always the driver's responsi-
bility.■
Too low or too high inflation pressure impairs handling.
■
If the inflation pressure is too low, the tyre will have to overcome a higher
rolling resistance. This will cause a significant increase in the temperature
of the tyre, especially at higher speeds. This can result in tread separation
and a tyre blow-out.
■
In the event of very fast tyre inflation pressure loss, such as a sudden tyre
failure, an attempt should be made to bring the vehicle carefully to a stop
without sudden steering movements and without any hard braking.
For the sake of the environment
Tyres that are insufficiently inflated increase your fuel consumption. BCDEFG117Wheels
Page 120 of 160

NoteThe declaration of conformity (the so-called COC document), can be obtained
from a ŠKODA 1)
partner.
Tyre wear
Read and observe
on page 116 first.
Tyre wear depends on the pressure, driving style, and other circumstances.
Attention to the following factors can reduce tyre wear.
Driving style
Fast cornering, sharp acceleration and braking increase the wear of your tyres.
Wheel balance
The wheels of a new vehicle are balanced. When driving, however, there are a
range of factors that may result in an imbalance. This may become apparent by
a “vibration” in the steering. If this is the case, have the wheels checked by a
specialist garage.
Have the wheels likewise rebalanced after replacing the tyres.
Setting the vehicle geometry
Incorrect wheel alignment at the front or rear leads to excess wear on the
tyres and impairs driving safety. With a distinct tyre wear pattern, we recom-
mend that you check the setting of the vehicle geometry in a specialist work-
shop.
WARNING■ An incorrect wheel alignment at the front or rear impairs handling.■Unusual vibrations or pulling of the vehicle to one side could be a sign of
tyre damage. If there is any doubt that a wheel is damaged, immediately re-
duce your speed and stop! If no external tyre damage is evident, drive slow-
ly and carefully to the nearest specialist garage to have the vehicle
checked.Tyre wear indicator and wheel replacementFig. 114
Principle sketch: Replace tire tread with wear indicators / wheels
Read and observe
on page 116 first.
Wear indicators
The base of the tread of the tyres contains has a 1.6 mm high wear indicator » Fig. 114 -
. In some countries, different tyre wear rates may apply.
Markings on the walls of the tyres through the letters “TWI”, triangular sym-
bols or other symbols identify the position of the wear indicators.
Replacement of wheels
For uniform wear on all tyres, we recommend that you change the wheels ev-
ery 10 000 km according to the scheme » Fig. 114-
. You will then obtain ap-
proximately the same life for all the tyres.
After a wheel has been replaced, the tyre pressure has to be adjusted.
In vehicles with tyre pressure monitoring, save tyre pressure values » page 91.
WARNING■
You must have your tyres replaced with new ones at the latest when the
wear indicators have been worn down.■
Worn tyres impair necessary adhesion to the road surface, particularly at
high speeds on wet roads. This could lead to “aquaplaning” (uncontrolled vehicle movement – “swimming” on a wet road surface).
1)
Only valid for some countries and some models.
118General Maintenance
Page 132 of 160

›Attach clamp 3 to the negative terminal of the battery supplying power B.›Attach the clamp 4 to a solid metal component firmly connected to the en-
gine block or to the engine block itself.
On vehicles with the START-STOPsystem the jump-start cable must be con-
nected to the engine earthing point » Fig. 125.
Starting engine›
Start the engine on the vehicle providing the power and allow it to idle.
›
Start the engine of the vehicle with the discharged battery.
›
If the engine does not start, halt the attempt to start the engine after 10 sec-
onds and wait for 30 seconds before repeating the process.
›
Remove the jump start cables in the reverse order as attachment.
Both batteries must have a rated voltage of 12 V. The capacity (Ah) of the bat-
tery supplying the power must not be significantly less than the capacity of
the discharged battery in your vehicle.
Jump-start cables
Only use jump-start cables which have an adequately large cross-section and
insulated terminal clamps. Observe the instructions of the jumper lead manu-
facturer.
Positive cable – colour coding in the majority of cases is red.
Negative cable – colour coding in the majority of cases is black.
WARNING■
Do not clamp the jump-start cable to the negative terminal of the dis-
charged battery. There is the risk of detonating gas seeping out the battery
being ignited by the strong spark which results from the engine being star-
ted.■
The non-insulated parts of the terminal clamps must never touch each
other – there is a risk of short circuit.
■
The jump-start cable connected to the positive terminal of the battery
must not come into contact with electrically conducting parts of the vehicle
– there is a risk of short circuit.
■
Route the jump-start cables so that they cannot be caught by any rotat-
ing parts in the engine compartment.
Towing the vehicle
Introduction
Fig. 126
Braided tow rope / Spiral tow rope
This chapter contains information on the following subjects:
Front towing eye
131
For towing, a braided tow rope is to be used » Fig. 126 -
.
When towing, the following guidelines must be observed.
Vehicles with manual transmission may be towed with a tow bar or a tow rope
or with the front or rear wheels raised.
Vehicles with automatic transmission may be towed in with a tow bar or a tow
rope or with the front wheels raised. If the vehicle is raised at rear, the auto-
matic gearbox is damaged!
Driver of the tow vehicle
›
Engage the clutch gently when starting off or depress the accelerator partic-
ularly gently if the vehicle is fitted with an automatic gearbox.
›
Only then approach correctly when the rope is taut.
The maximum towing speed is 50 km/h.
Driver of the towed vehicle
›
Switch on the ignition so that the steering wheel is not locked and so that
the turn-signal lights, windscreen wipers and windscreen washer system can
be used.
›
Take the vehicle out of gear or move the selector lever into position N if the
vehicle is fitted with an automated transmission.
130Do-it-yourself
Page 133 of 160

Please note that the brake servo unit and power steering only operate if the
engine is running. If the engine is not running, significantly more physical force
is required to depress the brake pedal and steer the vehicle.
If using a tow rope, ensure that it is always kept taught.
General information on towing
Both drivers should be familiar with the problems which might occur while a
vehicle is being towed. Unskilled drivers should not attempt to tow in another
vehicle or to be towed in.
The vehicle must be transported on a special breakdown vehicle or trailer if it
is not possible to tow in the vehicle in the way described or if the towing dis-
tance is greater than 50 km.
If the gearbox has no oil, your vehicle must be towed with the front axle raised
clear of the ground or on a breakdown vehicle or trailer.
To protect both vehicles when tow-starting or towing, the tow rope should be elastic. Thus one should only use plastic fibre rope or a rope made out of a
similarly elastic material.
Attach the tow rope or the tow bar only to the towing eye » page 131 .WARNING■
When towing, exercise increased caution.■Do not use spiral rope for towing » Fig. 126- , the towing eye may un-
screw from the vehicle - risk of accident.■
Ensure tow rope is not twisted - risk of accident.
CAUTION
■ Do not start engine by towing - there is a risk of damaging the engine parts.
The battery from another vehicle can be used as a jump-start aid » page 129,
Jump-starting .■
There is always a risk of excessive stresses and damage resulting at the
points to which you attach the tow rope or tow bar when you attempt to tow a
vehicle which is not standing on a paved road.
Note
We recommend using a tow rope from ŠKODA Original Accessories, which is
available from a ŠKODA Partner.Front towing eyeFig. 127
Removing the cap/installing the towing eye
Read and observe
and on page 131 first.
Removing/fitting the cover cap
›
Press on the cover cap in the direction of the arrow
1
» Fig. 127 .
›
Remove the cover cap in the direction of the arrow
2
.
›
After screwing out the towing eye, insert the cover cap in the area of arrow
1
and then press the opposite side of the cover cap.
The cap must engage firmly.
Removing/fitting the towing eye
›
Manually screw in the towing eye as far as it will go in the direction of the
arrow
3
» Fig. 127 » .
For tightening purposes, we recommend, for example, using the wheel
wrench, towing eye from another vehicle or a similar object that can be pushed through the eye.
›
Unscrew the towing eye against the opposite direction to arrow
3
.
WARNINGThe towing eye must always be screwed in fully and firmly tightened, oth-
erwise the towing eye can tear when towing in or tow-starting.131Emergency equipment and self-help