2015 SKODA CITIGO buttons
[x] Cancel search: buttonsPage 4 of 13
General information
Important information
Introductory information
Please read the Owner's Manual for this Radio Funky (hereinafter referred to solely as "device") carefully, because operation in accordance with these in-
structions is a prerequisite for proper use of the device.
These operating instructions describe all possible equipment variants without
identifying them as special equipment, model variants or market-dependent
equipment.
Consequently, this vehicle does not need to contain all of the equipment compo-
nents described in these operating instructions.
The scope of equipment of your vehicle relates to your purchase contract for the vehicle. More information is available from the ŠKODA Partner 1)
where you bought
the vehicle.
Please note that these instructions are meant only as an addendum to the infor-
mation provided in your vehicle's owner's manual. Therefore, they can be used
only in conjunction with the latest manual for this vehicle. For a detailed descrip-
tion of some of the functions listed in these instructions, see the owner's manual
for your vehicle.
If you have any questions about your radio navigation system, please contact a
ŠKODA Partner.
The illustrations can differ in minor details from your radio navigation system;
they are only intended for general information.
Device operation
The device should only be used when traffic conditions permit safe use.
WARNING■ Concentrate fully at all times on your driving! As the driver, you are fully re-
sponsible for the operation of your vehicle.■
Only use the device in a way that ensures that you are in full control of your
vehicle in every traffic situation - there is a risk of accidents occurring!
■
Adjust the volume to ensure that acoustic signals from outside the vehicle,
e.g. sirens from vehicles to give way to, such as the police, ambulance and fire
brigade , can be heard at all times.
■
High volumes can cause hearing damage.
Care of the Display
CAUTION
■ Do not use solvents such as benzine or turpentine, which may damage the dis-
play surface.■
Treat the display with care, as finger pressure or contact with sharp objects may
cause dents and scratches on the surface.
Note
The display can be cleaned with a soft cloth and alcohol, if necessary.
Anti-theft protection
The anti-theft coding of your device prevents operation of the system following a
voltage interruption, e.g. during a vehicle repair or following theft. After discon-
necting the battery, disconnecting the radio from the on-board voltage of the ve- hicle and after a fuse failure, the code must be entered before the vehicle can be
used again.
Enter code
›
Switch on the radio with the ignition turned on. SAFE is displayed and then
1000 .
›
Use the selection buttons 1 - 4
11
to enter the safety code.
›
Confirm the safety code by pressing the selection button 6
11
for a longer peri-
od.
1)
Explanation of terms
» Owner's Manual , chapter Foreword .
2General information
Page 5 of 13
Code number
The code number can only be called up “online” via the ŠKODA system, as this
guarantees even more effective anti-theft protection. In this case you will have to call on a specialist 1)
garage.
Incorrect code number
If an incorrect code is confirmed after entry of the code, the procedure can be re-
peated once again . The number of attempts is shown in the bottom screen line.
If the code is entered incorrectly a second time, the unit will be blocked for ap- prox. one hour. It is only possible to enter the safety code again after one hourhas expired if both the device and the ignition have stayed turned on during thattime.
If two invalid attempts are then made again, the unit will be blocked again for an hour.
The cycle - two attempts, blocked for an hour - will continue to apply.
Note
The code is normally stored in the instrument cluster. This ensures that it is auto-
matically decoded (convenience coding). Manual input of the code is normally not necessary.
Device specification and operation
Equipment overview
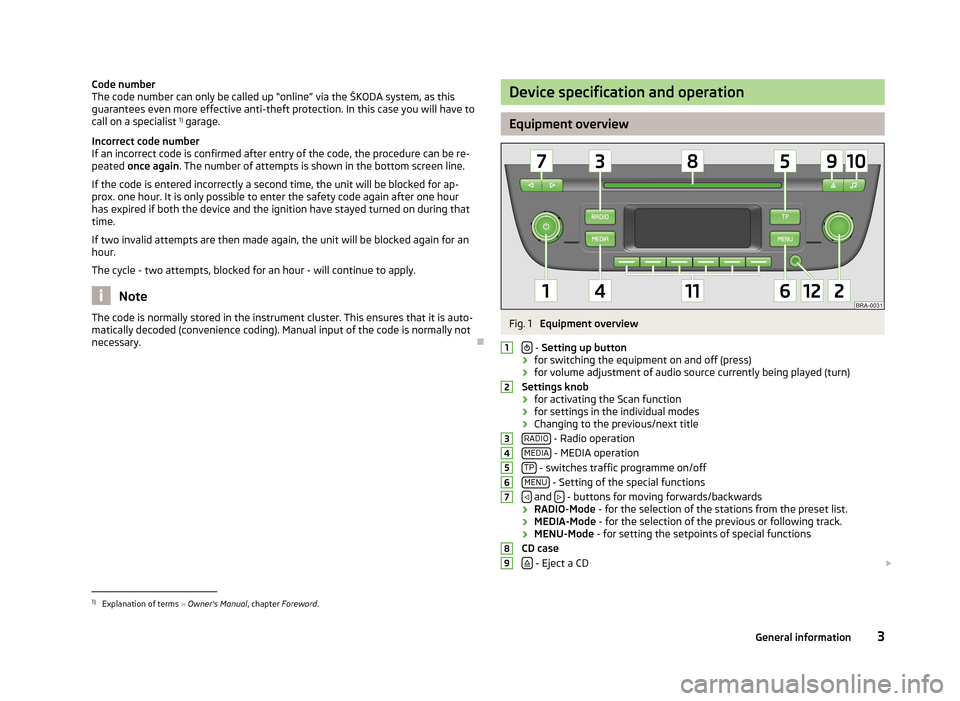
Fig. 1
Equipment overview
- Setting up button
› for switching the equipment on and off (press)
› for volume adjustment of audio source currently being played (turn)
Settings knob
› for activating the Scan function
› for settings in the individual modes
› Changing to the previous/next title
RADIO
- Radio operation
MEDIA - MEDIA operation
TP - switches traffic programme on/off
MENU - Setting of the special functions
and - buttons for moving forwards/backwards
› RADIO-Mode
- for the selection of the stations from the preset list.
› MEDIA-Mode
- for the selection of the previous or following track.
› MENU-Mode
- for setting the setpoints of special functions
CD case
- Eject a CD
1234567891)
Explanation of terms
» Owner's Manual , chapter Foreword .
3General information
Page 9 of 13
CD player
Using the system
Information on how to use a CD
Audio-CDs (CD-A) and MP3-CDs can be played in the internal drive.
Inserting the CD
Insert a CD, with the printed side facing up, into the CD slot
8
until it is automati-
cally drawn in.
The play function will start automatically.
When a CD is inserted, this will be indicated by the text “ CD-IN ” on the device
screen.
Taking out the CD
Press the
button – the CD is ejected.
If the “ejected” CD is not taken out within 10 seconds, it will be retracted again for
safety reasons.
Buttons on the unit for controlling the current audio sources The arrow buttons on unit
or will always affect the currently heard audio
source, irrespective of the current menu used.
- pressing this button briefly within 2 seconds of playback takes you to the be-
ginning of the previous track or chapter, or after 2 seconds to the beginning of
the current title or chapter.
- pressing this button takes you to the start of the next track or chapter.
Playback of the previous or next track can also be selected by turning the menu
button
2
» Fig. 1 on page 3.
Changing between the audio sources
Press the MEDIA
button to select the audio source:
CD (internal CD drive) NAV
(connected MFP) or AUX .
WARNINGThe CD-player is a laser product. On the manufacturing date, this unit was
classified as a class 1 laser product in accordance with the national/interna-
tional standards DIN EN 60825-1: 2008-05 and DHHS Rules 21 CFR,
Subchapter J. The laser used in this class 1 laser product is so weak that there is no risk of danger when operated correctly. This product is designed such
that the laser is restricted to the inside of the unit. However, the installed la- ser could be classified in a higher class were the housing to be removed. Forthis reason, never remove the housing of the unit.
CAUTION
■ Never insert CDs with the designation “into the internal drive. Do not insert in
drives without a drawer ” or use Eco Discs.■
After pressing the button there is a time delay of a few seconds before the
CD is ejected. During this time the lock in front of the CD slot is open.
■
Be sure to wait until the CD has been fully ejected before you try to insert a new
CD. Otherwise you can damage the drive inside the unit.
■
A dirty, mechanically damaged, unreadable or incorrectly inserted CD can cause
playback problems. The CD may not be playable or may jump because of this.
Check the CD and insert it properly into the unit. Should the problem persist , try
using another CD and visit a specialist garage if necessary.
■
If the internal temperature of the device is too high, no CDs will be accepted.
The unit switches into the last active operating mode.
■
Never use liquids such as gasoline, paint thinner or record cleaner to clean the
surface of the CD - this may cause damage.
■
Never expose the CD to direct sunlight!
■
Only write on the CD using appropriate pens.
■
Do not stick anything to the CD.
Note
■ Poor or unpaved road surfaces and severe vibrations may cause the CD to jump.■In cold weather or after rain showers, moisture (condensate) may deposit in the
unit. This can effect the CD jump or impair the play function. Wait until the mois-
ture has evaporated if this happens.■
If a CD is dirty, never clean it in a circular motion, but rather from the inside out.
Use a soft, lint-free cloth. For heavy stains, we recommend that you clean the CD with a commercially available CD cleaner and allow it to dry.
■
It is possible that CDs protected by copyright and home-made CD-R and CD-RW
will not be played back at all or only in certain circumstances.
7CD player