Page 65 of 96

Pair and connect a mobile telephone
t o the Inf
ot
ainment systemIn order to manage a mobile telephone via
the Infot
ainment
system, it is necessary to
pair both")
Telephone management system (PHONE)
Pair and connect a mobile telephone
t o the Inf
ot
ainment systemIn order to manage a mobile telephone via
the Infot
ainment
system, it is necessary to
pair both devices once.
For your safety, we recommend you make the
link when the vehicle is stationary. In some
countries it is not possible to perform the
pairing with the vehicle running.
Conditions
You must guarantee the following setup in
the mobile phone and the Infotainment sys-
tem:
● The ignition must be switched on.
● The Bluetooth ®
fu
nction of the mobile tele-
phone and the Infotainment system must be
active as well as visibility.
● The keypad lock on the mobile telephone
mus
t be deactivated.
Follow instructions in the manual for the mo-
bile telephone.
After turning on the ignition, the visibility of
the Bluetooth ®
function activates.
During the pairing process it is necessary to
enter data via the mobile telephone's key-
pad. To do so, the mobile telephone must be
ready. Starting mobile telephone pairing
● Make sure the Bluetooth function of the
mobi
le device is active and visible.
● Press the PHONE button on the Infotain-
ment sy
s
tem.
● Press the Find telephone function button and
then R
e
s
ults .
OR:
● Press the PHONE button on the Infotain-
ment sy
s
tem.
● Press the Setup function button.
● Press the Sel
ect
t
elephone function button
and then R
e
s
ults .
OR:
● Press the PHONE button on the Infotain-
ment sy
s
tem.
● Press the Setup function button.
● Press the Bluet
ooth function button.
● Press the Find dev
ic
e
s function button and
then R
e
s
ults .
OR:
● Connect from the mobile device itself.
The n ame of
the Bluet
ooth function of your
Infotainment system will be displayed in the
main PHONE screen and you can edit this via
the Bluetooth Settings menu
››
› p
age 70 The search process can take up to 1 minute.
On the scr
een the system will dynamically
update the names of the Bluetooth devices
found.
As soon as the search is completed, the
names of the Bluetooth ®
devices found are
displayed on-screen.
● In the Infotainment system select the mo-
bil
e telephone to which you want to connect
from the list of Bluetooth devices found. In
certain circumstances, it is possible that to
finish the connection between the two devi-
ces, you must enter additional data in the
mobile telephone and Infotainment system.
● If necessary, confirm the link to the mobile
telephone.
● U
se your mobile telephone to enter and
confirm y
our PIN code, as indicated in the
display of the infotainment system.
OR:
● Compare the PIN code shown on the dis-
pla
y of the Infotainment system with that
shown on the mobile telephone. If they
match, confirm on both devices.
The infotainment system and the mobile tele-
phone will now be connected to each other.
When pairing has been completed correctly,
the PHONE main menu is displayed and the
phonebook; call lists stored on the mobile
telephone are automatically loaded. The »
63
Page 66 of 96

duration of the loading process depends on
the amou nt
of
data stored on the mobile tele-
phone. After loading, the data will be availa-
ble on the Infotainment s")
Telephone management system (PHONE)
duration of the loading process depends on
the amou nt
of
data stored on the mobile tele-
phone. After loading, the data will be availa-
ble on the Infotainment system.
Pairing and connection of mobile telephones
You can pair up to 20 mobile telephones to
the Infotainment system, but there can only
be two mobile phones simultaneously con-
nected as hands-free, and a third device as
BT audio at any time.
When the Infotainment system is switched
on, it automatically connects to the last con-
nected mobile telephone. If it is not possible
to connect to this mobile telephone, the tele-
phone management system will try to auto-
matically connect to the next mobile tele-
phone on the list of paired devices.
The maximum range of the Bluetooth ®
is ap-
proximate. 10 metres. The active Bluetooth ®
connection disconnects if this distance is ex-
ceeded. The connection is automatically re-
established as soon as the device is once
again within Bluetooth ®
range.
If the maximum number of paired devices is
reached and you wish to pair another one to
the system, it will automatically replace the
one least used recently. If you wish to replace
it with another one, the user must erase it be-
forehand. To do so:
● Press the Setup button on the device while
in telephone mode. ●
Pr
es
s the function button Bluetooth setup .
● Activate the P
air
ed dev
ices function button.
● In the list of paired devices, press the function button next to the mobile telephone
t
o be del
et
ed and then press Delete to con-
firm the process. Note
It may be necessary to confirm the phone-
book d at
a transfer request on the mobile tel-
ephone. Description of the telephone
m
an
ag
ement system
Introduction Some functions and setup can only be per-
f
ormed when the
v
ehicle is stopped and are
not available on all mobile telephones.
With the help of the telephone manager, up
to 3 mobile telephones can be connected to
the Infotainment system via the Bluetooth
profiles (for example, one used as a Blue-
tooth-audio player and/or another two as
hands-free telephones). Note
● Us in
g a mobile telephone inside the vehicle
may provoke noise in the speakers. ●
Some network s
may not recognise all lan-
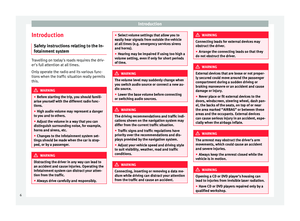
guage characters or offer all services. PHONE main menu
Fig. 58
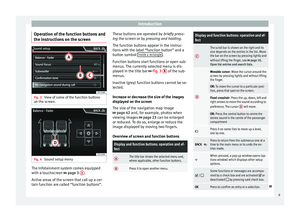
PHONE main menu Fig. 59
Active call64
Page 67 of 96

Assign a user profile
The d at
a fr
om the phonebook, the call lists
and the stored speed dial buttons are as-
signed to a user profile and remain stored on
the tel")
Telephone management system (PHONE)
Assign a user profile
The d at
a fr
om the phonebook, the call lists
and the stored speed dial buttons are as-
signed to a user profile and remain stored on
the telephone management system. This in-
formation will be available every time the mo-
bile telephone is connected to the telephone
management system.
After the first connection, it will take a few
minutes for the data from the phonebook of
the linked mobile phone to be available in
the Infotainment system. The next time that
the mobile telephone is connected (e.g. on
the next journey) the phonebook is updated
automatically.
If any entries in the mobile phonebook have
been modified while connected, a manual
update of the phonebook data can be initi-
ated from the User profile settings
menu ››› page 70.
Telephone management can store a maxi-
mum of 4 user profiles for mobile tele-
phones. If you wish to link/connect another
mobile phone, the oldest user profile will au-
tomatically be replaced. If you do not want it
to do this, you must previously delete one of
the user profiles. To delete a profile manual-
ly:
● Menu Setup >
U
ser pr
ofi
le and press
D el
et
e other user profiles .Telephone management system function but-
t
on s
● Pr
ess the PHONE button on the Infotain-
ment sy
s
tem to open the PHONE main menu.
Function button: function
1Name of connected mobile telephone.
Press the icon to the left to connect or
pair with another mobile telephone.
2Speed dial buttons, to which telephone
numbers from the phonebook may be as-
signed respectively ››› page 69.
3
Change to another connected telephone:
Allows user to change between connec-
ted telephones as hands-free. This but-
ton will only be visible when there are
two telephones connected as hands-free.
The active user profile corresponds to the
telephone appearing on the screen.
DIAL NO.To open the number pad and enter a tele-
phone number ››› page 66.
CONTACTSTo open the phonebook of the connected
mobile telephone ››› page 67.
SMSTo open the menu for SMS messages
››› page 68.
CALLSTo open call lists of the connected mobile
telephone ››› page 69.
SETUPTo open the Telephone settings
menu ››› page 70. Display and symbols of the telephone man-
ag
ement
sy
stem
Display: Meaning ››› Fig. 59
AName of the mobile network operator (provid-
er) to which the mobile telephone is connec-
ted.
BView of stored telephone number or name. If
the name stored in the phonebook has an as-
signed photo, it can be displayed ››› page 70.
Press to
accept a call.
Press to
end a call.
OR: Press to reject an incoming call.
Press to mute or to reactivate the ring tone dur-
ing an incoming call.
Press to mute the microphone during an active
call and to reactivate it.
This button keeps the call active. While the call
is on hold the listener will not hear the conver-
sation. To reactivate it, press the call accept
button
. To reject it, press the reject button.
Charge status of a mobile telephone connec-
ted via “Hands-free profile” (HFP) Bluetooth
®
.
Strength of coverage signal received by the
mobile telephone.
Private mode
Priv
at
e mode c
an only be activated during an
active call. »
65
Page 68 of 96

To activate private mode:
● Setup menu.
● Uncheck the checkbox: Hand
s-fr
ee .
W ith the priv
at
e mode activated the active
audio and microphone become that")
Telephone management system (PHONE)
To activate private mode:
● Setup menu.
● Uncheck the checkbox: Hand
s-fr
ee .
W ith the priv
at
e mode activated the active
audio and microphone become that of the
mobile phone connected to the hands-free.
When deactivated, the audio reverts to the
vehicle's audio system. This configuration is
only applicable to the active call, so for sub-
sequent calls, the audio will revert by default
to vehicle's audio system. WARNING
Remember that the driver must not operate
the mob i
le telephone while driving. Enter telephone number menu
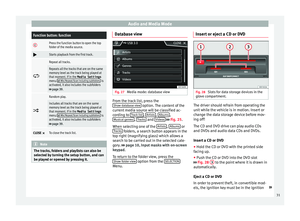
Fig. 60
Enter telephone number menu. Open the
Enter telephone number
menu
Pr es
s the DIAL NO. function button from the
PHONE m ain menu.
Possible functions
Enter telephone
numberEntering a phone number with the
keypad.
Press the function button to
make a call.
Select a contact
from the list
Enter the first letters of the contact
to find using the keypad. The avail-
able entries appear in the contact
list.
From the contact list select the de-
sired contact to establish the con-
nection.
Call mailbox
Press the Mailbox function but-
ton to establish the connection.
OR: Press the function button
for approx. 2 seconds to establish
the connection.
If the number for the mailbox has
not yet been stored, enter it and
confirm with OK
.
Redial
Press button
1
››› Fig. 60 and the
last number dialled will be shown
on the display. To place the call,
press button 1
again.
Possible functions
a)
Prefix func-
tion
Enter the telephone number with-
out the prefix and press the function button. The prefix stored
in the User profile settings
menu ››› page 70 is automatically
placed before the entered number
and the call is made.
Enter the country
code
To enter a country code, instead of
the first two digits (international
access code e.g. “00 ”) you can en-
ter the character “+”.
Press the 0 button for approx. 2
seconds to add the +.
Breakdown serv-
ice call Press the function button to obtain
help in the event of breakdown.
For this the network of SEAT deal-
erships is available to you with
their Mobile Service.
Information call Press the function button to obtain
information on the SEAT brand and
the additional services contracted
related to traffic and travel.
a)
The function button is only displayed when the prefix function
is activated in the User profile settings menu
››› page 70. Note
Breakdown service and information calls can
incur an a d
ditional cost on your telephone
bill. 66
Page 69 of 96

Phonebook Menu (contacts) Fig. 61
Contacts Menu. Fig. 62
Search window. As soon as the first pairing is performed, it
m
a
y
take some time for the phonebook 1)")
Telephone management system (PHONE)
Phonebook Menu (contacts) Fig. 61
Contacts Menu. Fig. 62
Search window. As soon as the first pairing is performed, it
m
a
y
take some time for the phonebook 1)
da-
ta from the paired mobile telephone to be
available on the Infotainment system. De- pending on the volume of data to be transfer-
red, the proc
ess can take several minutes. It
may be necessary to confirm the data transfer
on the mobile telephone.
The phonebook can also be opened during a
telephone call.
If the name stored in the phonebook has an
assigned photo, it can be displayed in the list
next to the name ››› page 70, Telephone
settings. For this purpose the option Show images for contacts must be activated in
the T el
ephone settin
gs context (check the
compatibility list; your mobile telephone
must support this function).
Press the Contacts function button in the
PHONE m ain menu.
Possible functions
Select a con-
tact from the
list
Search the list and press the desired
contact to establish the connection.
OR: If the contact has several tele-
phone numbers, first press the con-
tact and then the number to be used
to establish a connection.
Possible functions
Searching for a
contact in the
search window
Press the Search function button
››› Fig. 61 1 to open the search win-
dow.
Enter the name to be searched for in
the window ››› Fig. 62. As the charac-
ters are entered, a contact is dis-
played in the input field.
The number of matching results is
displayed to the right of the input
field. Press the function button to
change to the list.
Search the list and press the desired
contact to establish the connection.
Opening the
detailed view
of a contact
Press the ››› Fig. 61 function but-
ton located next to the entry in the
contact list.
All the telephone numbers are dis-
played in the detailed view, and
where applicable, the address recor-
ded for the contact in question.
Read contact
namePress the function button on the
detailed list for the voice control sys-
tem to say the contact name.
» 1)
Depending on the device, only the contacts from
the tel ephone memor
y are loaded. 67
Page 70 of 96
Possible functions
Dialling a con-
tact
Press the desired telephone number
on the detailed list to establish the
connection.
Press the (pencil) icon to edit the")
Telephone management system (PHONE)Possible functions
Dialling a con-
tact
Press the desired telephone number
on the detailed list to establish the
connection.
Press the (pencil) icon to edit the
number before calling.
Send an SMS
to a contactPress the function button in the
detailed list.
Starting route
guidance to
the address of
a contactIf the address details of a contact
have been stored, route guidance can
be started for the address of the con-
tact. Press the address data on the
detailed view to start route guidance. Note
If you edit the number before calling, this will
only be u
sed for the call and will not be stor-
ed in the phonebook. Short messages menu (SMS)
Fig. 63
Short messages menu (Text messag-
e s). If the mobile telephone connected to the HFP
pr
ofi
l
e also supports the SMS profile, a new
function button will appear in the top left-
hand corner of the telephone menu, which
will allow SMS messages to be received,
viewed and sent by the Infotainment system.
The proper operation of the functions men-
tioned above will depend on the compatibili-
ty of the connected mobile telephone.
Buttons on the Short messages (SMS) menu
● From the PHONE main menu, pre
ss the
SMS function button.
Function button: function
New text mes-
sageTo write and send a text message (in-
cludes the possibility of accessing
templates with predefined messag-
es).
InboxTo open the received text messages
folder.
OutboxTo open the outbox folder. This is
where any unsent text messages are
stored.
SentTo open the sent text messages fold-
er.
DraftsTo select a stored unsent message.
Send contact
detailsTo send the details of a contact from
the contact list. Possible function buttons for the submenus
Function button: function
ReadIn order for the speech control
system to play the text message.
OptionsOpen the Options
menu.
Reply with tem-
plateTo select a text template from a
list.
Delete current
text messageDeletes the text message from
the Inbox.
Display tele-
phone numberDisplays the sender's telephone
number.
ForwardTo forward a text message.68
Page 71 of 96
Function button: function
ReplyTo reply to an incoming text mes-
sage.
Enter number
To enter a telephone number or to
select a recipient from the con-
tact list.
Pre")
Telephone management system (PHONE)Function button: function
ReplyTo reply to an incoming text mes-
sage.
Enter number
To enter a telephone number or to
select a recipient from the con-
tact list.
Press the
Recipients function but-
ton to select multiple recipients.
RecipientsTo select multiple recipients from
the contact list.
DeleteTo delete a text message. Call Menu (call lists)
Fig. 64
Call lists menu. ●
In the PHONE m ain menu, pr
e
ss the Call list function button.
● Press the FIL
TER function button. ●
Sel ect
the de
sired call list: All ,
Mi
s
sed ,
Di al
l
ed or
R
ec
eiv ed .
If a phone number h
a
s been stored in the
phonebook, the call list will display the name
stored instead of the number.
If the name stored in the phonebook has an
assigned photo, it can be displayed in the
call list next to the name ››› page 70.
Possible displays in the Calls menu
Display: Meaning
Missed calls: Displays the numbers of missed and
unanswered calls.
Dialled numbers: Indicates the numbers dialled on
the mobile telephone and on the Infotainment
system telephone management system.
Received calls: Indicates the numbers of the calls
received on the mobile telephone and on the Info-
tainment system telephone management system. Note
The availability of the call lists will depend on
the mob i
le phone used. Speed dial buttons
Fig. 65
PHONE main menu The speed dial buttons
››
›
Fig. 65 1 may
e ac
h be u
sed to store a telephone number
from the phonebook.
If the name stored in the phonebook has an
assigned photo, it can be displayed on the
speed dial button ››› table on page 69.
All the speed dial buttons must be manually
edited and will be assigned to a user profile.
Up to 15 favourites can be added to the quick
dial buttons.
Possible functions
Assigning speed
dial buttons
Press a free speed dial button from
the PHONE main menu.
Select the desired contact from the
list. If the selected contact has
several telephone numbers, select
the desired number.
» 69
Page 72 of 96
Possible functions
Editing assigned
speed dial but-
tons
Press and hold
a used speed dial
button in the PHONE main menu
until the Contacts menu opens.
Select the d")
Telephone management system (PHONE)Possible functions
Editing assigned
speed dial but-
tons
Press and hold
a used speed dial
button in the PHONE main menu
until the Contacts menu opens.
Select the desired contact from the
list. If the selected contact has
several telephone numbers, select
the desired number.
To close the Contacts menu with-
out applying the changes, press
the BACK
function button.
Deleting assigned
speed dial but-
tonsThe telephone numbers stored in
the speed dial buttons can be de-
leted in the User profile set-
tings
> Manage favourites
menu ››› table on page 70.
Dialling with
speed dial but-
tonsBriefly press an assigned speed di-
al button from the PHONE main
menu to call the telephone number
that has been stored on it. Note
The contacts stored on the speed dial buttons
DO NOT upd at
e automatically. If a contact
stored on a speed dial button is modified on
the mobile telephone, the speed dial button
will need to be reassigned. Telephone settings
Press the
S
ETUP function button from the
PHONE m ain menu.
Function button: function
Select phone: Select the mobile telephone to be connec-
ted to the hands-free profile with the Infotainment sys-
tem.
OR: Press Find telephone to connect a new mobile tele-
phone.
Bluetooth: Open the Bluetooth settings menu
››› page 70.
User profile: Open the User profile settings menu
››› page 70. Bluetooth
®
settin g
s In the PHONE m
ain menu, pr
e
ss the SETUP function button and then the
Bluet
ooth func-
tion b utt
on.
Function button: function
Bluetooth: Press to deactivate Bluetooth
®
. Disconnects
all active connections.
Visibility: Connection and disconnection of Bluetooth ®
visibility.
Visible: Bluetooth ®
visibility is active.
Hidden: Bluetooth ®
visibility is deactivated. Blue-
tooth ®
visibility must be active for the external
pairing of a Bluetooth ®
device with the Infotain-
ment system. If you have a Bluetooth audio device
active and playing, the visibility is automatically
set to Hidden .
Function button: function
Name: Viewing and changing the name the Bluetooth ®
of the Infotainment system. This will be the name dis-
played to other Bluetooth ®
devices.
Paired devices: Displays paired devices. To disconnect
and connect Bluetooth ®
devices and Bluetooth ®
pro-
files.
Find devices: Search for visible Bluetooth ®
devices within
the range of the Infotainment system. The maximum
range is approx. 10 metres.
Bluetooth audio (A2DP/AVRCP): This function must be ac-
tive if it is necessary to connect an external audio source
via Bluetooth ®
to the Infotainment system. ››› page 34. User profile settings
In the PHONE m
ain menu, pr
e
ss the SETUP function button and then the
U
ser pr
ofi le func-
tion b utt
on.
Function button: function
Manage favourites: Editing speed dial buttons.
Speed dial button in use : Press to delete the stored
number.
Speed dial button free : Press to assign a number
from the phonebook to the speed dial button in
question.
Mailbox number: To enter or edit the voicemail number. 70