Page 97 of 308

Fuses and bulbs
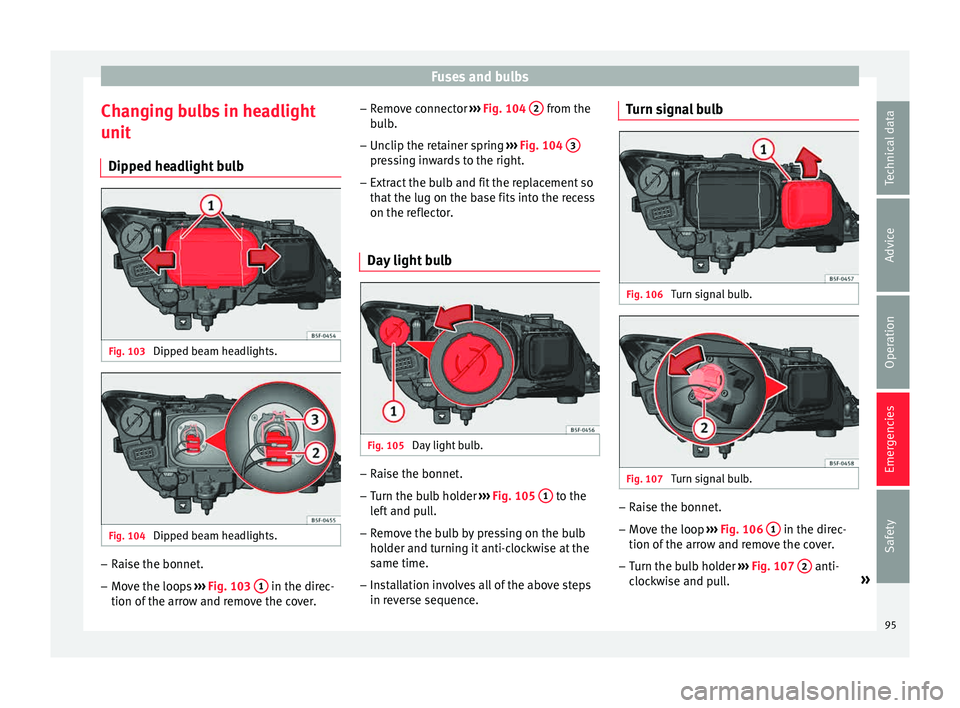
Changing bulbs in headlight
u nit
Dip ped he
adlight bulbFig. 103
Dipped beam headlights. Fig. 104
Dipped beam headlights. –
Raise the bonnet.
– Move the loops ››
›
Fig. 103 1 in the direc-
tion of the arr
o
w and remove the cover. –
Remov
e connector ››› Fig. 104 2 from the
b u
l
b.
– Unclip the retainer spring ›››
Fig. 104 3 pressing inwards to the right.
– Extract the bulb and fit the replacement so
th at
the lug on the b
ase fits into the recess
on the reflector.
Day light bulb Fig. 105
Day light bulb. –
Raise the bonnet.
– Turn the bulb holder ››
›
Fig. 105 1 to the
l ef
t
and pull.
– Remove the bulb by pressing on the bulb
holder and t
urning it anti-clockwise at the
same time.
– Installation involves all of the above steps
in rever
se sequence. Turn signal bulb
Fig. 106
Turn signal bulb. Fig. 107
Turn signal bulb. –
Raise the bonnet.
– Move the loop ››
›
Fig. 106 1 in the direc-
tion of the arr
o
w and remove the cover.
– Turn the bulb holder ›››
Fig. 107 2 anti-
c loc
k
wise and pull. »
95
Technical data
Advice
Operation
Emergencies
Safety
Page 98 of 308
Emergencies
– Remo
v
e the bulb by pressing on the bulb
holder and turning it anti-clockwise at the
same time.
– Installation involves all of the above steps
in rever
se sequence.
Main beam headlight bulb Fig. 108
Main beam headlight bulb. Fig. 109
Main beam headlight bulb. –
Rai
se the bonnet
.
– Move the loop ›››
Fig. 108 1 in the direc-
tion of the arr
o
w and remove the cover.
– Slide connector ›››
Fig. 109 2 to the left or
right and p
u
ll.
– Remove the bulb by disconnecting the con-
nector.
– In
stallation involves all of the above steps
in rever
se sequence.
Changing front fog light bulbs* Front f
og light bulb Fig. 110
Front fog light. Fig. 111
Front fog light. –
Remove the bolt ››
›
Fig. 110 1 from the fog
light gri
l
le with a screwdriver.
– Remove the bolts (3x) ›››
Fig. 111 2 to re-
mo v
e the f
og light.
– Remove the fog light. Note
Due to the difficulty of accessing fog light
bu l
bs, have them replaced at a Technical
Service or specialised workshop. 96
Page 99 of 308

Fuses and bulbs
FR version fog-light bulb Fig. 112
Fog light: access to the connector
and t o the light
b
ulb holder. Fig. 113
Fog light: access to the connector
and t o the light
b
ulb holder. –
Remove the 3 bolts 1
› ›
› Fig. 112
from the
inside of the wheel housing and the 2 bot-
tom bolts 2
› ›
› Fig. 112
from the bumper
with the help of a screwdriver. –
Pul
l the wheel housing 3
› ››
Fig. 113
ac -
cess the 2 hidden screws 4
› ››
Fig. 113
of
the b
umper.
– Remove the screws using a screwdriver.
– Pull the bumper to release it from its an-
chorag
es to access the connector and the
light bulb holder. Note
Due to the difficulty of accessing fog light
bu l
bs, have them replaced at a Technical
Service or specialised workshop. Remove the bulb holder
Fig. 114
Front fog light. –
Remove connector ››
›
Fig. 114 1 from the
b ul
b.
– Turn the bulb holder ›››
Fig. 114 2 anti-
c loc
k
wise and pull. –
Remov
e the bulb by pressing on the bulb
holder and turning it anti-clockwise at the
same time.
– Installation involves all of the above steps
in rever
se sequence.
– Check that the bulb works properly.
Changing the rear light bulbs
(on the side panel) R
ear lights summary Rear lights on the side panel
Turn signalPY21W NA LL
Side light and brake lightP21W LL
97
Technical data
Advice
Operation
Emergencies
Safety
Page 100 of 308

Emergencies
Removing the rear light Fig. 115
Luggage compartment: location of
the bo lt
sec
uring the tail light unit. Fig. 116
Remove the rear light unit from side
p anel . –
Check which of the bulbs is defective.
– Open the rear lid.
– Remove the cover by prying the flat side of
a s c
r
ewdriver into the recess and remove
the cover from the opening ››› Fig. 115 1 .–
Car
ef
ully loosen the screw located behind
the cover with a screwdriver, turning it anti-
clockwise (arrows) ››› Fig. 115 2 .
– Tilt the light in the direction of the arrows
unti
l
it comes out (positions 3 and
4 ›››
Fig. 116).
– Remove the bulb holder ››
›
page 98. CAUTION
Take care when removing the rear light unit to
mak e s
ure there is no damage to the paint-
work or any of its components. Note
Make sure you have a soft cloth ready to
pl ac
e under the glass on the rear light unit, to
avoid any scratches. Removing the bulb holder
Fig. 117
Retaining tabs on reverse side of tail
light . –
Remove the bulb holder ››
› Fig. 117 unlock-
ing the retaining tabs 1 .
– Raise the bulb holder.
– Change the defective bulb.
– To refit follow the steps in reverse order,
tak
in
g special care when fitting the bulb
holder. And especially that all retaining
tabs are properly secured.
– Place the light back into place and tighten
with a sc
rewdriver. Note
In the case of LED lights, change only the turn
sign a
l bulb.98
Page 101 of 308

Fuses and bulbs
Changing the rear light bulbs
(on the r e
ar lid)
R
ear lights summary Rear lights on tailgate
Left side
Side lights2x W5W LL
Fog lightsH21 W
Right side
Side lights2x W5W LL
Reverse lightP21W LL
The table corresponds to a right-hand traffic
v
ehic
l
e. The position of lights may vary ac-
cording to the country. Removing the bulb holder Fig. 118
Remove the cover from the boot lid. Fig. 119
Remove the bulb holder. The rear lid must be open to change the
b
u
l
bs.
– Remove the rear lid cover in the direction
indicated ›
›› Fig. 118.
– Unlock the retaining tabs A of the bulb
ho l
der
, following the direction of arrows 1 and
2
› ›
› Fig. 119
. –
Remov
e the bulb holder by turning it in the
direction of arrow 3
› ››
Fig. 119
.
Ch
anging the bulbs Fig. 120
Position of the bulbs in the bulb
ho l
der –
Lightly press the defective bulb into the
bu
l
b holder ››› Fig. 120 1 , then turn it to
the l ef
t
2 and remove it.
– Fit the new bulb, pressing it into the bulb
ho l
der and t
urn it to the right as far as it
will go.
– Use a cloth to remove any fingerprints from
the glas
s part of the bulb.
– Check that the new bulb works properly.
– Replace the bulb holder. »
99
Technical data
Advice
Operation
Emergencies
Safety
Page 102 of 308

Emergencies
Note
For LED pilots, you can only change the fog or
rev er
se bulb, on the left or right guide. Fitting the bulb holder
–
Install the bulb holder making sure that
lock in
g clips ››› Fig. 119 A are properly
clip ped on.
– R
eplace the cover of the rear lid lining
›››
Fig. 118.
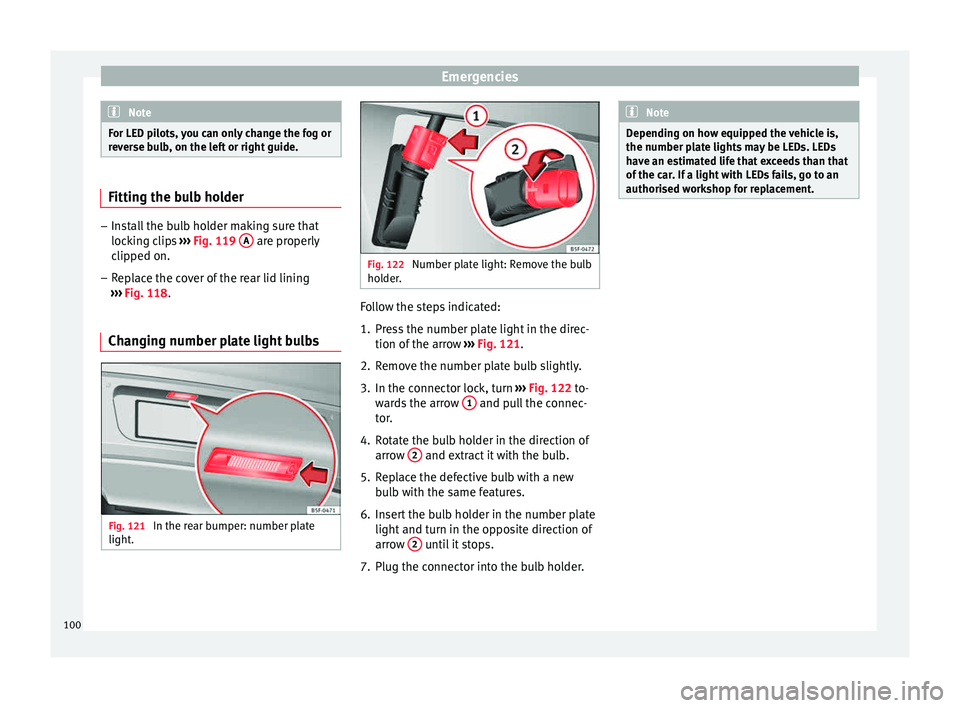
Changing number plate light bulbs Fig. 121
In the rear bumper: number plate
light . Fig. 122
Number plate light: Remove the bulb
hol der
. Follow the steps indicated:
1. Press the number plate light in the direc-
tion of the arr
o
w ››› Fig. 121.
2. Remove the number plate bulb slightly.
3. In the connector lock, turn ›››
Fig. 122 to-
wards the arrow 1 and pull the connec-
t or
.
4.
Rotate the bulb holder in the direction of
arrow 2 and extract it with the bulb.
5. Replace the defective bulb with a new bu
l
b with the same features.
6. Insert the bulb holder in the number plate light and turn in the op
posite direction of
arrow 2 until it stops.
7. Plug the connector into the bulb holder. Note
Depending on how equipped the vehicle is,
the number pl at
e lights may be LEDs. LEDs
have an estimated life that exceeds than that
of the car. If a light with LEDs fails, go to an
authorised workshop for replacement. 100
Page 103 of 308
Page 104 of 308
Operation
Fig. 123
Instruments and controls.102