2015 Seat Leon 5D infotainment
[x] Cancel search: infotainmentPage 46 of 88

Navigation*Symbol: Meaning
: Danger
: Road works
: Strong wind
: Road closed to traffic
During route guidance, traffic congestion that
does
not
affect the route calculated is dis-
played in grey.
The extent of the traffic congestion along the
route calculated is shown by a red line.
Any incidents that affect the route calculated
and have caused the route to be recalculated
are displayed in orange.
The position of a symbol indicates the start
of the traffic congestion if it is clearly defined
in the traffic report. Predictive navigation Fig. 38
Predictive navigation There is a function in the navigation system
whic
h, when activ
at
ed, detects and stores in
the background routes that are frequently fol-
lowed, without being an active destination
route. This function has no navigation an-
nouncements unless the user requires them,
by pressing the adjustment knob ››› Fig. 1 12 .
Pr edictiv
e n
avigation is a function similar to
dynamic navigation with traffic announce-
ments (TMC).
● On the main screen of the Navigation
menu, in the pop-up window pr
ess the
Most frequent routes button to display frequent-
ly f
o
llowed routes ›››
Fig. 38.
● With no destination route initiated, since it
is a r
oute that is frequently followed, if a traf-
fic report is received that indicates an inci-
dent affecting this frequently followed route, ›››
page 43, the system will suggest an alter-
nativ
e route which avoids this traffic incident.
Importing vCards (electronic business
card
s) Importing vCards to the destination memory
● Insert the data storage device with the stor-
ed vC ar
ds or connect it to the Infotainment
system ››› page 23.
● Press the SETUP function button in the
m ain
Na
vigation menu.
● In the Navigation settings menu,
pres
s the Import destinations function button.
● Select the data carrier with the vCards
s av
ed in the li
st.
● Press Import al
l vCards in the folder .
● Confirm the import notice with the OK function button.
The s
av
ed
vCards will now be in the destina-
tion memory ›››
page 40 and may be used for
navigation. Note
Only one address per vCard can be imported.
In the event an
y vCards have several address-
es, only the main address will be imported. 44
Page 47 of 88

Navigation*
Importing Personal POI Importing the Personal POI to a points of in-
ter
e
st destination memory
● Insert the data storage device with the stor-
ed Person
al POI or connect it to the Infotain-
ment system ››› page 23.
● Press the Infotainment MENU button and
then select Set
up .
● In the System settings menu, pres
s the
System information function button.
● Press U
pd at
e software to import the Personal
POI.
● Confirm the import notice with the OKfunction button.
The s
t
or
ed Personal POI are now in the points
of interest destination memory ›››
page 41
and can be used for navigation purposes.
The stored Personal POI can be deleted in the
Navigation Settings menu
››› page 46. Navigation with images Fig. 39
Images main menu. Selecting an image and starting route guid-
anc
e
B e
ar in mind the requirements and formats of
the compatible images ››› page 24.
● Insert the data storage device with the stor-
ed image
s or connect it to the Infotainment
system.
● Press the Infotainment system MENU but-
t on and then sel
ect
Images .
● Press the SOURC
E
› ›
› Fig. 39
function button
and select the data storage device where the
images are stored.
● Select the desired image.
● If the image displayed was taken using GPS
localis
ation, the function button will ap-
pe ar
. Pr
ess to start route guidance. Road sign indicators The road sign indicators must be active in the
Navigation Setup MAP menu
›› ›
page 46.
If road signs for the road being travelled are
stored in the navigation data, the system can
show them on the map display (e.g. a speed
restriction). It there is more than one sign,
pressing on them will display the hidden
ones.
Please bear in mind how recent the naviga-
tion data is and the limitations of the system
››› page 36 !
Traffic sign recognition Some vehicles are also equipped with a cam-
er
a f
or tr
affic sign recognition. If traffic sign
recognition is installed in the vehicle and ac-
tivated, the recognised traffic signs and addi-
tional information are displayed in the map
view.
Read and take note of the information and in-
dications provided by the traffic sign recogni-
tion system in the vehicle ›››
Booklet Instruc-
tion Manual.
45
Page 50 of 88
CAR menu
CAR menu Intr oduction t
o m
anaging the
CAR menu
Car menu By pressing the “CAR” infotainment button
you w
i
ll access its main menu with the follow-
ing options:
● VIEW
● In the top right corner: MINIPLAYER (Radio
or Medi a) or HDC
(Descent control)*.
● PREVIOUS-NEXT (to change screen).
● SETUP ›››
Booklet Instruction Manual,
chapter System settings (CAR) .
With the function button View you can access
the f o
l
lowing information:
● SPORT*
● OFFROAD*
● CONSUMERS
● DRIVING DATA
● ECOTRAINER*
● VEHICLE STATUS Sport*
Fig. 40
SPORT menu Fig. 41
Lap Timer SPORT menu ●
Press the CAR button on the Infotainment
sy s
t
em. ●
Pres
s the VIEW function button and then
sel ect
S
PORT.
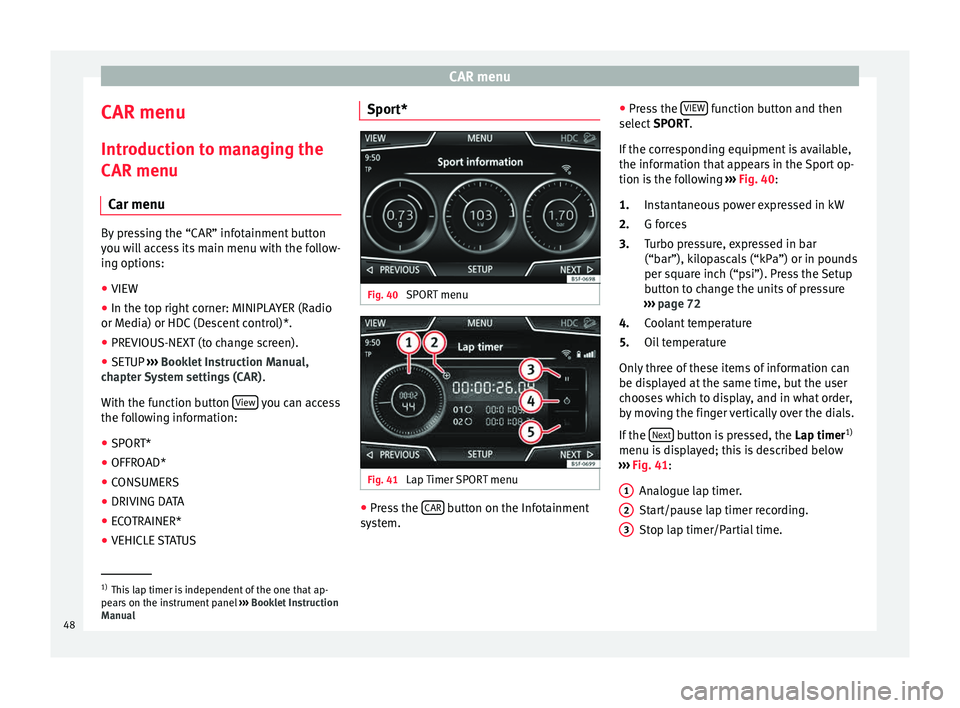
If the corresponding equipment is available,
the information that appears in the Sport op-
tion is the following ››› Fig. 40:
Instantaneous power expressed in kW
G forces
Turbo pressure, expressed in bar
(“bar”), kilopascals (“kPa”) or in pounds
per square inch (“psi”). Press the Setup
button to change the units of pressure
››› page 72
Coolant temperature
Oil temperature
Only three of these items of information can
be displayed at the same time, but the user
chooses which to display, and in what order,
by moving the finger vertically over the dials.
If the Next button is pressed, the
Lap timer1)
menu i s
di
splayed; this is described below
››› Fig. 41:
Analogue lap timer.
Start/pause lap timer recording.
Stop lap timer/Partial time.
1.
2.
3.
4.
5.
1 2
3
1)
This lap timer is independent of the one that ap-
pear s
on the instrument panel ››› Booklet Instruction
Manual
48
Page 51 of 88
CAR menu
A new lap timer recording is started by
pr e
s
sing on the surface of the digital lap
timer + .
Statistics/close.
Offroad* Fig. 42
CAR Menu Offroad. ●
Press the CAR button on the Infotainment
sy s
t
em.
● Press the VIEW function button and then
sel ect
OFFROAD .
If
the corresponding equipment is available,
the information that appears is the following:
Compass.
Altimeter: altitude above sea level.
4 5
1.
2. Turning angle of steered wheels.
C
oo
l
ant temperature.
Lubricating oil temperature
Only three of these items of information can
be displayed at the same time, but the user
chooses which to display, and in what order,
by moving the finger vertically over the dials.
Consumers Fig. 43
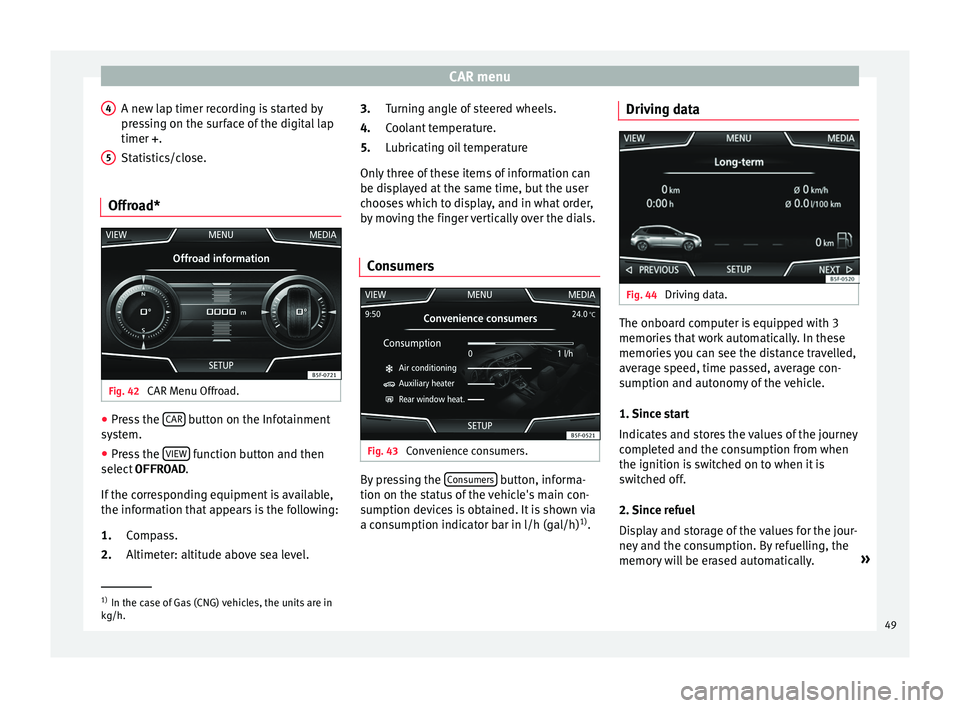
Convenience consumers. By pressing the
C
on
s
umers button, informa-
tion on the s t
at
us of the vehicle's main con-
sumption devices is obtained. It is shown via
a consumption indicator bar in l/h (gal/h) 1)
.
3.
4.
5.
Driving data Fig. 44
Driving data. The onboard computer is equipped with 3
memorie
s
th
at work automatically. In these
memories you can see the distance travelled,
average speed, time passed, average con-
sumption and autonomy of the vehicle.
1. Since start
Indicates and stores the values of the journey
completed and the consumption from when
the ignition is switched on to when it is
switched off.
2. Since refuel
Display and storage of the values for the jour-
ney and the consumption. By refuelling, the
memory will be erased automatically. »1)
In the case of Gas (CNG) vehicles, the units are in
kg/h. 49
Page 52 of 88
CAR menu
3. Long-term
The memor y
r
ecords the values for a specific
number of partial trips, up to a total of 19
hours and 59 minutes or 99 hours and 59 mi-
nutes, or 1999.9 km (or miles) for 9999 km
(or miles), depending on the model of instru-
ment panel.
When one of these values is reached (de-
pending on the version of the instrument
panel), the memory is automatically deleted
and it starts counting from 0 again.
Ecotrainer* Fig. 45
CAR Menu Ecotrainer. Fig. 46
Driving style symbols. Open ECOTRAINER menu
● With the vehicle stopped, press the CAR button on the Infotainment system.
● Press the VIEW function button and then
sel ect
ECOTRAINER .
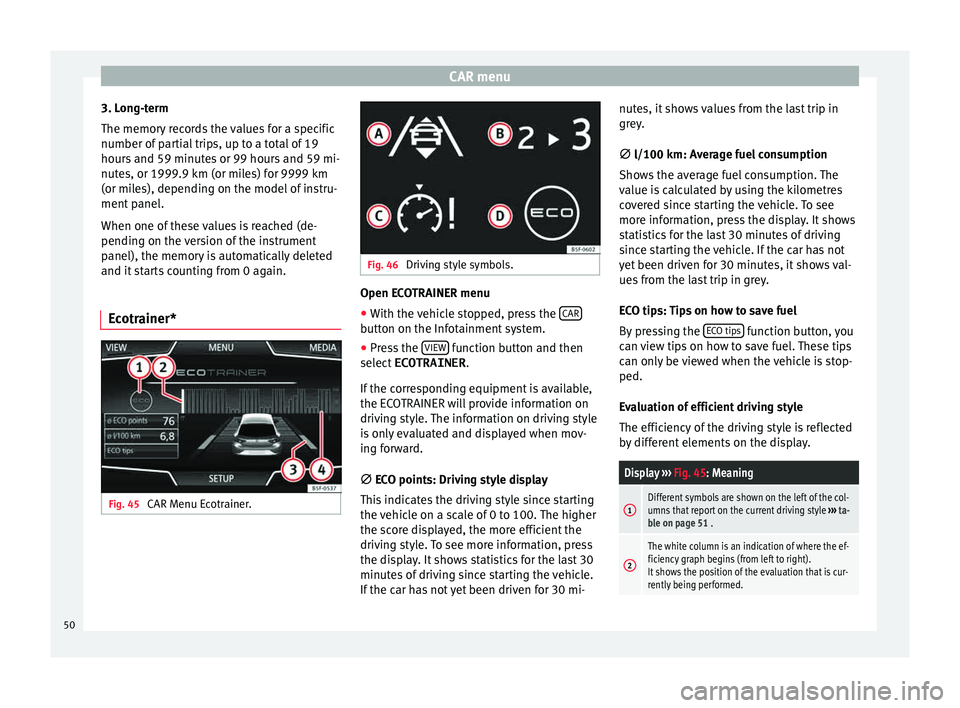
If
the corresponding equipment is available,
the ECOTRAINER will provide information on
driving style. The information on driving style
is only evaluated and displayed when mov-
ing forward.
∅ ECO points: Driving style display
This indicates the driving style since starting
the vehicle on a scale of 0 to 100. The higher
the score displayed, the more efficient the
driving style. To see more information, press
the display. It shows statistics for the last 30
minutes of driving since starting the vehicle.
If the car has not yet been driven for 30 mi- nutes, it shows values from the last trip in
grey.
∅
l/100 km: Average fuel consumption
Shows the average fuel consumption. The
value is calculated by using the kilometres
covered since starting the vehicle. To see
more information, press the display. It shows
statistics for the last 30 minutes of driving
since starting the vehicle. If the car has not
yet been driven for 30 minutes, it shows val-
ues from the last trip in grey.
ECO tips: Tips on how to save fuel
By pressing the ECO tips function button, you
c an
v
iew tips on how to save fuel. These tips
can only be viewed when the vehicle is stop-
ped.
Evaluation of efficient driving style
The efficiency of the driving style is reflected
by different elements on the display.
Display ››› Fig. 45: Meaning
1Different symbols are shown on the left of the col-
umns that report on the current driving style ››› ta-
ble on page 51 .
2
The white column is an indication of where the ef-
ficiency graph begins (from left to right).
It shows the position of the evaluation that is cur-
rently being performed. 50
Page 54 of 88
Telephone management system (PHONE)
Telephone management sys-
t em (PHONE)
Intr oduction t
o the telephone
management system
General information
›› ›
table on page 2
The Telephone functions described below
can be used through the Infotainment system
if there is a mobile telephone connected to it
via Bluetooth ®
››› page 54.
In order for the mobile telephone to be able
to connect to the Infotainment system the tel-
ephone must be equipped with Bluetooth®
.
If there is no mobile telephone connected to
the Infotainment system, the telephone man-
agement system will not be available.
The instructions shown on the screen for the
telephone menus will depend on the mobile
telephone used. There may be variations.
Only use compatible Bluetooth ®
devices. For
further information on compatible Blue-
tooth ®
products, ask your nearest SEAT deal-
er or check on the internet.
Use the instruction manual of the mobile tel-
ephone and of any accessories. If you detect any operating issues between
your mo
b
ile telephone and the Infotainment
system, restart your mobile by switching it off
and on again.
You may experience poor reception or may be
cut off in areas where the signal is weak.
Most electronic devices are shielded against
HF (high-frequency) signals. In any case, the
electronic equipment may not be protected
from the HF signals of the telephone man-
agement system. This may cause interfer-
ence. WARNING
Speaking by telephone and operating the mo-
bi l
e telephone whilst driving can distract you
from the road and cause an accident.
● Always drive carefully and responsibly.
● Select volume settings that allow you to
eas
ily hear signals from outside the vehicle
at all times (e.g. emergency services sirens
and horns).
● In areas of little or no coverage or, in some
case
s, in a tunnel, garage or underpass, your
call may be cut off and you may not be able to
make even emergency calls. WARNING
If a mobile telephone is not secured or is in-
corr ectly
secured in the vehicle, it could move
around the passenger compartment in the event of a sudden driving manoeuvre or emer-
gency
s
top, resulting in injury.
● While the vehicle is in motion, always se-
cure the mo
bile telephone properly outside
the airbag deployment zone. WARNING
Mobile telephones may interfere with and al-
t er the c orr
ect operation of pacemakers if
they are carried directly over them.
● Maintain a minimum distance of at least
20 centimetre
s between the aerials of the
mobile telephone and the pacemaker, as mo-
bile phones may affect the functioning of
pacemakers.
● Do not carry your switched-on mobile tele-
phone in your br
east pocket directly over the
pacemaker.
● If you suspect interference, switch off the
mobi
le telephone immediately. CAUTION
High speeds, poor weather or road conditions
and the quality of
reception can all affect the
quality of a telephone conversation in the ve-
hicle. Note
● Re s
trictions on the use of devices using
Bluetooth ®
technology may apply in some
countries. For further information, contact the
local authorities. 52
Page 56 of 88
Telephone management system (PHONE)
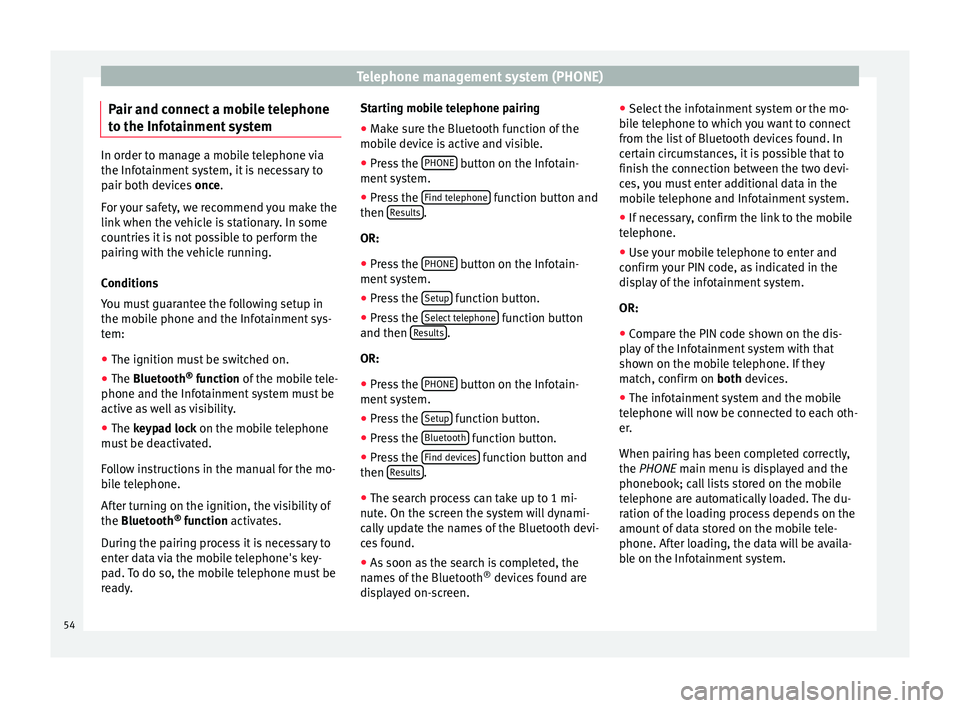
Pair and connect a mobile telephone
t o the Inf
ot
ainment systemIn order to manage a mobile telephone via
the Infot
ainment
system, it is necessary to
pair both devices once.
For your safety, we recommend you make the
link when the vehicle is stationary. In some
countries it is not possible to perform the
pairing with the vehicle running.
Conditions
You must guarantee the following setup in
the mobile phone and the Infotainment sys-
tem:
● The ignition must be switched on.
● The Bluetooth ®
fu
nction of the mobile tele-
phone and the Infotainment system must be
active as well as visibility.
● The keypad lock on the mobile telephone
mus
t be deactivated.
Follow instructions in the manual for the mo-
bile telephone.
After turning on the ignition, the visibility of
the Bluetooth ®
function activates.
During the pairing process it is necessary to
enter data via the mobile telephone's key-
pad. To do so, the mobile telephone must be
ready. Starting mobile telephone pairing
● Make sure the Bluetooth function of the
mobi
le device is active and visible.
● Press the PHONE button on the Infotain-
ment sy
s
tem.
● Press the Find telephone function button and
then R
e
s
ults .
OR:
● Press the PHONE button on the Infotain-
ment sy
s
tem.
● Press the Setup function button.
● Press the Sel
ect
t
elephone function button
and then R
e
s
ults .
OR:
● Press the PHONE button on the Infotain-
ment sy
s
tem.
● Press the Setup function button.
● Press the Bluet
ooth function button.
● Press the Find dev
ic
e
s function button and
then R
e
s
ults .
● The search process can take up to 1 mi-
nut e. On the s
c
reen the system will dynami-
cally update the names of the Bluetooth devi-
ces found.
● As soon as the search is completed, the
names
of the Bluetooth ®
devices found are
displayed on-screen. ●
Select the inf
otainment system or the mo-
bile telephone to which you want to connect
from the list of Bluetooth devices found. In
certain circumstances, it is possible that to
finish the connection between the two devi-
ces, you must enter additional data in the
mobile telephone and Infotainment system.
● If necessary, confirm the link to the mobile
telephone.
● U
se your mobile telephone to enter and
confirm y
our PIN code, as indicated in the
display of the infotainment system.
OR:
● Compare the PIN code shown on the dis-
pla
y of the Infotainment system with that
shown on the mobile telephone. If they
match, confirm on both devices.
● The infotainment system and the mobile
telephone w
ill now be connected to each oth-
er.
When pairing has been completed correctly,
the PHONE main menu is displayed and the
phonebook; call lists stored on the mobile
telephone are automatically loaded. The du-
ration of the loading process depends on the
amount of data stored on the mobile tele-
phone. After loading, the data will be availa-
ble on the Infotainment system.
54
Page 57 of 88

Telephone management system (PHONE)
Pairing and connection of mobile telephones
Y ou c
an p
air up to 20 mobile telephones to
the Infotainment system, but there can only
be two mobile phones simultaneously con-
nected as hands-free, and one of these in
turn as BT Audio.
When the Infotainment system is switched
on, it automatically connects to the last con-
nected mobile telephone. If it is not possible
to connect to this mobile telephone, the tele-
phone management system will try to auto-
matically connect to the next mobile tele-
phone on the list of paired devices.
The maximum range of the Bluetooth ®
is ap-
proximate. 10 metres. The active Bluetooth ®
connection disconnects if this distance is ex-
ceeded. The connection is automatically re-
established as soon as the device is once
again within Bluetooth ®
range.
If the maximum number of paired devices is
reached and you wish to pair another one to
the system, it will automatically replace the
one least used recently. If you wish to replace
it with another one, the user must erase it be-
forehand. To do so:
● Press the Setup button on the device while
in telephone mode.
● Pr
ess the function button Bluetooth setup .
● Activate the P
air
ed dev
ices function button.
● In the list of paired devices, press the function button next to the mobile telephone to be deleted and then press
Delete to c
on-
firm the pr
ocess. Note
It may be necessary to confirm the phone-
book d at
a transfer request on the mobile tel-
ephone. Description of the telephone
man
ag
ement system
Introduction Some functions and setup can only be per-
f
ormed when the
v
ehicle is stopped and are
not available on all mobile telephones.
With the help of the telephone manager, up
to 2 mobile telephones can be connected to
the infotainment system via the Bluetooth
profiles (for example, one used as a Blue-
tooth-audio player and hands-free and an-
other as a hands-free telephone). Note
● Us in
g a mobile telephone inside the vehicle
may provoke noise in the speakers.
● Some networks may not recognise all lan-
guage ch
aracters or offer all services. PHONE main menu
Fig. 49
PHONE main menu Fig. 50
Active call Assign a user profile
The d
at
a fr
om the phonebook, the call lists
and the stored speed dial buttons are as-
signed to a user profile and remain stored on »
55