2015 Seat Altea XL steering
[x] Cancel search: steeringPage 59 of 236

Steering wheel controls*
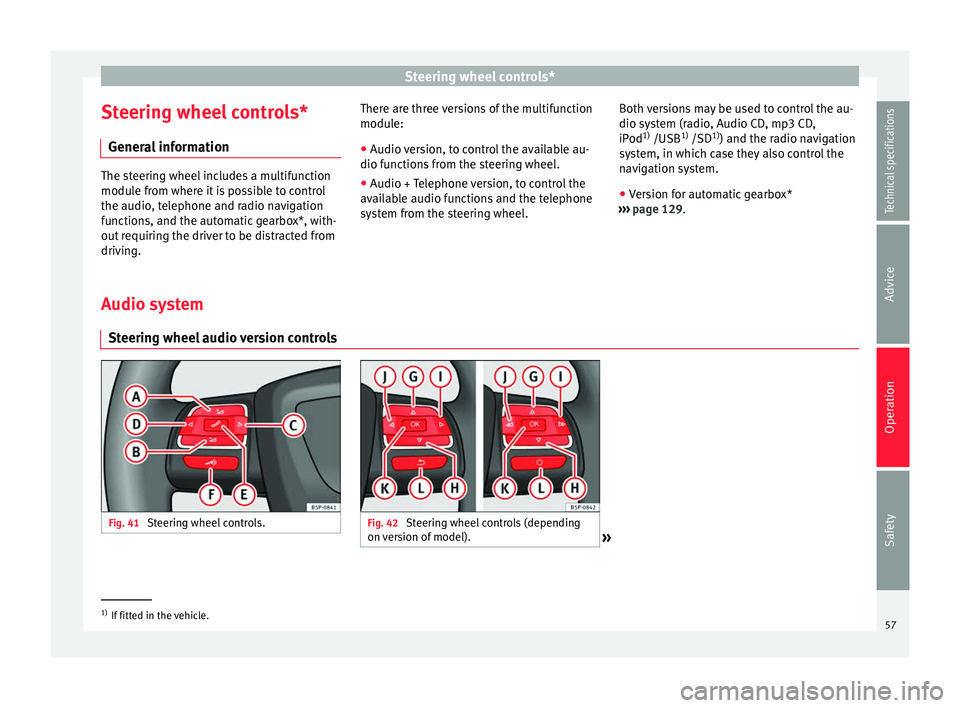
Steering wheel controls* General information The steering wheel includes a multifunction
module from where it is possible to control
the audio, telephone and radio navigation
functions, and the automatic gearbox*, with-
out requiring the driver to be distracted from
driving.
There are three versions of the multifunction
module:
● Audio version, to control the available au-
dio functions from the steering wheel.
● Audio + Telephone version, to control the
available audio functions and the telephone
system from the steering wheel. Both versions may be used to control the au-
dio system (radio, Audio CD, mp3 CD,
iPod
1)
/USB 1)
/SD 1)
) and the radio navigation
system, in which case they also control the
navigation system.
● Version for automatic gearbox*
››› page 129
.
Audio sy s
tem
Steering wheel audio version controls Fig. 41
Steering wheel controls. Fig. 42
Steering wheel controls (depending
on version of model). »1)
If fitted in the vehicle.
57Technical specifications
Advice
Operation
Safety
Page 61 of 236

Steering wheel controls*
Steering wheel audio version + telephone controls Fig. 43
Steering wheel controls. Fig. 44
Steering wheel controls (depending
on version of model).ButtonRadioCD/MP3/USB*/iPod*AUXTELEPHONE
AVolume upVolume upVolume upVolume up
BVolume downVolume downVolume downVolume down
CSearch for next stationNext track
Hold down: fast forwardNo function specifiedNo function specified
DSearch for last stationPrevious track
Hold down: quick rewindNo function specifiedNo function specified
EAccess telephone menu on instrument pan- elAccess telephone menu on instrument pan-elAccess telephone menu on instru-ment panelMake call
Accept incoming call End call
Hold down: reject incoming call
FEnable voice recognitionEnable voice recognitionEnable voice recognitionActivate voice control/
Interrupt current message/ Deactivate voice control
» 59
Technical specifications
Advice
Operation
Safety
Page 63 of 236

Steering wheel controls*
Radio navigation system Steering wheel audio version + telephone controls Fig. 45
Steering wheel controls. Fig. 46
Steering wheel controls (depending
on version of model).ButtonRadioCD/MP3/USB*/iPod*AUXNAVIGATORTELEPHONE
AVolume upVolume upVolume upVolume upVolume up
BVolume downVolume downVolume downVolume downVolume down
CSearch for next stationNext track
Hold down: fast forwardNo function specifiedNo function specifiedNo function specified
DSearch for last stationPrevious track
Hold down: quick rewindNo function specifiedNo function specifiedNo function specified» 61
Technical specifications
Advice
Operation
Safety
Page 65 of 236

Opening and closing
Opening and closing Central locking Basic functions The central locking system enables you to
lock and unlock all doors and the rear lid by
just pushing the button.
Description
Central locking can be activated by using any
of the following options:
● the key , by inserting it into the driver door
cylinder and r ot
ating it manually,
● the central lock button in the vehicle interi-
or ›››
page 65
.
● the radio frequency remote control , using
the buttons on the key ›››
page 67.
Various functions are available to improve
the vehicle safety: “Safe” locking system
Selective unlocking system*
Automatic speed-dependent locking and
unlocking system*
Self-locking system to prevent involunta-
ry unlocking
Emergency unlocking system
–
–
–
–
– Unlocking the vehicle*
Press button
››› Fig. 50 on remote
c ontr
ol to unlock all the doors and rear
lid.
Locking the vehicle* Press button
››› Fig. 50 on the remote
c ontr
ol to lock all doors and the rear lid
or turn the key in the door to lock all
doors and the rear lid. WARNING
● Never leave children or disabled persons in
the vehicle. In case of emergency, they may
not be able to leave the vehicle or manage on
their own.
● Never allow children to play in or around
the vehicle. A locked vehicle can be subjected
to extremely high and low temperatures, de-
pending on the time of year, thus causing se-
rious injuries/illness. It could even have fatal
consequences. Close and lock both the rear
lid and all the other doors when you are not
using the vehicle.
● Always take you car keys with you when
you leave the vehicle. Misuse of the keys, for
example, by children, may result in serious
damage and accident.
– The engine may accidentally be started
and be out of control.
– If the ignition is switched on, the electric
equipment could be activated with risk of –
– injury, for example, in the electric win-
dows.
– The doors can be locked using the remote
control key. This could become an obsta-
cle for assistance in an emergency situa-
tion.
– Always take the key with you when you
leave the vehicle.
● Never remove the key from the ignition if
the vehicle is in motion. The steering lock
could suddenly engage, and you would not be
able to steer the vehicle. Note
● While the driver door is open, the vehicle
cannot be locked with the remote control.
This avoids the user from forgetting his key
inside the vehicle.
● If the driver door is unlocked with the key
shaft, only the driver door is unlocked, the
rest of the doors remain locked. When the ig-
nition is switched on, the door “deadlock”
function is deactivated (although the doors
remain locked) and the central lock button is
activated. See ››› page 68.
● If the c
entral locking or anti-theft alarm are
faulty, the driver door control lamp remains
lit for approx. 30 seconds after the vehicle
locks.
● For anti-theft security, only the driver door
is fitted with a lock cylinder. 63
Technical specifications
Advice
Operation
Safety
Page 79 of 236

Lights and visibility
When the automatic dipped beam headlight
control is on but the dipped beam headlights
are off, the warning lamp lights up on
the light control ››› Fig. 59. If the automatic
control switches on the dipped lights, the in-
strument and control lighting is also switch-
ed on. WARNING
● Even if the automatic headlight control is
switched on, the dipped beam headlights will
not be switched on with fog. Therefore, the
dipped beam must be switched on manually. Note
● For those vehicles with the automatic head-
light system, when the key is removed from
the ignition, the audible warning will only
sound if the light control is in the position
or if the vehicle is not fitted with the com-
in g home f
unction.
● If the daylight driving automatic light func-
tion is switched on, the front fog lights or
rear fog light cannot be switched on in addi-
tion.
● The use of the lighting described here is
subject to the relevant statutory require-
ments.
● Do not put stickers on the windscreen in
front of the sensor. This may cause disrup-
tions or faults in the automatic lighting sys-
tem. ●
To avoid damage to the tail lights, the
lights mounted on the rear lid go off when the
rear lid is opened (depending on the country). Turn signal and main beam headlight
lever
Fig. 60
Turn signal and main beam lever The turn signal and main beam headlight lev-
er has the following functions:
Switching on the turn signals
– Move the lever all the way up ››› Fig. 60 1 to indicate
right
, and all the way down 2 to indicate
left
.
Sign
alling a lane change
– Push the lever up 1 or down
2 to the
point where you incur resistance and then
release it. The turn signal will flash several times. The corresponding control lamp will
also flash.
Switching main beam on and off – If the dipped lights are on, push the lever
forward ››› Fig. 60 3 to switch on the main
beam headlights.
– Push the lever towards the steering wheel
››› Fig. 60 4 to switch off the main beam.
Headlight flashers
– Pull the lever towards the steering wheel
4 to operate the flasher.
Switching on parking lights
– Switch the ignition off and remove the key
from the lock.
– Move the turn signal lever up or down to
turn the right or left-hand parking lights on,
respectively. WARNING
The main beam can dazzle other drivers. Risk
of accident! Never use the main beam head-
lights or the headlight flasher if they could
dazzle other drivers. Note
● The turn signals only
work when the igni-
tion is switched on. The corresponding warn-
ing lamp or flashes in the instrument
» 77
Technical specifications
Advice
Operation
Safety
Page 86 of 236

Operation
Rear window sun blind* – Pull out the visor and hook it onto the
hooks at the top of the door frame
››› Fig. 68 .
W ind
screen wiper and rear
window wiper systems
Windscreen wipers Fig. 69
Windscreen wiper lever. Fig. 70
Rain sensor on the windscreen seen
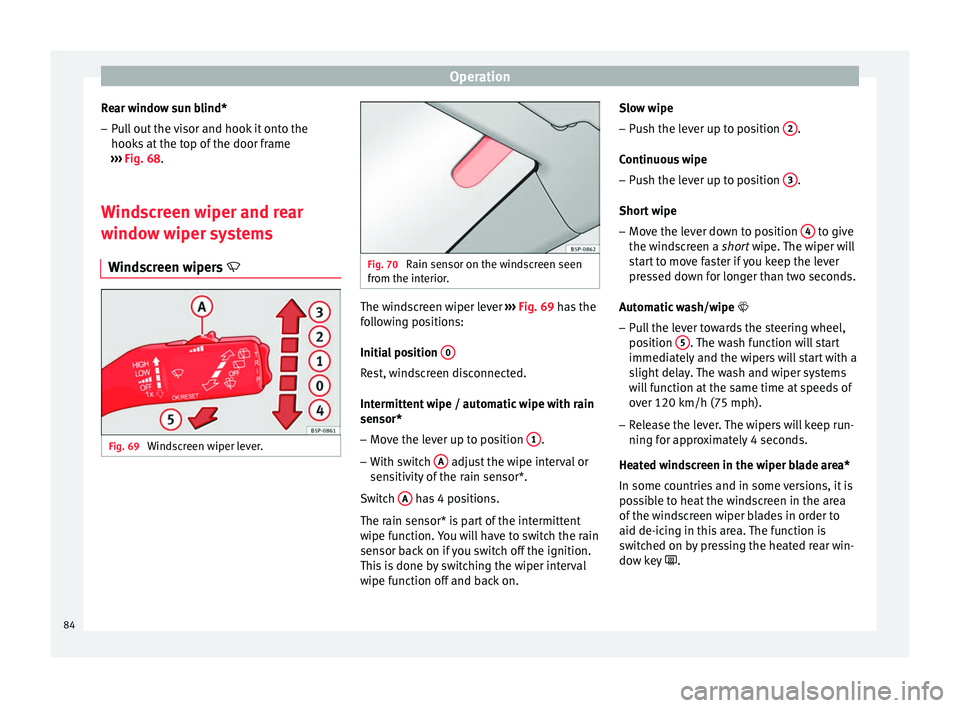
from the interior. The windscreen wiper lever
››› Fig. 69 has the
f o
llowing positions:
Initial position 0 Rest, windscreen disconnected.
Intermittent wipe / automatic wipe with rain
sensor*
– Move the lever up to position 1 .
– With switch A adjust the wipe interval or
sensitivity of the rain sensor*.
Switch A has 4 positions.
The rain sensor* is part of the intermittent
wipe function. You will have to switch the rain
sensor back on if you switch off the ignition.
This is done by switching the wiper interval
wipe function off and back on. Slow wipe
–
Push the lever up to position 2 .
Continuous wipe – Push the lever up to position 3 .
Short wipe – Move the lever down to position 4 to give
the windscreen a short wipe. The wiper will
s t
art to move faster if you keep the lever
pressed down for longer than two seconds.
Automatic wash/wipe
– Pull the lever towards the steering wheel,
position 5 . The wash function will start
immediately and the wipers will start with a
slight delay. The wash and wiper systems
will function at the same time at speeds of
over 120 km/h (75 mph).
– Release the lever. The wipers will keep run-
ning for approximately 4 seconds.
Heated windscreen in the wiper blade area*
In some countries and in some versions, it is
possible to heat the windscreen in the area
of the windscreen wiper blades in order to
aid de-icing in this area. The function is
switched on by pressing the heated rear win-
dow key .
84
Page 87 of 236

Lights and visibility
WARNING
● Worn and dirty wiper blades reduce visibili-
ty and safety levels while driving.
● In cold conditions, you should not use the
wash/wipe system unless you have warmed
the windscreen with the heating and ventila-
tion system. The windscreen washer fluid
could otherwise freeze on the windscreen and
obscure your view of the road.
● The rain sensor may not detect enough rain
to switch on the wipers. If necessary, switch
on the wipers manually when water on the
windscreen impedes visibility.
● Always note the corresponding warnings
››› page 194. CAUTION
In icy conditions, always check that the wiper
blades are not frozen to the glass before us-
ing the wipers for the first time. If you switch
on the windscreen wipers when the wiper
blades are frozen to the windscreen, you
could damage both the wiper blades and the
wiper motor. Note
● The windscreen wipers will only work when
the ignition is switched on.
● In certain versions of vehicles with alarms,
the windscreen wiper will only work when the
ignition is on and the bonnet closed. ●
When in use, the wipers do not go as far as
the rest position. When the lever is moved to
position 0, they are totally hidden.
● If the vehicle stops when wiper speed 2 ›››
Fig. 69 or 3 is selected, the next speed
down will be selected automatically. The set
speed will be resumed when the vehicle pulls
away.
● The windscreen will be wiped again after
approximately five seconds once the “auto-
matic wash/wipe system” has been activa-
ted, provided the vehicle is moving (drip func-
tion). If you activate the wipers less than 3
seconds after the drip function, a new wash
sequence will begin without performing the
last wipe. For the “drip” function to work
again, you have to turn the ignition off and
then on again.
● When the “interval wipe function” is on,
the intervals are directly proportional to the
speed. This way, the higher the vehicle speed
the shorter the intervals.
● The wiper will try to wipe away any obsta-
cles that are on the windscreen. The wiper
will stop moving if the obstacle continues to
block its path. Remove the obstacle and
switch the wiper back on again.
● Before removing any objects that may be
trapped in the side areas of the windscreen,
always move the wiper arms to the service
position (horizontal).
● The heat output of the heated jets is con-
trolled automatically when the ignition is
switched on, depending upon the outside
temperature. ●
Do not put stickers on the windscreen in
front of the rain sensor*. This may cause sen-
sor disruption or faults. Rear window wiper
Fig. 71
Windscreen wiper lever: rear window
wiper. Switching on the interval wipe
– Press the lever forward to position 6 ›››
Fig. 71 . The wiper will wipe the window
ap pr
oximately every 6 seconds.
Switching off the interval wipe function
– Pull the lever back from position 6 toward
the steering wheel. The wiper will continue
to function for a short period if you switch
off whilst the wipers are in motion. »
85
Technical specifications
Advice
Operation
Safety
Page 88 of 236

Operation
Switching on automatic wipe – Press the lever fully forwards to position 7›››
Fig. 71 . The rear wash function will start
immedi at
ely and the wiper will start a few
seconds later. The rear window wash sys-
tem will function as long as you hold the
lever in this position.
– Release the lever. The wiper then wipes for
approximately 4 seconds, and then in inter-
vals again.
– Release the lever. The washer system stops
and the wipers function. WARNING
● Worn and dirty wiper blades reduce visibili-
ty and safety levels while driving.
● Always note the corresponding warnings
on ››› page 194. CAUTION
In icy conditions, always check that the wiper
blade is not frozen to the glass before using
the wiper for the first time. If you switch on
the wiper when the wiper blade is frozen to
the glass, this could damage both the wiper
blade and the wiper motor. Note
● The windscreen wiper will only function
when the ignition is switched on and the rear
lid is closed. ●
In reverse gear, with the windscreen wipers
switched on, the rear windscreen wiper will
make one wipe. Headlight washer*
The headlight washers clean the headlight
lenses.
The headlight washers are activated auto-
matically when the windscreen washer is
used and the window wiper lever is pulled to-
wards the steering wheel for at least 1.5 sec-
onds – provided the dipped beam headlights
or main beams are switched on. Clean off
stubborn dirt (insects, etc.) from the head-
lights at regular intervals, for instance, when
filling the fuel tank.
Note
● To ensure that the headlight washers work
properly in winter, keep the nozzle holders in
the bumper free of snow and remove any ice
with a de-icer spray.
● To remove water, the windscreen wipers
will be activated from time to time, the head-
light washers will be activated every three cy-
cles. Rear vision mirrors
Interior rear vision mirror It is dangerous to drive if you cannot see
clearly through the rear window.
Manual anti-dazzle function for interior rear
vision mirror
In the basic mirror position, the lever at the
bottom edge of the rear vision mirror should
be at the front. Pull the lever to the back to
select the anti-dazzle function.
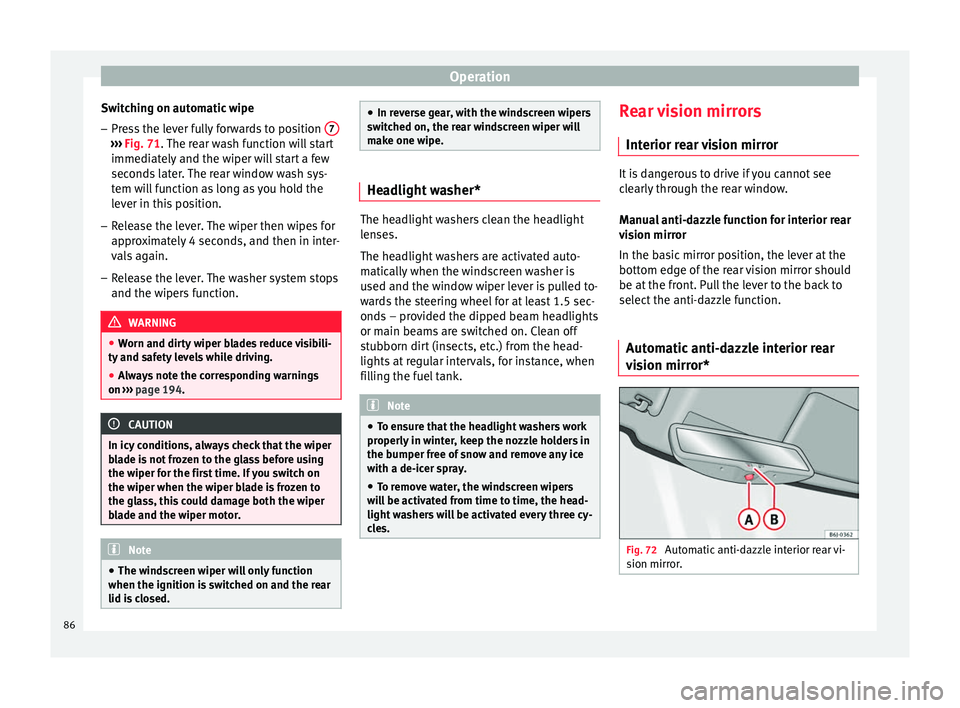
Automatic anti-dazzle interior rear
vision mirror* Fig. 72
Automatic anti-dazzle interior rear vi-
sion mirror. 86